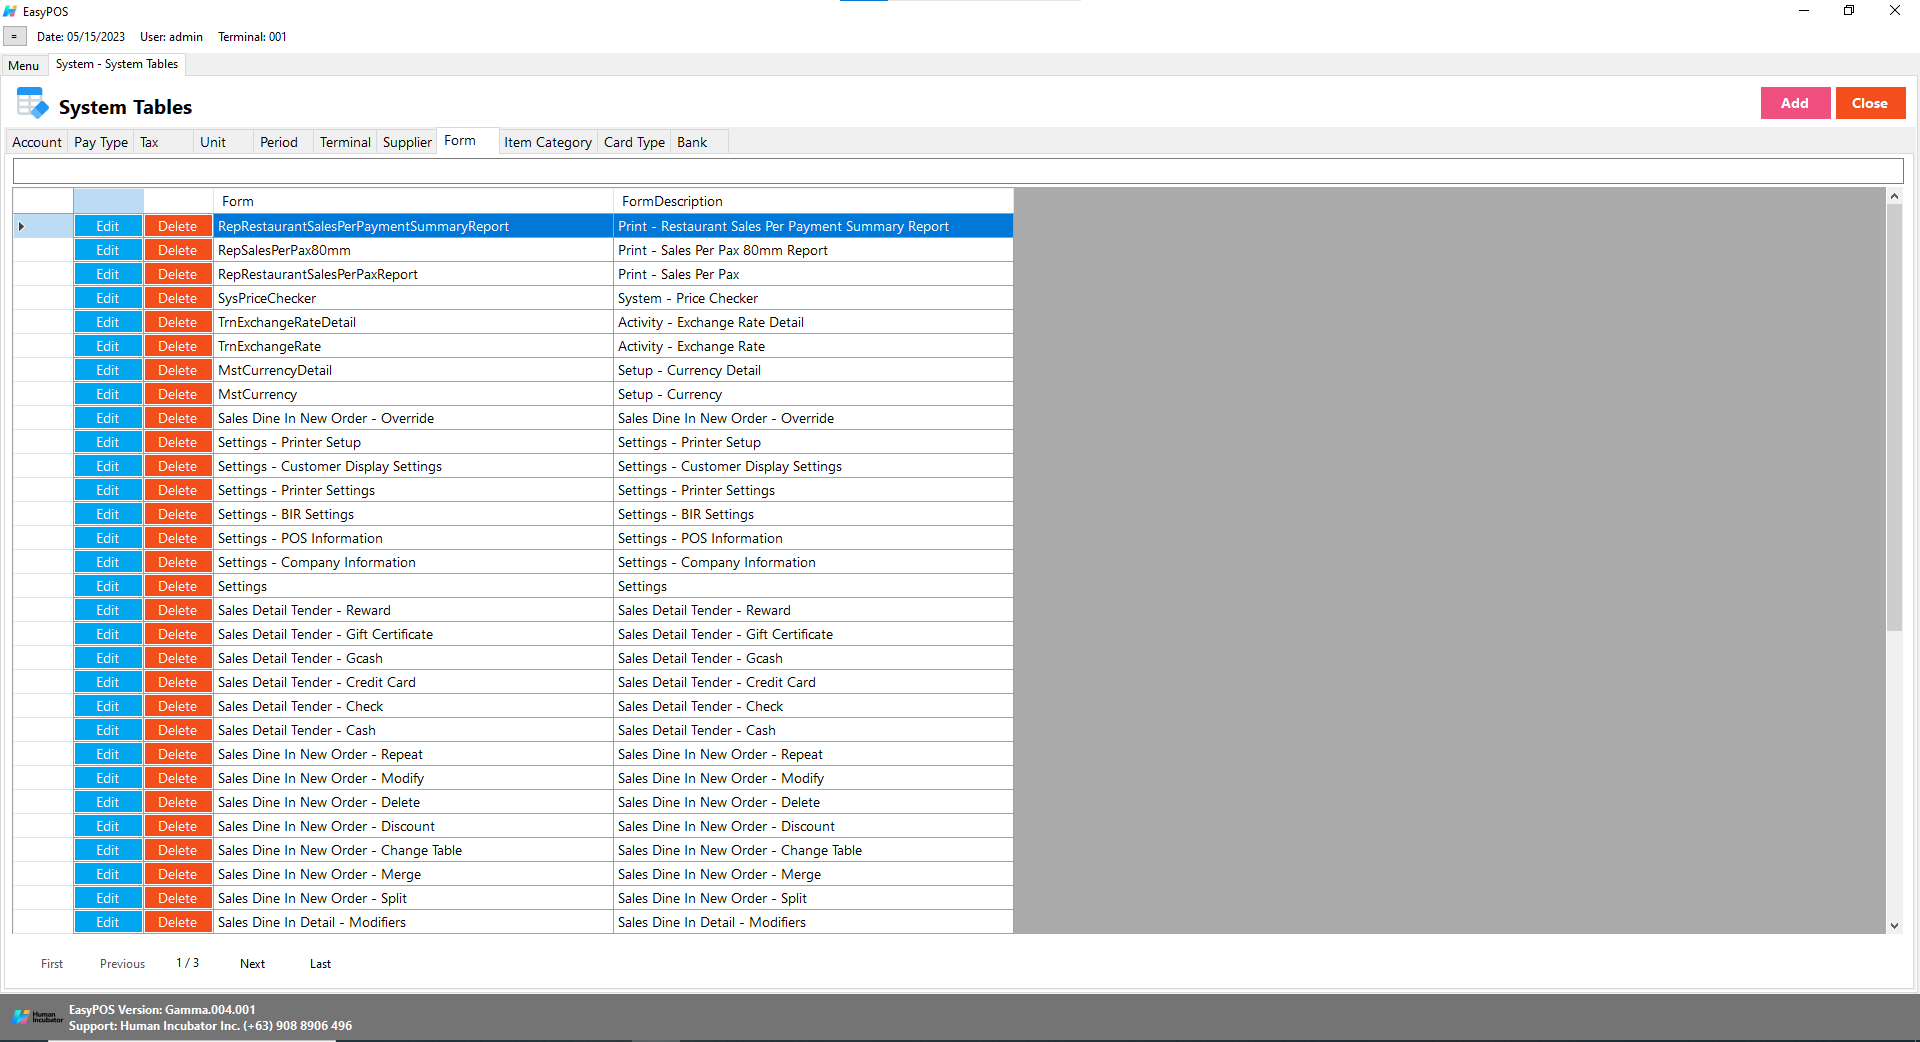
System Tables contains tabs of master tables where users can set up other useful modules for EasyPOS such as Pay Types, Accounts, Units, Supplier, Forms, Card Type, etc.
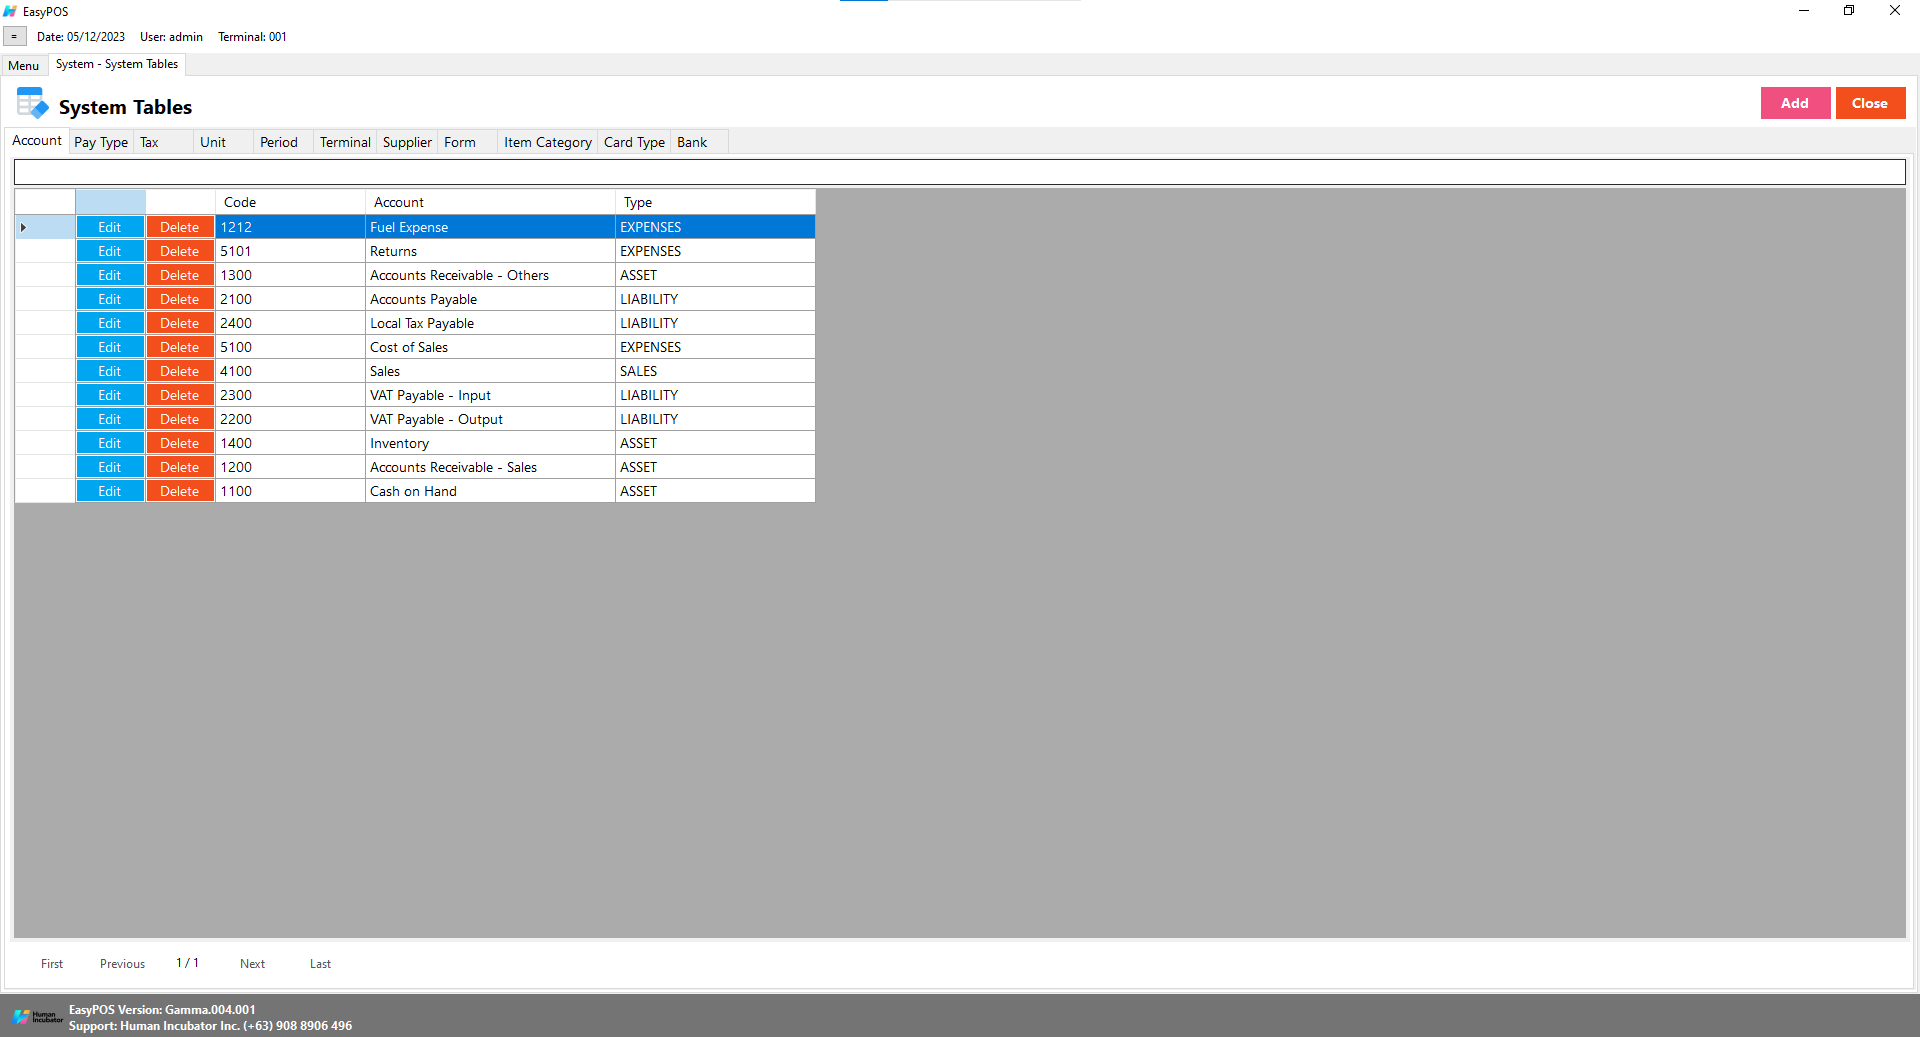
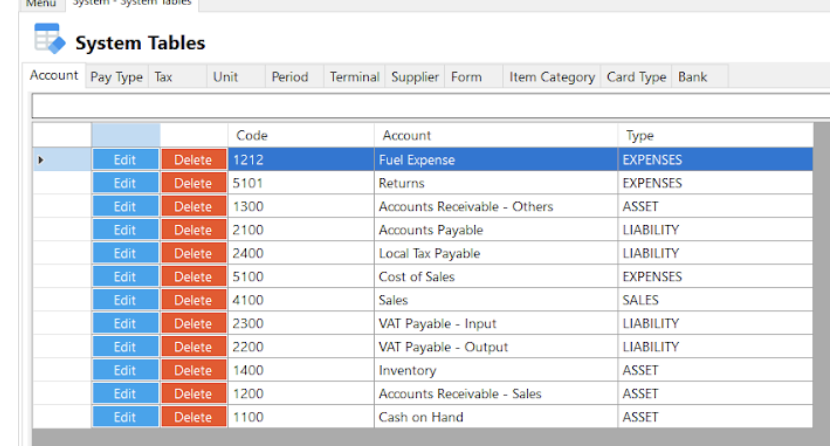
Accounts
In a Point of Sale (POS) system with accounting functionality, various accounts are used to track financial transactions. Here’s a breakdown of how “liability,” “expenses,” “asset,” and “sales” might be associated within a POS system:
Liability Account: In a POS system, a liability account might be associated with transactions that involve owed amounts or obligations. For instance, if a customer makes a purchase on credit, the outstanding balance becomes a liability until it is paid. The system might track this liability until the customer settles the account.
Expenses Account: Expenses accounts in a POS system track the costs incurred by the business. This includes operating expenses such as rent, utilities, and wages. In a retail context, expenses might also include transaction fees associated with payment processing.
Asset Account: Asset accounts in a POS system represent resources owned by the business that have economic value. This can include inventory, equipment, or cash. When products are sold, the inventory decreases, and the system updates the asset account accordingly.
Sales Account: The sales account in a POS system tracks the revenue generated from the sale of goods or services. Each sale contributes to this account, reflecting the total value of products sold. This is a key account for understanding the business’s income.
Here’s a simplified example of how these accounts might be involved in a retail transaction within a POS system, Sale Transaction:
Asset (Inventory): The inventory decreases as products are sold.
Revenue (Sales): The total value of the products sold contributes to the sales account.
Liability (Accounts Receivable): If the sale is on credit, it creates a liability until the customer pays.
Expenses (Transaction Fees): Any transaction fees associated with payment processing might be recorded as an expense.
Shows the list of all added accounts.
Delete button will proceed to deleting account details.
Edit button will proceed to updating account details.
Close button will proceed to closing the system table module.
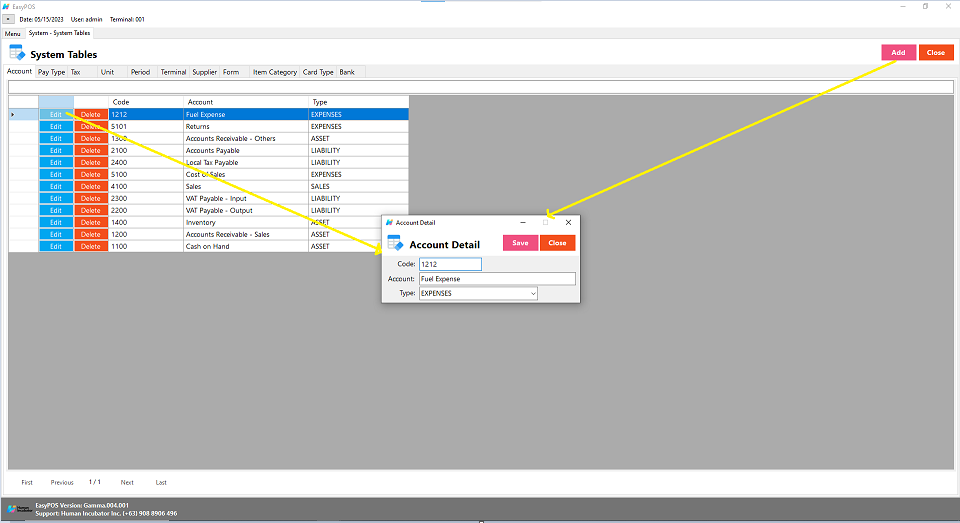
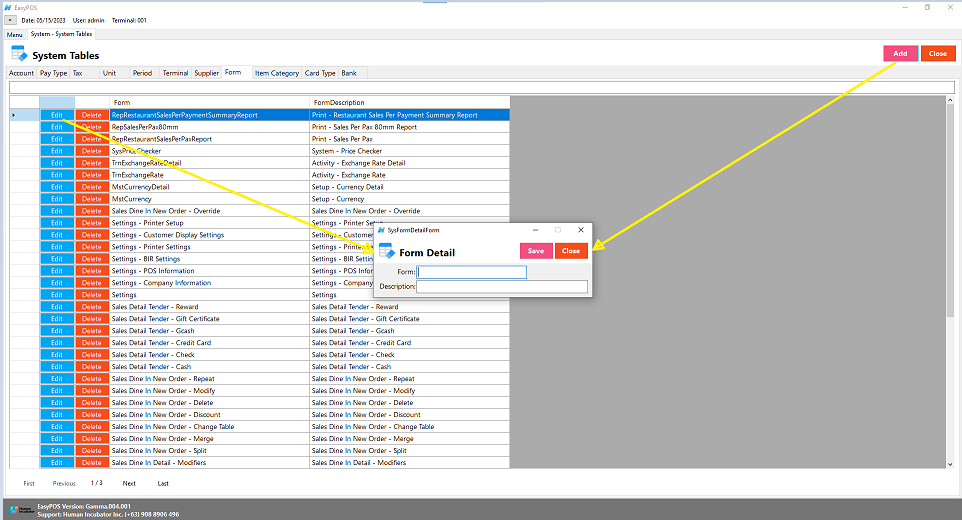
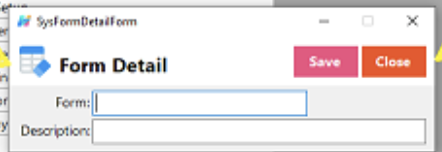
Assumption: Add button is already clicked on the upper right corner in the system tables.
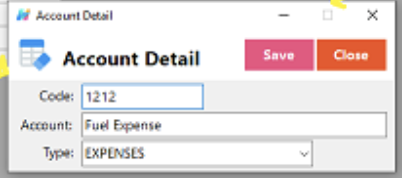
Fill up all the necessary information like:
Code, Account and Type
Click the Save button to save account details.
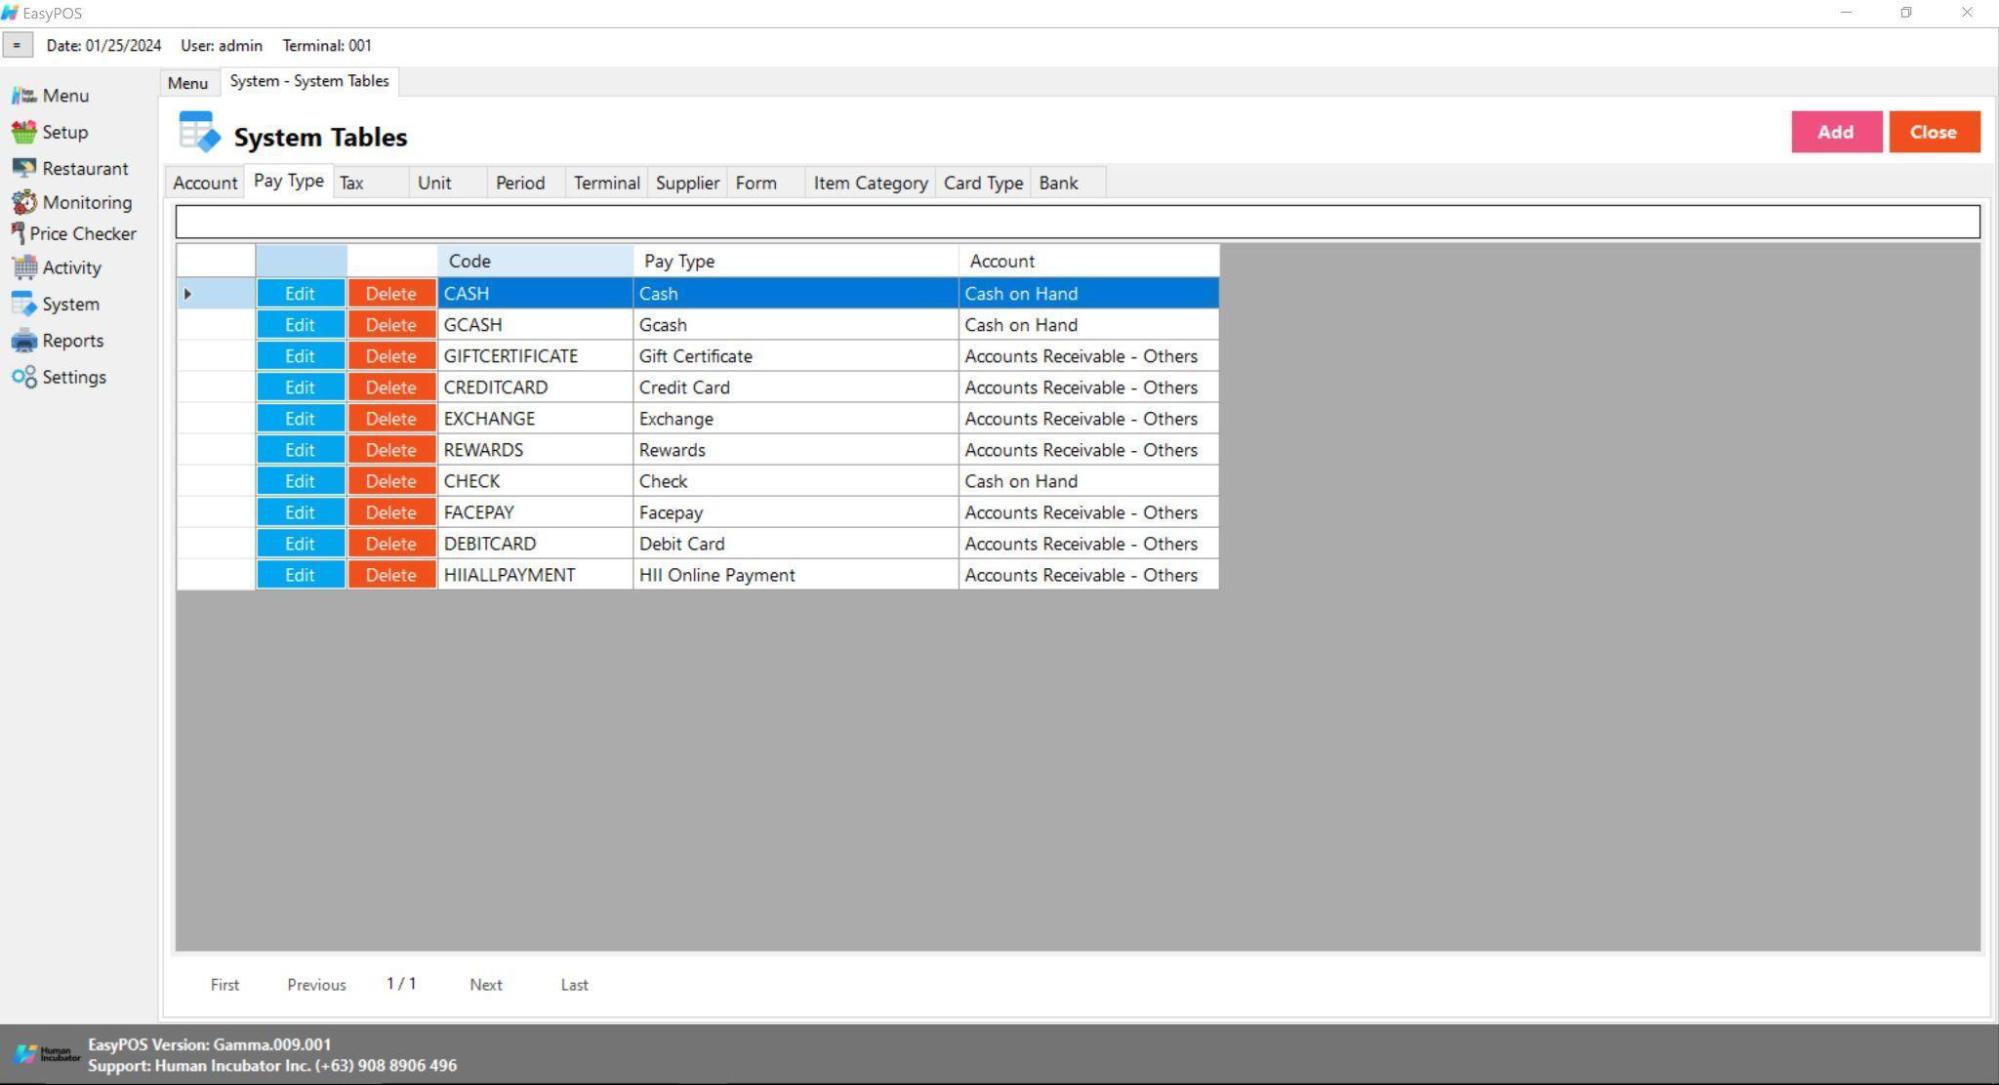
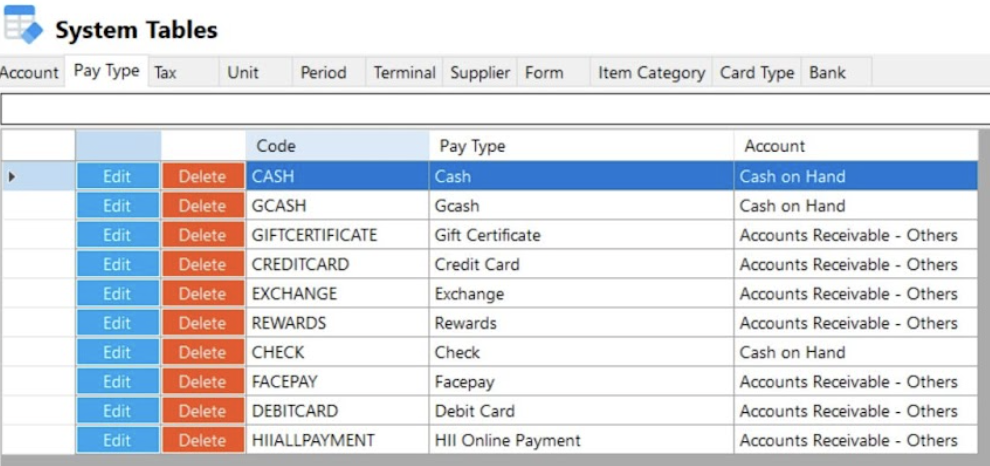
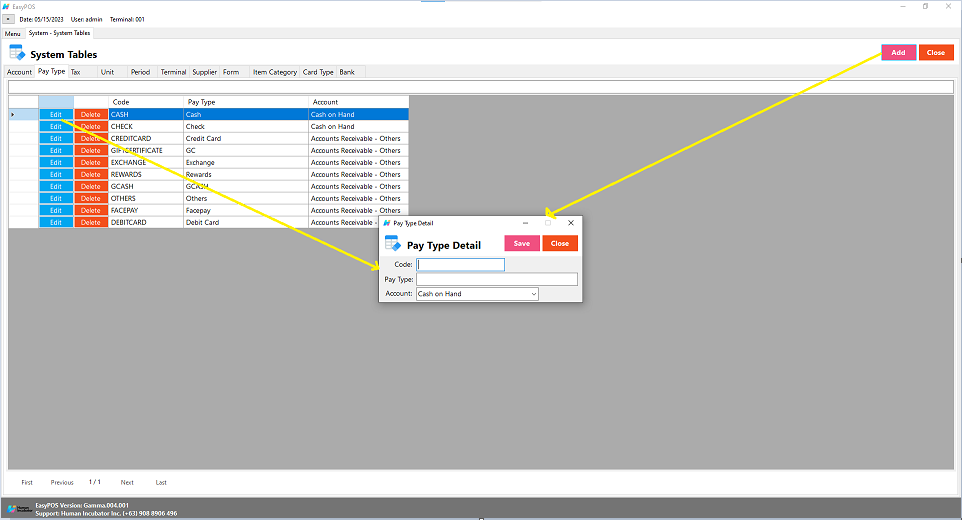
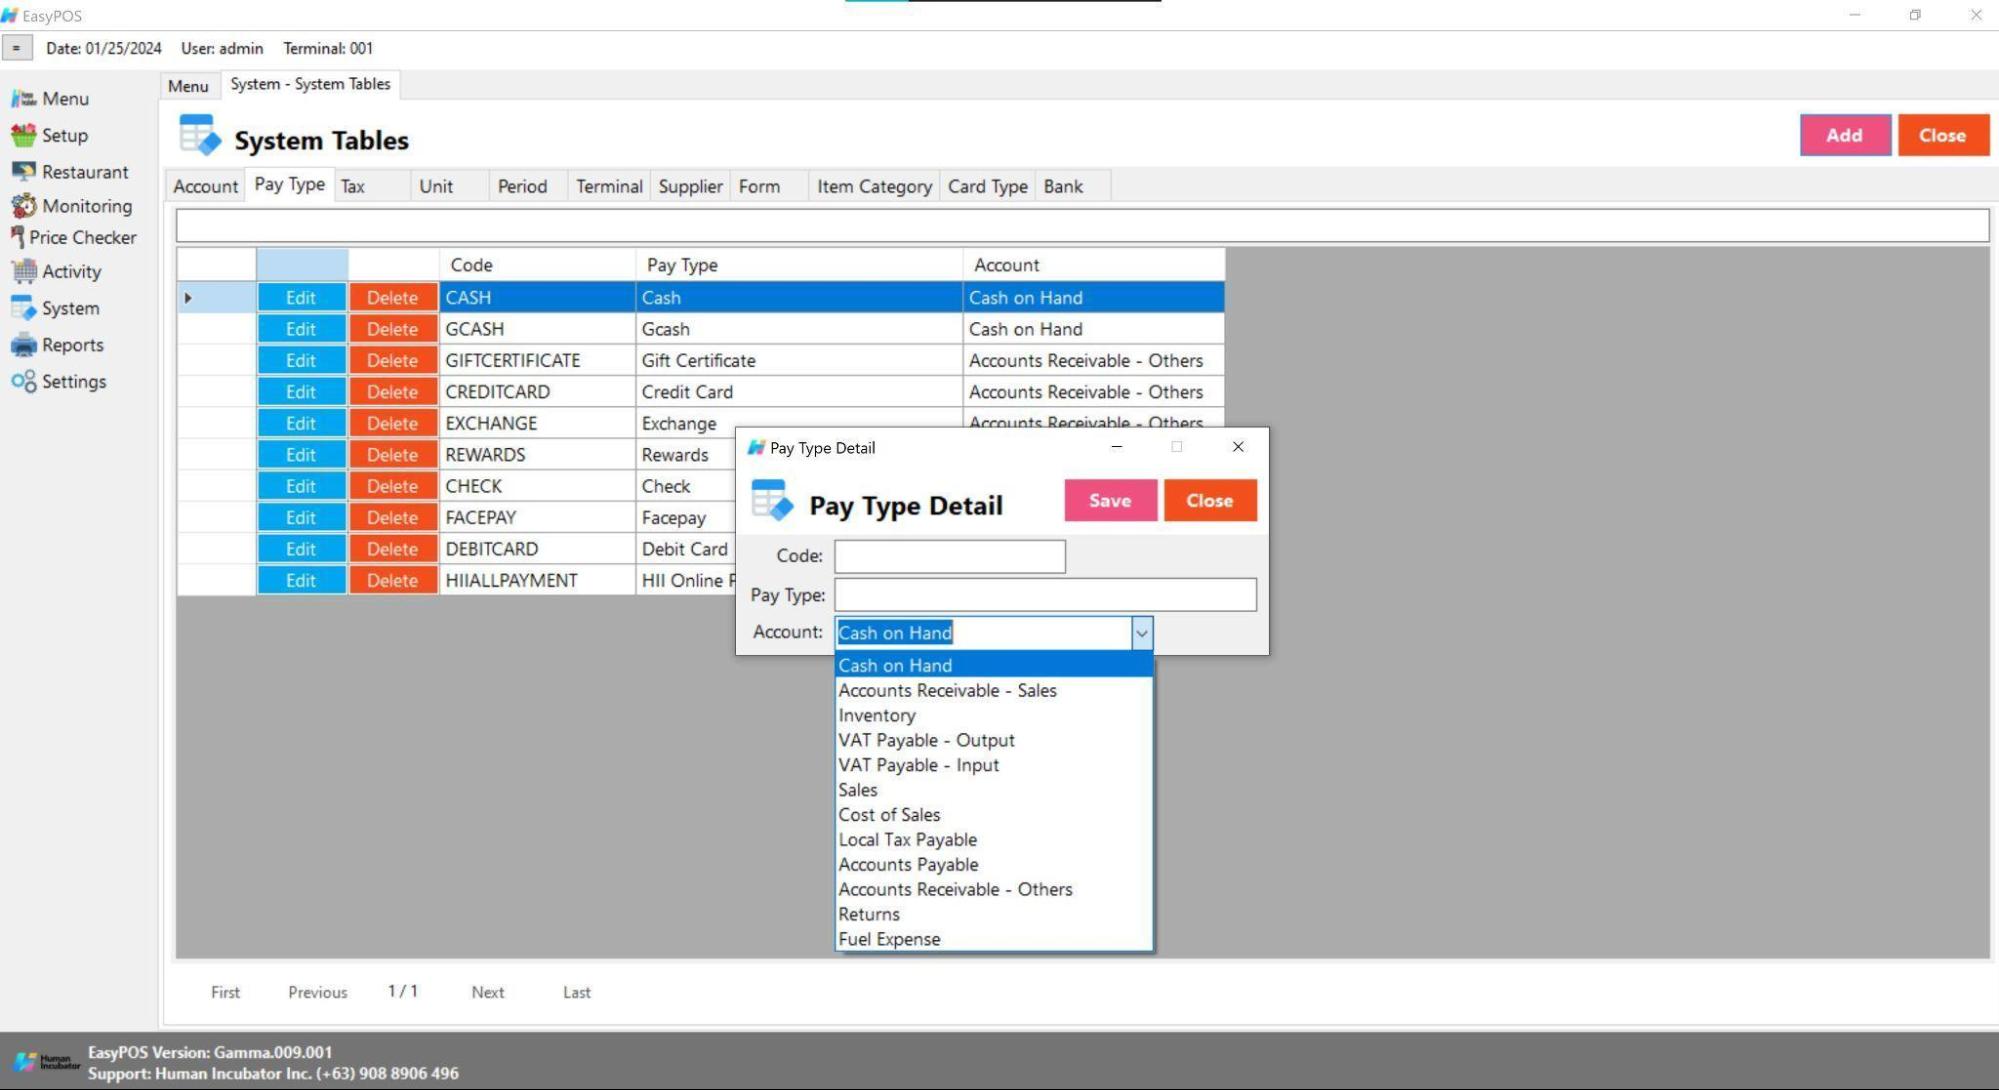
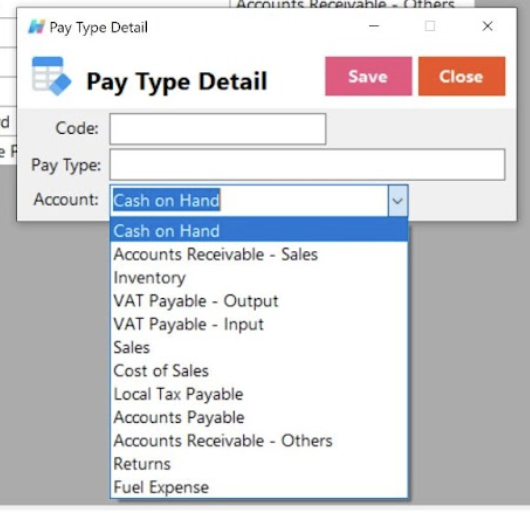
Pay Type
“pay type” typically refers to the method or form of payment used by a customer to complete a transaction. When a customer makes a purchase at a retail store or any business that uses a POS system, they have various options for paying for the goods or services they are buying. The pay type is a categorization of these different payment methods. Common pay types in a POS system include:
Cash: The customer pays with physical currency, such as coins or banknotes.
Credit Card: The customer uses a credit card to make the payment.
Debit Card: The customer uses a debit card linked to their bank account for the transaction.
Mobile Payment: Payment is made using a mobile wallet or payment app on a smartphone or other mobile device.
Gift Card: The customer uses a prepaid gift card for all or part of the payment.
Check: Payment is made by writing a check, which is a paper document instructing the bank to transfer funds.
Split Payment: The customer divides the payment between multiple methods, such as using both cash and a credit card.
Store Credit: The customer uses credit that they have at the store, often issued as a result of a return or as part of a loyalty program.
Shows the list of all added pay types.
Delete button will proceed to deleting pay type details.
Edit button will proceed to updating pay type details.
Close button will proceed to closing the system table module.
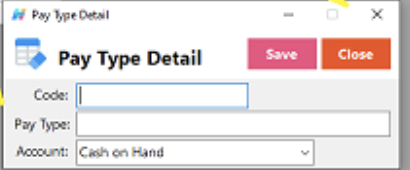
Assumption: Add button is already clicked on the upper right corner in the system tables.
Fill up all the necessary information like:
Code, Pay Type and Account
Click the Save button to save pay type details.
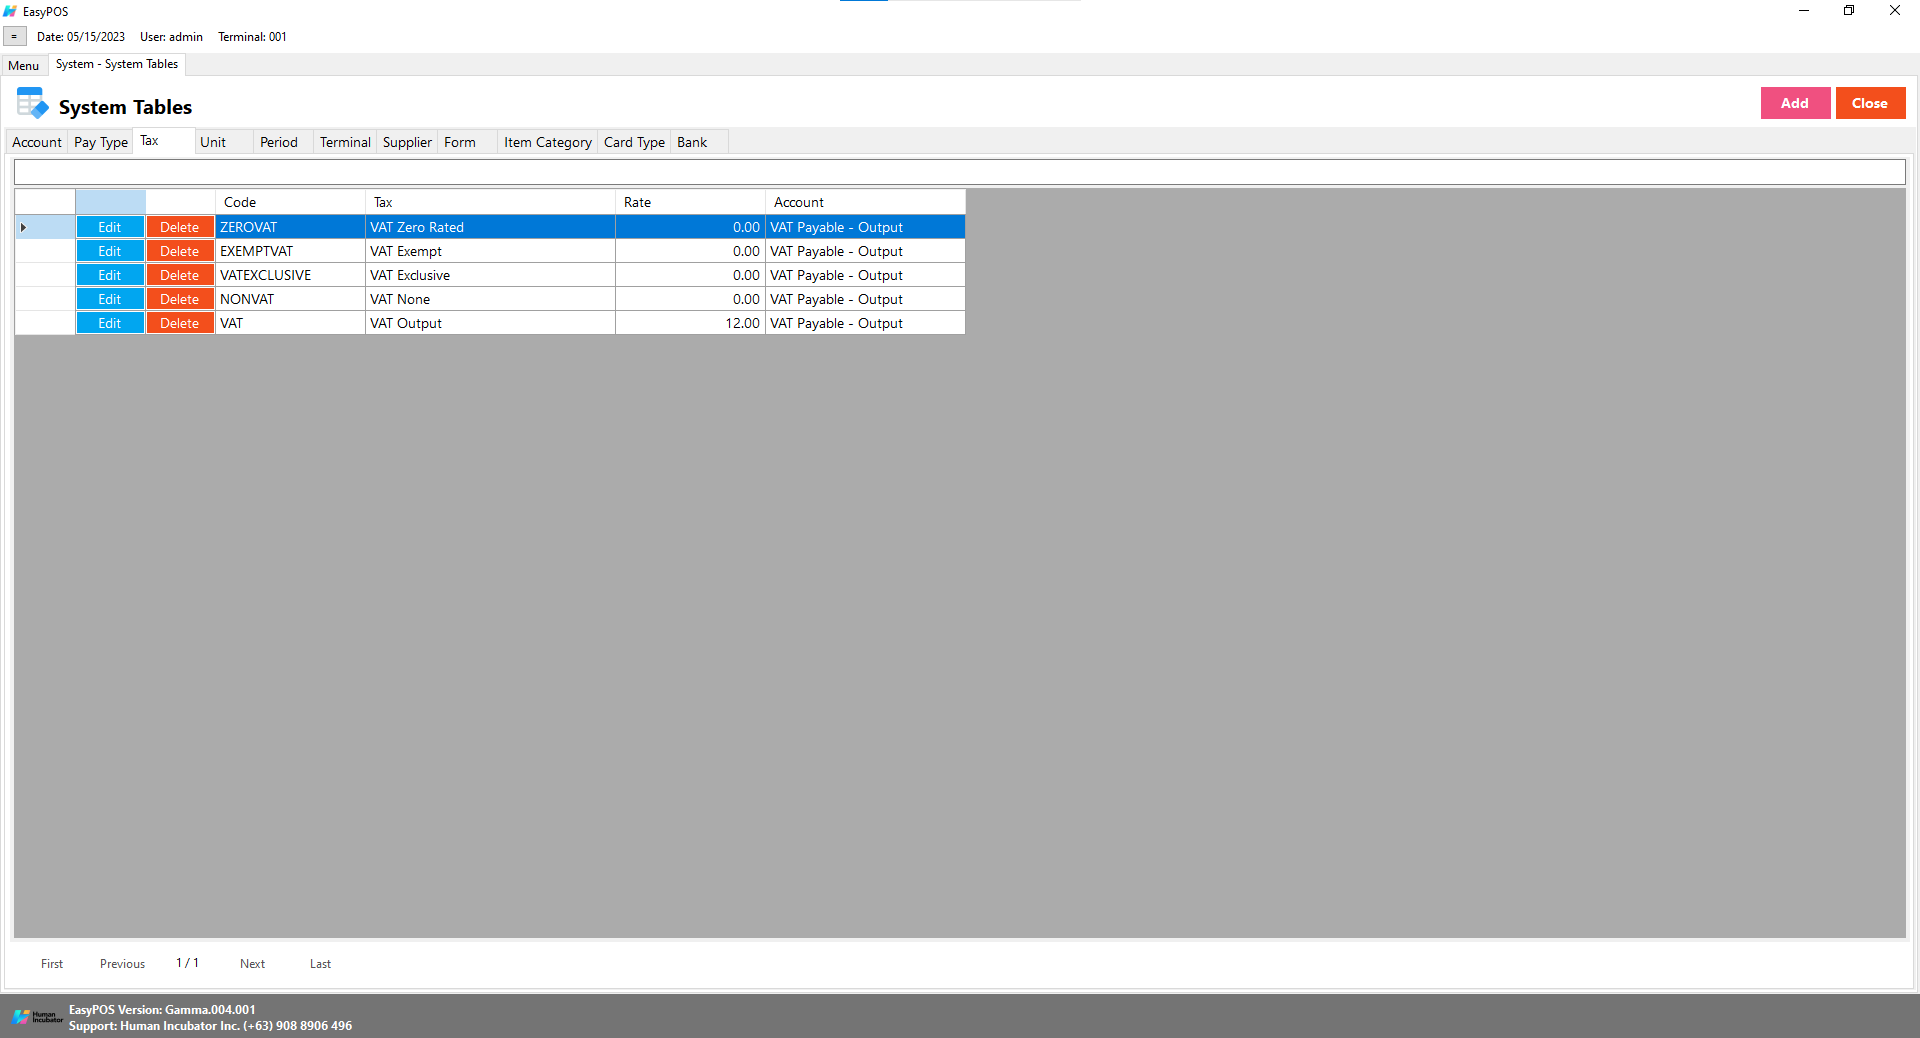
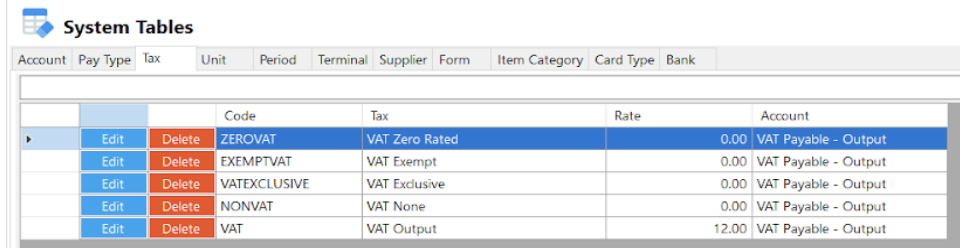
Tax
In a Point of Sale (POS) system, handling taxes is a crucial aspect of transactions. Here’s how taxes are typically managed in a POS system:
Tax Configuration: POS systems allow businesses to configure and set up different types of taxes applicable to their sales. This includes sales tax, value-added tax (VAT), or other regional taxes. Businesses need to specify the tax rates and rules that apply to their products or services.
Automatic Tax Calculation: When a sale is processed in the POS system, the system automatically calculates the applicable taxes based on the configured rates. This ensures that the correct amount of tax is added to the total sale amount.
Tax-Inclusive or Tax-Exclusive Pricing: POS systems often provide the flexibility to set whether prices displayed to customers include or exclude taxes. In some regions, the displayed price includes the applicable taxes, while in others, taxes are added at the checkout.
Multiple Tax Rates: Businesses may need to deal with multiple tax rates, especially if they operate in regions with different tax jurisdictions. A POS system should be capable of handling various tax rates and applying them appropriately based on the location of the sale.
Tax Exemptions: Some customers or types of transactions may be exempt from certain taxes. A POS system should allow for the application of exemptions when necessary, ensuring accurate and compliant tax calculations.
Reporting and Compliance: A robust POS system includes reporting features that help businesses track and report on tax-related information. This is essential for financial reporting, filing taxes, and ensuring compliance with local tax regulations.
Integration with Accounting Software: For seamless financial management, a POS system often integrates with accounting software. This integration ensures that tax information is accurately recorded in the business’s financial records, streamlining the overall accounting process.
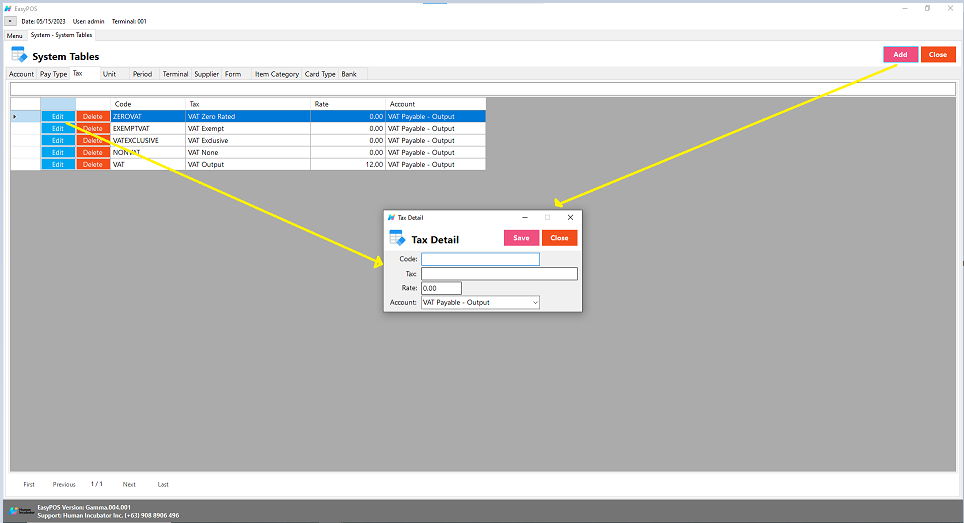
Shows the list of all added taxes.
Delete button will proceed to deleting tax details.
The Edit button will proceed to updating tax details.
Close button will proceed to closing the system table module.
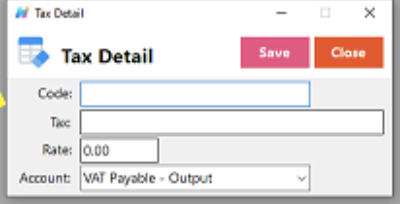
Assumption: Add button is already clicked on the upper right corner in the system tables.
Fill up all the necessary information like:
Code, Tax, Rate and Account
Click the Save button to save tax details.
Unit
The term “unit” typically refers to a standard measure used to quantify and sell products. The concept of a unit is crucial for inventory management and sales tracking. Here are a few key aspects of units in a POS system:
Product Quantity: The unit represents the quantity in which a product is sold. For example, if a business sells beverages, the unit might be a bottle, can, or liter. If it’s a retail store, the unit could be an individual item (e.g., a piece of clothing, an electronic device).
Pricing and Costing: Products are often priced and cost based on a per-unit basis. The POS system helps manage the pricing structure, allowing businesses to set prices for individual units or in bulk (e.g., per dozen).
Inventory Management: The unit is crucial for tracking and managing inventory levels. The POS system monitors the quantity of units sold and updates the inventory accordingly. This helps businesses avoid stockouts or overstock situations.
Sales Tracking: When a customer makes a purchase, the POS system records the number of units sold. This information is valuable for analyzing sales patterns, determining popular products, and understanding customer preferences.
Variety of Units: A flexible POS system allows businesses to handle a variety of units based on the nature of their products. For example, a grocery store might sell produce by weight (pound or kilogram), while a hardware store might sell items by quantity (each) or volume (gallon).
Unit Conversions: Some POS systems support unit conversions. For instance, if a product is typically sold in one unit but can also be sold in a different unit, the system can handle the conversion and update the inventory accordingly.
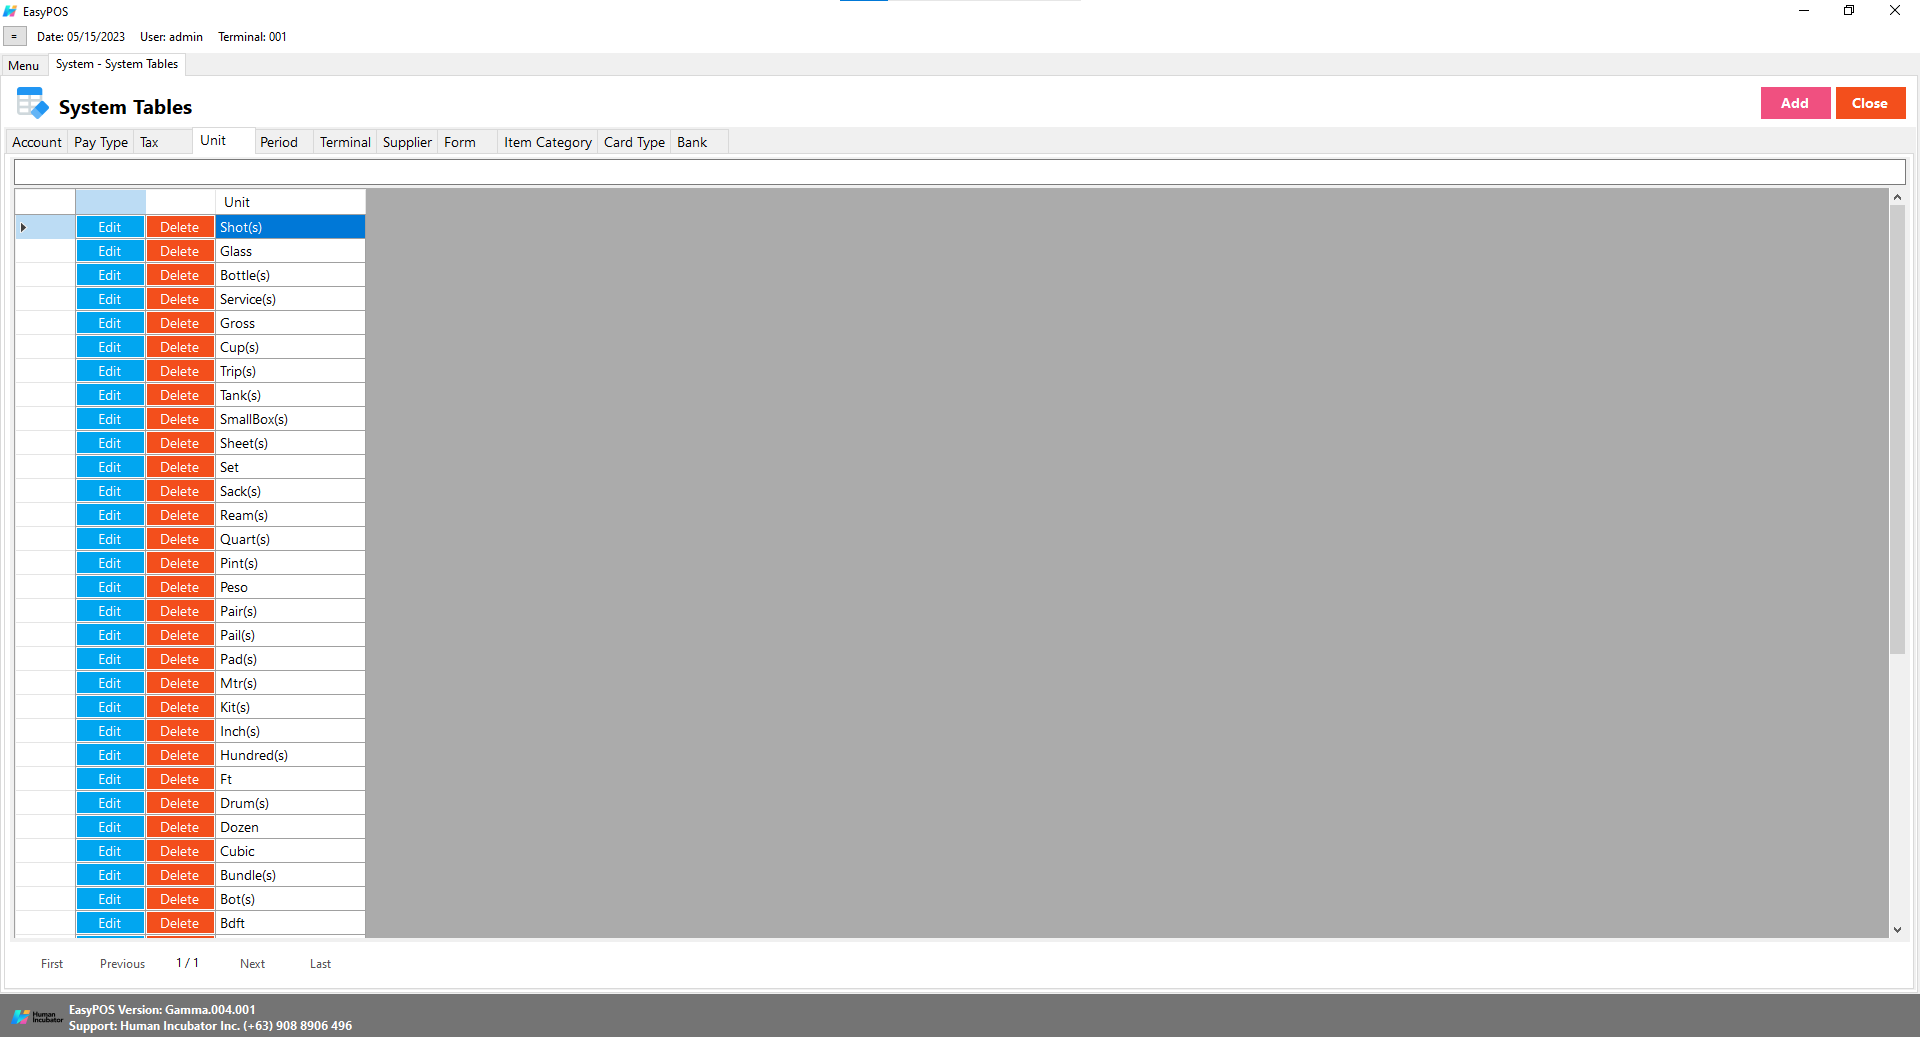
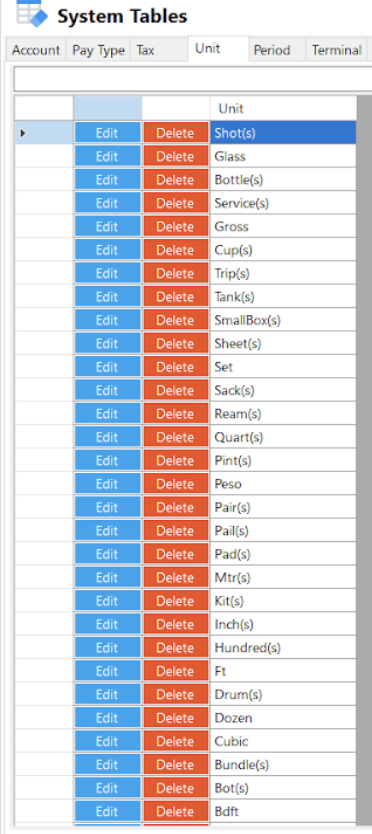
Shows the list of all added units.
Delete button will proceed to deleting unit details.
Edit button will proceed to updating unit details.
Close button will proceed to closing the system table module.
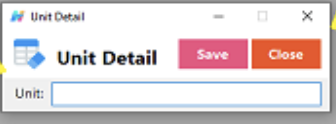
Assumption: Add button is already clicked on the upper right corner in the system tables.
Fill up all the necessary information like:
Unit
Click the Save button to save unit details.
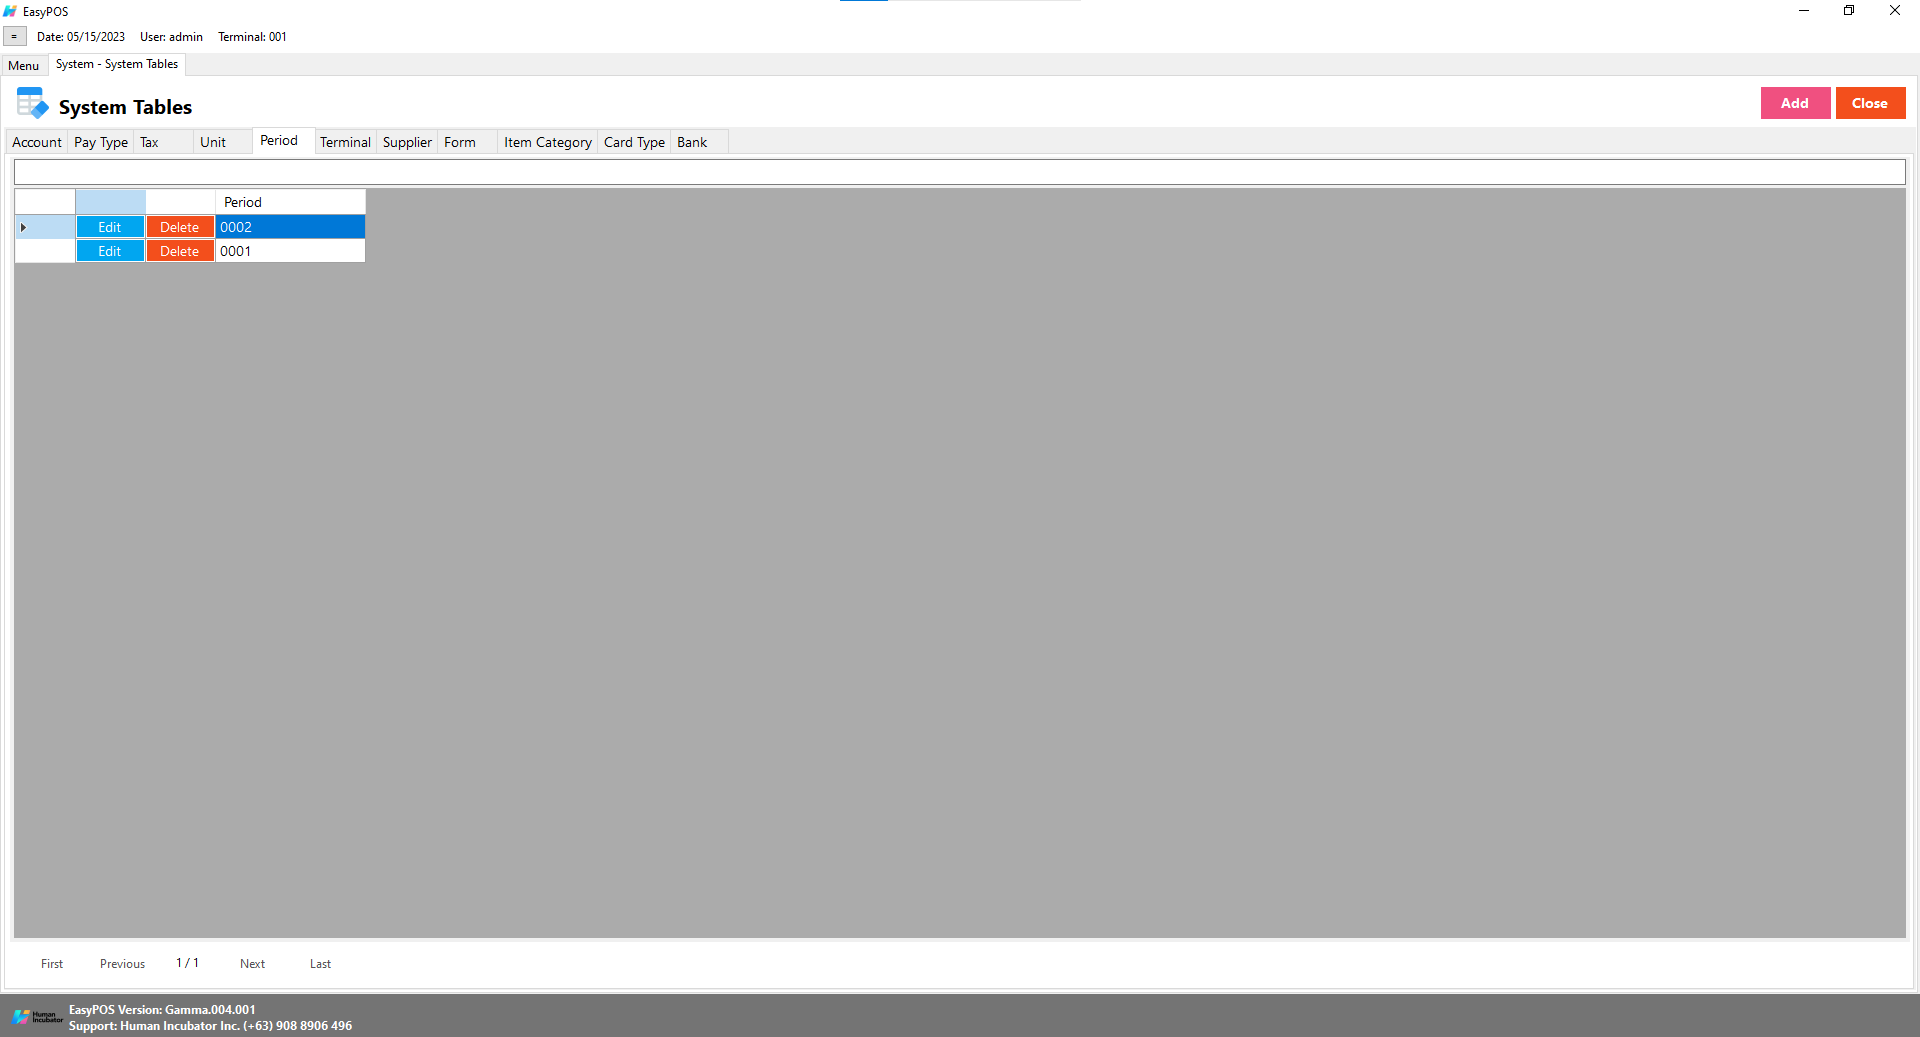
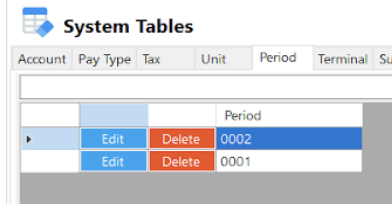
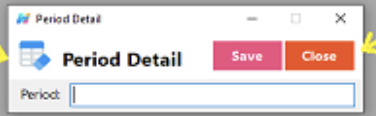
Period
Shows the list of all added periods.
Delete button will proceed to deleting period details.
Edit button will proceed to updating period details.
Close button will proceed to closing the system table module.
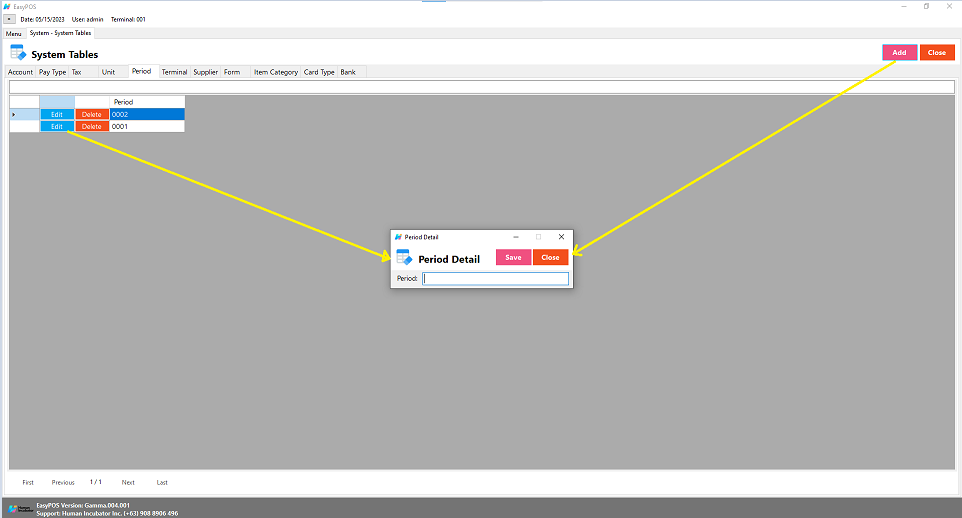
Assumption: Add button is already clicked on the upper right corner in the system tables.
Fill up all the necessary information like:
Period
Click the Save button to save unit details.
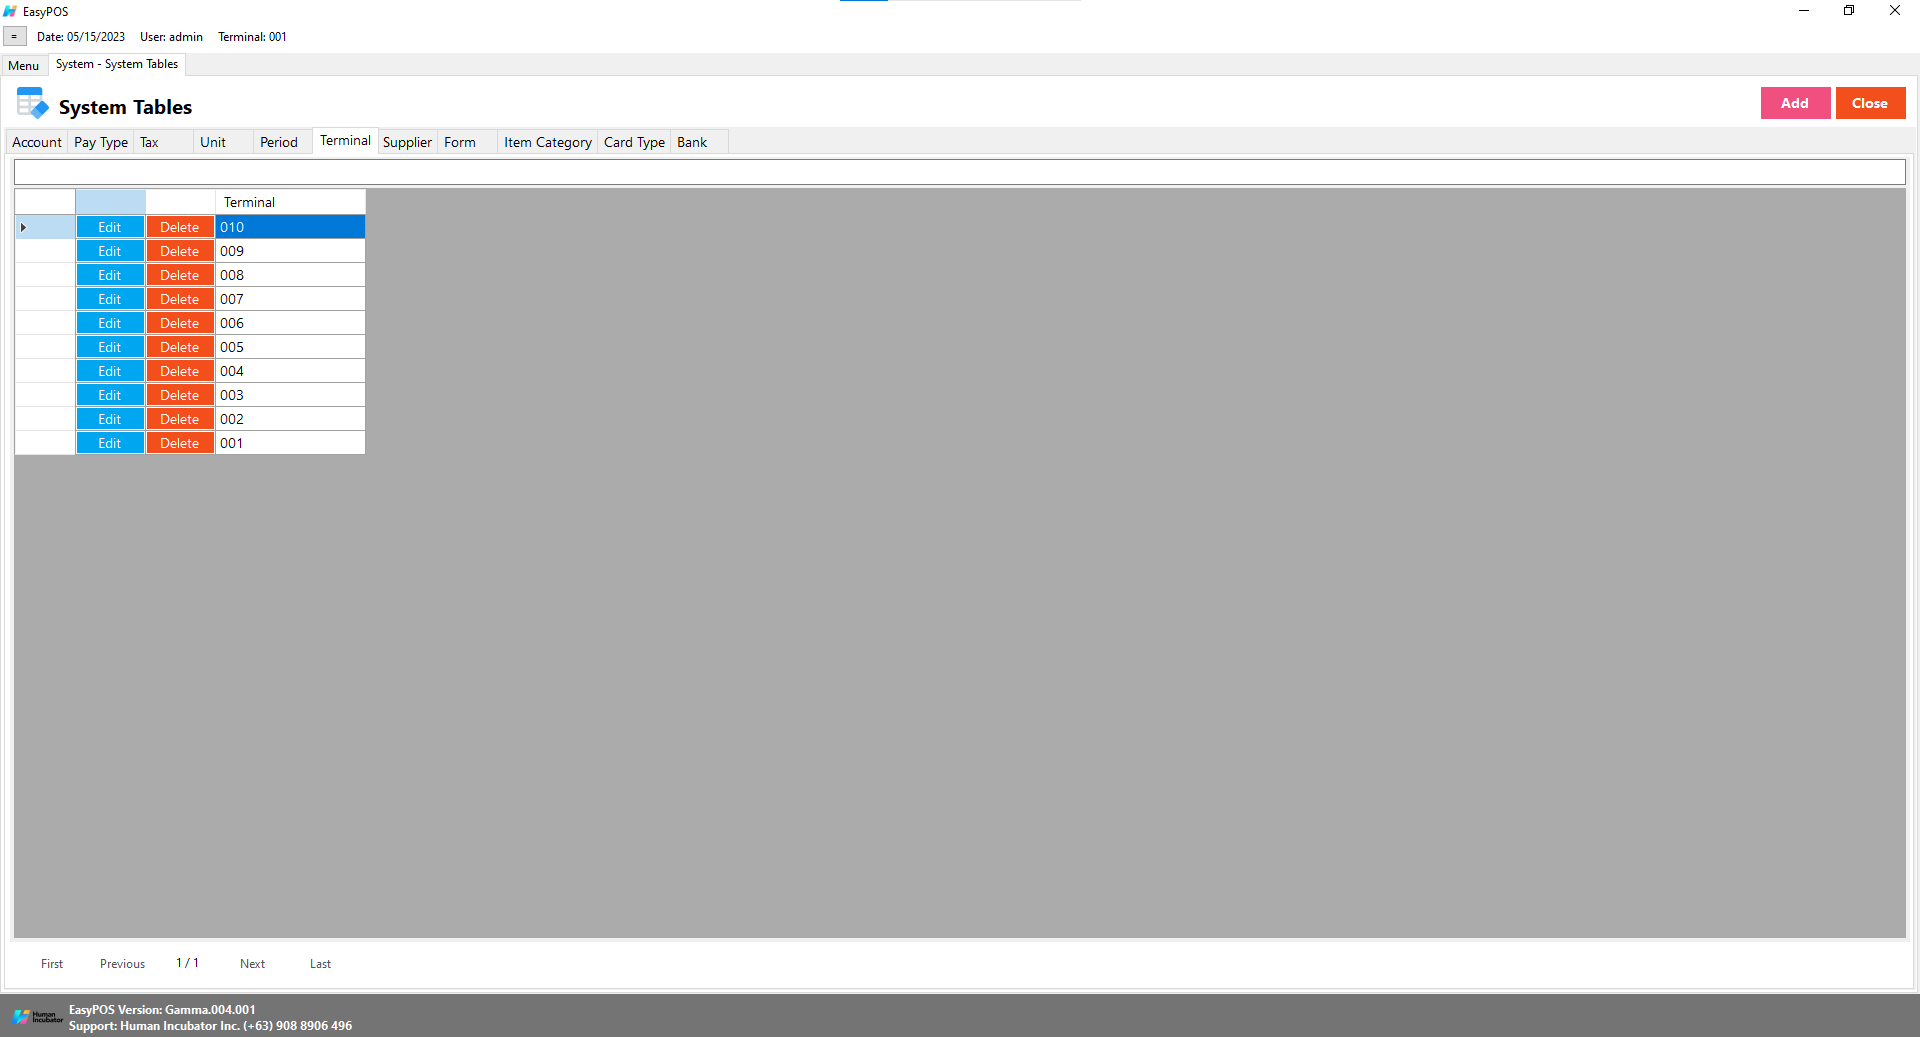
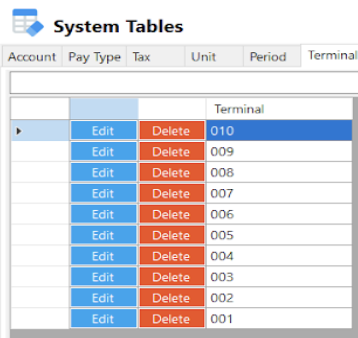
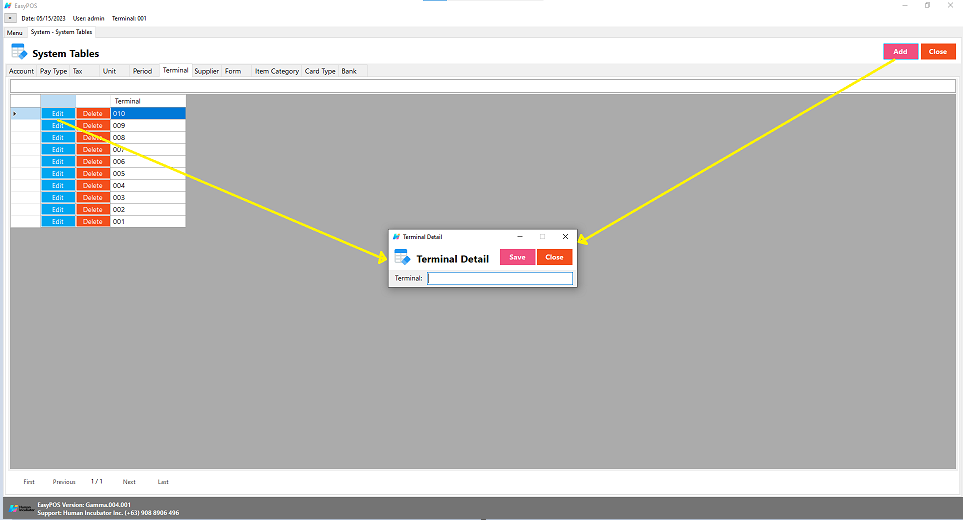
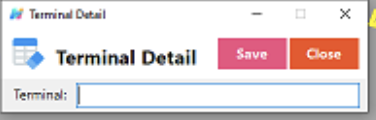
Terminal
In a Point of Sale (POS) system, the term “terminal” typically refers to the hardware or device used by businesses to process sales transactions. The POS terminal is a key component of the overall POS system, and it plays a central role in facilitating customer transactions.
Shows the list of all added terminals.
Delete button will proceed to deleting terminal details.
Edit button will proceed to updating terminal details.
Close button will proceed to closing the system table module.
Assumption: Add button is already clicked on the upper right corner in the system tables.
Fill up all the necessary information like:
Terminal
Click the Save button to save terminal details.
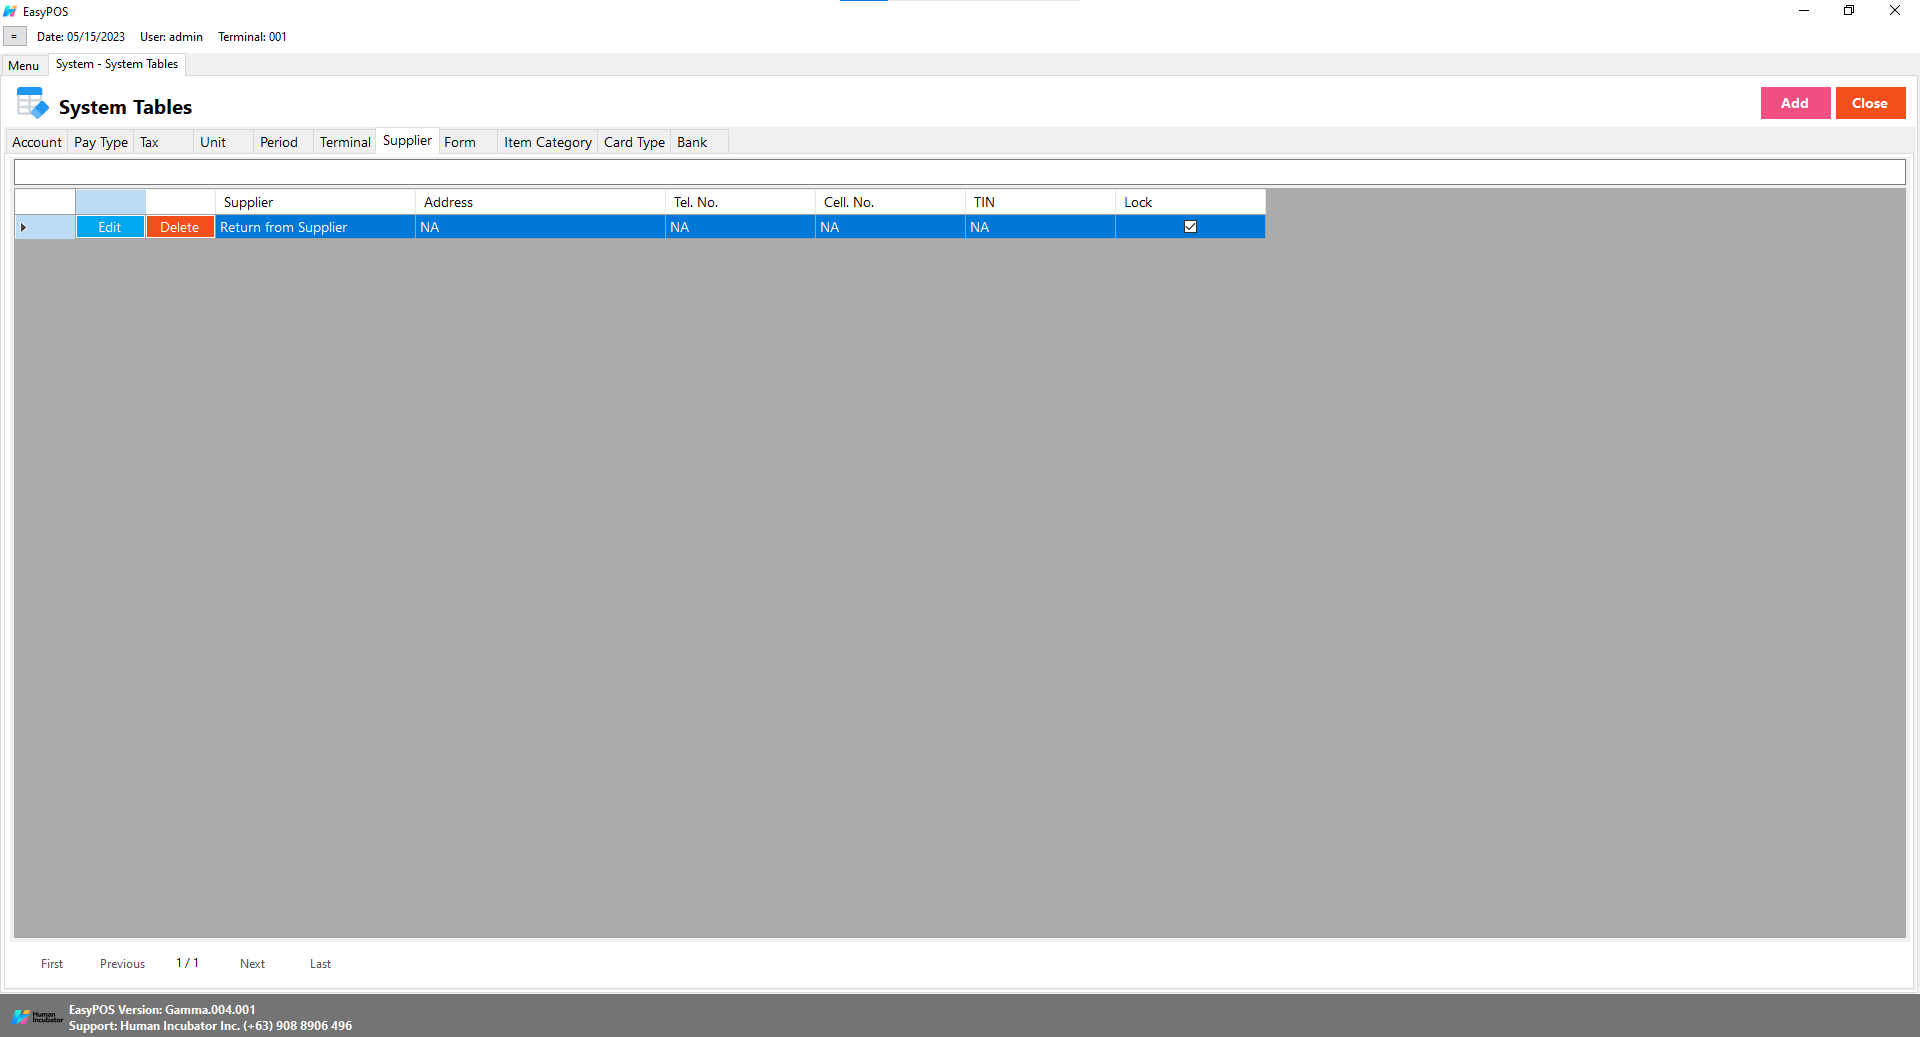
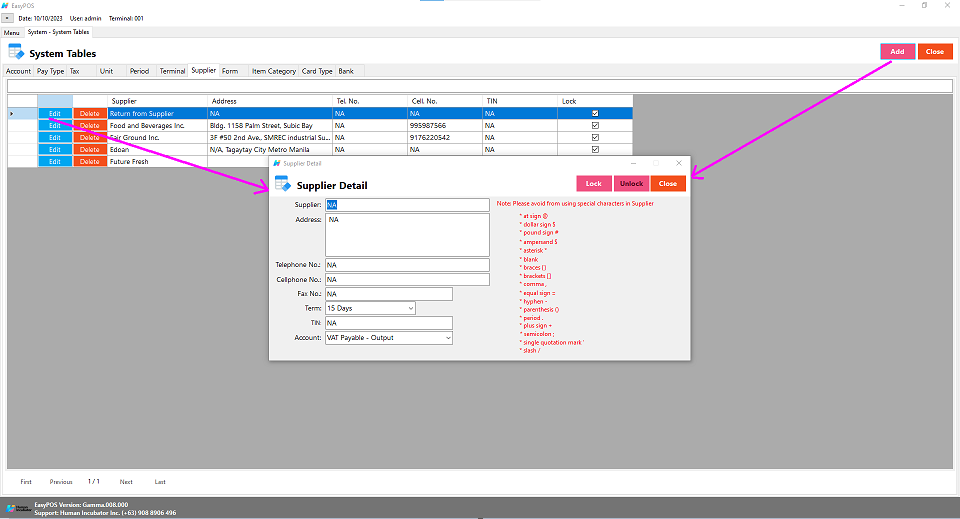
Supplier
Generally refers to the businesses or entities from which a retail business or establishment purchases its goods or products. The supplier information is an essential component of the POS system, and it helps businesses manage their inventory, track purchases, and maintain relationships with the entities that provide the products they sell.
Take Note: If the EasyPOS has an EasyFS Integration, the setting of supplier or adding of supplier should be done in the EasyFS system. Make sure that the “Term” list in EasyPOS and EasyFS should be the same.
Shows the list of all added suppliers.
Delete button will proceed to deleting supplier details.
Edit button will proceed to updating supplier details.
Close button will proceed to closing the system table module.
Assumption: Add button is already clicked on the upper right corner in the system tables.
Struggling to accept online payments? Discover how HII Online Payment Service solves your credit card merchant dilemma. HII Online Payment Service. Coming soon!
Struggling to accept online payments? Discover how HII Online Payment Service solves your credit card merchant dilemma. HII Online Payment Service. Coming soon!
Take advantage of Free easyFS Usage for Accounting Firms in the Philippines. Contact Us at +639176280355 or email at hiisales@humedit.ph
Take advantage of Free easyFS Usage for Accounting Firms in the Philippines. Contact Us at +639176280355 or email at hiisales@humedit.ph
Struggling to accept online payments? Discover how HII Online Payment Service solves your credit card merchant dilemma. HII Online Payment Service. Coming soon!
Struggling to accept online payments? Discover how HII Online Payment Service solves your credit card merchant dilemma. HII Online Payment Service. Coming soon!
Take advantage of Free easyFS Usage for Accounting Firms in the Philippines. Contact Us at +639176280355 or email at hiisales@humedit.ph
Take advantage of Free easyFS Usage for Accounting Firms in the Philippines. Contact Us at +639176280355 or email at hiisales@humedit.ph
Struggling to accept online payments? Discover how HII Online Payment Service solves your credit card merchant dilemma. HII Online Payment Service. Coming soon!
Struggling to accept online payments? Discover how HII Online Payment Service solves your credit card merchant dilemma. HII Online Payment Service. Coming soon!
Take advantage of Free easyFS Usage for Accounting Firms in the Philippines. Contact Us at +639176280355 or email at hiisales@humedit.ph
Take advantage of Free easyFS Usage for Accounting Firms in the Philippines. Contact Us at +639176280355 or email at hiisales@humedit.ph
Struggling to accept online payments? Discover how HII Online Payment Service solves your credit card merchant dilemma. HII Online Payment Service. Coming soon!
Struggling to accept online payments? Discover how HII Online Payment Service solves your credit card merchant dilemma. HII Online Payment Service. Coming soon!
Take advantage of Free easyFS Usage for Accounting Firms in the Philippines. Contact Us at +639176280355 or email at hiisales@humedit.ph
Take advantage of Free easyFS Usage for Accounting Firms in the Philippines. Contact Us at +639176280355 or email at hiisales@humedit.ph
Struggling to accept online payments? Discover how HII Online Payment Service solves your credit card merchant dilemma. HII Online Payment Service. Coming soon!
Struggling to accept online payments? Discover how HII Online Payment Service solves your credit card merchant dilemma. HII Online Payment Service. Coming soon!
Take advantage of Free easyFS Usage for Accounting Firms in the Philippines. Contact Us at +639176280355 or email at hiisales@humedit.ph
Take advantage of Free easyFS Usage for Accounting Firms in the Philippines. Contact Us at +639176280355 or email at hiisales@humedit.ph
Struggling to accept online payments? Discover how HII Online Payment Service solves your credit card merchant dilemma. HII Online Payment Service. Coming soon!
Struggling to accept online payments? Discover how HII Online Payment Service solves your credit card merchant dilemma. HII Online Payment Service. Coming soon!
Take advantage of Free easyFS Usage for Accounting Firms in the Philippines. Contact Us at +639176280355 or email at hiisales@humedit.ph
Take advantage of Free easyFS Usage for Accounting Firms in the Philippines. Contact Us at +639176280355 or email at hiisales@humedit.ph
Struggling to accept online payments? Discover how HII Online Payment Service solves your credit card merchant dilemma. HII Online Payment Service. Coming soon!
Struggling to accept online payments? Discover how HII Online Payment Service solves your credit card merchant dilemma. HII Online Payment Service. Coming soon!
Take advantage of Free easyFS Usage for Accounting Firms in the Philippines. Contact Us at +639176280355 or email at hiisales@humedit.ph
Take advantage of Free easyFS Usage for Accounting Firms in the Philippines. Contact Us at +639176280355 or email at hiisales@humedit.ph
Struggling to accept online payments? Discover how HII Online Payment Service solves your credit card merchant dilemma. HII Online Payment Service. Coming soon!
Struggling to accept online payments? Discover how HII Online Payment Service solves your credit card merchant dilemma. HII Online Payment Service. Coming soon!

 Log in to Messenger