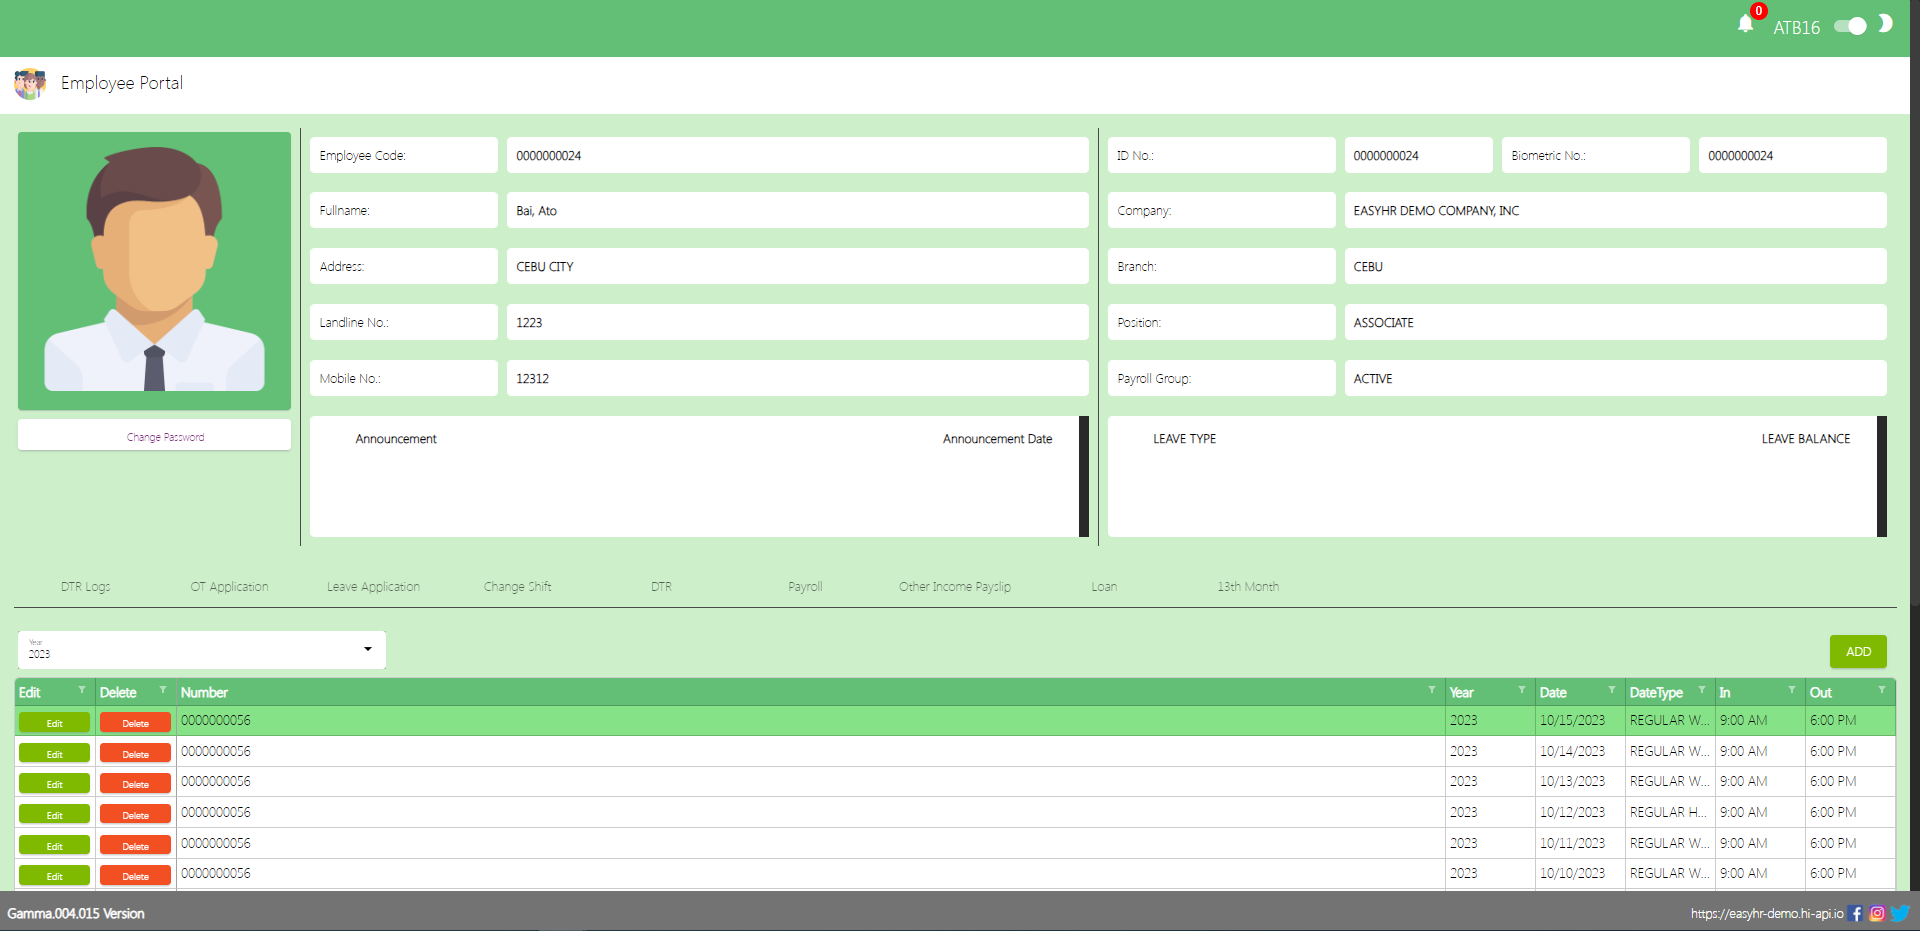
Employee Portal is used to provide employees with access to a wide range of information, tools, and self-service features related to their employment and the organization they work for and also the employee can view the DTR logs, Payslip, and 13th month.
Employee Portal
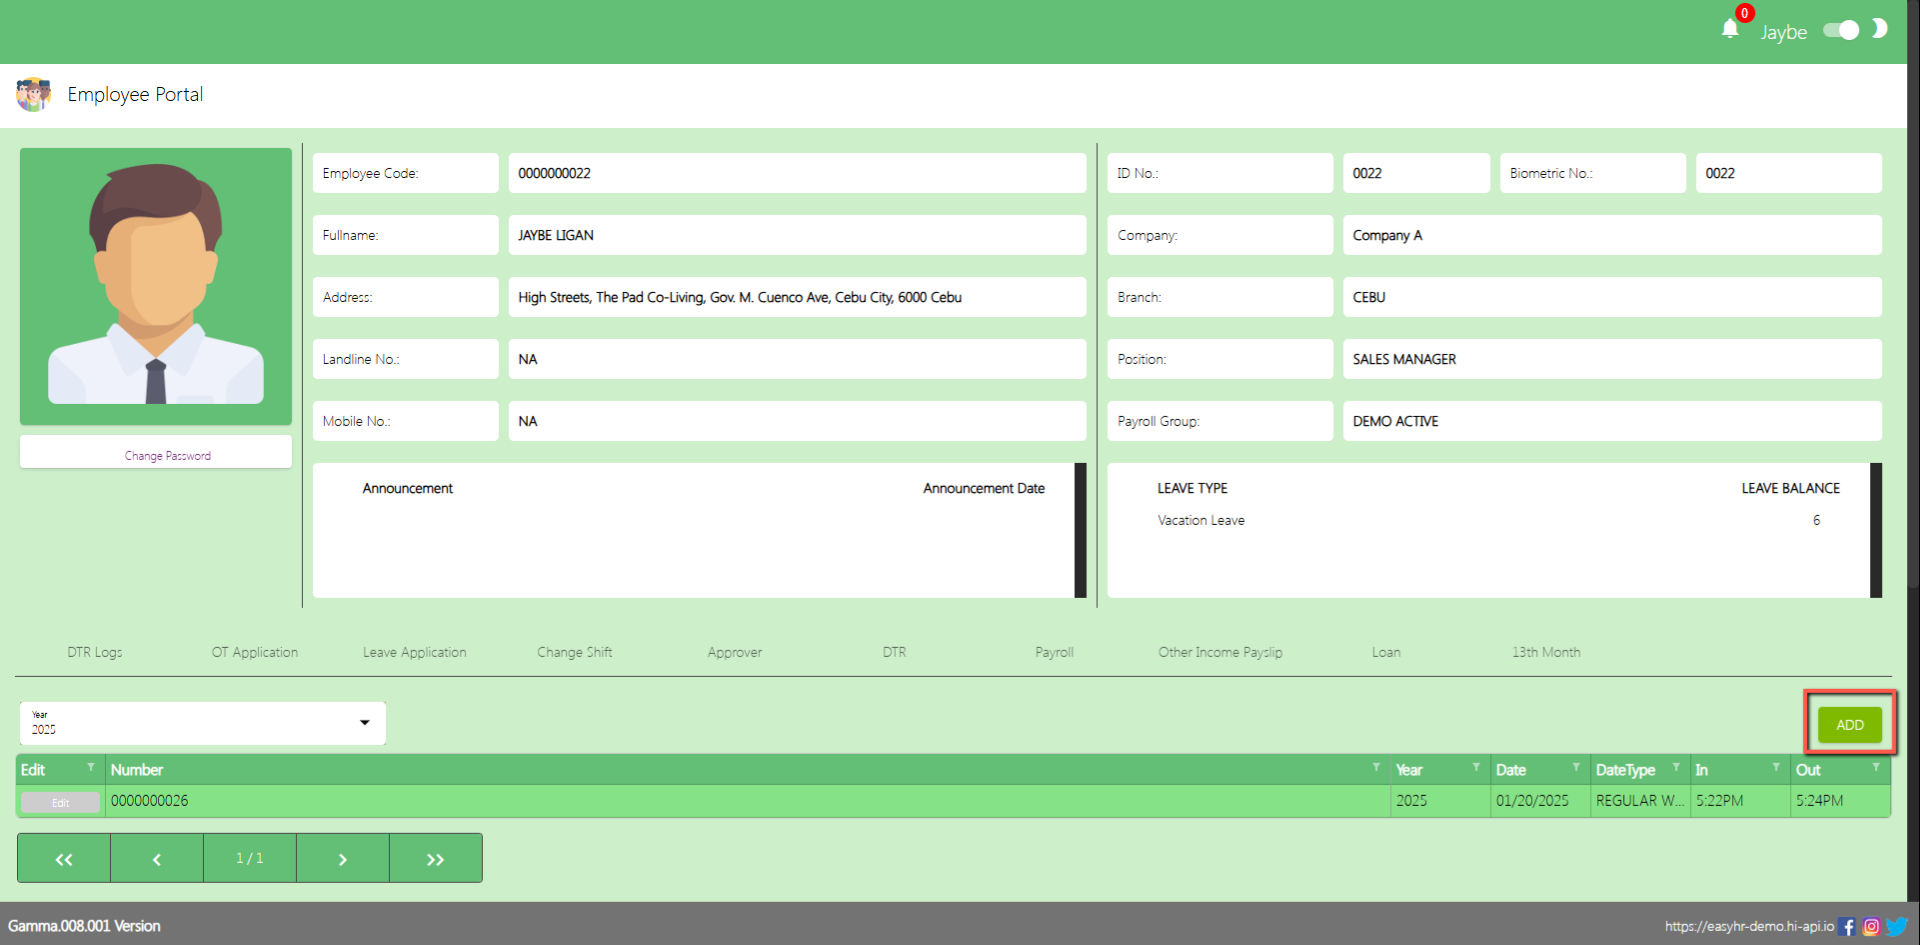
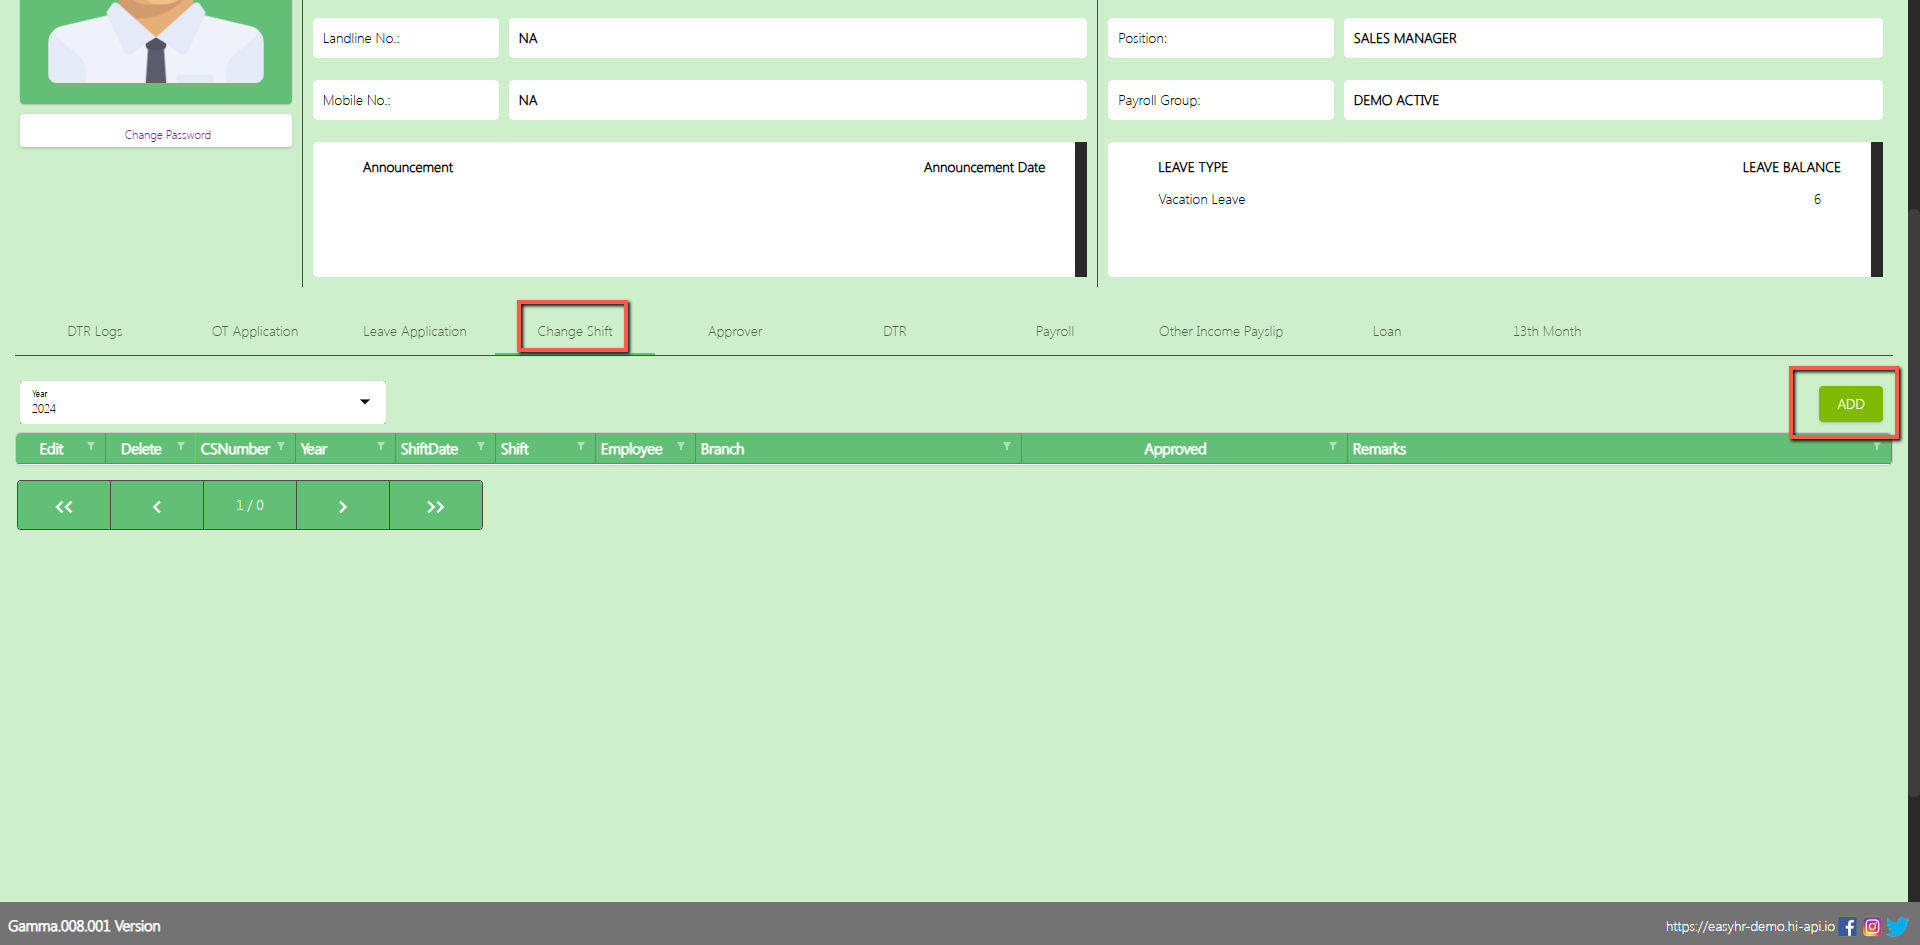
Shows the information of the employee and also can view the leave balances
The Employee can Change Password
There are 9 tabs of employee portal
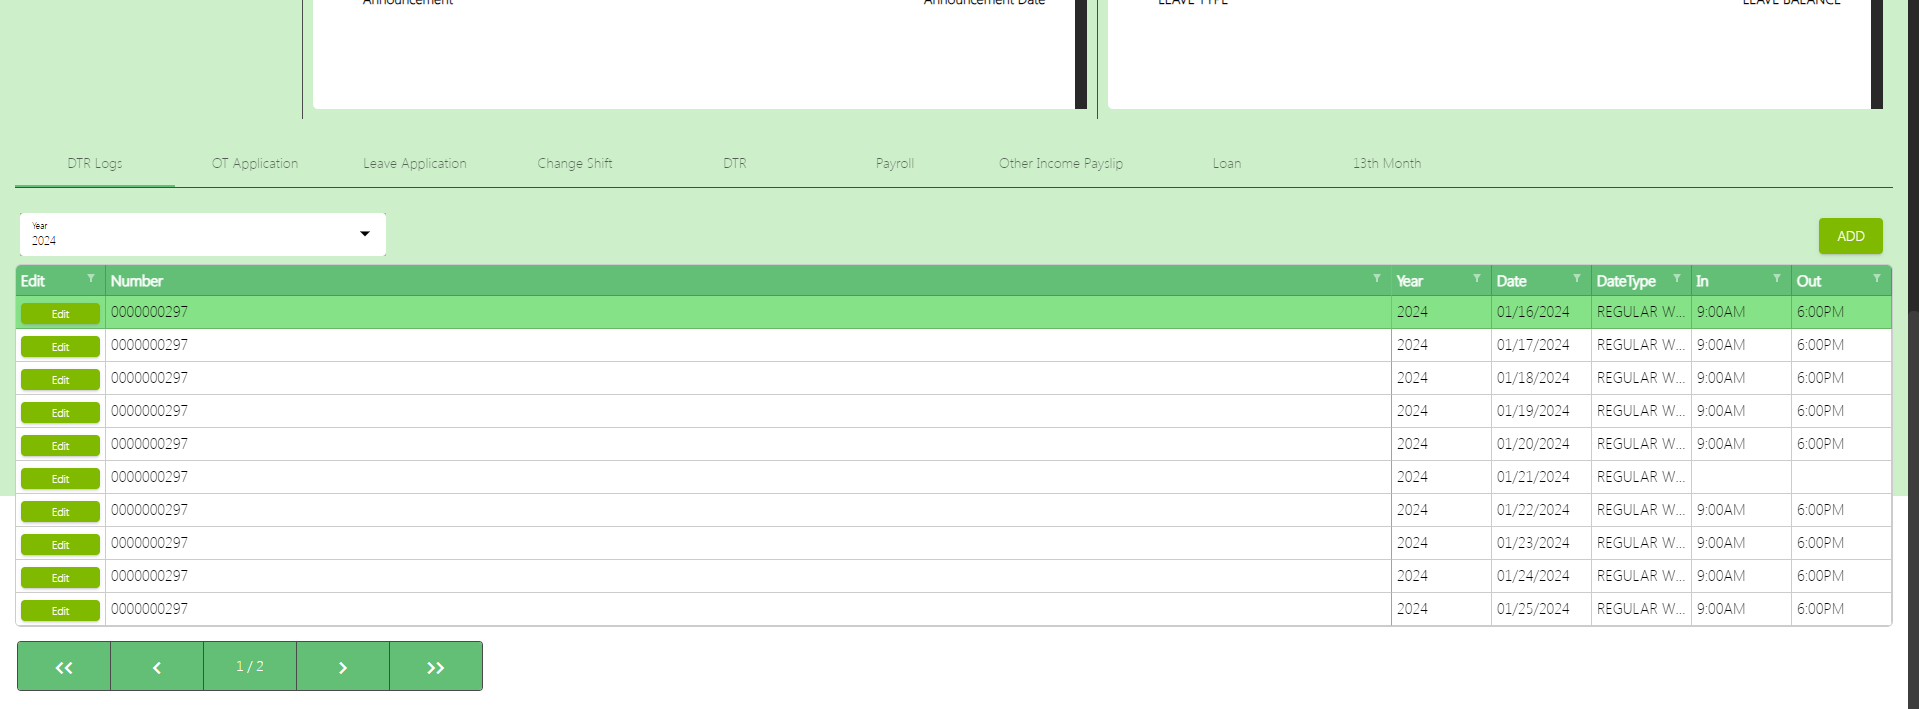
DTR logs
Overtime(OT) Application
Leave Application
Change Shift
DTR
Payroll
Other Income Payslip
Loan
13th Month
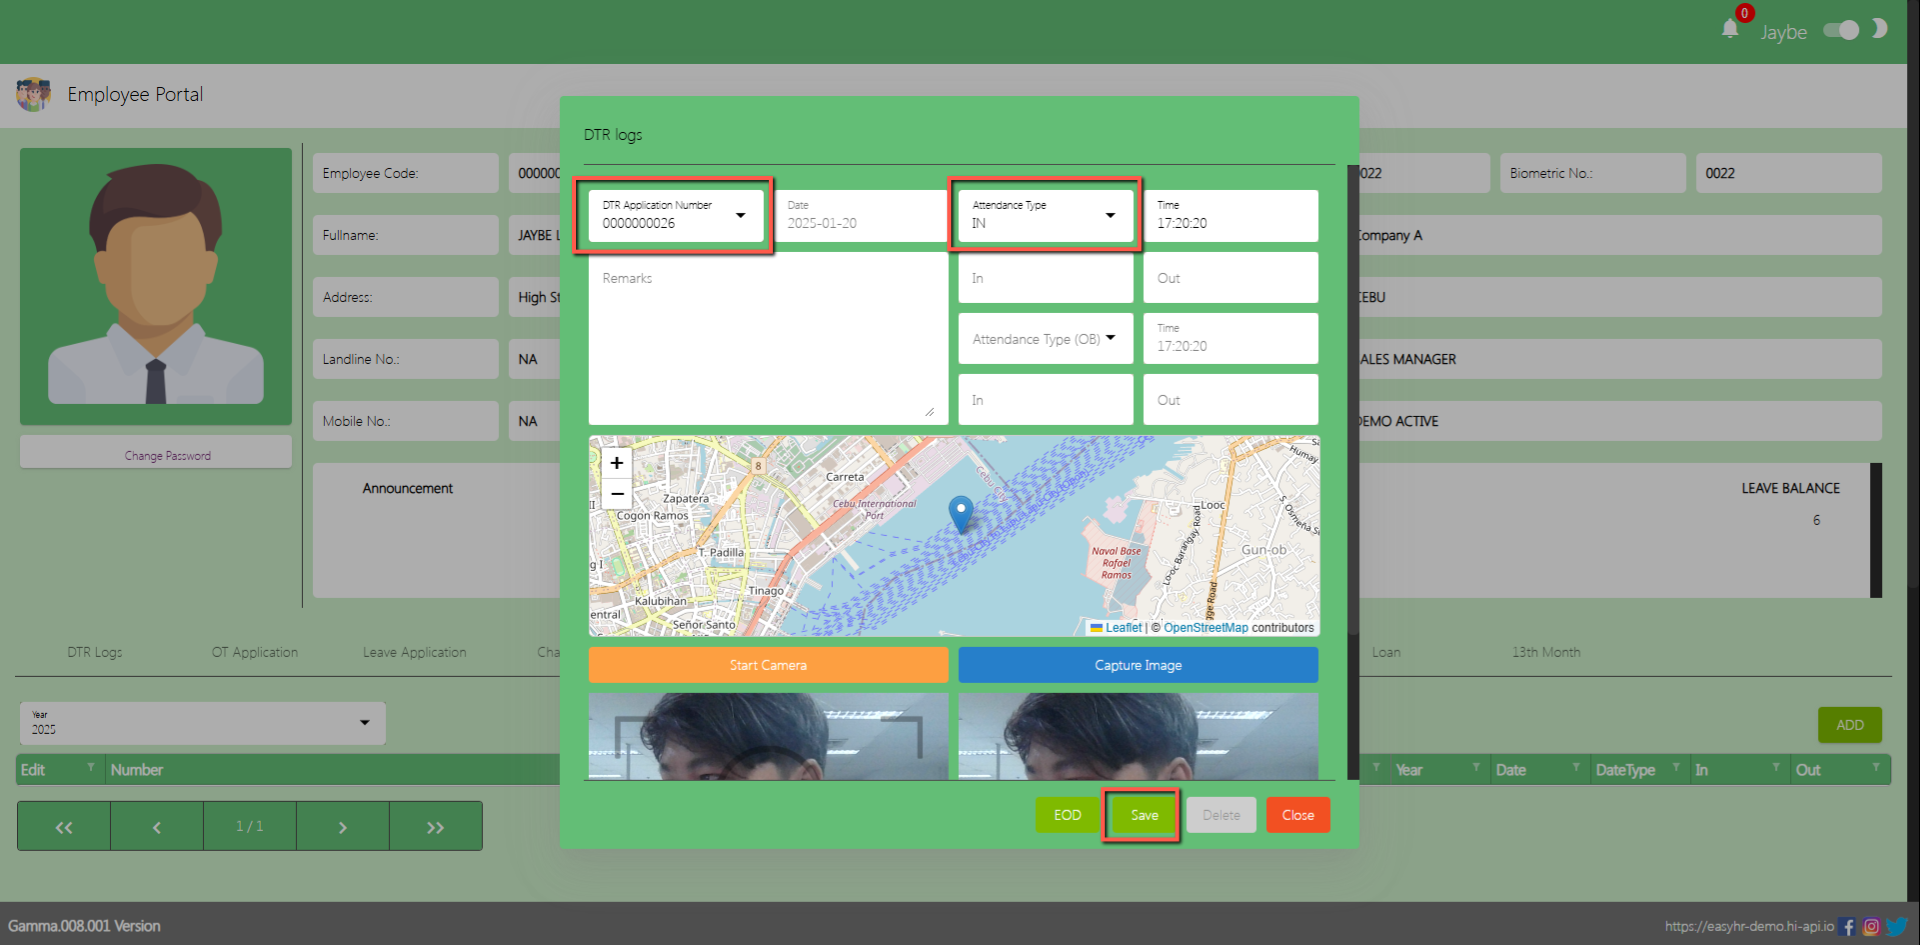
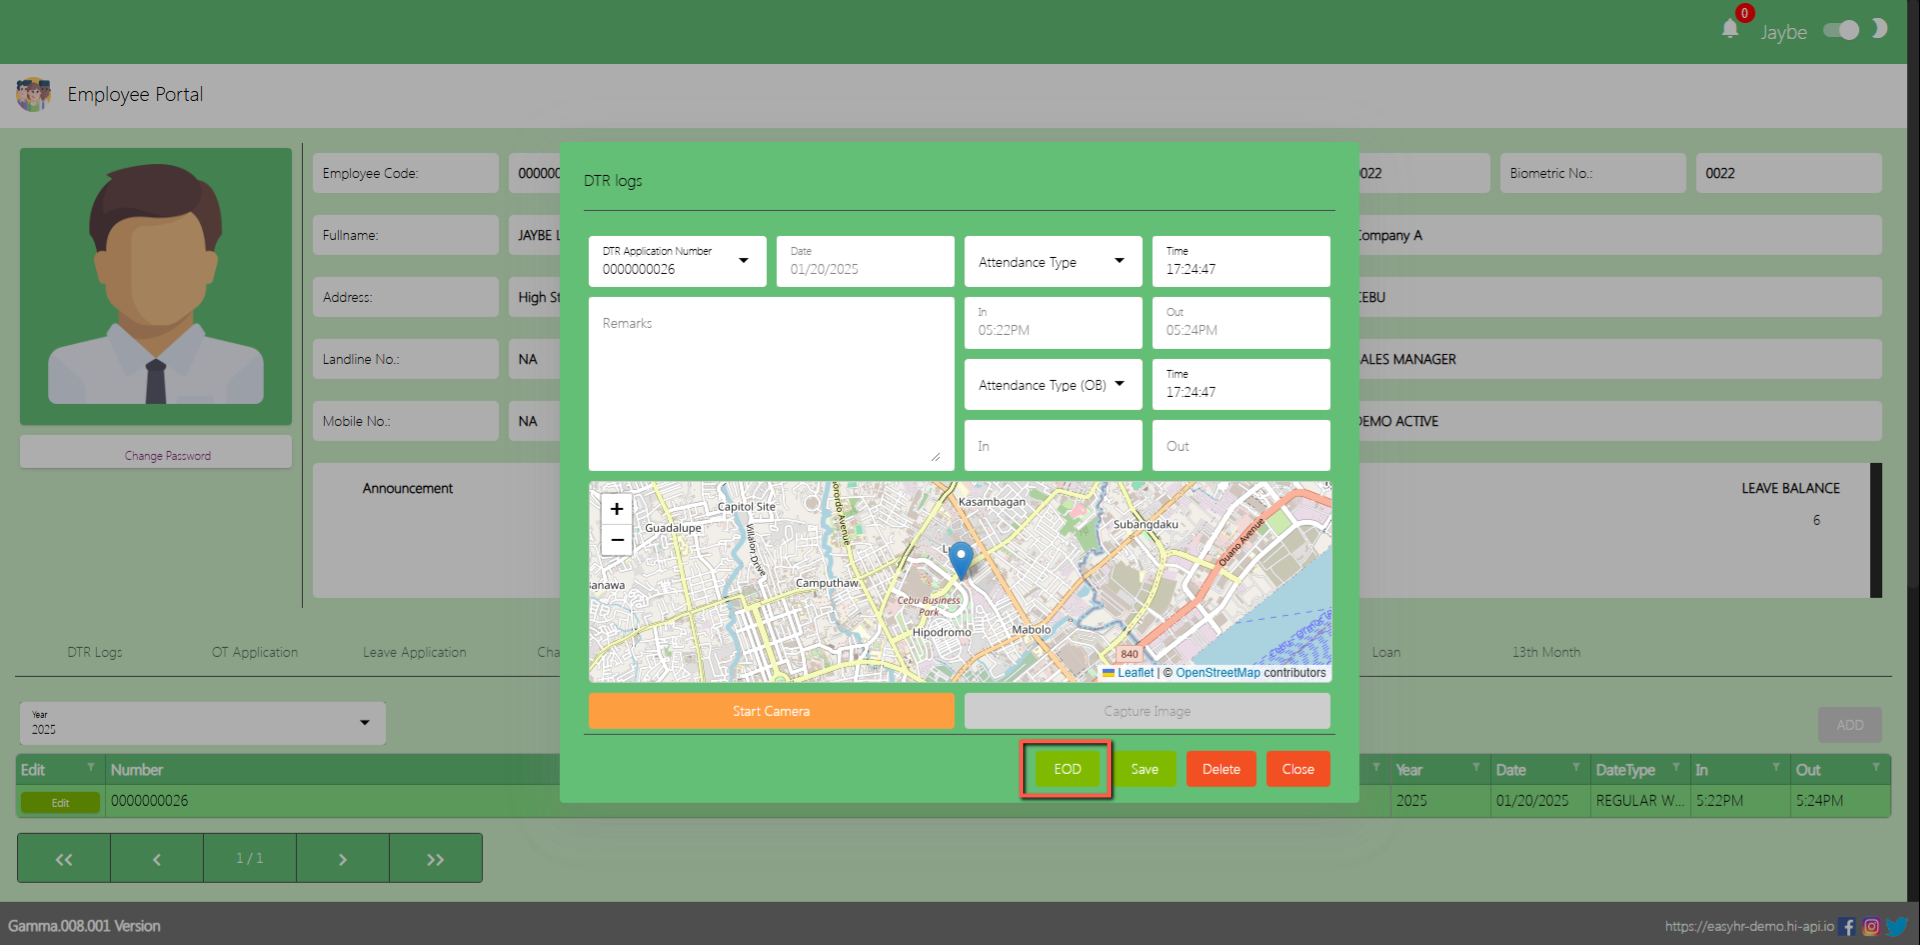
DTR Logs with Geotagging and Official Business Feature
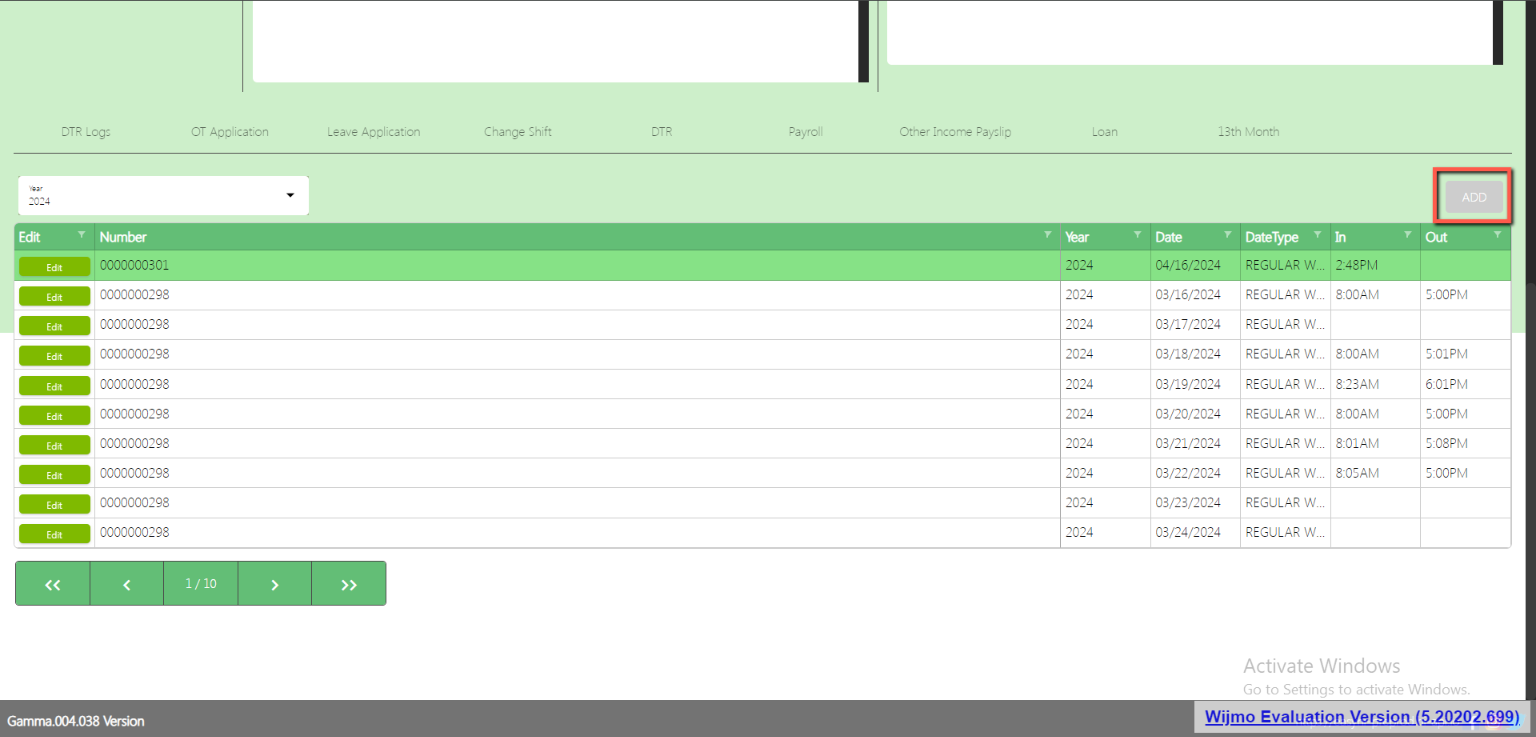
In the DTR logs tab the employee can addDTR logs.
After the superadmin is done for the geolocation setup on the company and employee detail
Assumption: The employee already clicked the Add button on the upper right corner in the DTR logs Tab.
Select DTR Application number
Select Attendance Type
Input Remarks
Click Start Camera
Click Capture Image
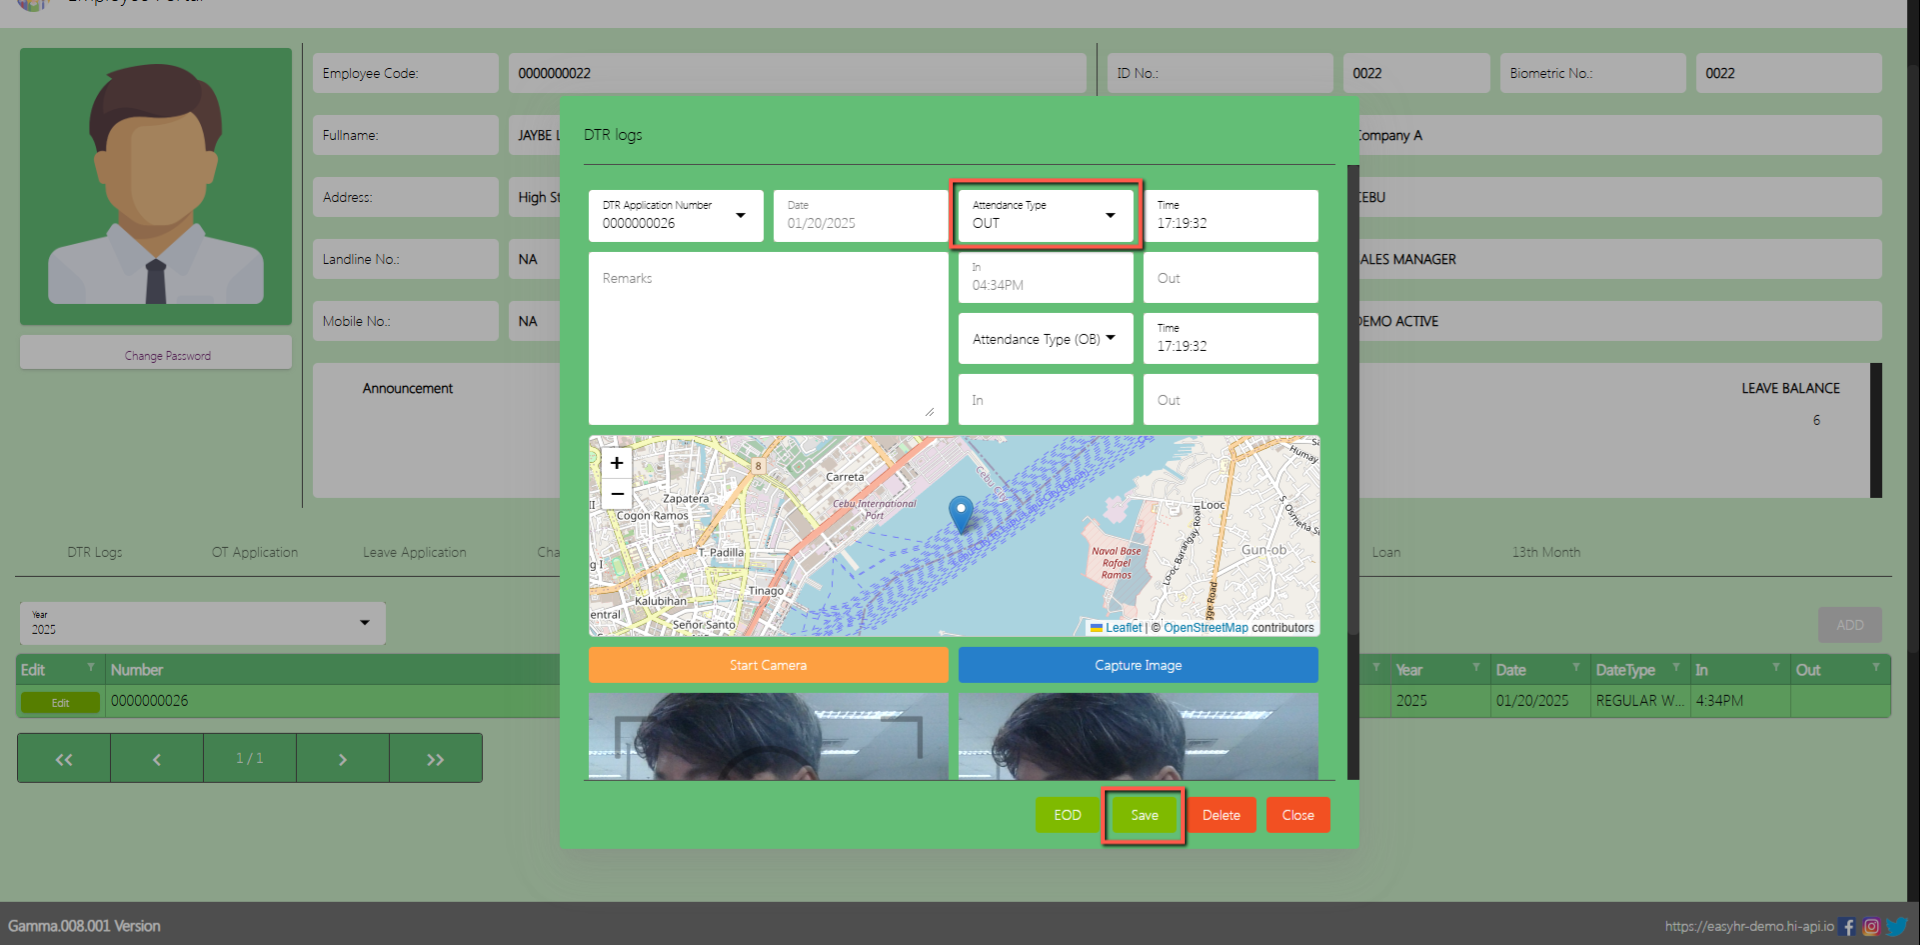
Click Save button to add DTR log with Geolocation and Captured Image.
(Note: Make sure theDTR number should not be locked by the admin so that employees can access the DTR Application number in DTR logs)
After recording their time in, the employee must repeat the process for their time out. Be sure to select the correct attendance type as ‘Out’ before clicking the Save button to ensure accurate records.
in order for the Add button to be enabled again an EOD must perform first.
EOD (End of Day)
DTR Logs
Click Edit
Click EOD
After clicking the EOD button there is a message that “EOD Updated Successfully!”, and the Add button will be enabled.
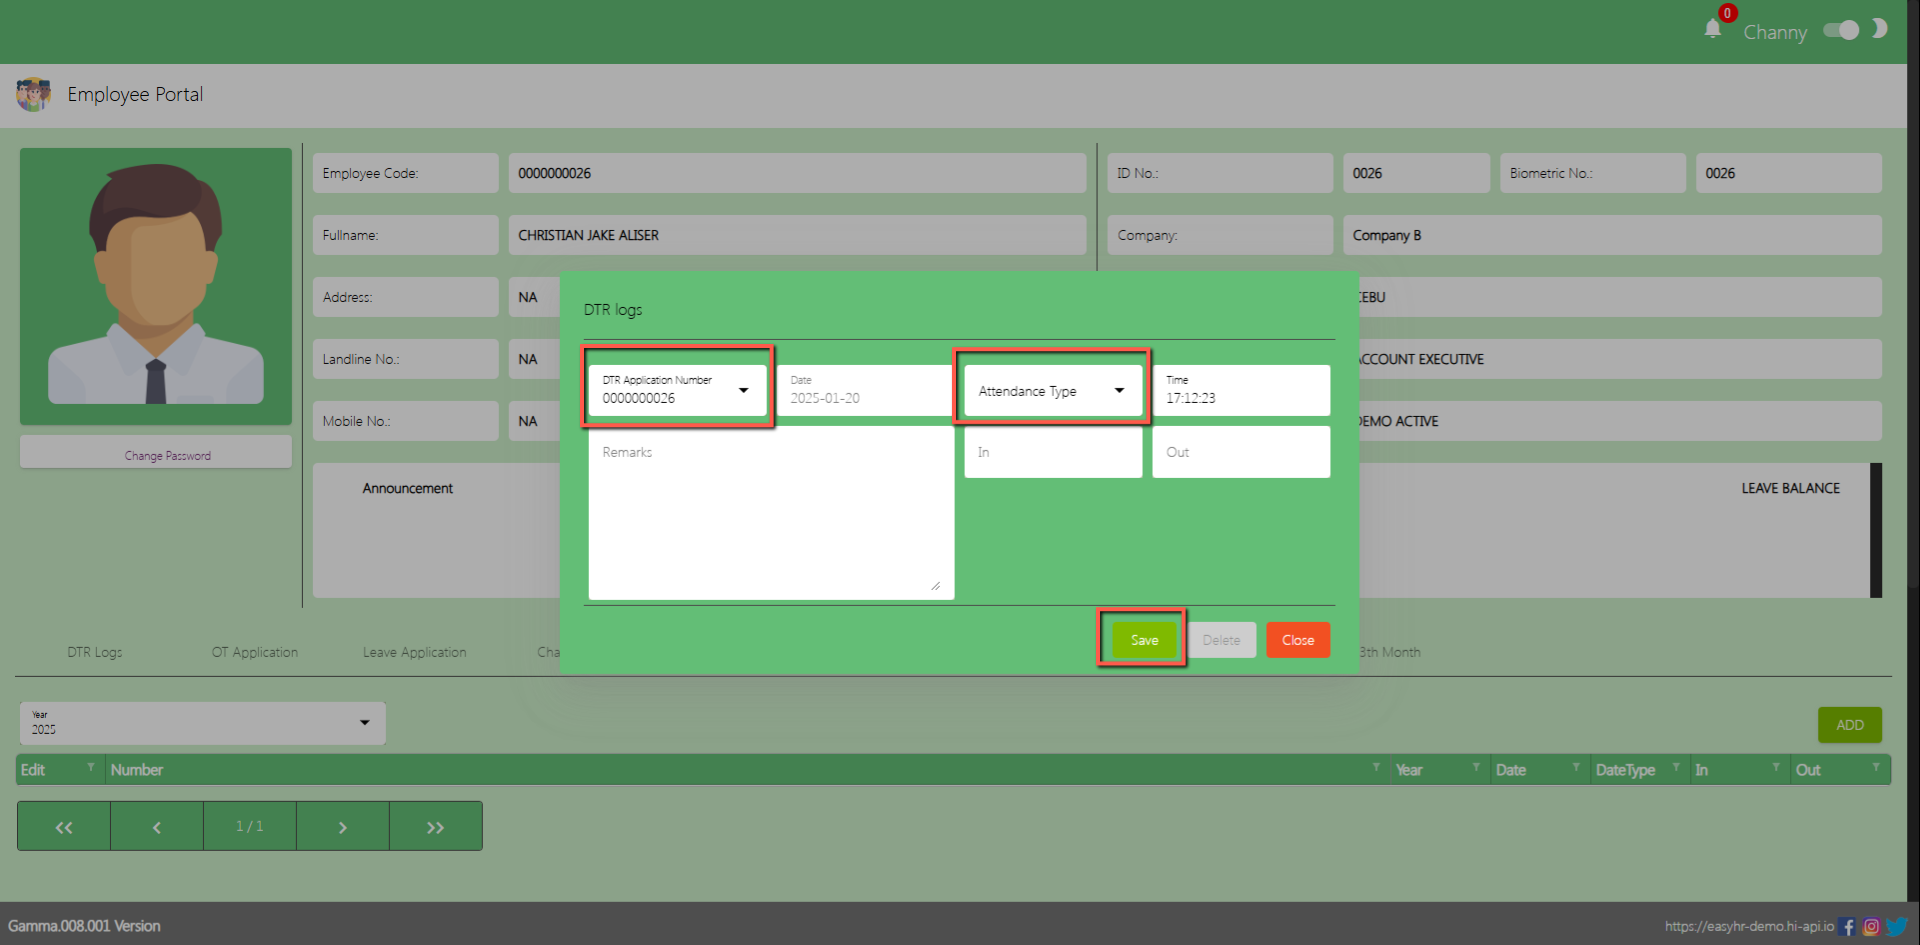
DTR Logs without the geotagging feature
Select DTR Application number
Select Attendance Type
Click Save
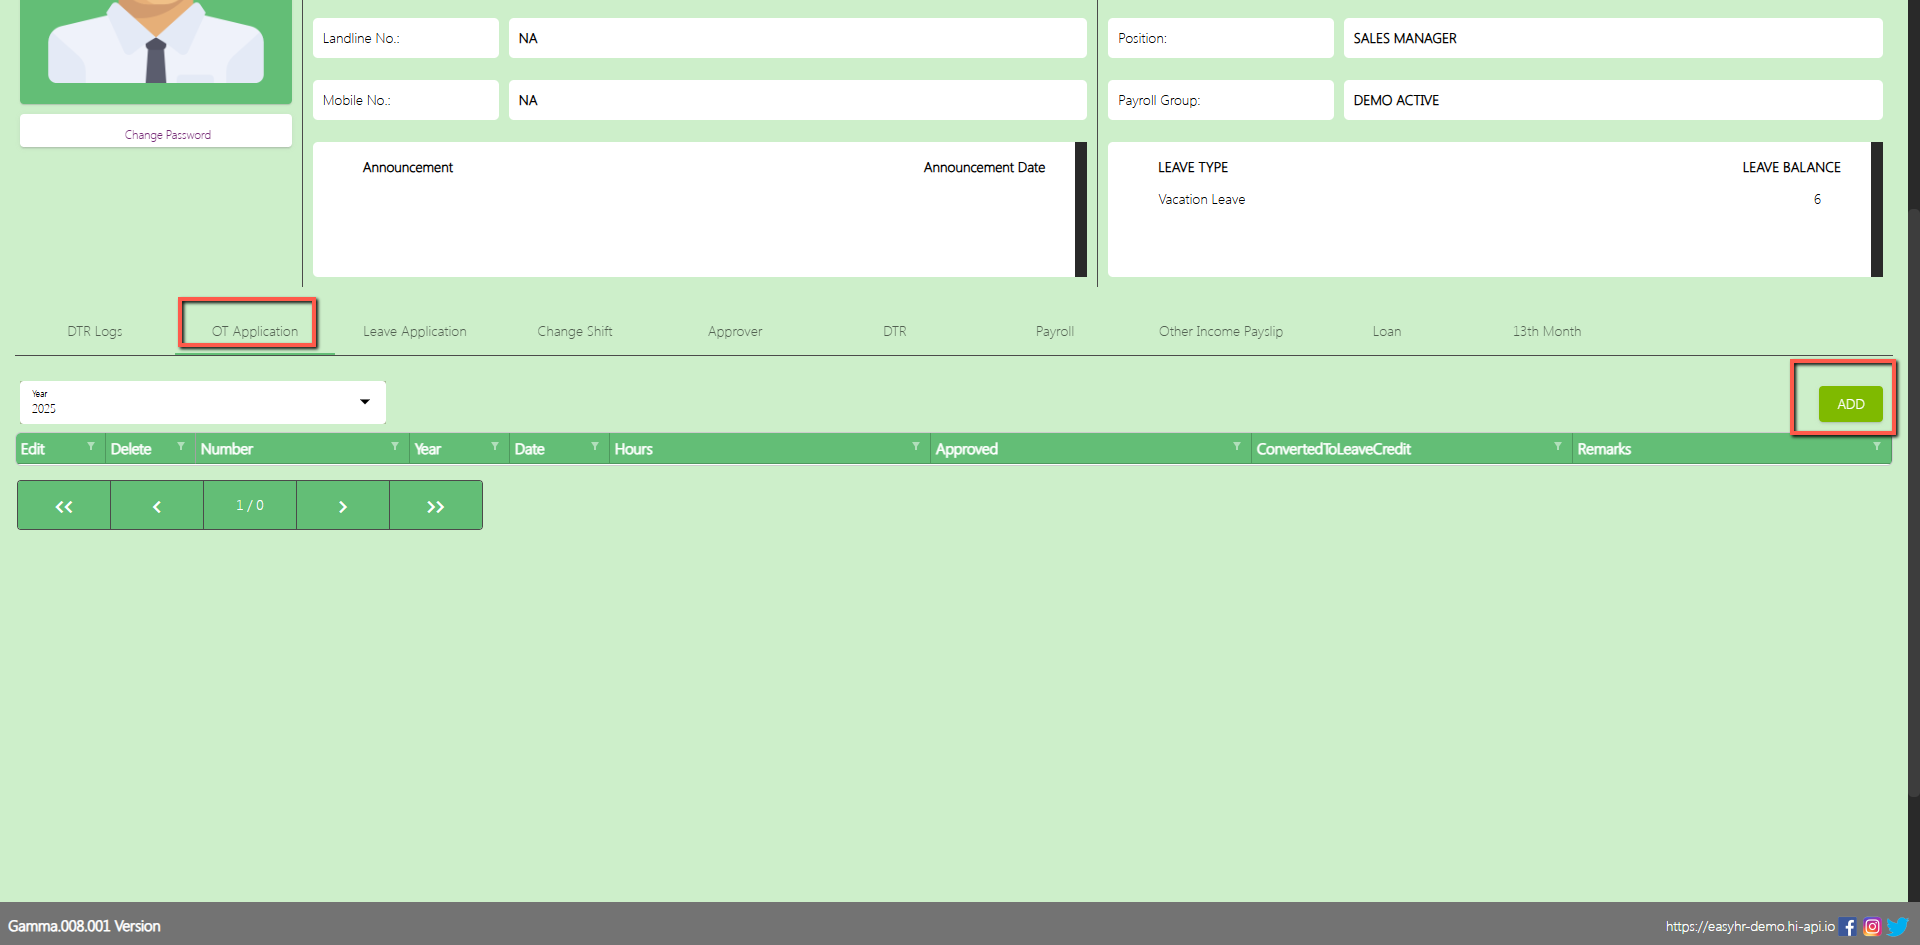
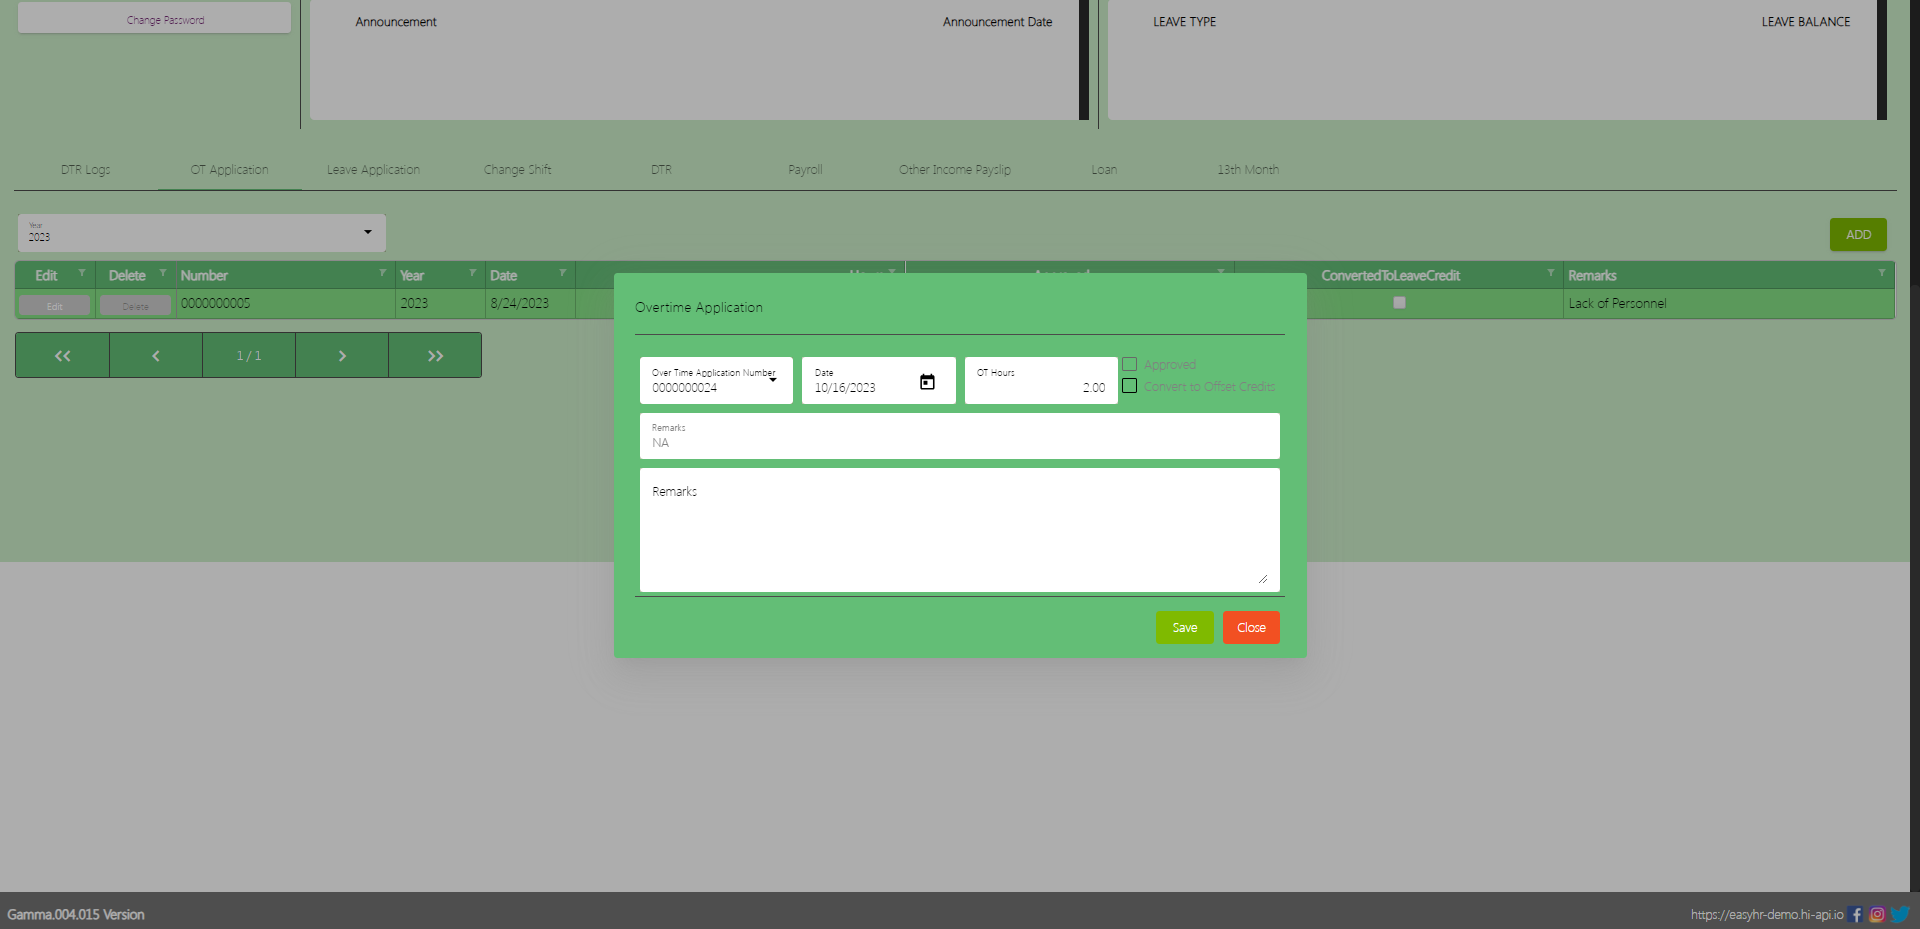
OT Application
In the OT Application tab the employee can Add overtime application.
Assumption: The employee already clicked the Add button on the upper right corner in the OT application tab.
(Note: Make sure theOT number should not be locked by the admin so that employees can access the Overtime Application number in Overtime Application)
Select Overtime Application number
Select Date
Input OT Hours
Input Remarks
The Employee can Check the Checkbox Convert to Offset Credits
Click Save button to add in overtime application employee table.
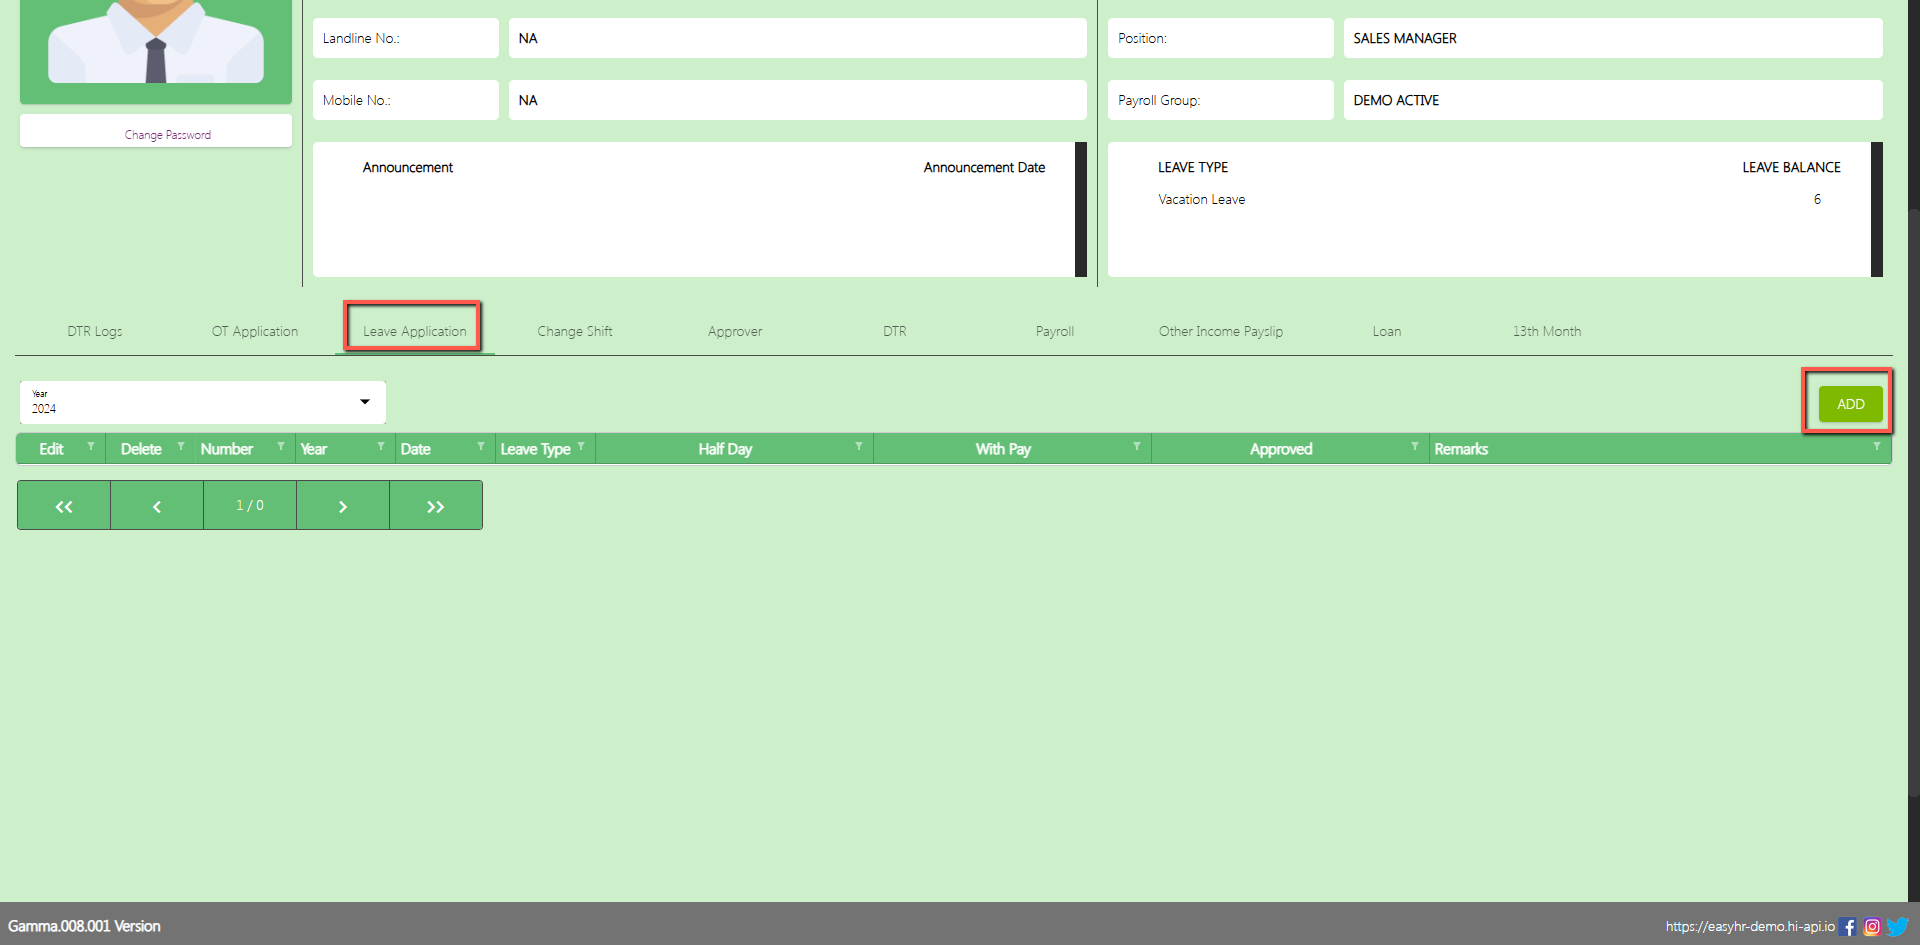
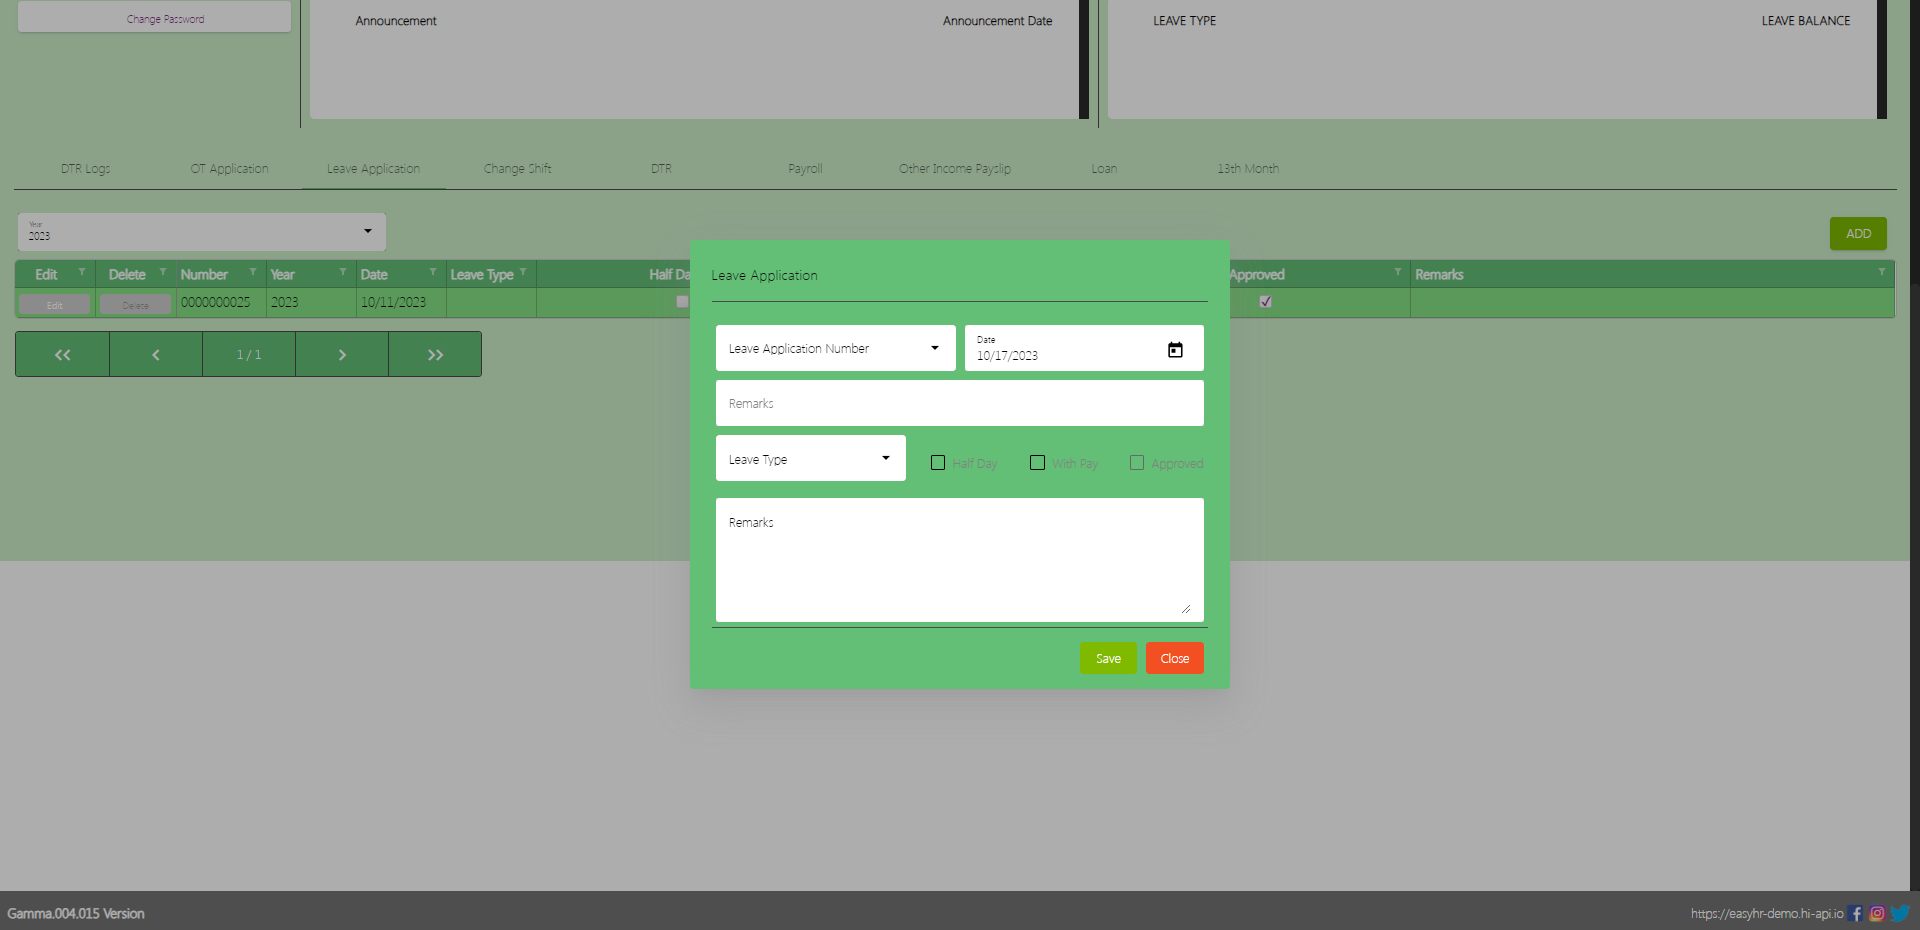
Leave Application
In the Leave Application tab the employee can Add a leave application.
Assumption: The employee already clicked the Add button on the upper right corner in the Leave application tab.
(Note: Make sure theLA number should not be locked by the admin so that employees can access the Leave Application number in Leave Application)
Select Leave Application number
Select Date
Select Leave Type
Check the Checkbox if Half Day or With Pay
Input Remarks
Click Save button to add in the leave application employee table.
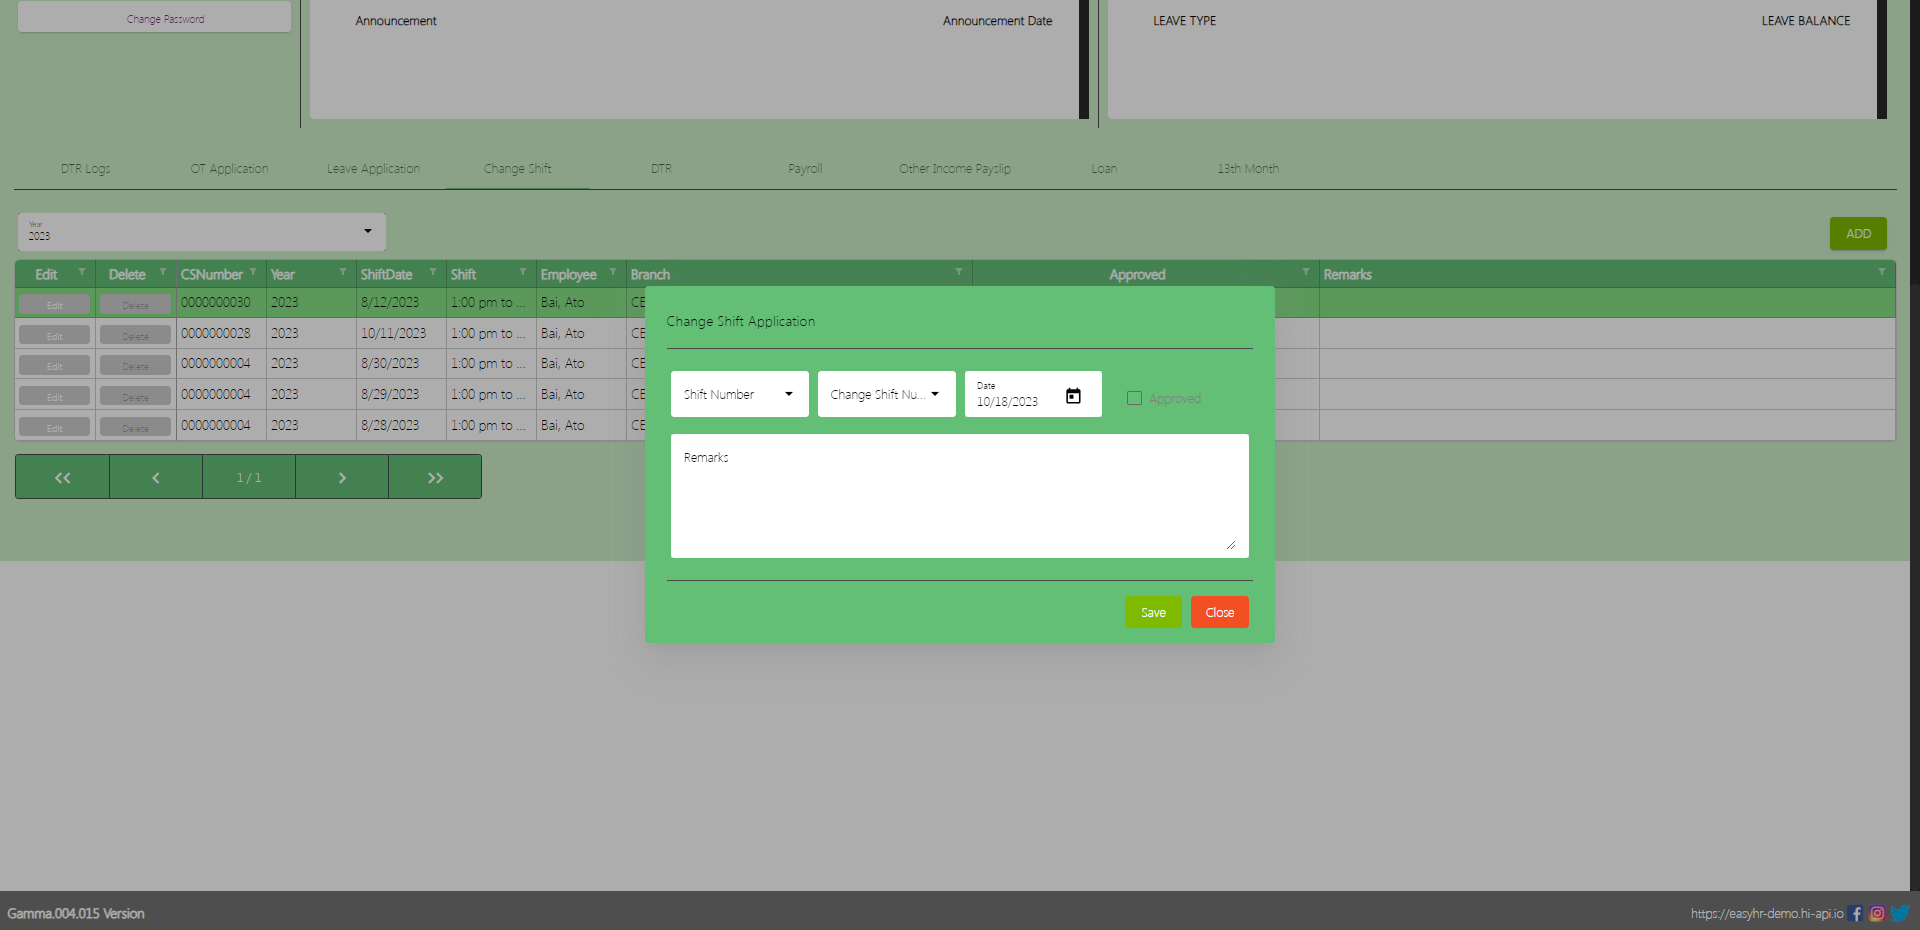
Change Shift
In the Change Shift tab the employee can Add a Change Shift.
Assumption: The employee already clicked the Add button on the upper right corner in the Change Shift tab.
(Note: Make sure theCS number should not be locked by the admin so that employees can access the Change Shift number in Change Shift)
Select Shift number
Select Change Shift number
Select Date
Input Remarks
Click Save button to add in the Change Shift employee table.
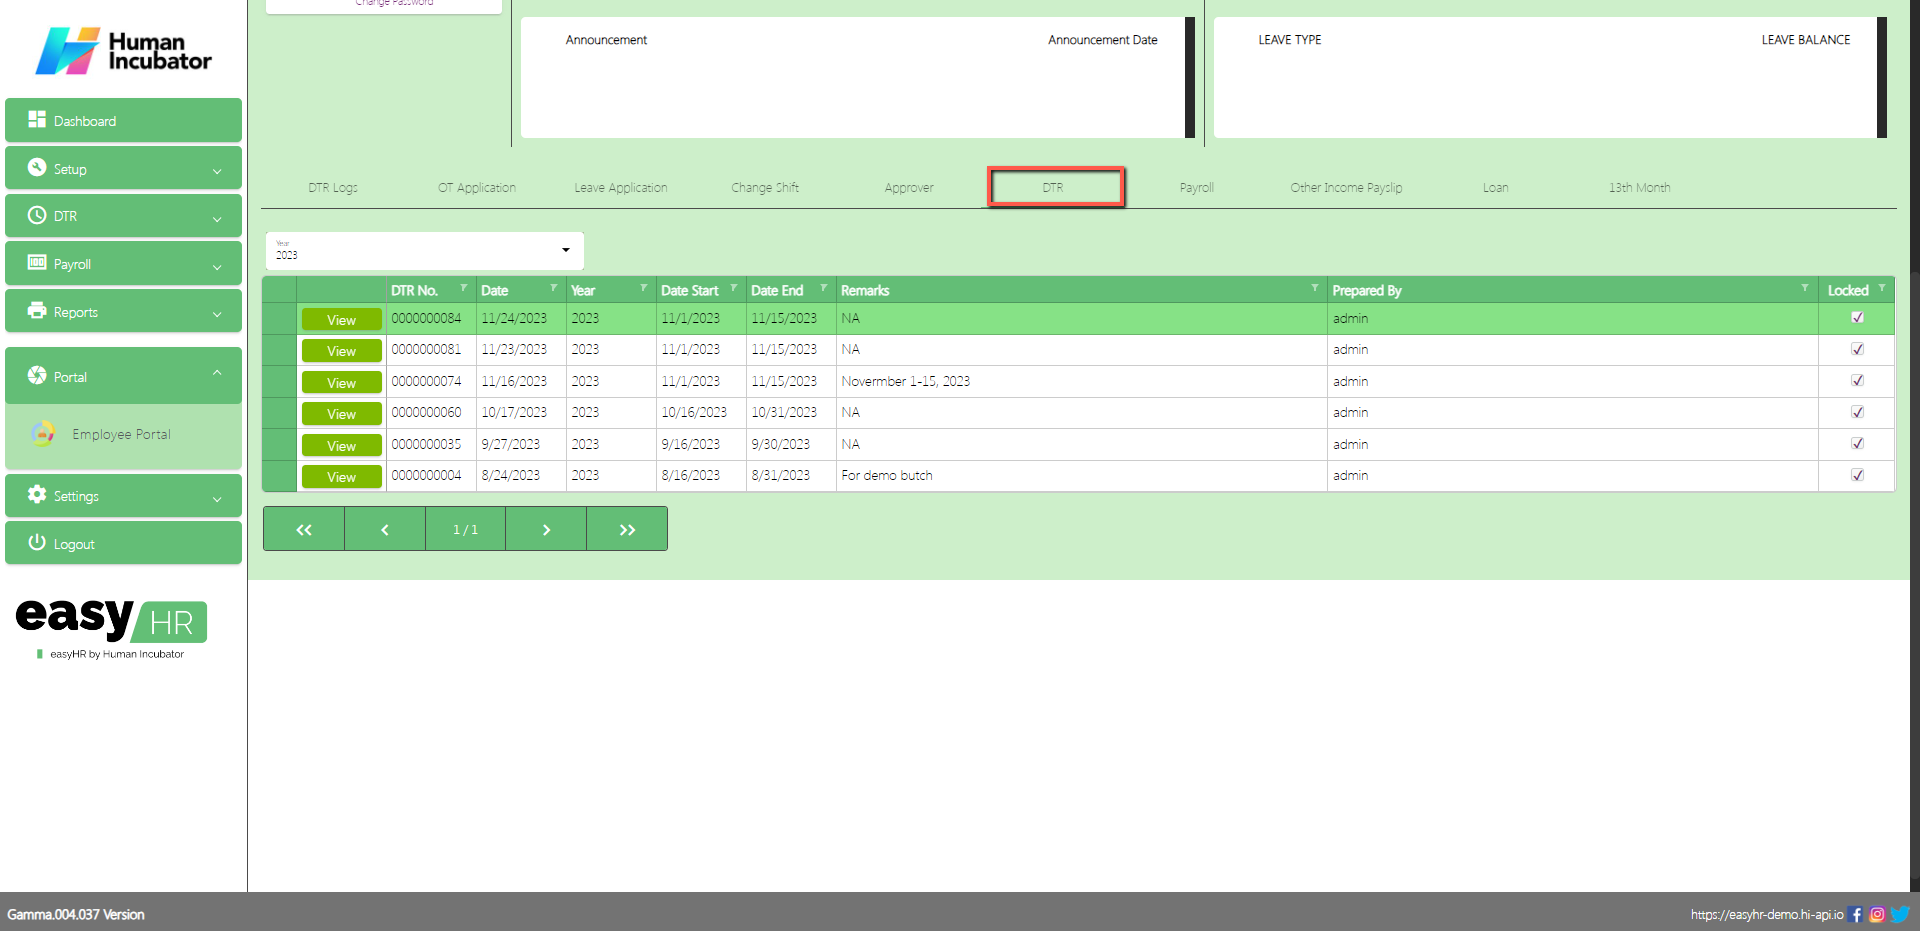
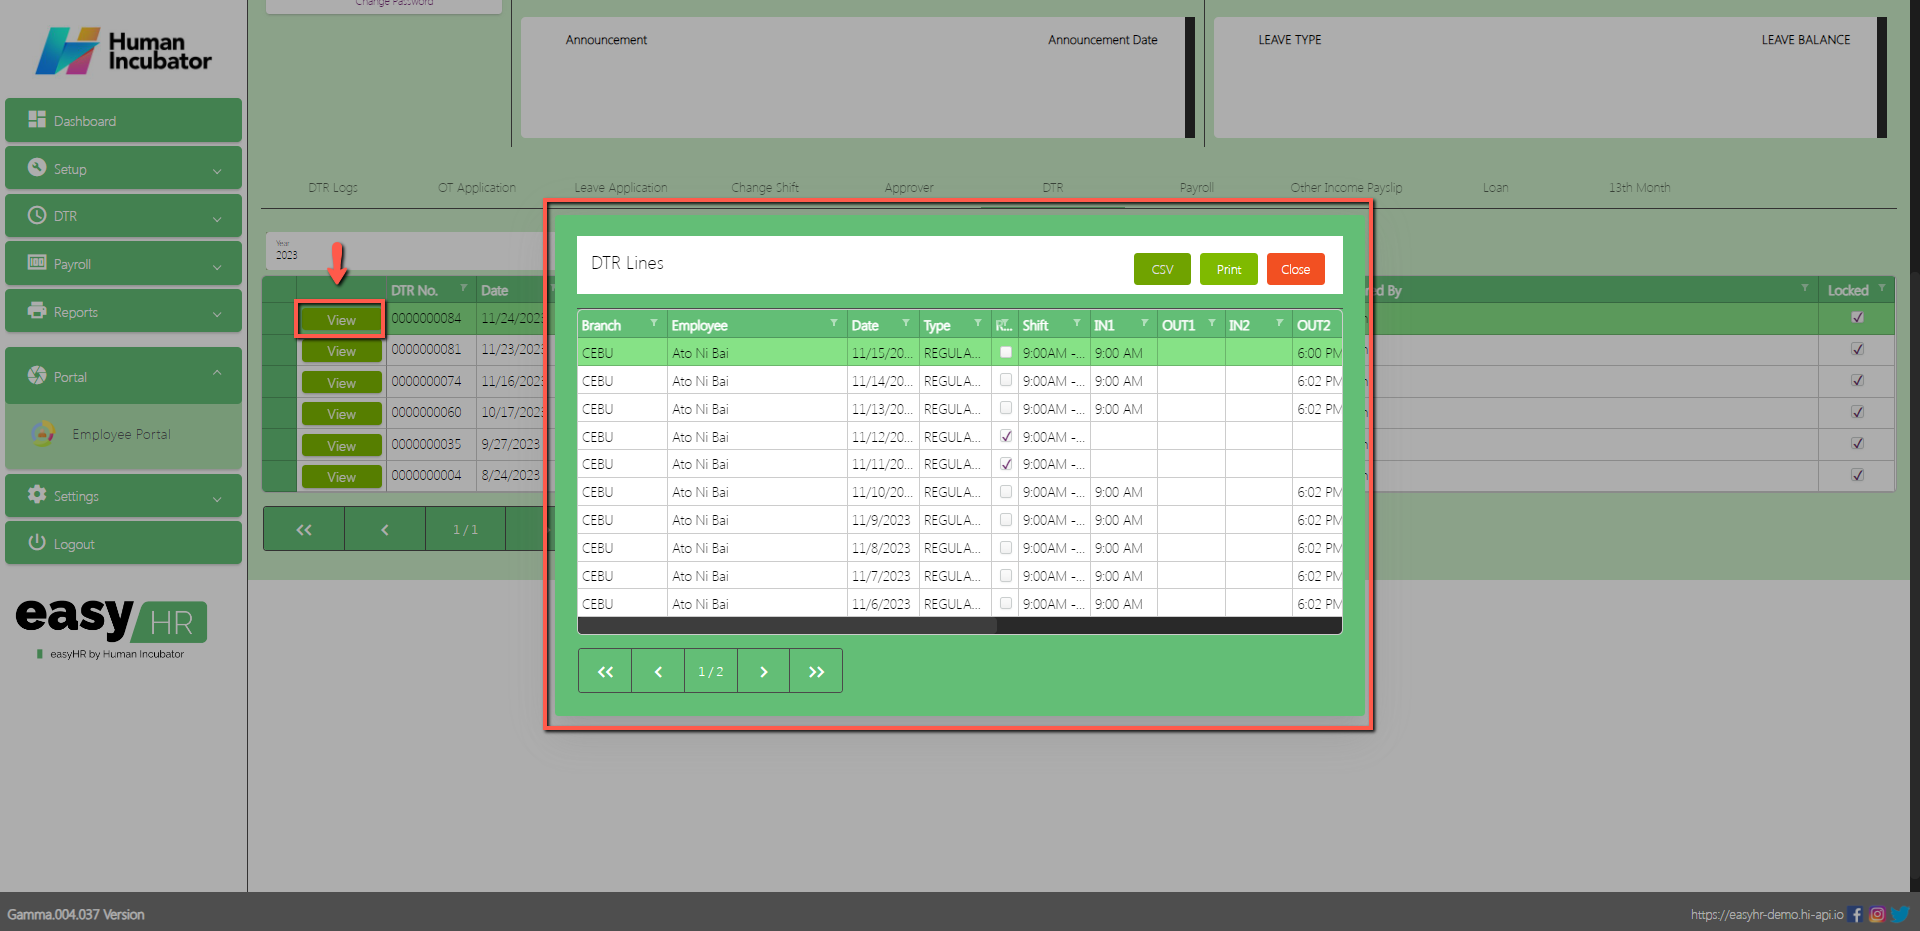
DTR
In the DTR tab the employee can View, Download CSV and Print DTR logs.
Assumption: The employee already clicked the View button on the left side in the DTR table.
Can View DTR logs
Can Download CSV file
Can Print to PDF file
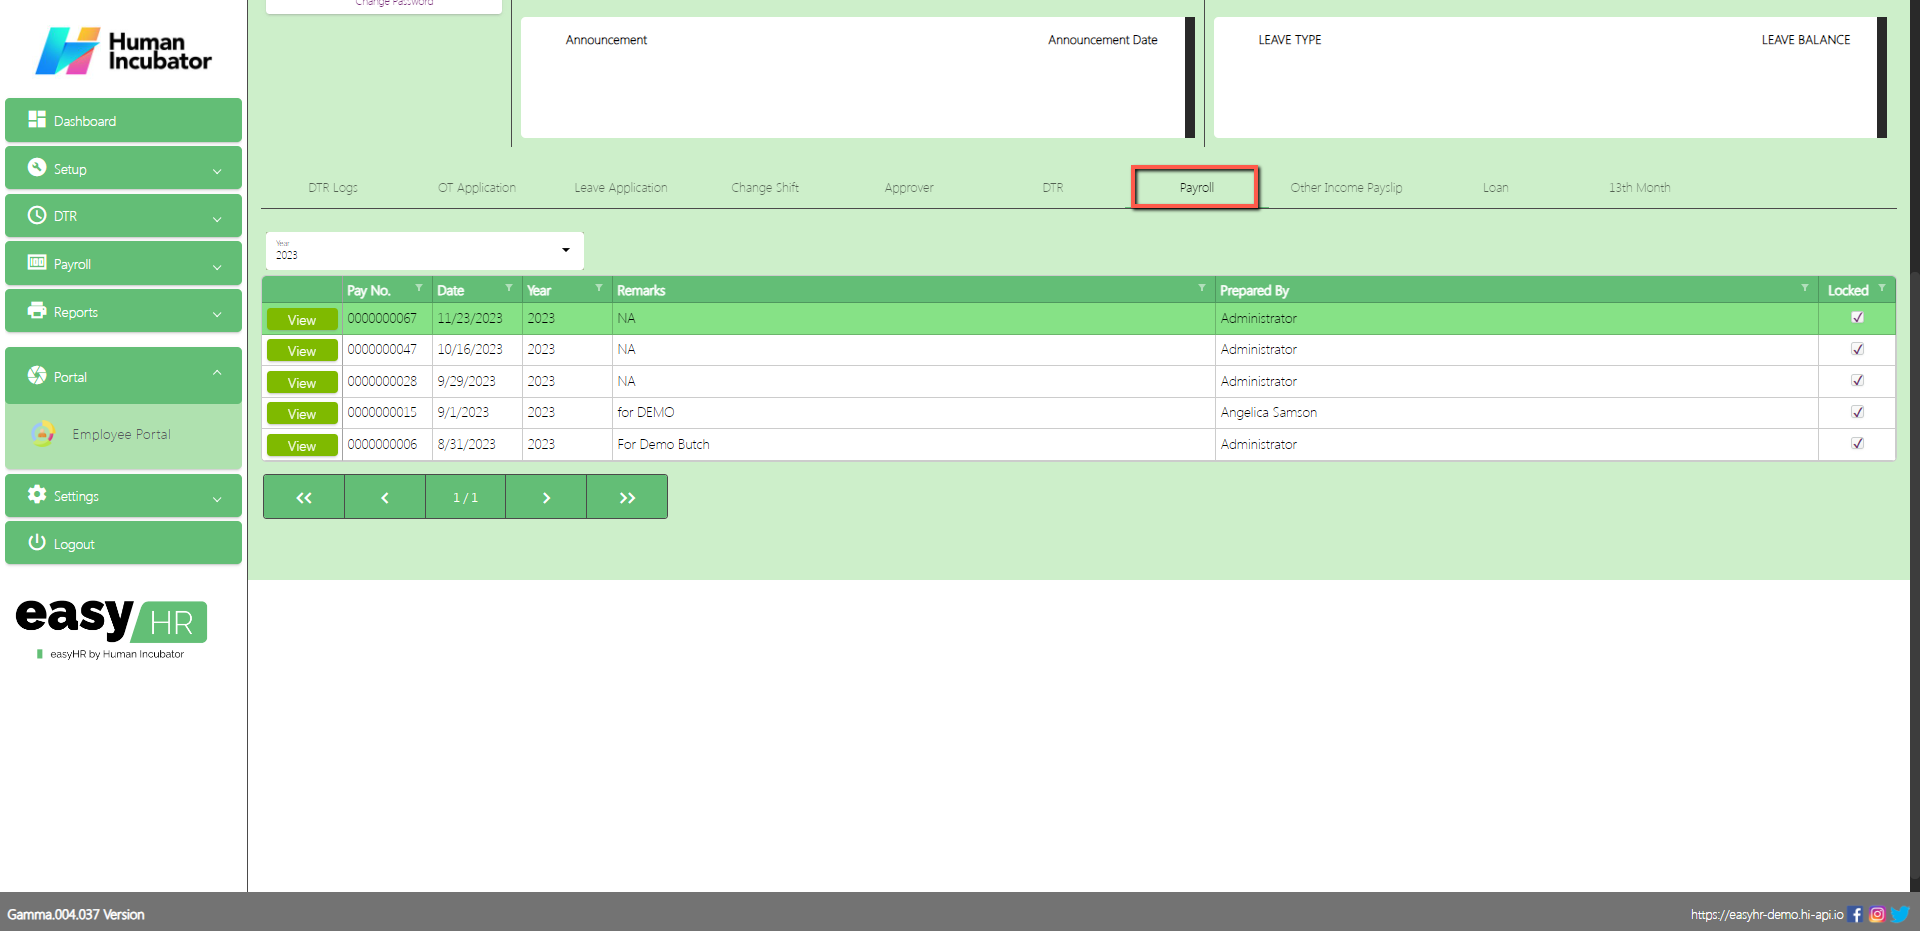
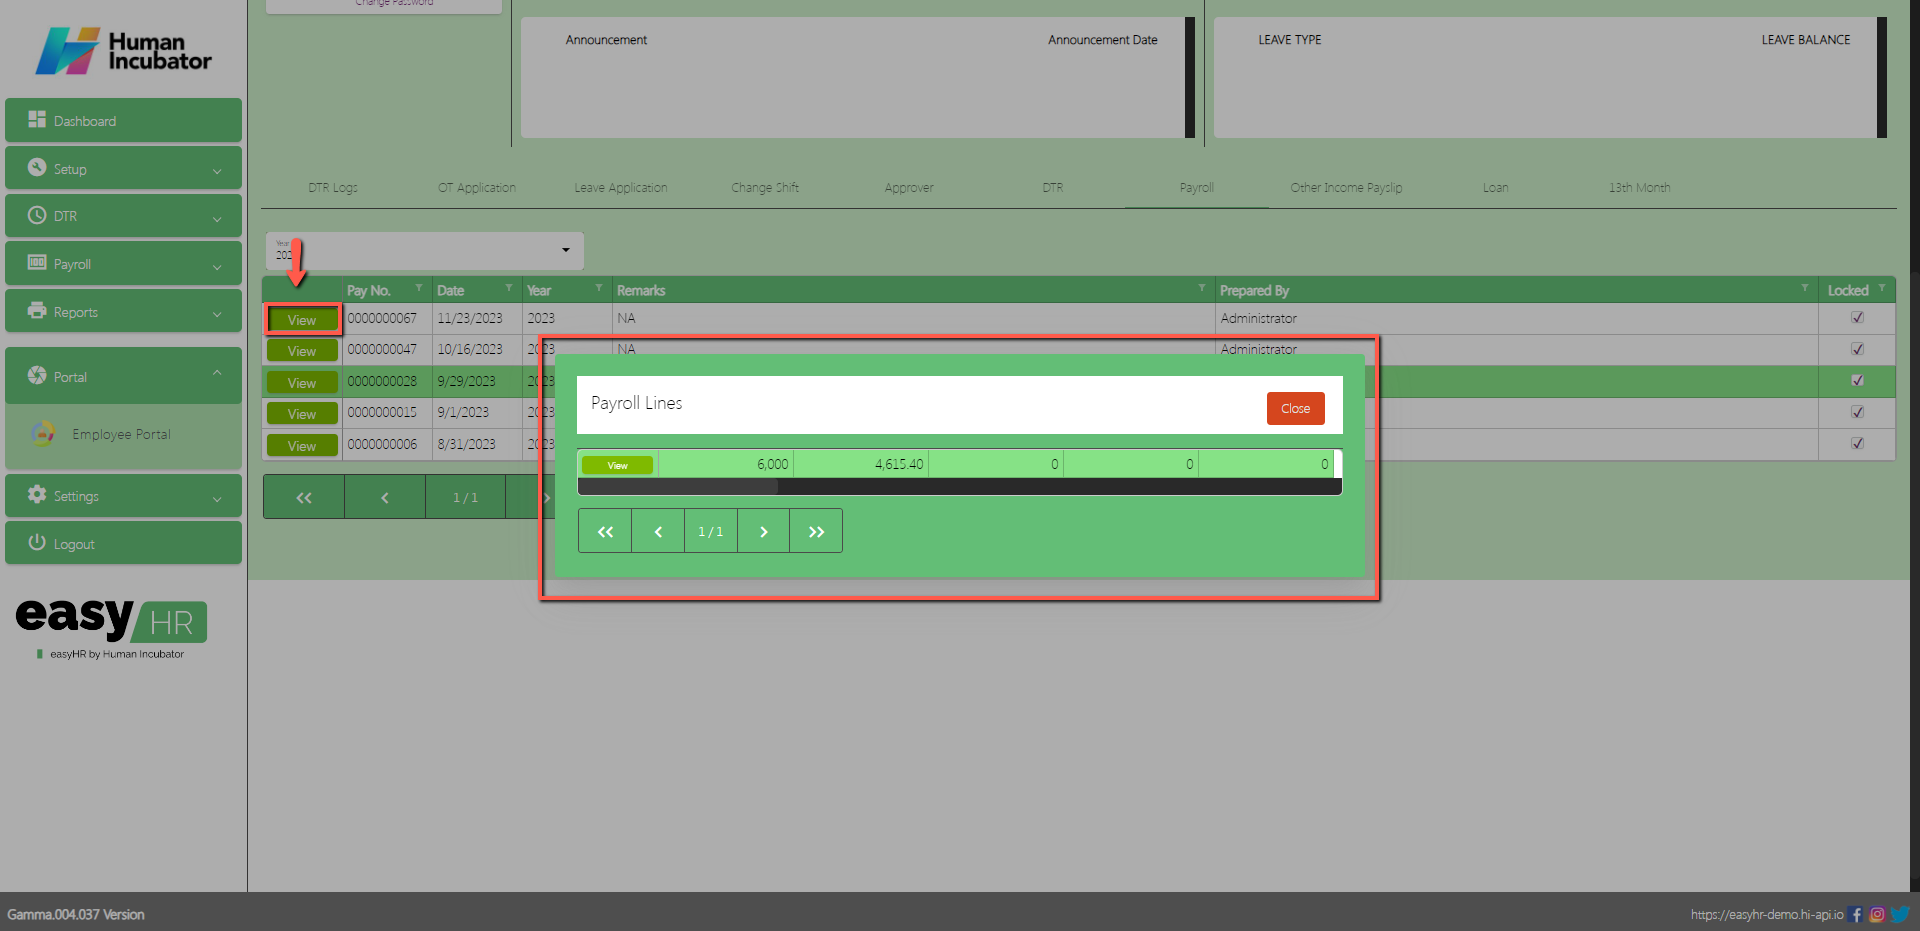
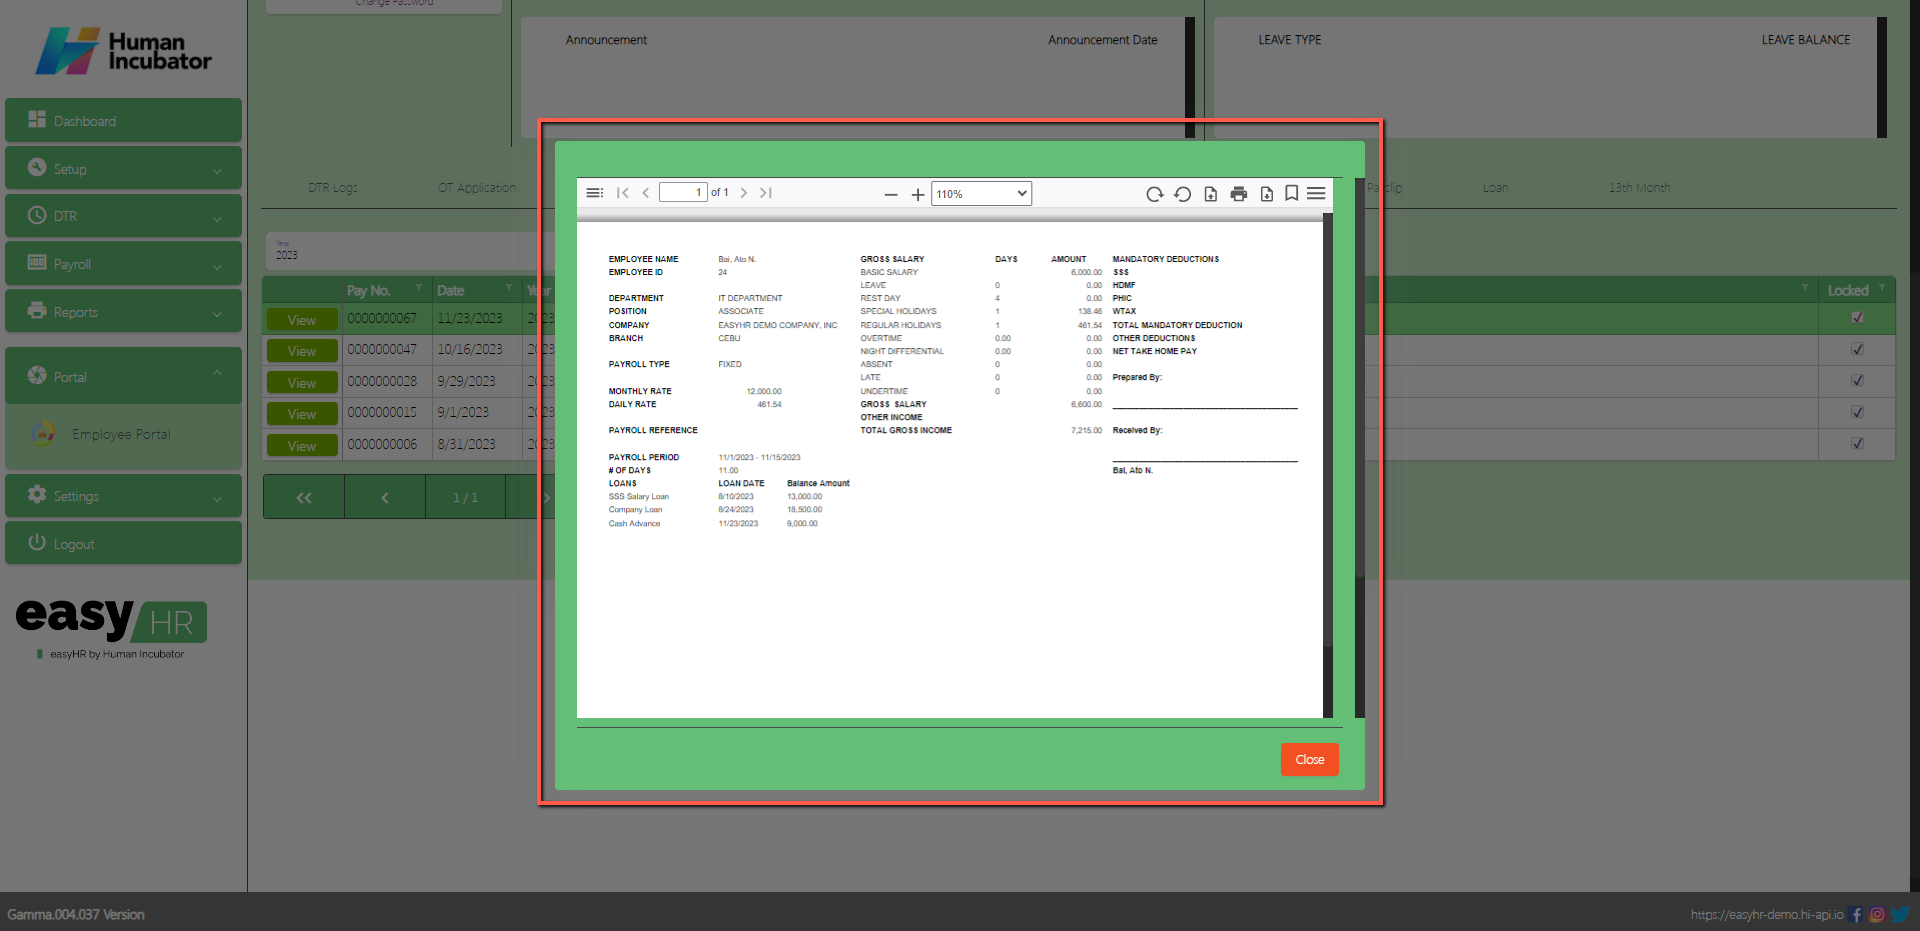
Payroll
In the Payroll tab the employee can view Payroll Lines and Payslip.
Assumption: The employee already clicked the View button on the left side in the Payroll table.
Can view Payroll Lines
Click View button to view payslip
Can Download PDF file
Can Print
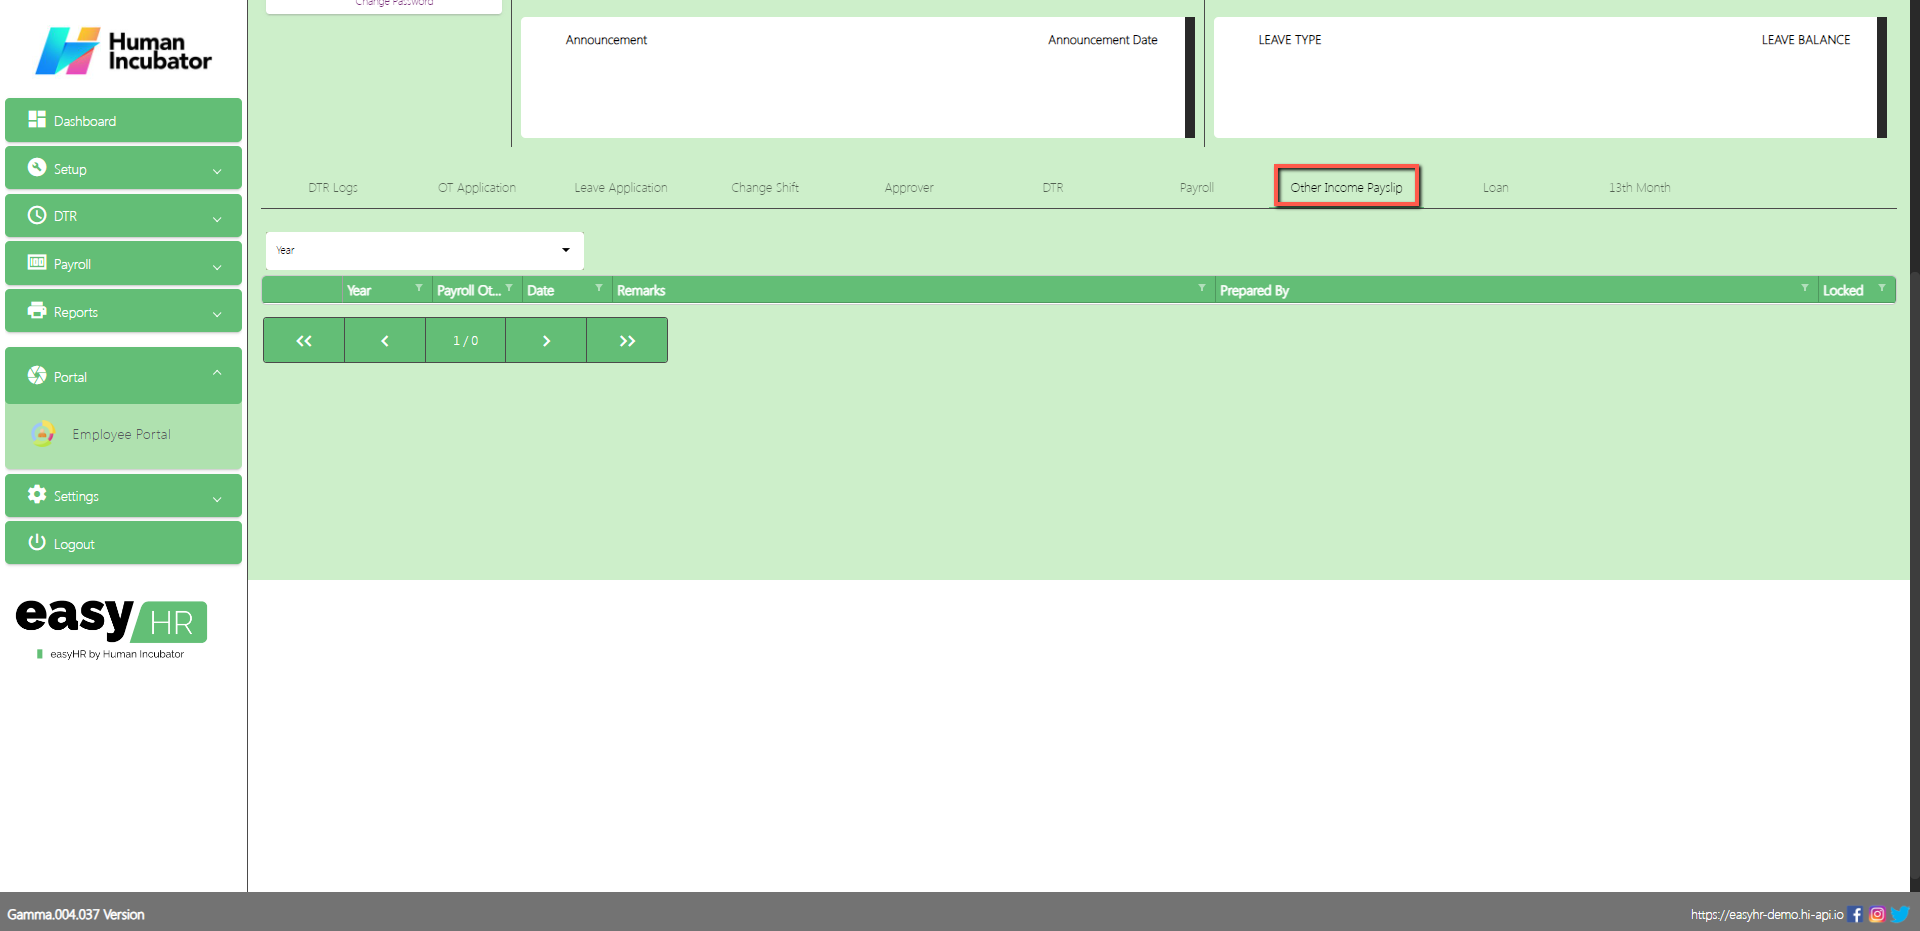
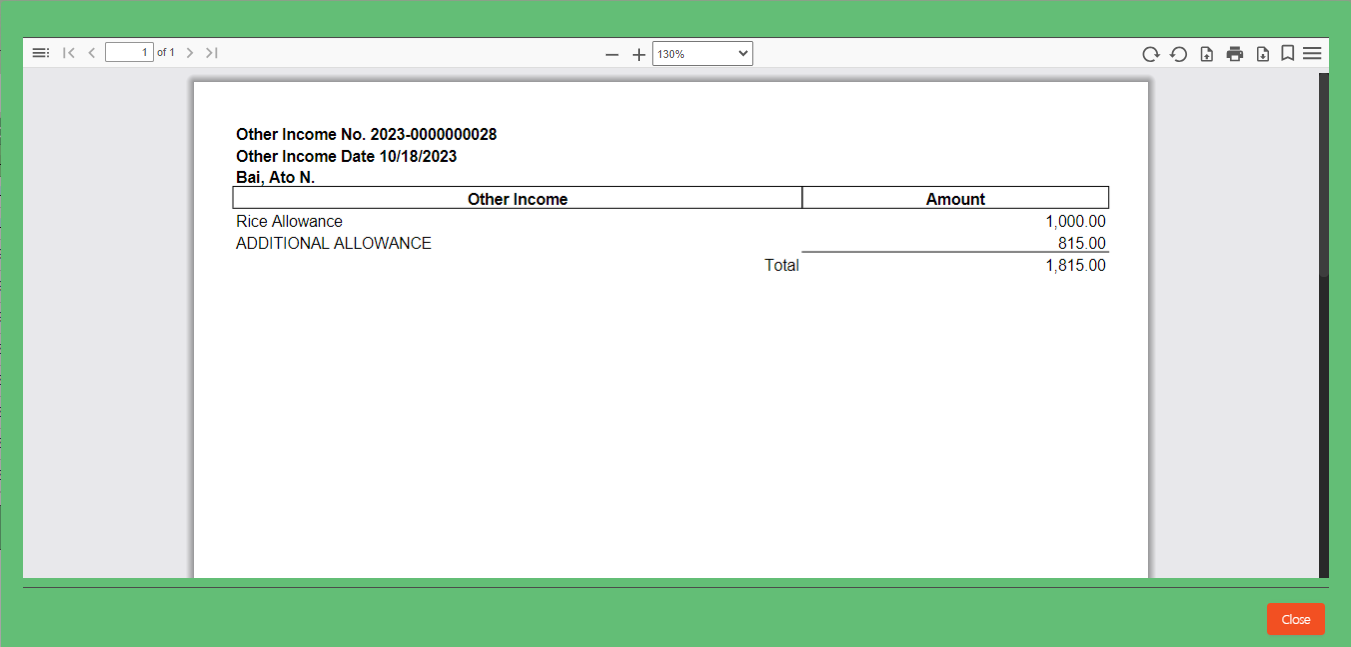
Other Income Payslip
In the Other Income Payslip tab the employee can view Other Income Payslip if the employee has another income.
Select Year
Assumption: The employee already clicked the View button on the left side in the Other Income Payslip table.
View Other Income Payslip
Can Download PDF file
Can Print
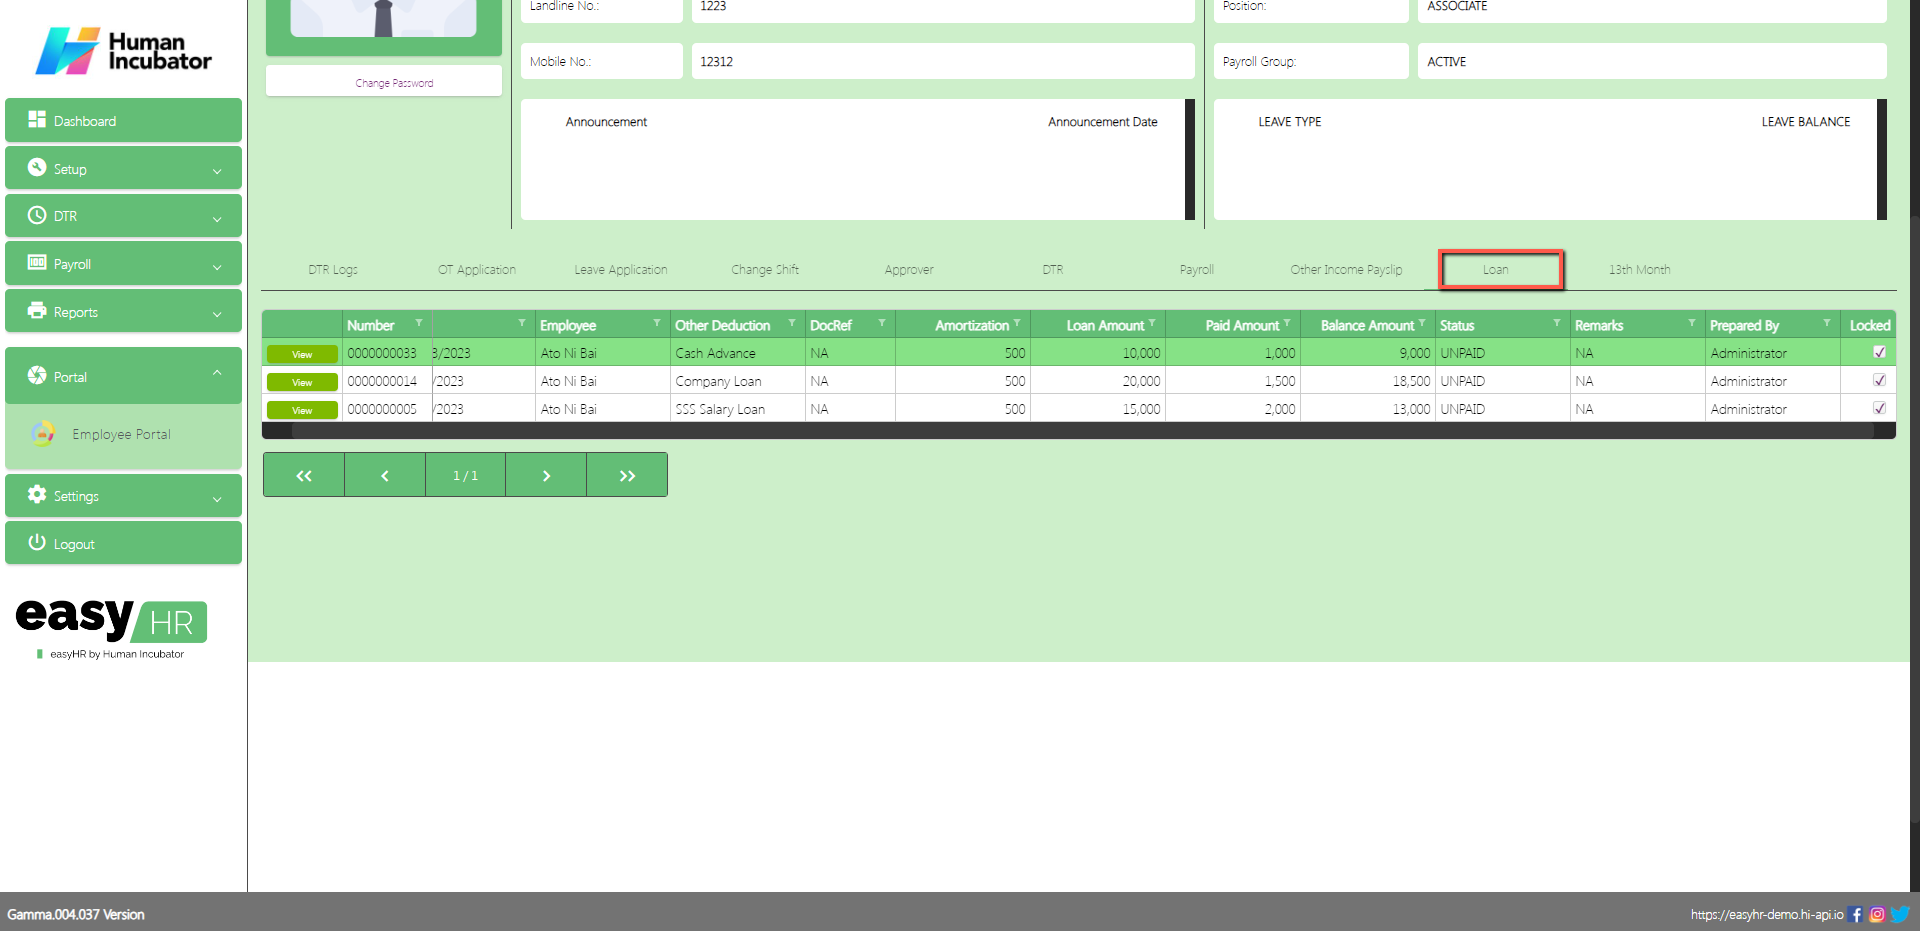
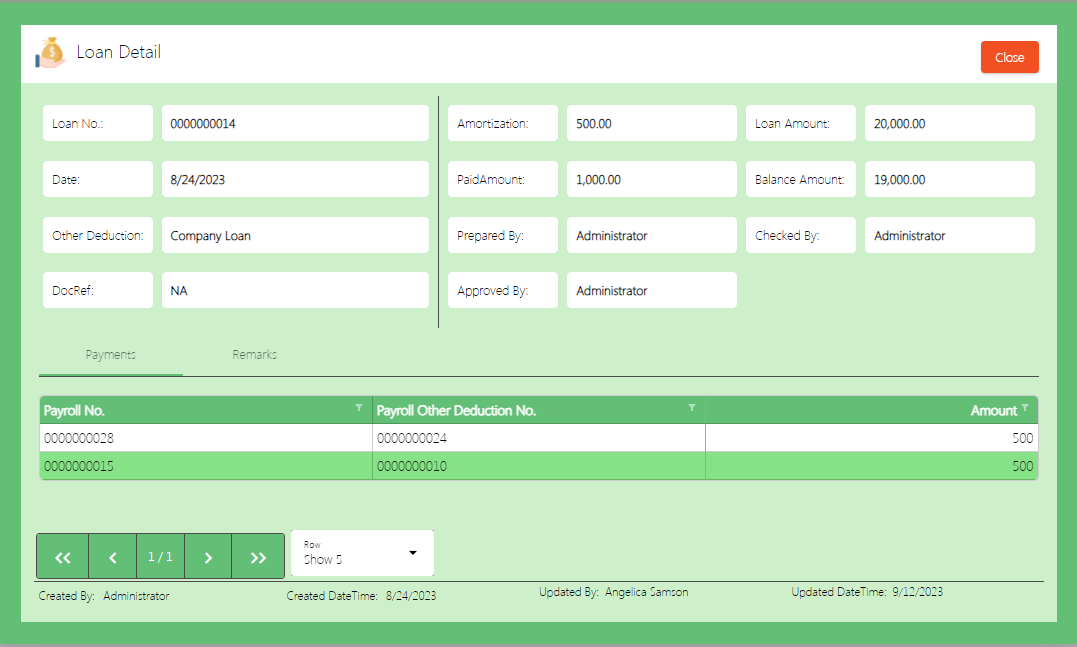
Loan
In the Loan tab the employee can view loan details.
Assumption: The employee already clicked the View button on the left side in the Loan table.
View Loan Detail
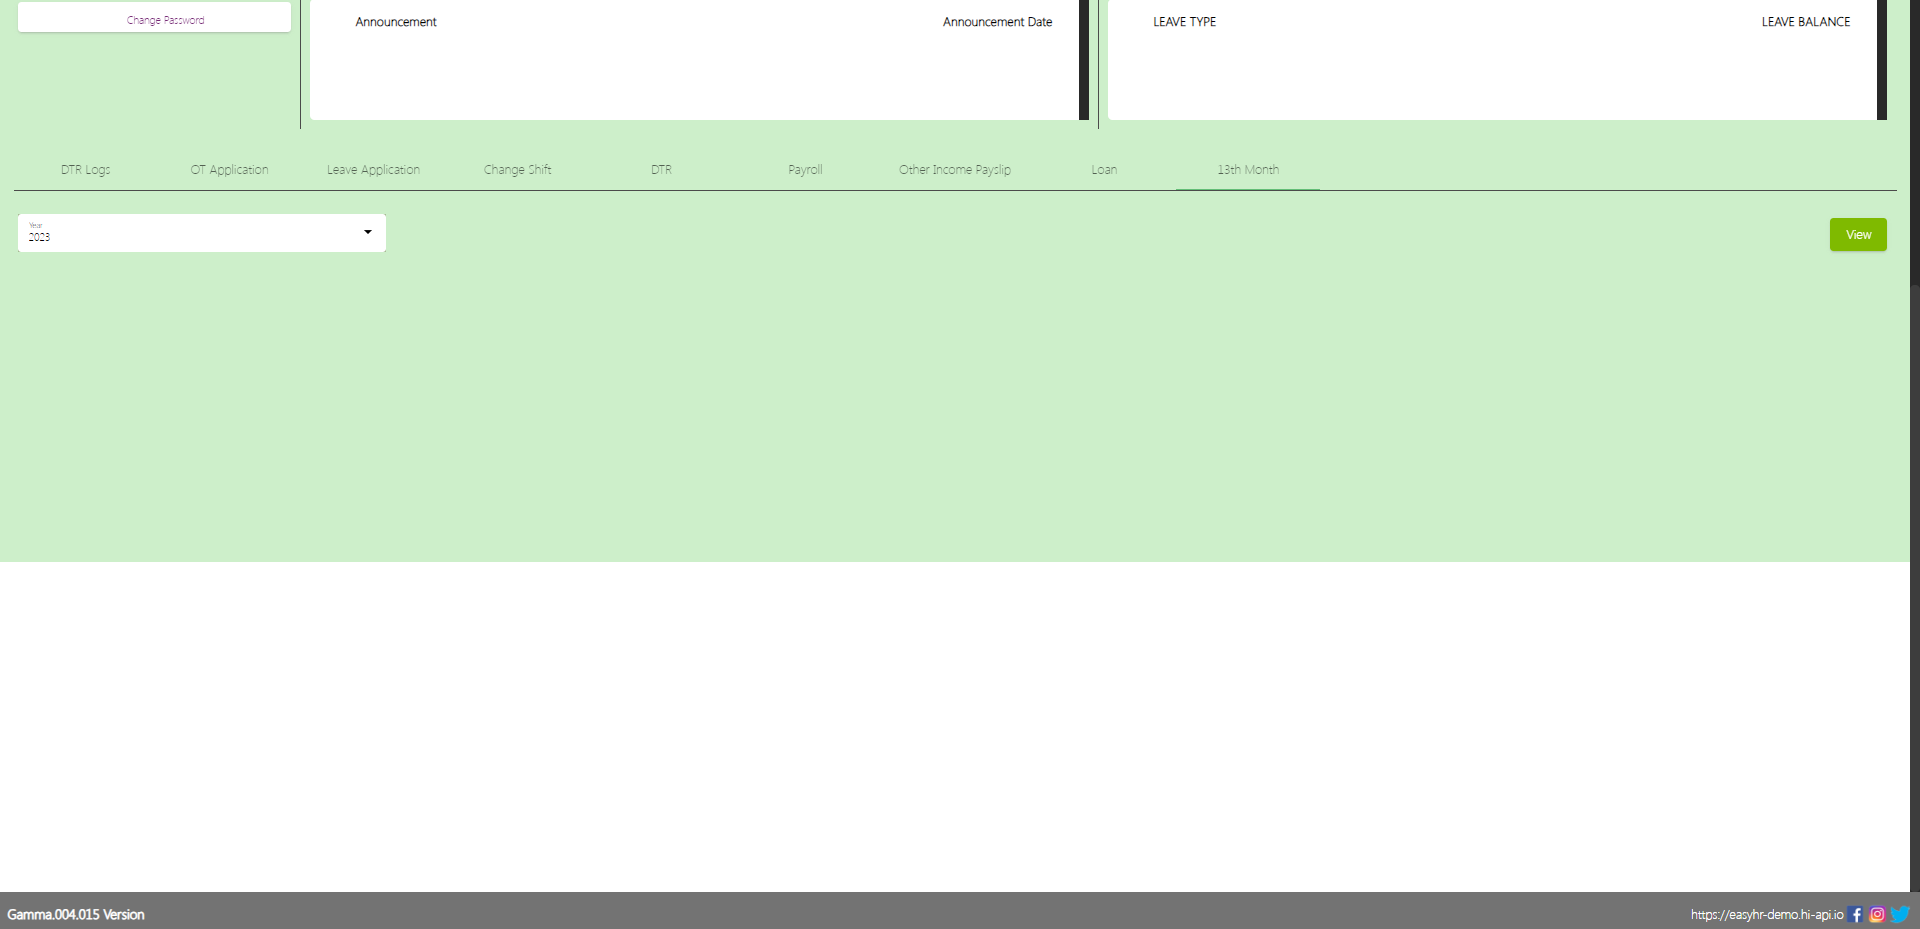
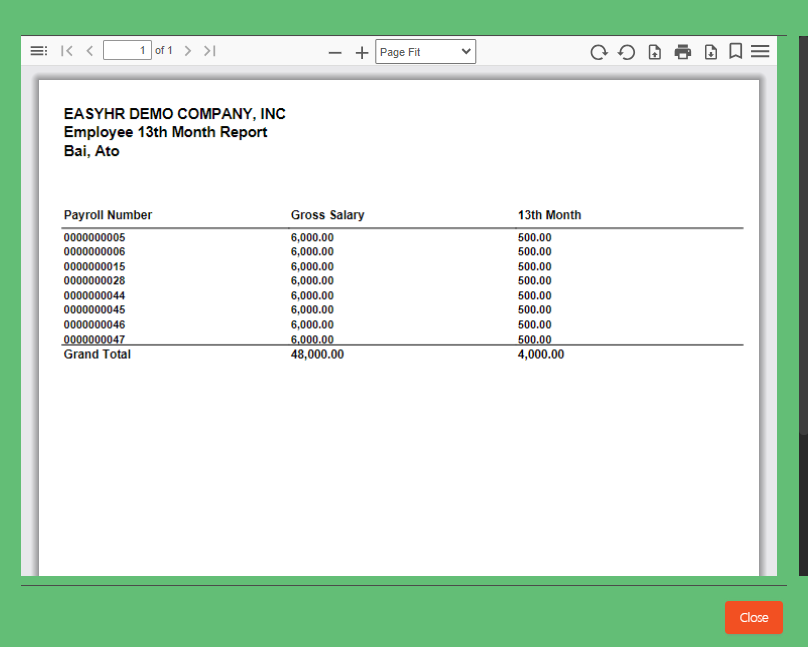
13th Month
In the 13th Month tab the employee can view the 13th month.
Assumption: The employee already clicked the View button on the right side in the 13th month.
Struggling to accept online payments? Discover how HII Online Payment Service solves your credit card merchant dilemma. HII Online Payment Service. Coming soon!
Struggling to accept online payments? Discover how HII Online Payment Service solves your credit card merchant dilemma. HII Online Payment Service. Coming soon!
Take advantage of Free easyFS Usage for Accounting Firms in the Philippines. Contact Us at +639176280355 or email at hiisales@humedit.ph
Take advantage of Free easyFS Usage for Accounting Firms in the Philippines. Contact Us at +639176280355 or email at hiisales@humedit.ph
Struggling to accept online payments? Discover how HII Online Payment Service solves your credit card merchant dilemma. HII Online Payment Service. Coming soon!
Struggling to accept online payments? Discover how HII Online Payment Service solves your credit card merchant dilemma. HII Online Payment Service. Coming soon!
Take advantage of Free easyFS Usage for Accounting Firms in the Philippines. Contact Us at +639176280355 or email at hiisales@humedit.ph
Take advantage of Free easyFS Usage for Accounting Firms in the Philippines. Contact Us at +639176280355 or email at hiisales@humedit.ph
Struggling to accept online payments? Discover how HII Online Payment Service solves your credit card merchant dilemma. HII Online Payment Service. Coming soon!
Struggling to accept online payments? Discover how HII Online Payment Service solves your credit card merchant dilemma. HII Online Payment Service. Coming soon!
Take advantage of Free easyFS Usage for Accounting Firms in the Philippines. Contact Us at +639176280355 or email at hiisales@humedit.ph
Take advantage of Free easyFS Usage for Accounting Firms in the Philippines. Contact Us at +639176280355 or email at hiisales@humedit.ph
Struggling to accept online payments? Discover how HII Online Payment Service solves your credit card merchant dilemma. HII Online Payment Service. Coming soon!
Struggling to accept online payments? Discover how HII Online Payment Service solves your credit card merchant dilemma. HII Online Payment Service. Coming soon!
Take advantage of Free easyFS Usage for Accounting Firms in the Philippines. Contact Us at +639176280355 or email at hiisales@humedit.ph
Take advantage of Free easyFS Usage for Accounting Firms in the Philippines. Contact Us at +639176280355 or email at hiisales@humedit.ph
Struggling to accept online payments? Discover how HII Online Payment Service solves your credit card merchant dilemma. HII Online Payment Service. Coming soon!
Struggling to accept online payments? Discover how HII Online Payment Service solves your credit card merchant dilemma. HII Online Payment Service. Coming soon!
Take advantage of Free easyFS Usage for Accounting Firms in the Philippines. Contact Us at +639176280355 or email at hiisales@humedit.ph
Take advantage of Free easyFS Usage for Accounting Firms in the Philippines. Contact Us at +639176280355 or email at hiisales@humedit.ph
Struggling to accept online payments? Discover how HII Online Payment Service solves your credit card merchant dilemma. HII Online Payment Service. Coming soon!
Struggling to accept online payments? Discover how HII Online Payment Service solves your credit card merchant dilemma. HII Online Payment Service. Coming soon!
Take advantage of Free easyFS Usage for Accounting Firms in the Philippines. Contact Us at +639176280355 or email at hiisales@humedit.ph
Take advantage of Free easyFS Usage for Accounting Firms in the Philippines. Contact Us at +639176280355 or email at hiisales@humedit.ph
Struggling to accept online payments? Discover how HII Online Payment Service solves your credit card merchant dilemma. HII Online Payment Service. Coming soon!
Struggling to accept online payments? Discover how HII Online Payment Service solves your credit card merchant dilemma. HII Online Payment Service. Coming soon!
Take advantage of Free easyFS Usage for Accounting Firms in the Philippines. Contact Us at +639176280355 or email at hiisales@humedit.ph
Take advantage of Free easyFS Usage for Accounting Firms in the Philippines. Contact Us at +639176280355 or email at hiisales@humedit.ph
Struggling to accept online payments? Discover how HII Online Payment Service solves your credit card merchant dilemma. HII Online Payment Service. Coming soon!
Struggling to accept online payments? Discover how HII Online Payment Service solves your credit card merchant dilemma. HII Online Payment Service. Coming soon!

 Log in to Messenger