Employee is used for add Employee, Employee detail, Payroll, Shift Schedule, Payroll Group
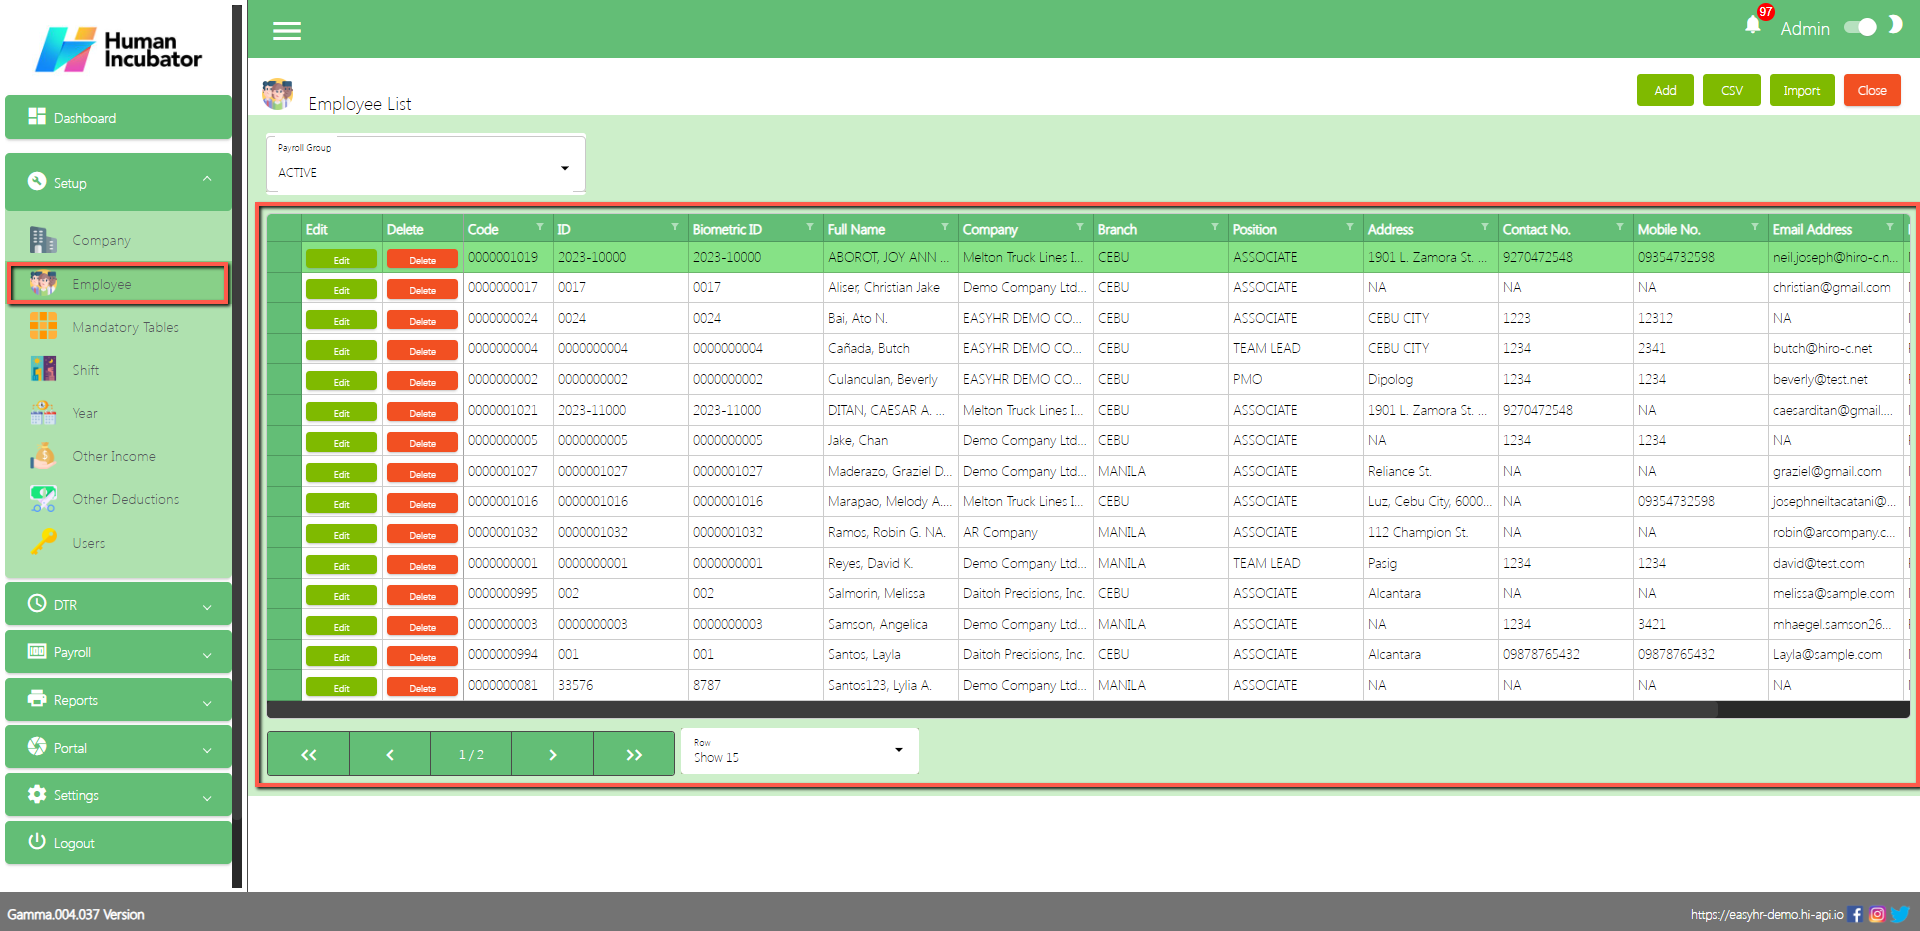
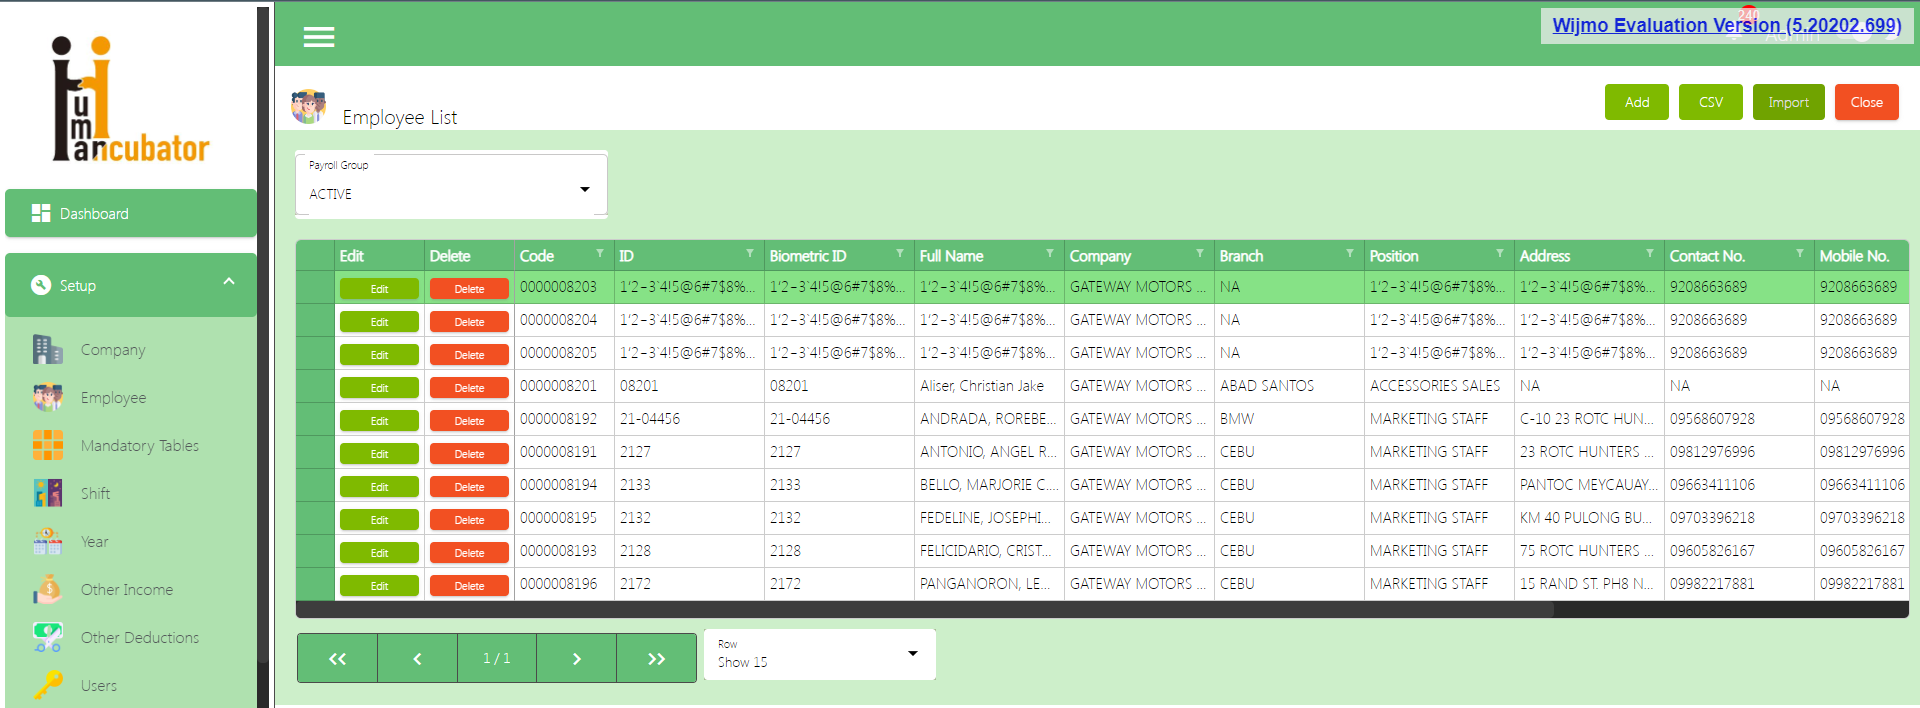
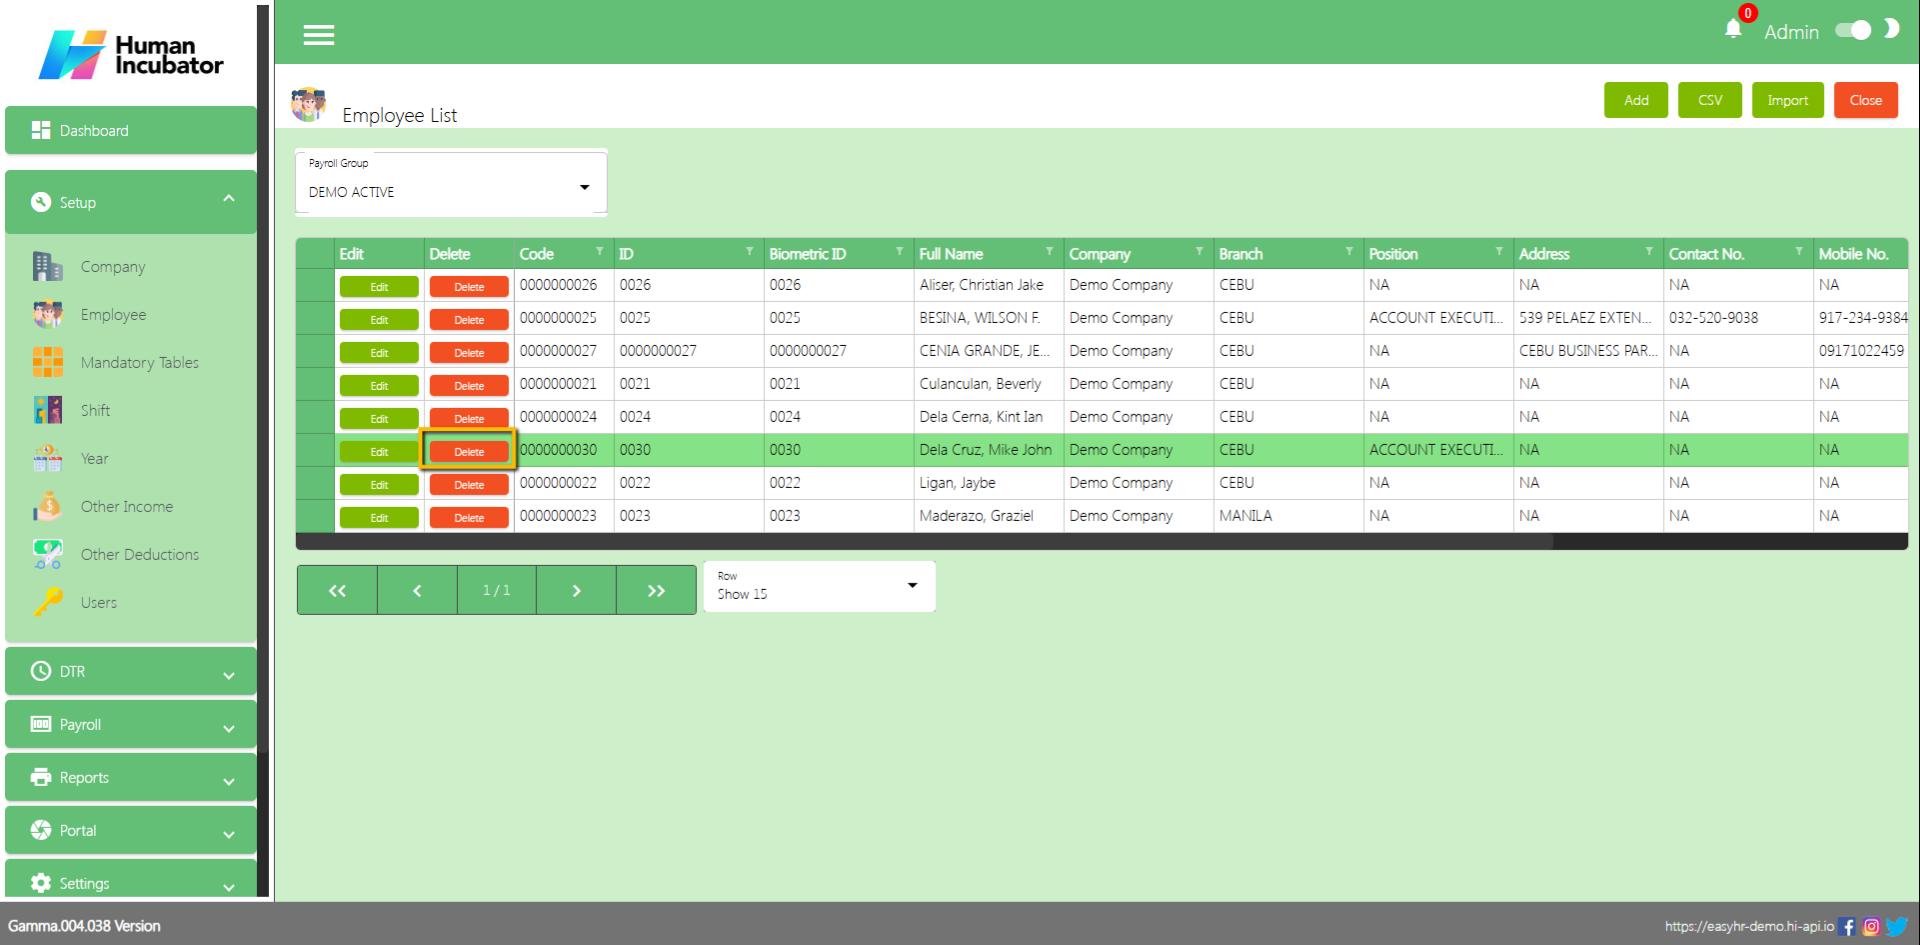
Employee List
Shows all the list of the employee
Employee List Column
Edit: This is a button that has the function to edit the company
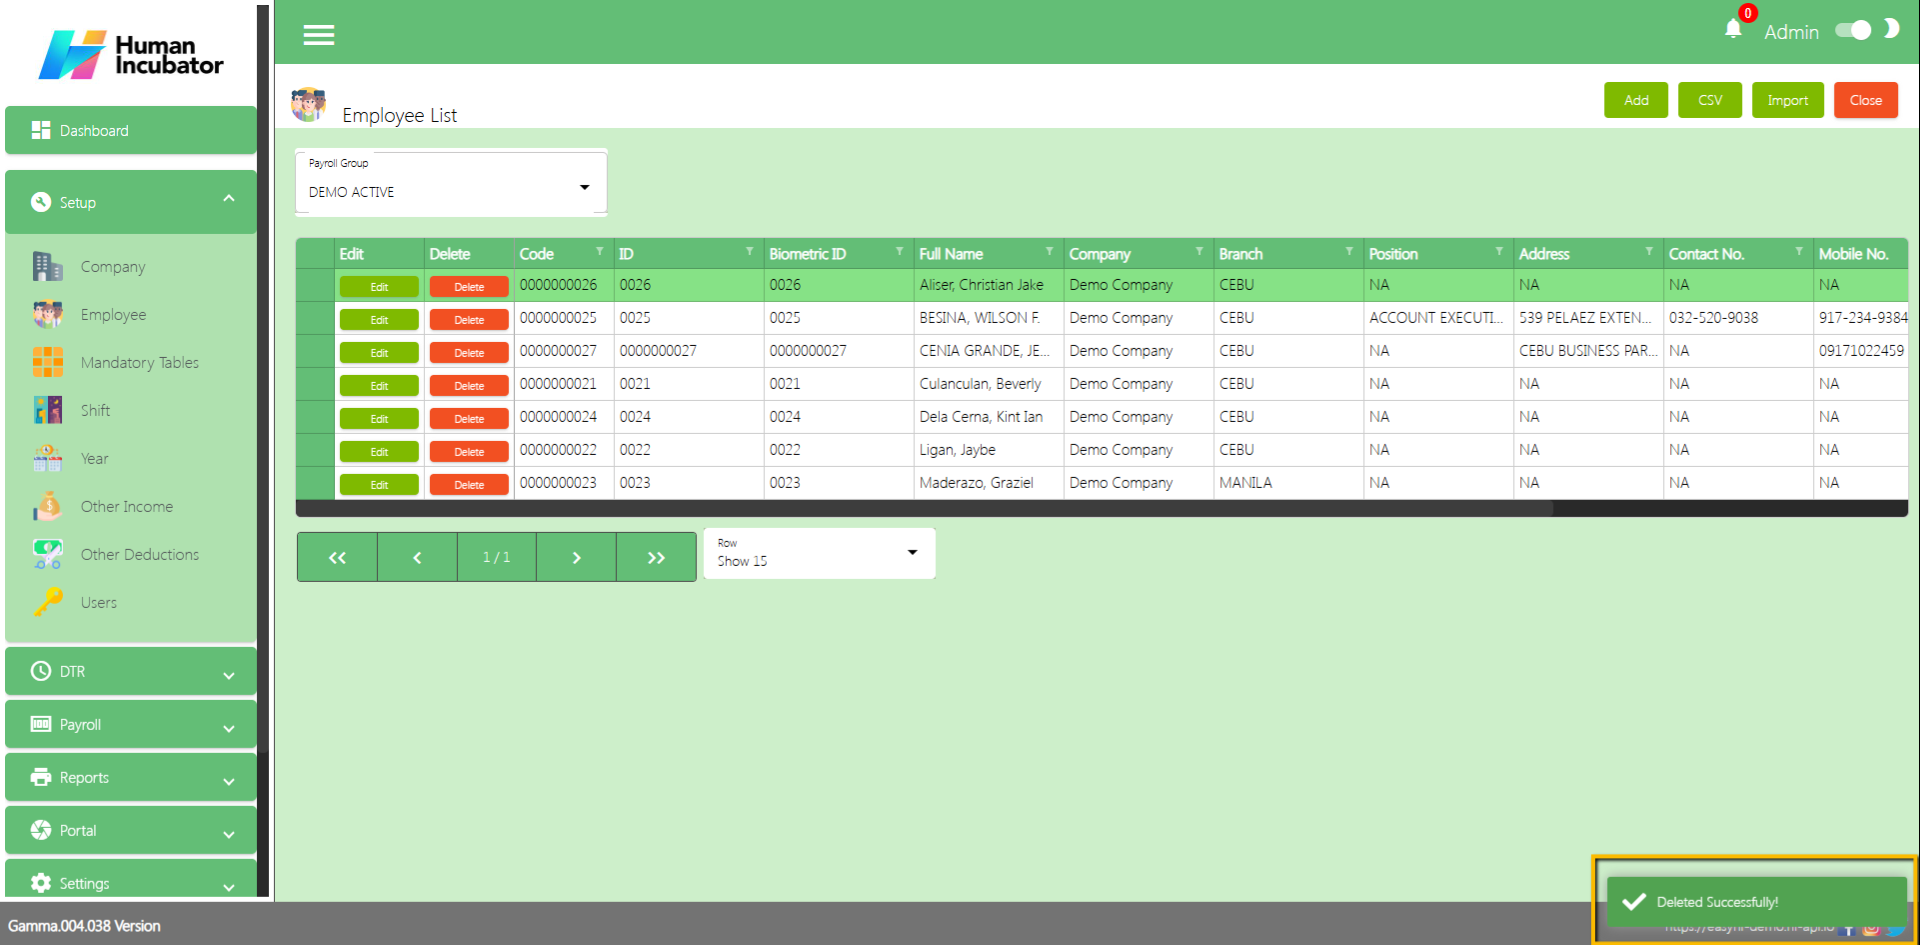
Delete: This is a button that has the function to Delete the Employee (Note: You cannot delete the Employee once it already has a transaction data)
Code: This will automatically generate according to the sequence of the added Employee
ID: This is for the Employee ID
Biometric ID: This is for the Employee Biometric ID if the Company is using a Biometric Device for their Employee’s logs
Full Name: This is for the Employees Fullname
Company: This is for the Employees Company
Branch: This is for the Employees Branch
Position: This is for the Employees Position
Address: This is for the Employees Address
Contact No.: This is for the Employees Contact No.
Mobile No.: This is for the Employees Mobile No.
Email Address: This is for the Employee’s Email Address
Remarks: You can put any Remarks for this Employee
Locked: If the Checkbox is checked then it is locked but if uncheck then it is unlocked. (Note: If the Employee is unlocked it will not show in the other module)
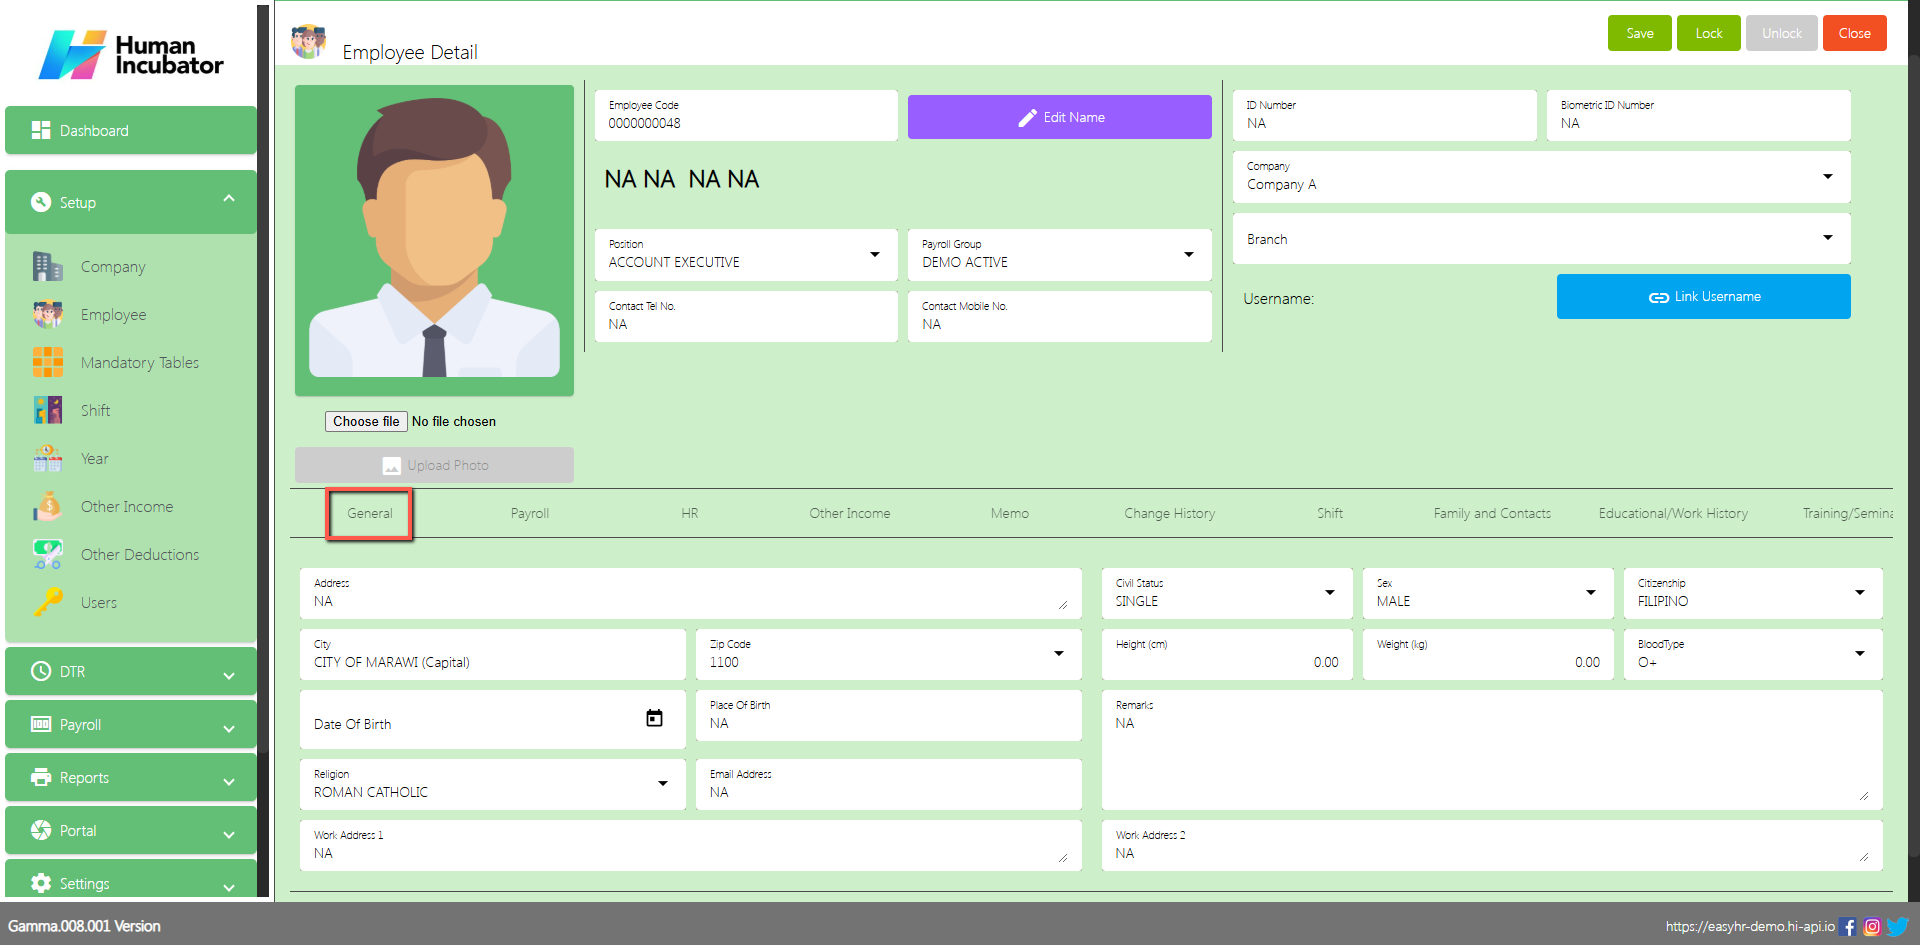
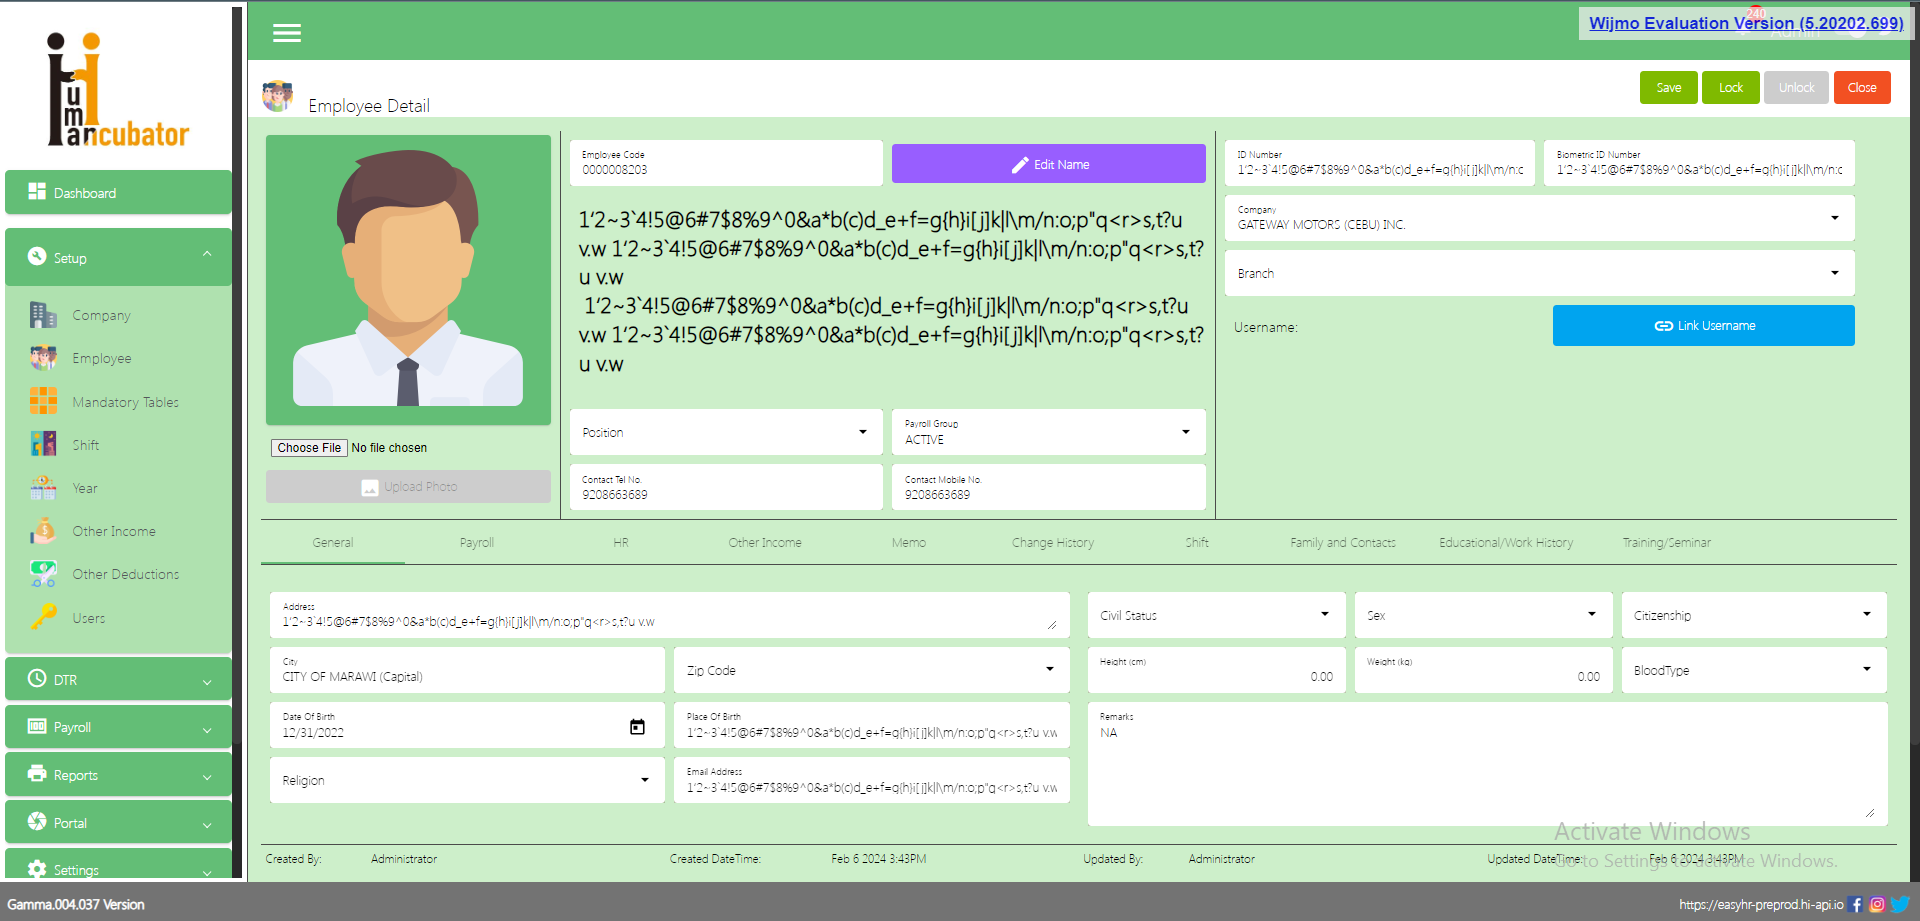
Employee Detail
Assumption: The user already clicked the Add button that can be seen on the Employee List.
Fill all the important fields for Employee Detail like:
Click Edit Name button to fill up the Last name, First name, Middle name, Extension name
ID number
Biometric number
Select Company
Select Branch
Upload Photo
Select Position
Select Payroll Group
Contact Tel No.
Contact Mobile No.
General
Address
Select City
Select Date of Birth
Select Religion
Select Zip Code
Place of Birth
Email Address
Select Civil Status
Select Sex
Select Citizenship
Height
Weight
Blood Type
Employee 201 Geotagging & Official Business Feature
After the superadmin is done for the geolocation setup in the Company settings and Company detail
In the Employee 201 you will need to setup for the address of the employee in the General tab and input the employees address on the Address field and the work address in the Work Address 1 or Work Address 2
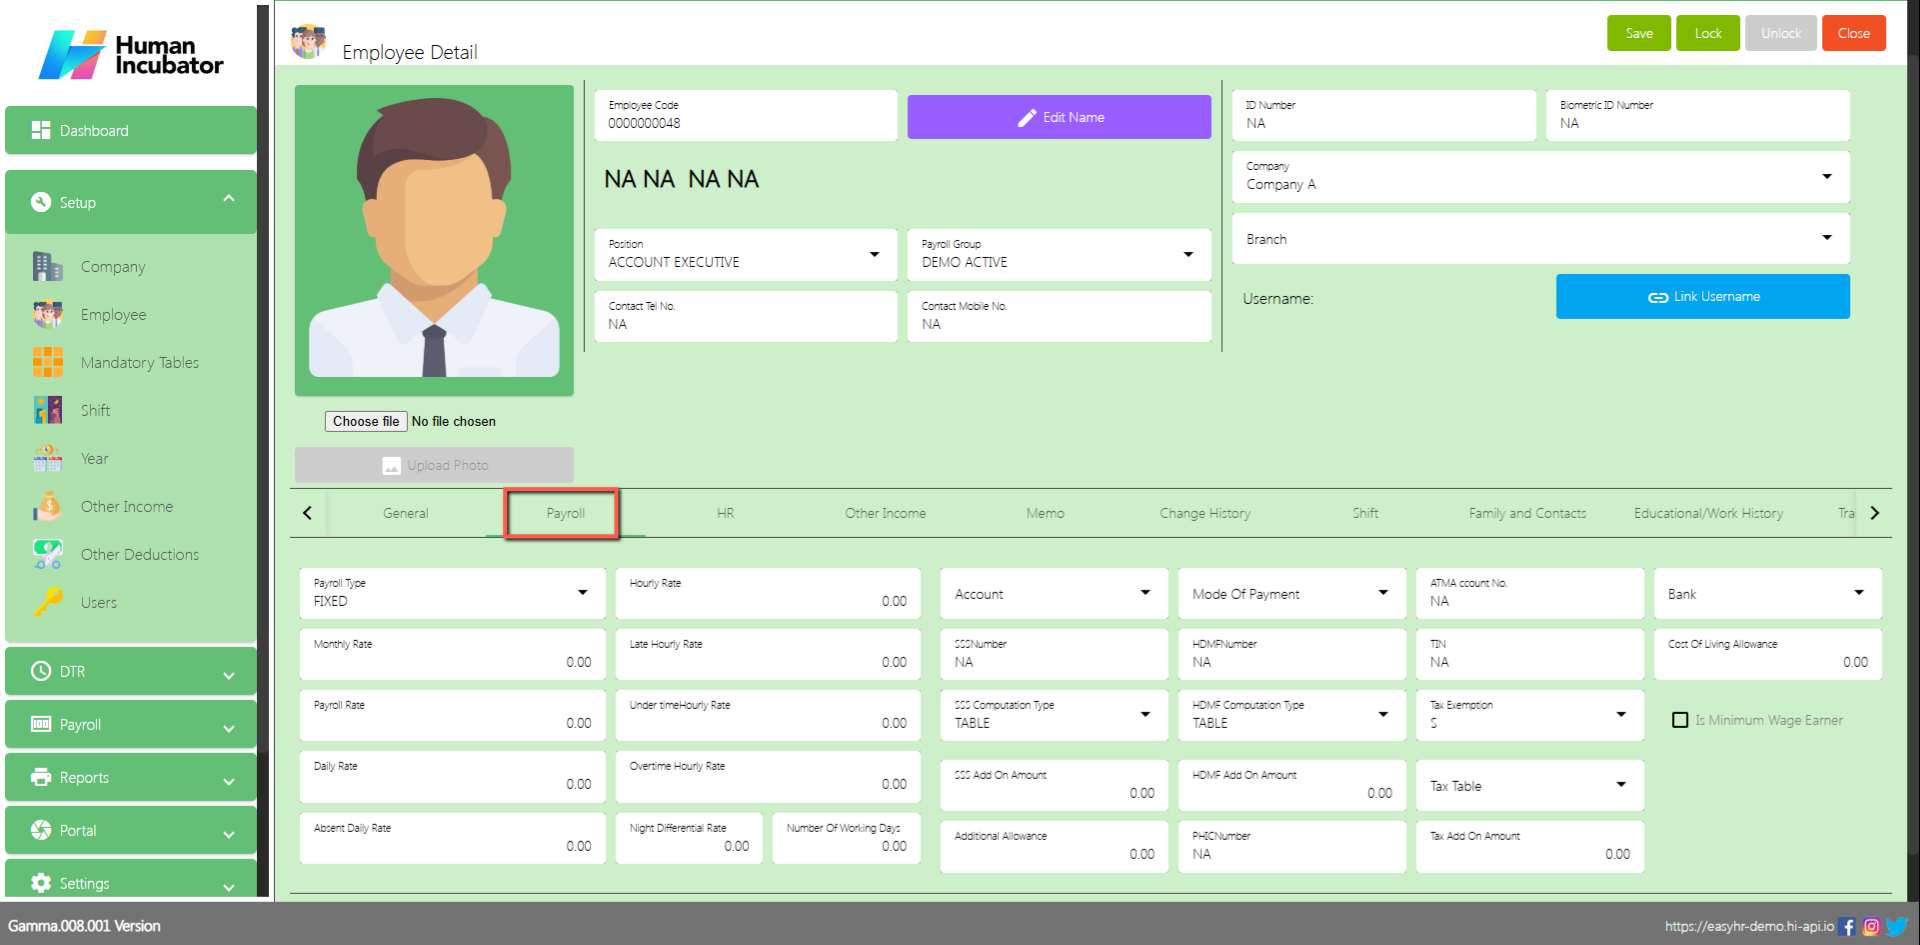
Payroll
In Payroll tab the user can input monthly rate and mandatory account of employee
Select and Fill all the important fields for Employee Detail like:
Select Payroll Type
Monthly Rate
Number of Working Days
Input SSS Number
Input HDMF Number
Input PHIC Number
Input TIN
Tax Exemption
Select SSS Computation Table
Select HDMF Computation Table
Tax Table
Select Mode of Payment
Input Additional Allowance if Necessary
Input ATM Account Number
Select Bank
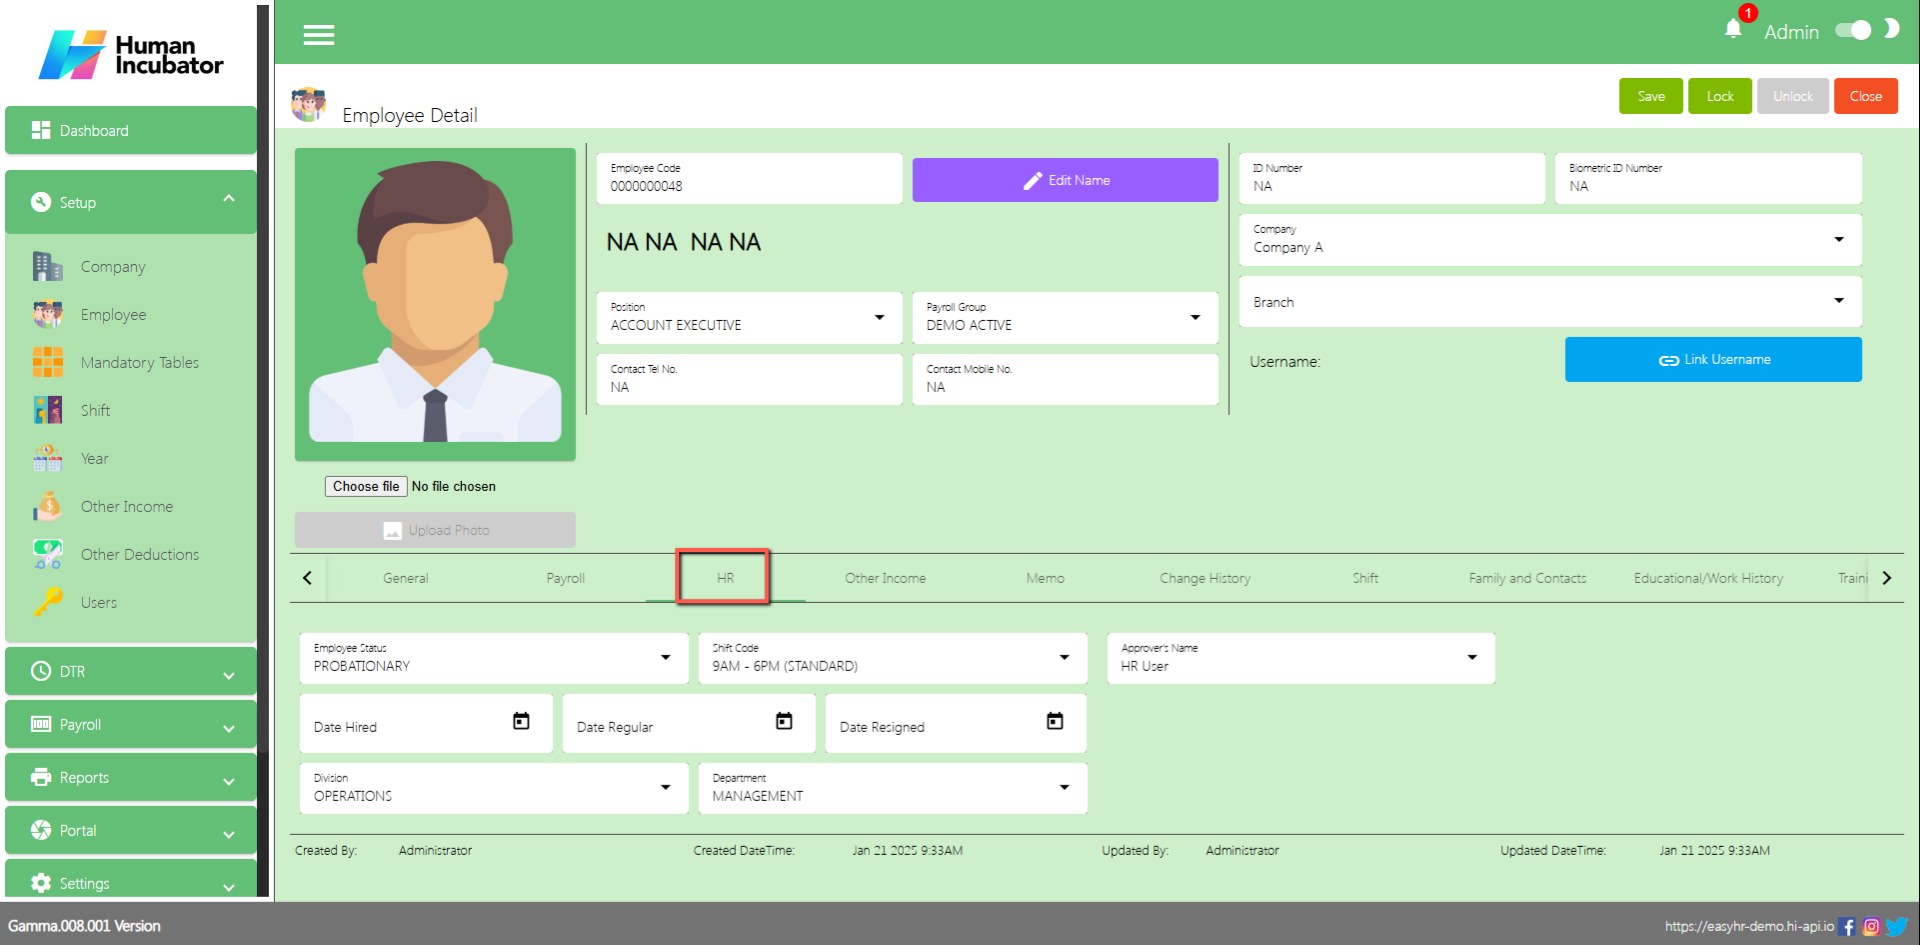
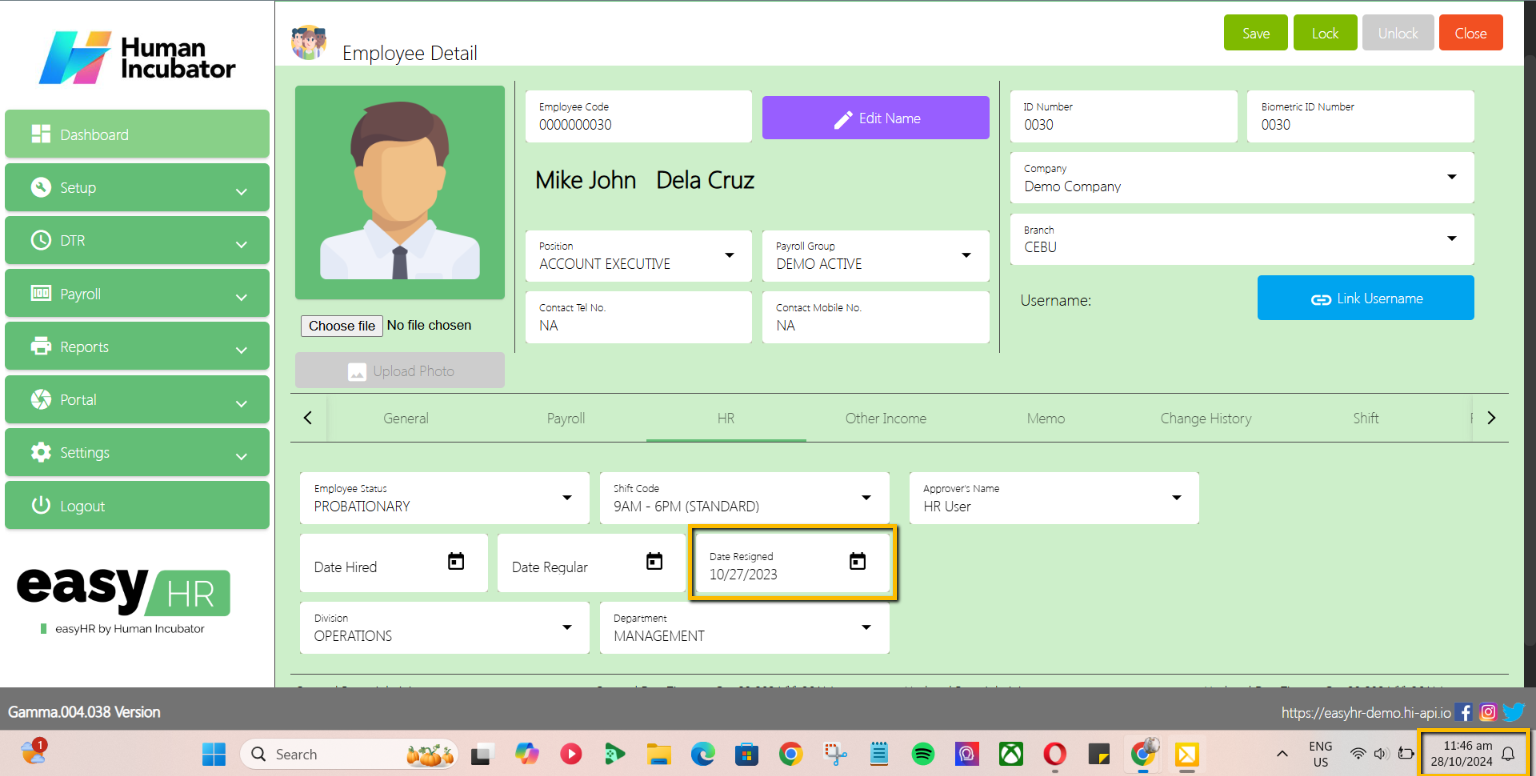
HR
In the HR tab the user can select the status of the employee and also the Date hired.
Select the important fields like:
Employee Status
Shift Code
Date Hired
Date Regular
Division
Department
Approver’s Name
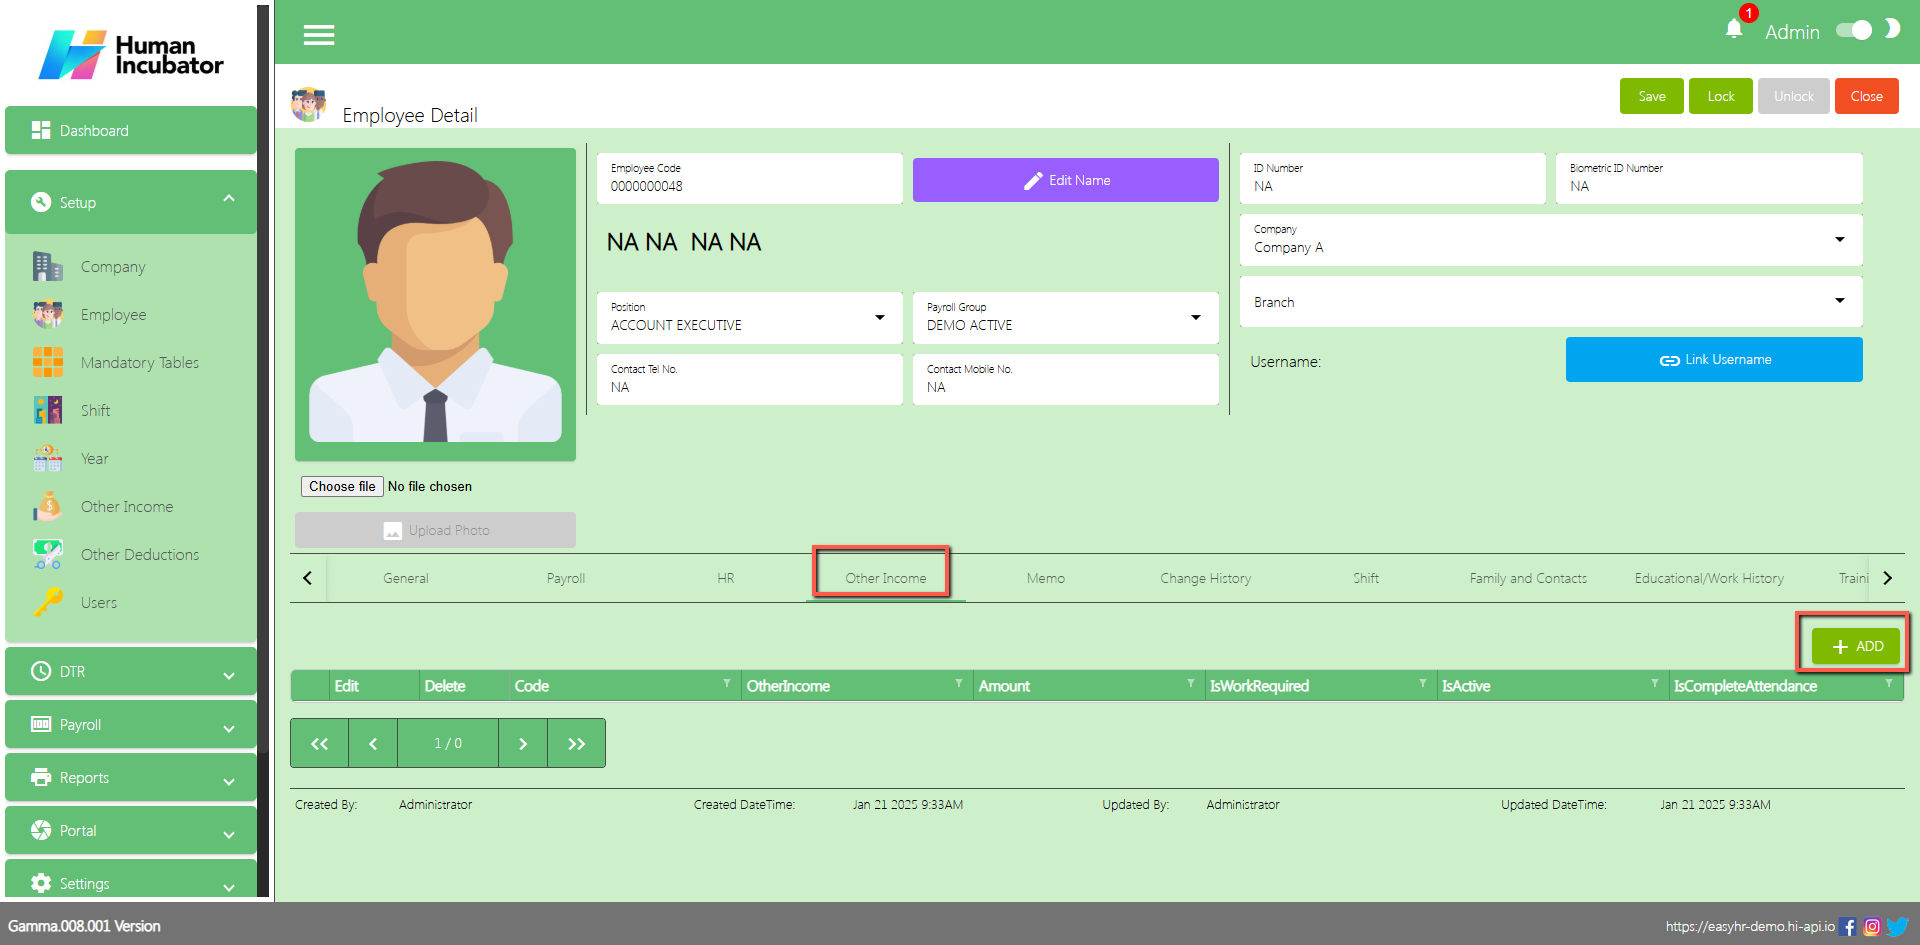
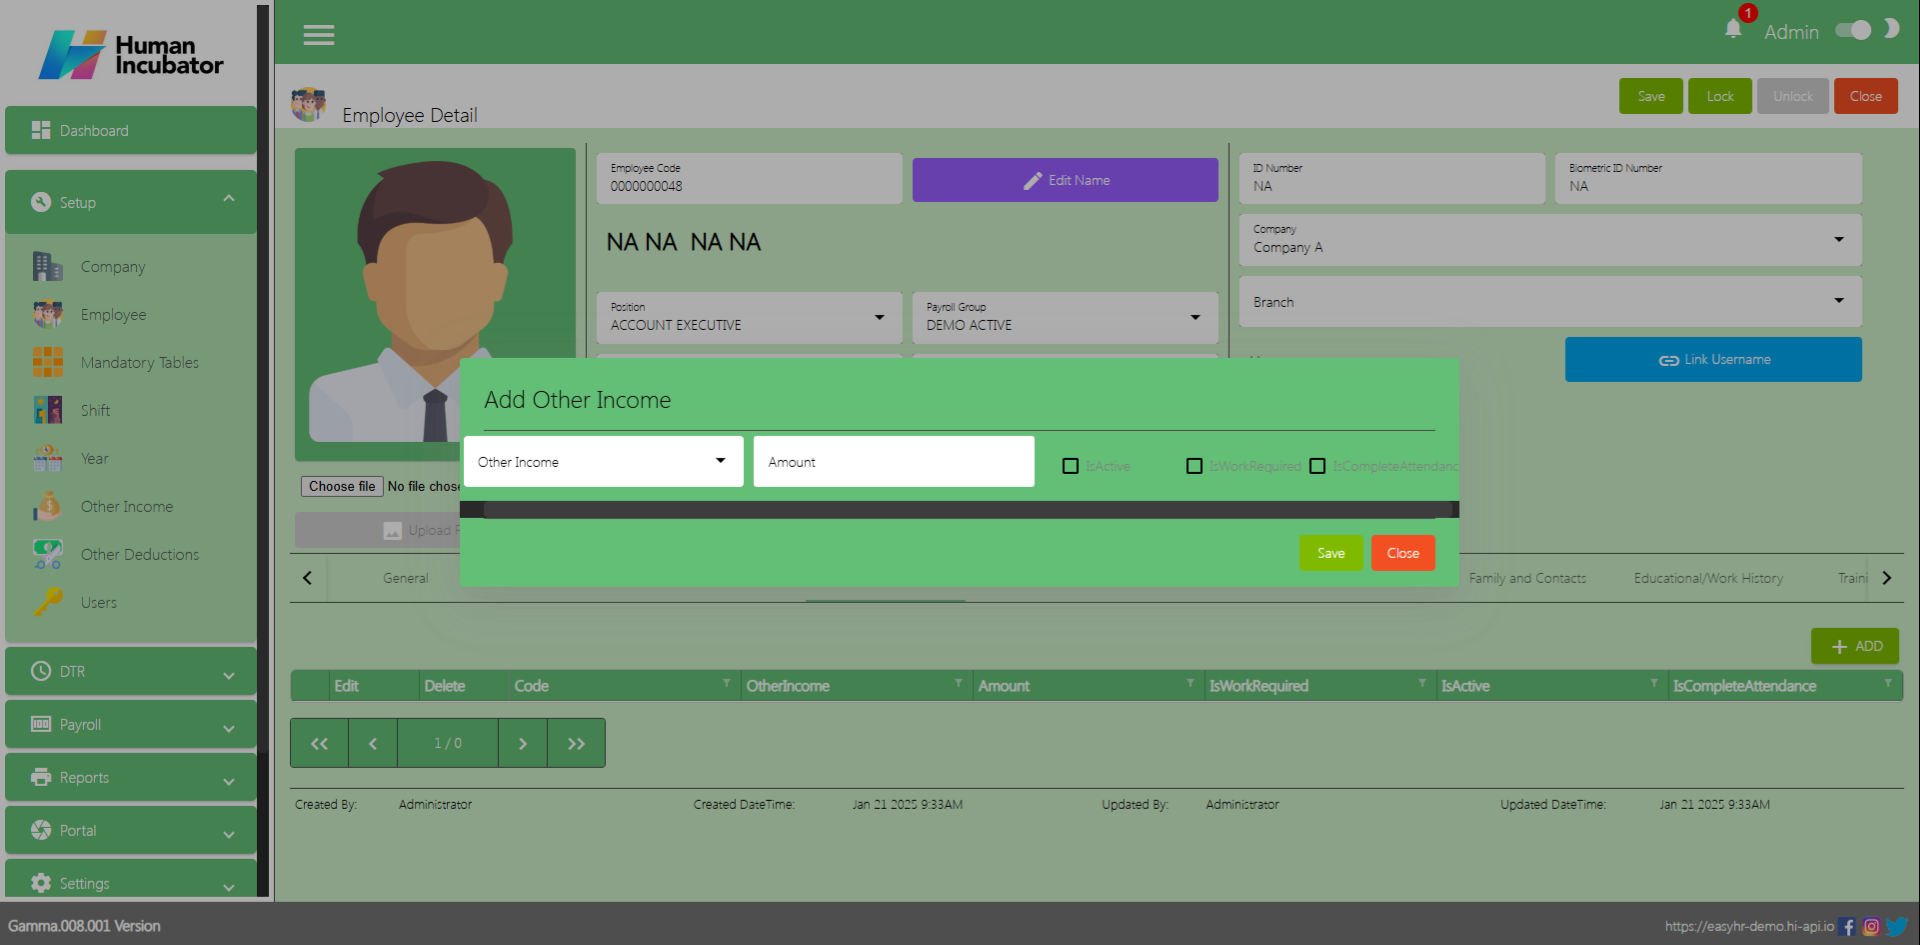
Other Income
In Other Income tab the use can add the other income of the employee
Click the Add button
Select other Income
Input Amount
Check the box IsActive, IsWorkRequired
Click Save button to add in Other Income table
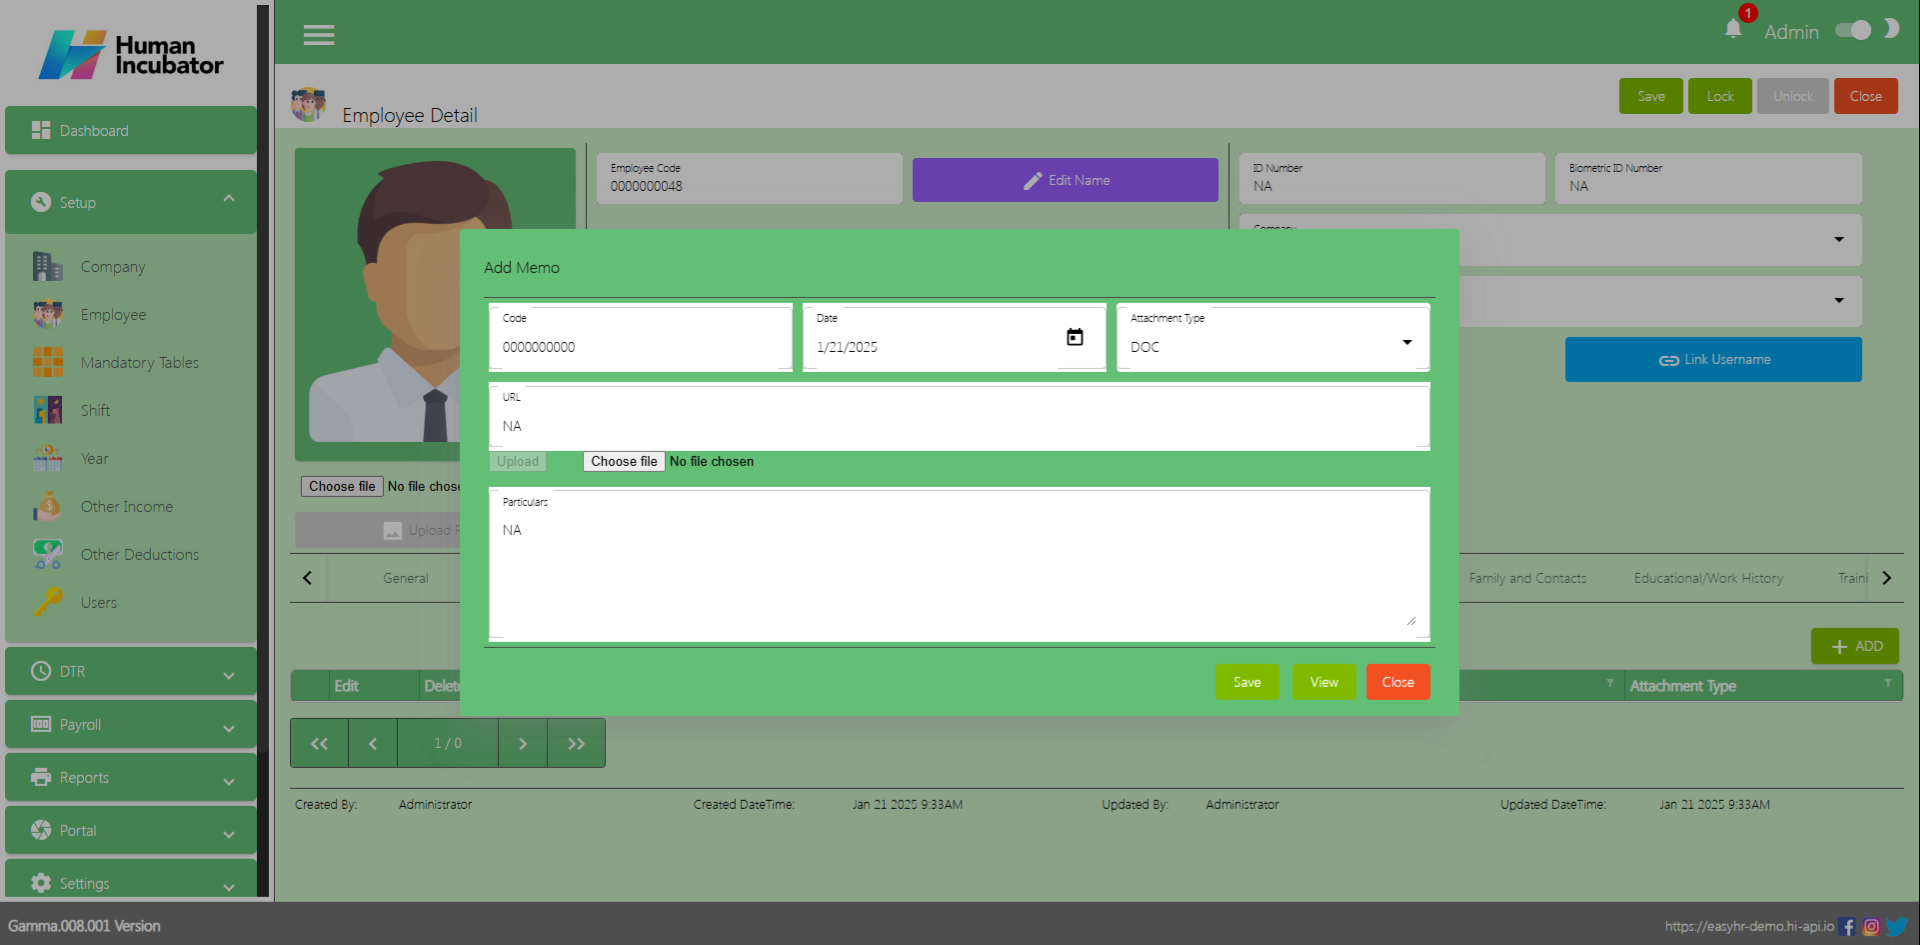
Memo
In Memo tab the user can Add the file for employee
Click Add button
Select Date
Select Attachment Type and Choose file
Input Particulars if Necessary
Can click View button
Click Save button to Add in Memo table
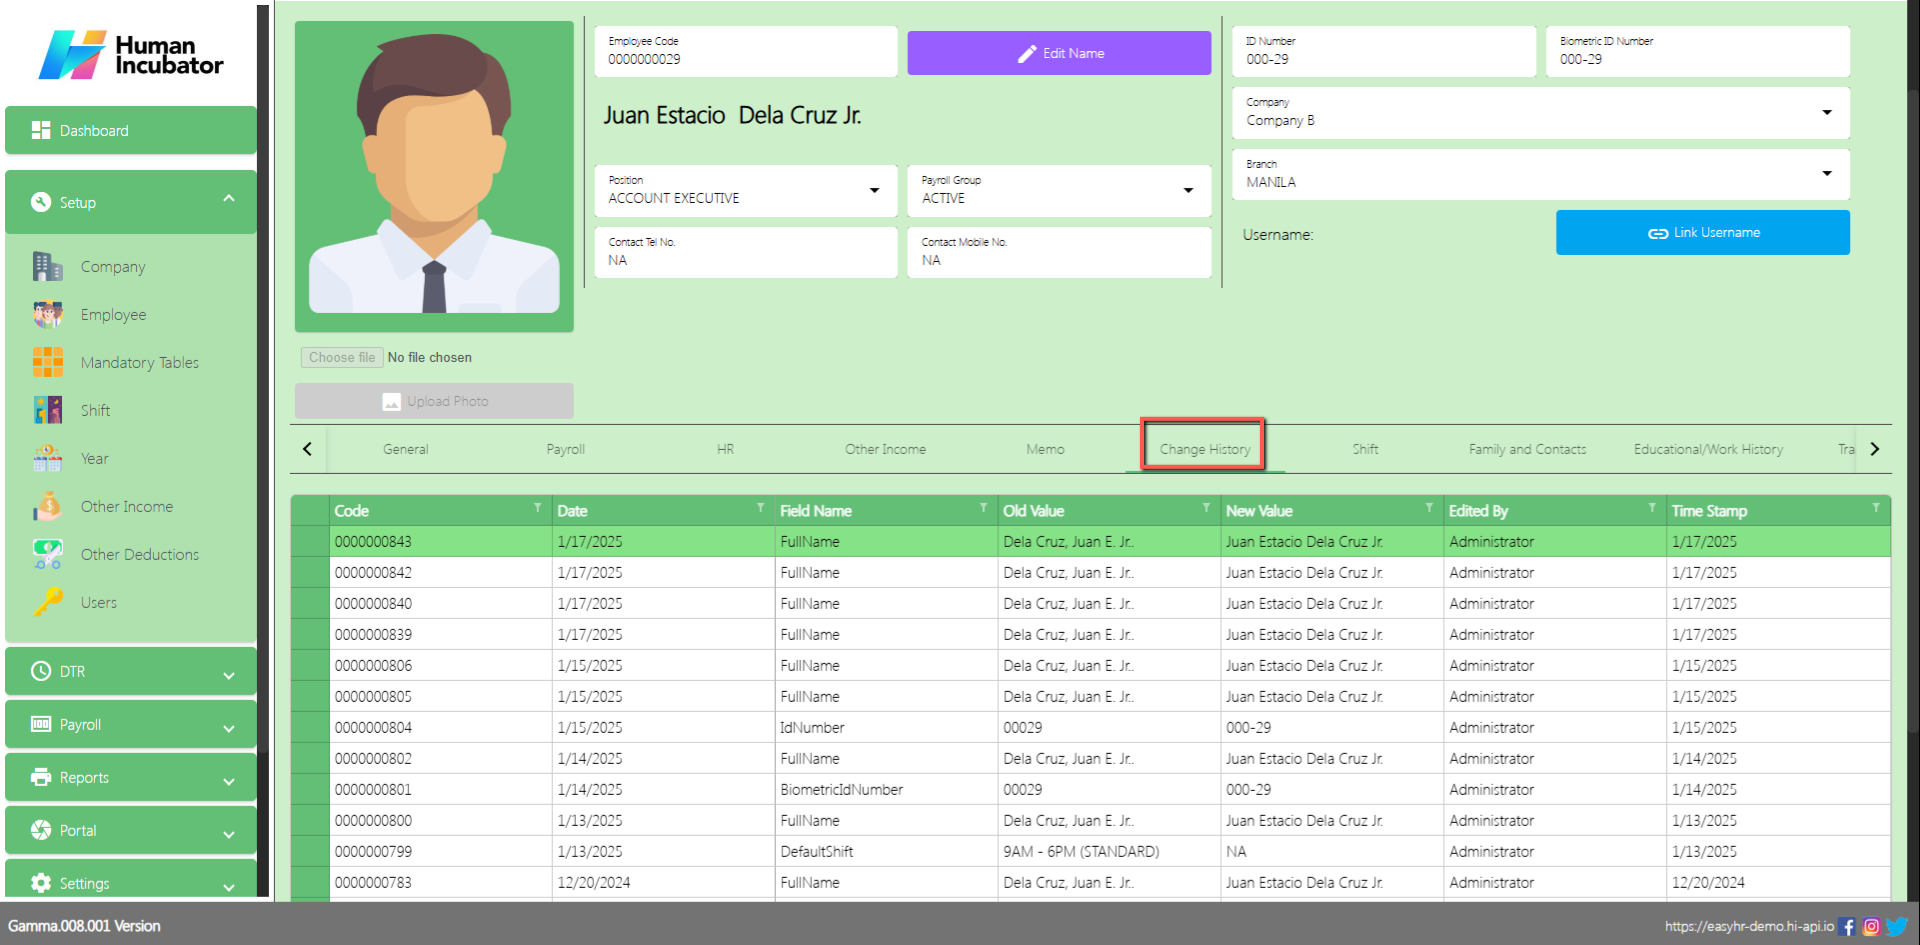
Change History
In the Change History tab the user can identify what are those changes in employee 201 or employee detail.
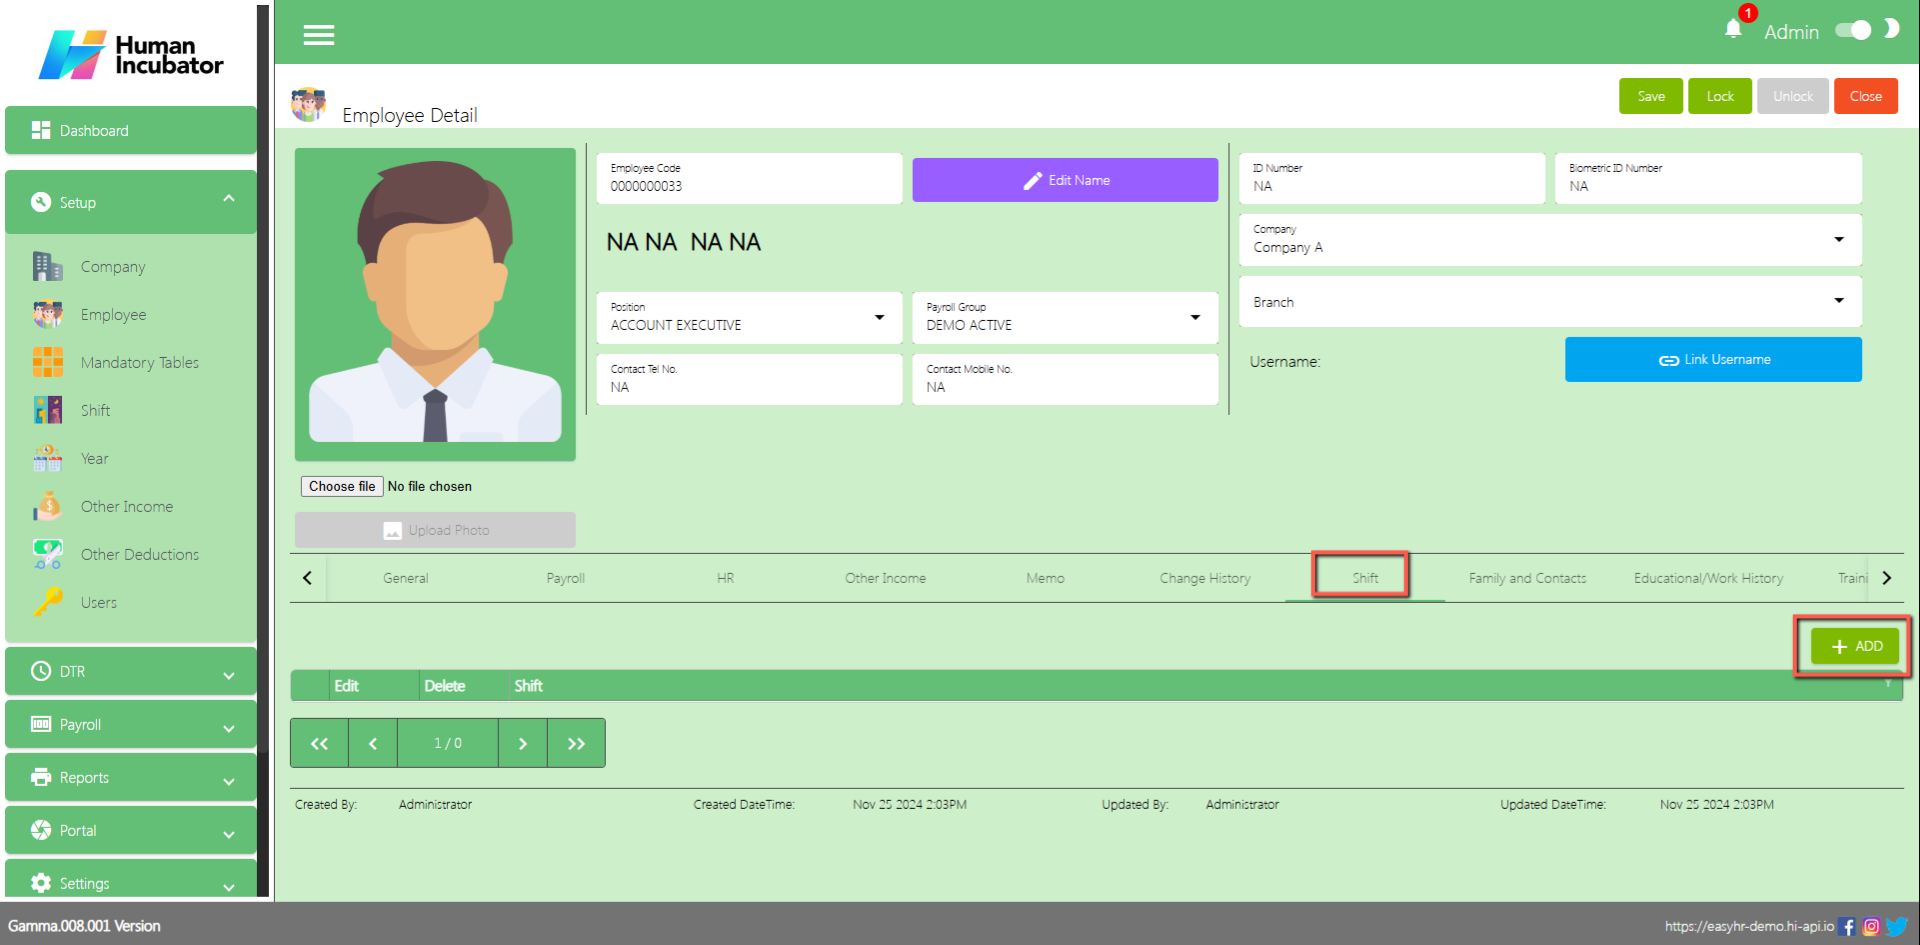
Shift
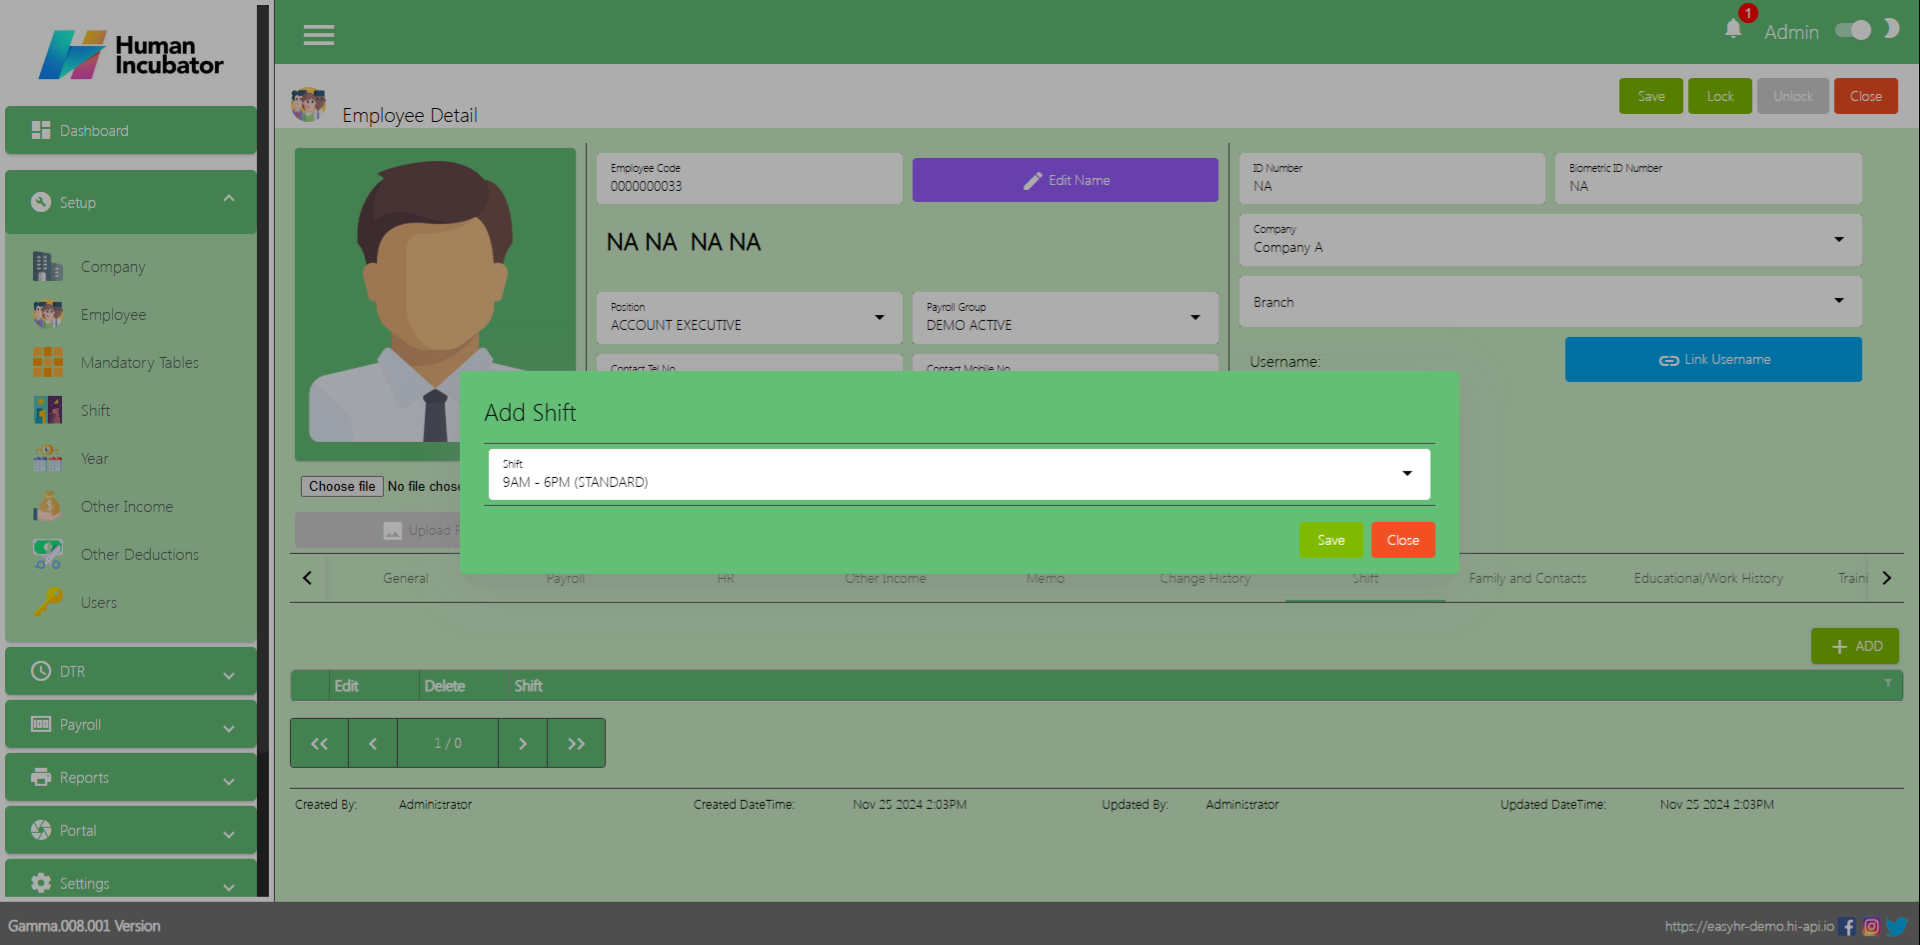
In Shift tab the user can Add other shift of employee
Click Add button
Select Shift
Click Save button to add in Shift table
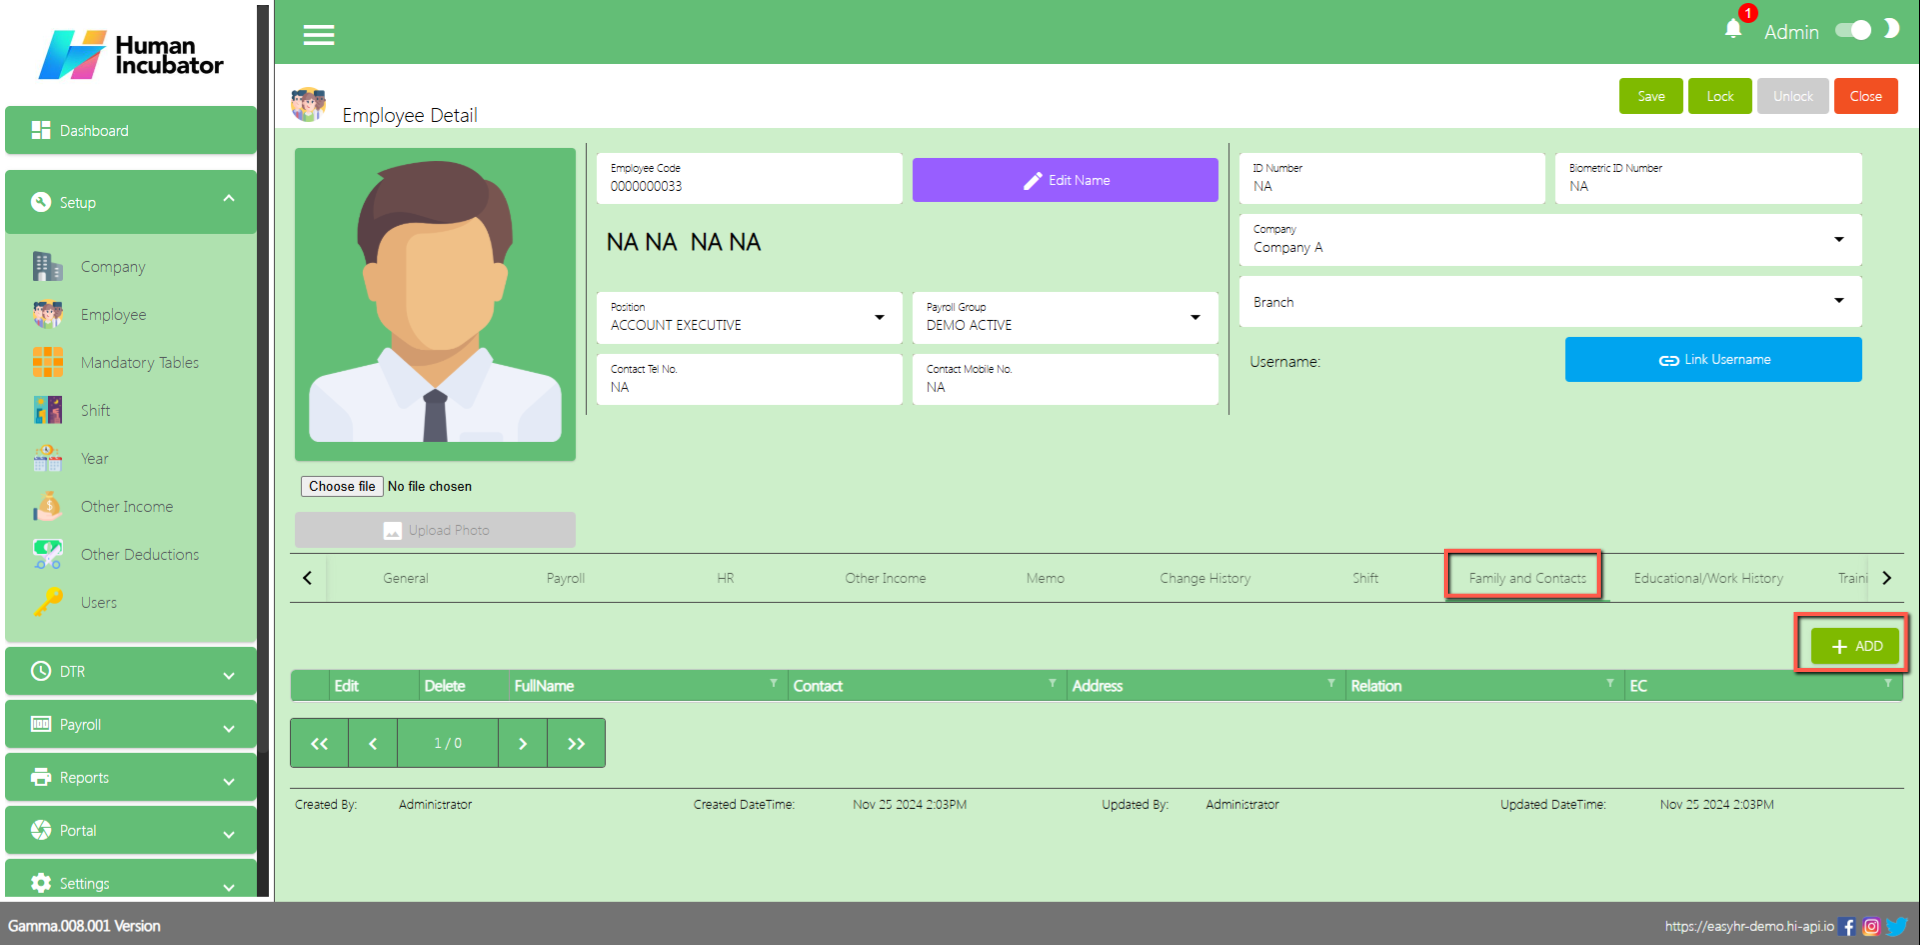
Family and Contacts
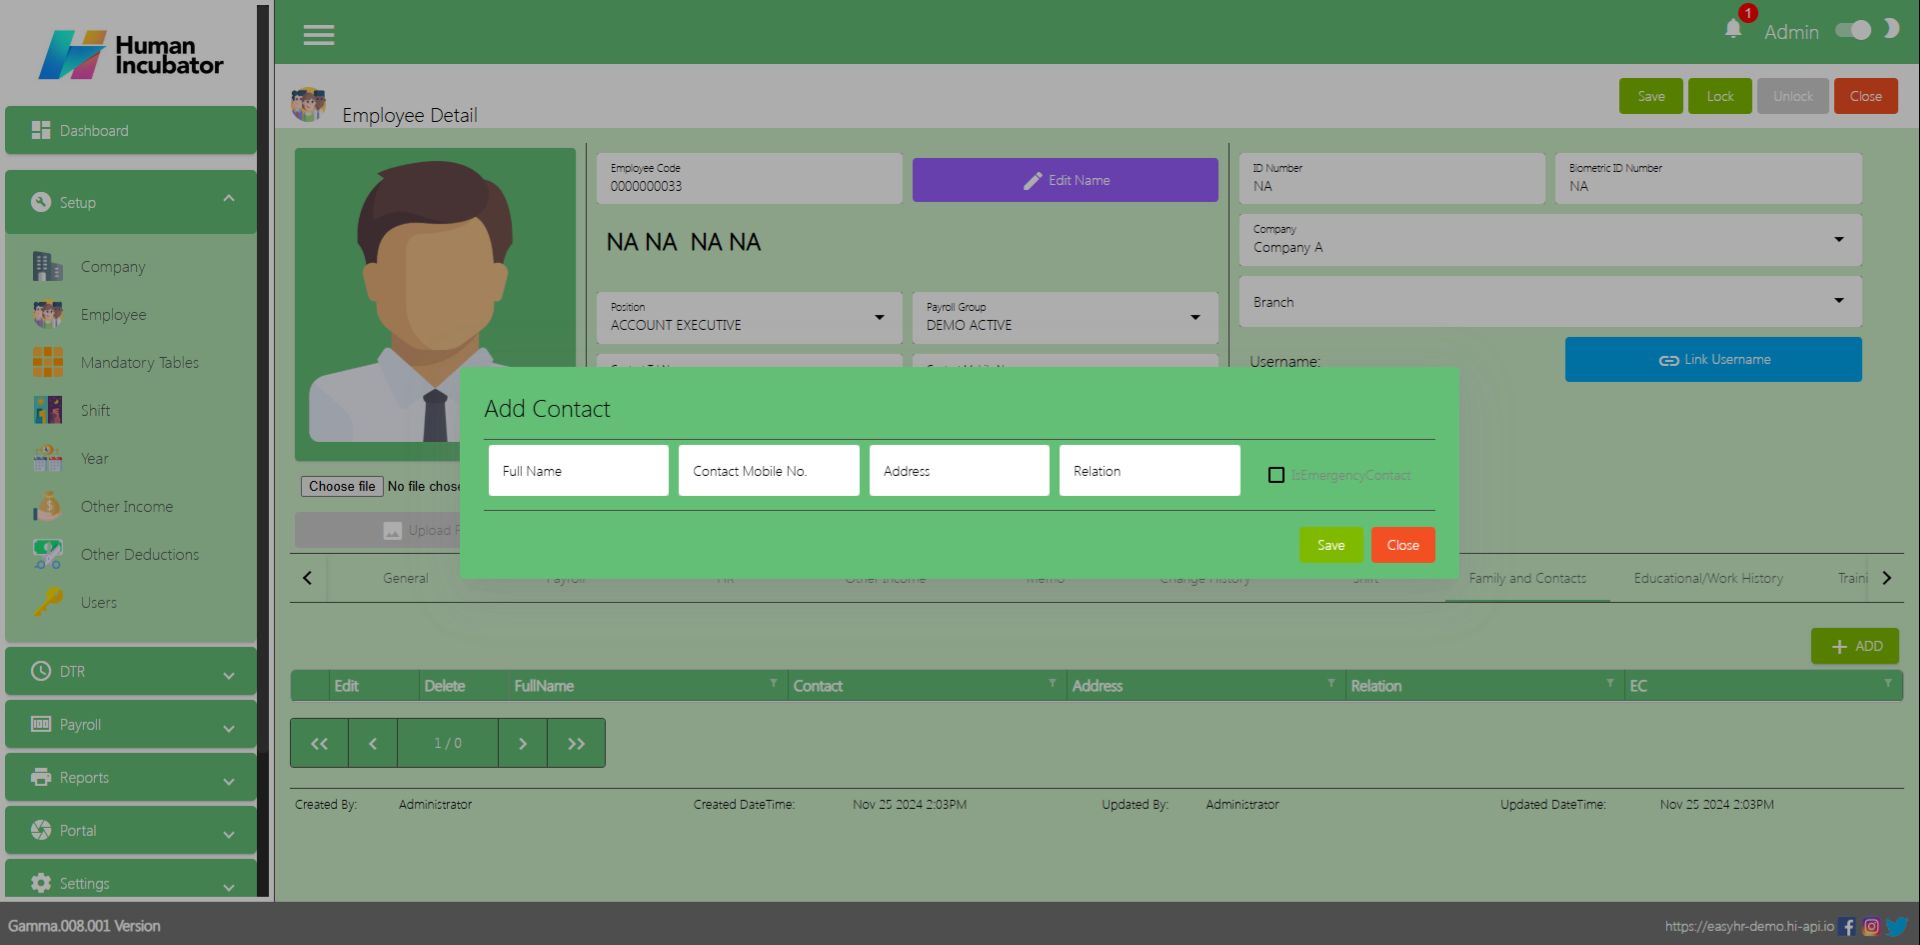
In Family and Contacts tab the user can Add contacts for his family
Click Add button
Input Fullname
Input Contact No.
Input Address
Input Relation
Check “IsEmergencyContact”
Click Save button to Add in table
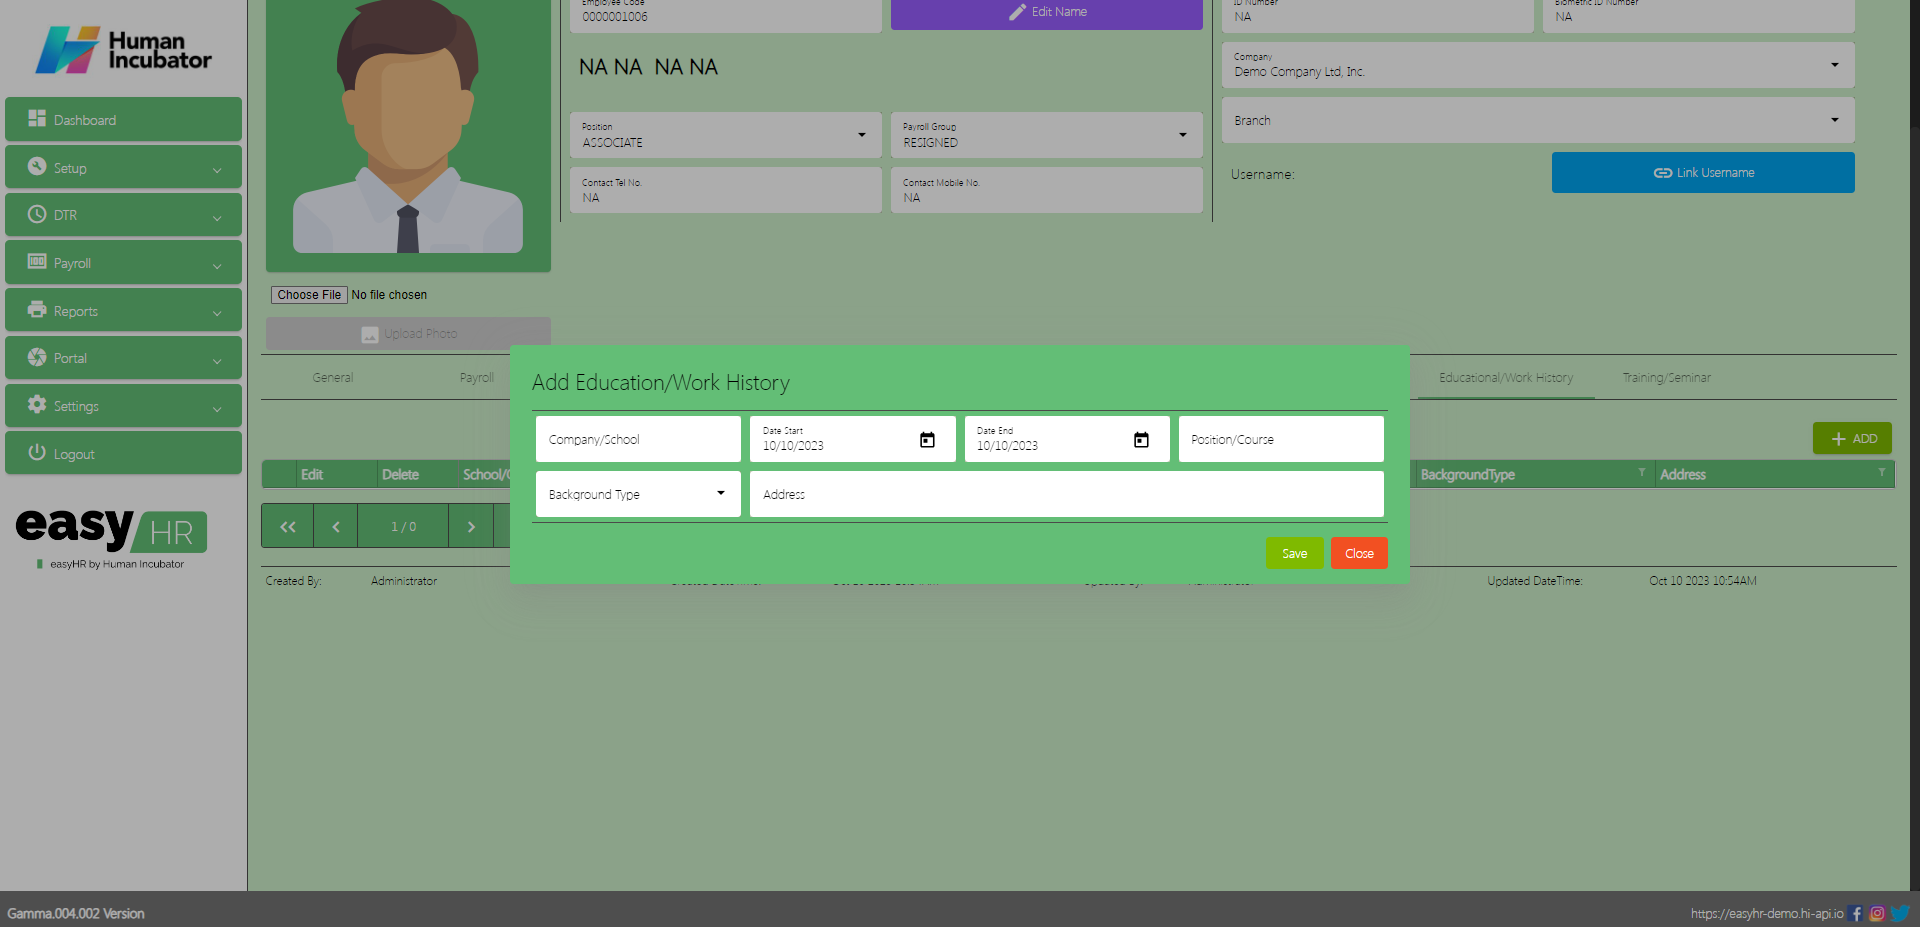
Educational/Work History
In Educational/ Work History tab the user can Add the educational attainment and Work History
Click Add button
Input Company/School
Select Date Start
Select Date End
Input Position/Course
Select Background Type
Input Address
Click Save button to Add in table
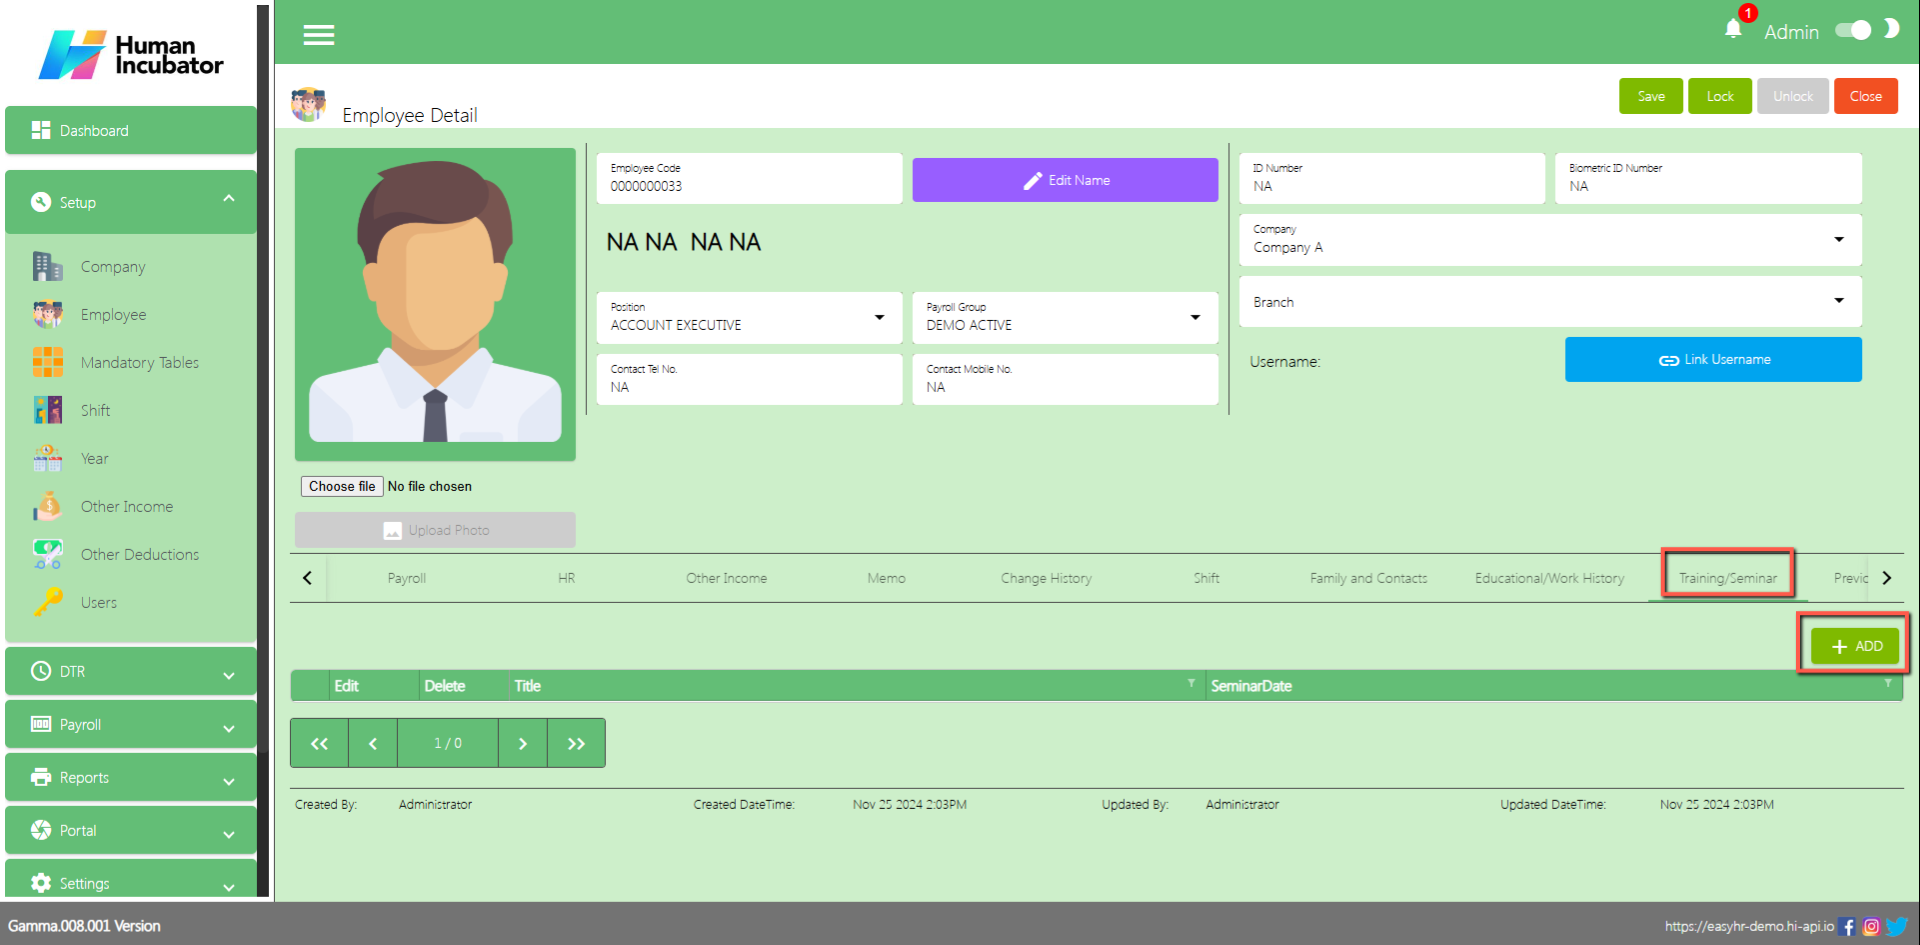
Training/Seminar
In Training/Seminar tab the user can Add if the employee has a seminar
Click Add button
Input Training/Seminar name
Select Seminar Date
Click Save button to Add in table
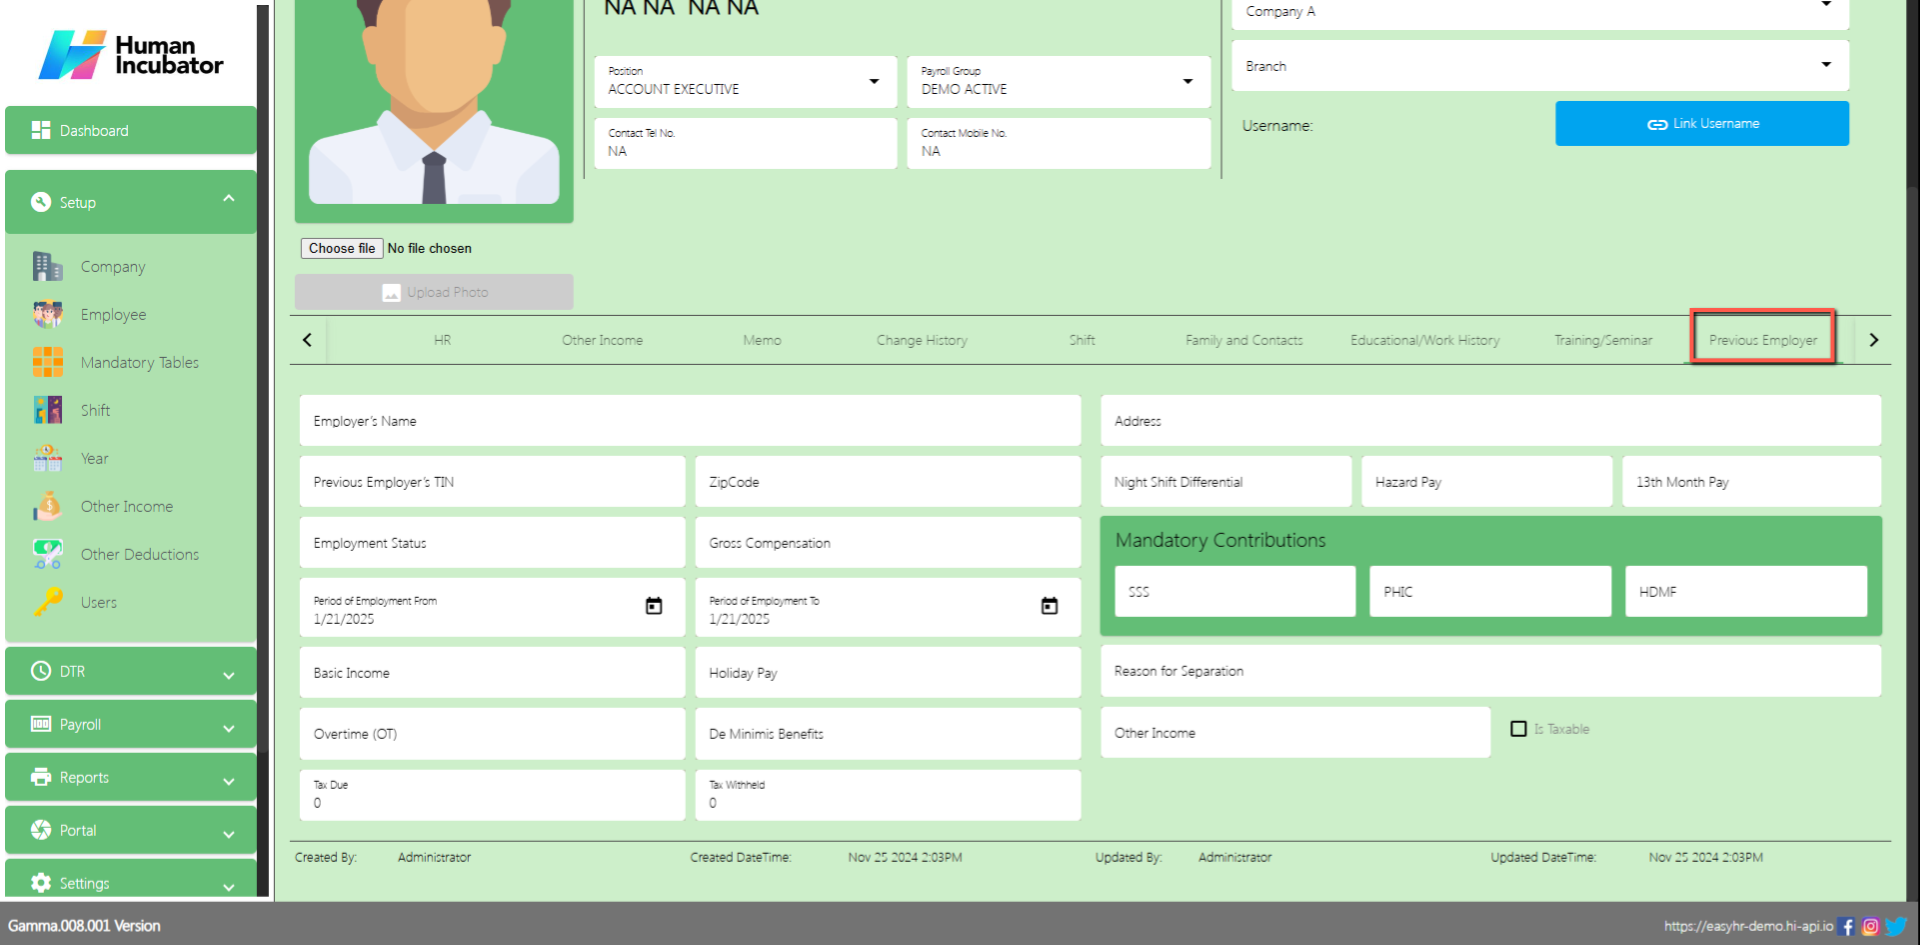
Previous Employer
You can add the Previous Employer of the employee
Input Employer’s name (Company Name)
Input Previous Employer’s TIN
Input Employment Status
Input Zipcode
Input Gross Compensation
Select Period of Employment from
Select Period of Employment to
Input Basic Income
Input Overtime(OT)
Input Tax Due
Input Holiday Pay
Input De Minimis Benefits
Input Tax Withheld
Input Address
Input Night Differential
Input Hazard Pay
Input 13 Month Pay
Input Mandatory Contributions (SSS,PHIC,HDMF)
Input Reason of Separation
Input Other Income
Check Is Taxable if it is taxable
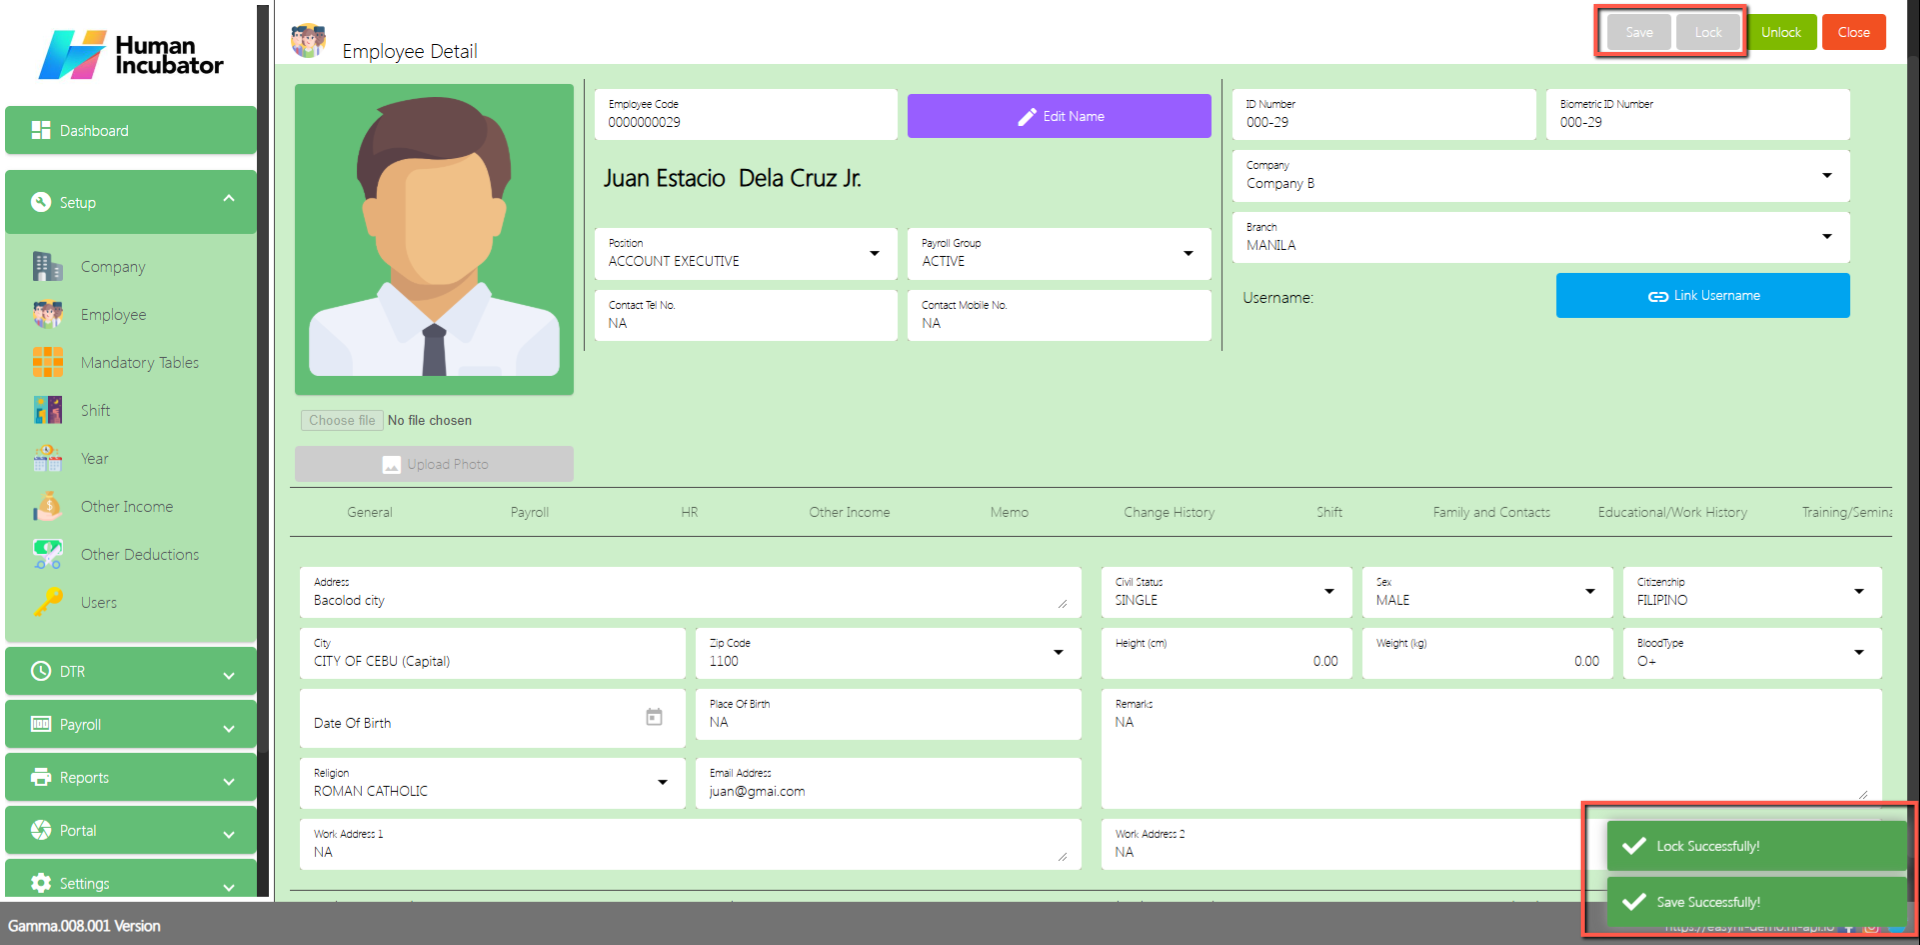
Save/Lock
Make sure to save/lock the record so that in every transaction the employee details will show.
Employee Special Characters Importing
Input special Characters in all the fields that is not Integer required
Import in the Employee 201
Can now accept Special Characters
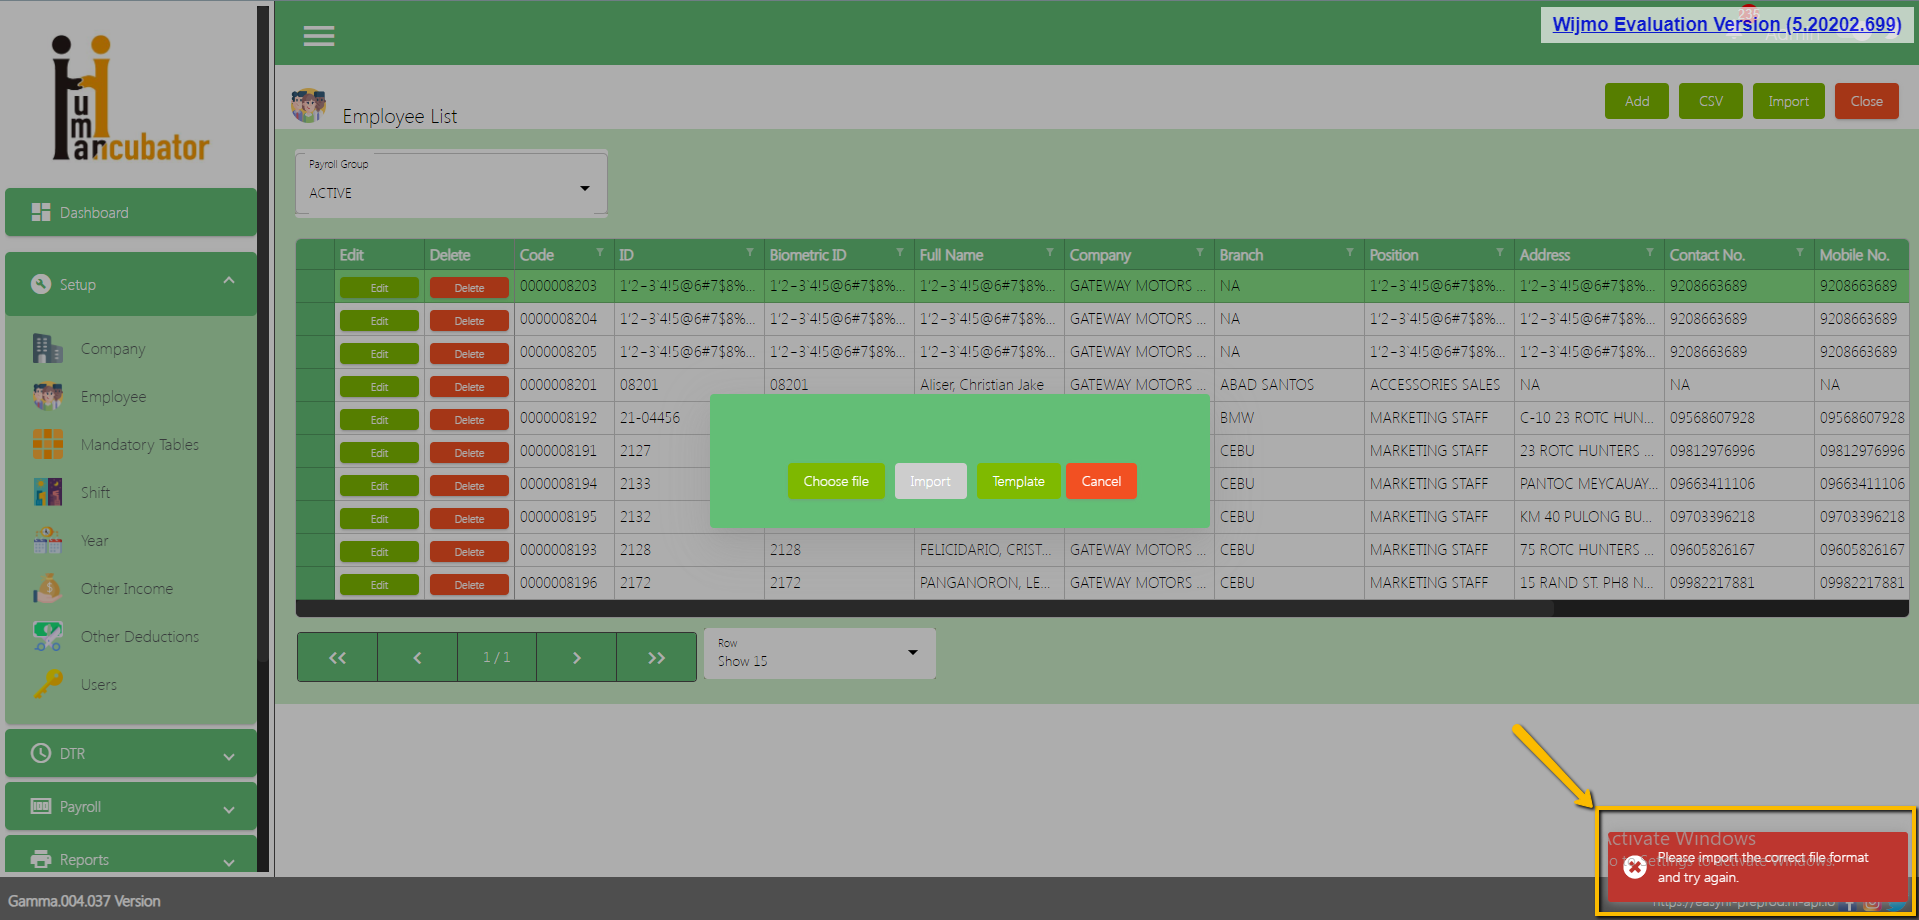
Import Employee Incorrect File format Error Message
Delete column name “EmployeeStatus”
Import Employee
Employee Soft Delete
If the employee’s resignation date was at least a year ago from the present date you can soft delete the employee in the employee 201
Go to Employee 201
Click Delete button
Click Yes for the Confirmation “Are you sure you want to delete it? You cannot revert it again. YES or NO?”
Employee can be deleted from the employee 201
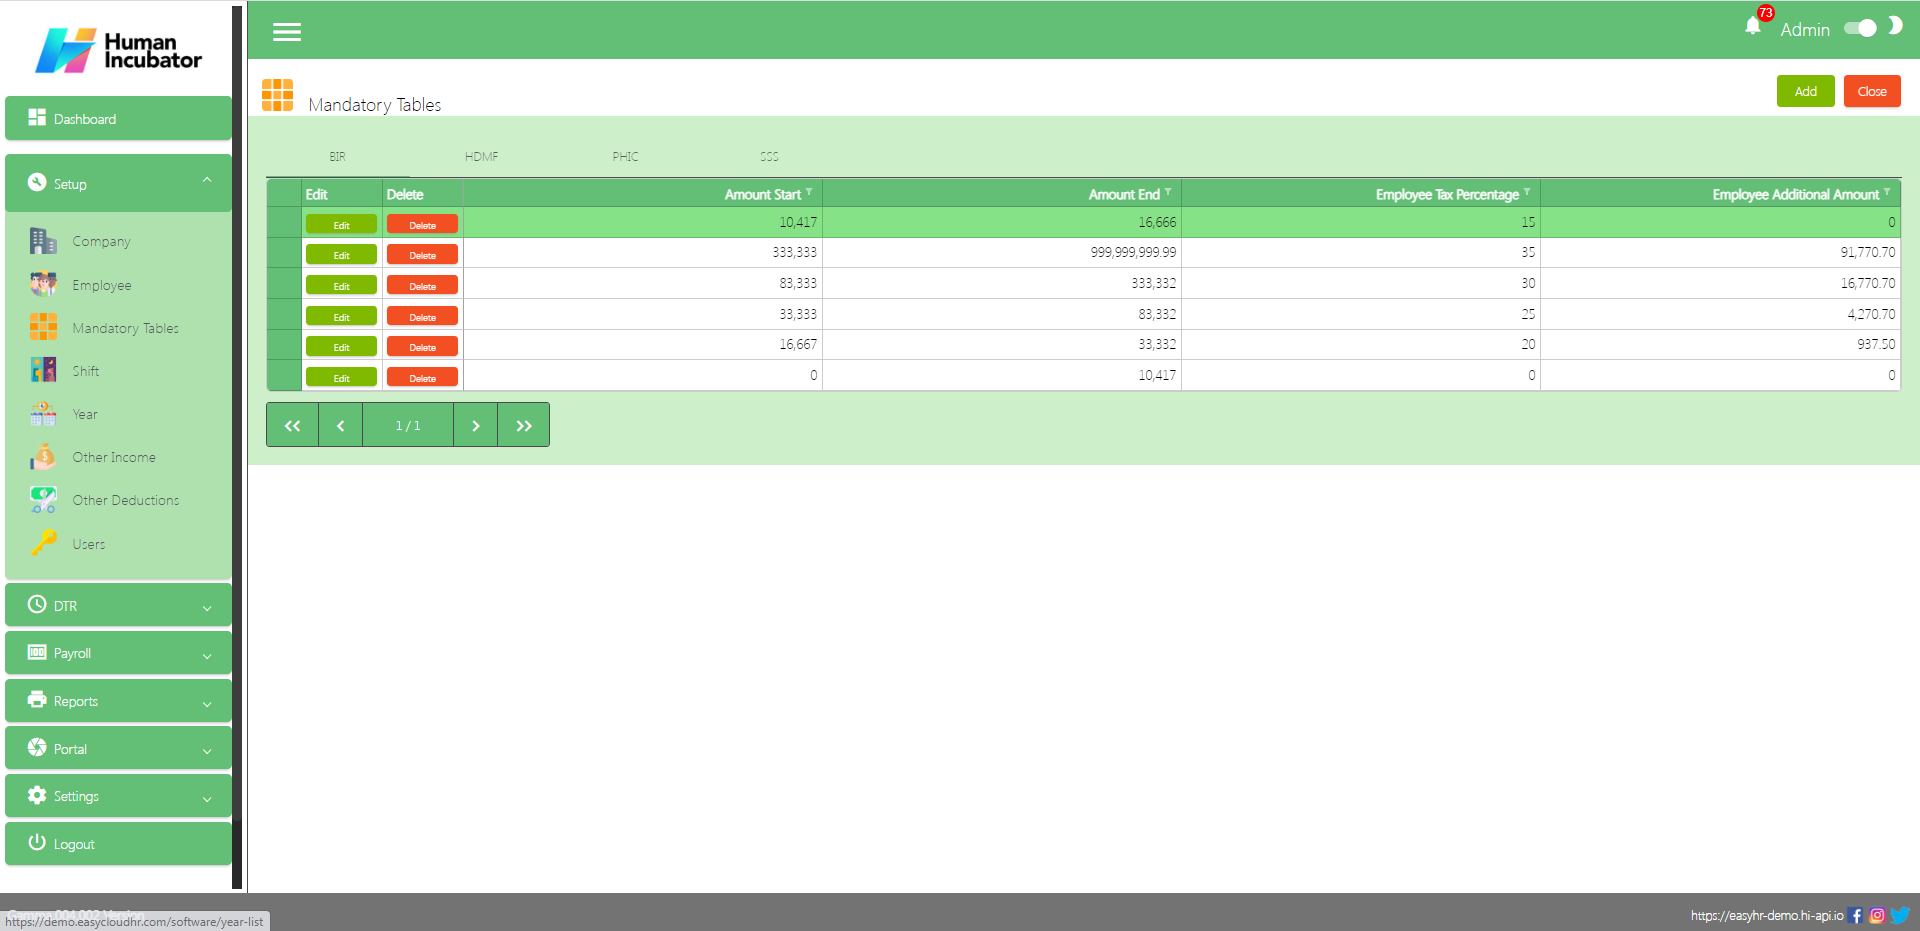
Mandatory Tables
Overview
Mandatory table is used for mandatory deduction for employee Note: Please do not change the mandatory table it’s all based on the government mandate(Update the range mandatory deduction if there is changes in government mandate )
BIR Mandatory
BIR Mandatory is based on the Employee’s Payroll Rate
Column Table
Edit: This is a button that has the function to edit the mandatory per line
Delete: This is a button that has the function to Delete the mandatory per line
Amount Start: This is the Range for the Employees Payroll Rate
Amount End: This is the Range for the Employees Payroll Rate
Employee Tax Percentage: Tax Percentage according to the Employees Payroll Range
Employee Additional Amount: Additional Amount according to the employee’s Payroll Range
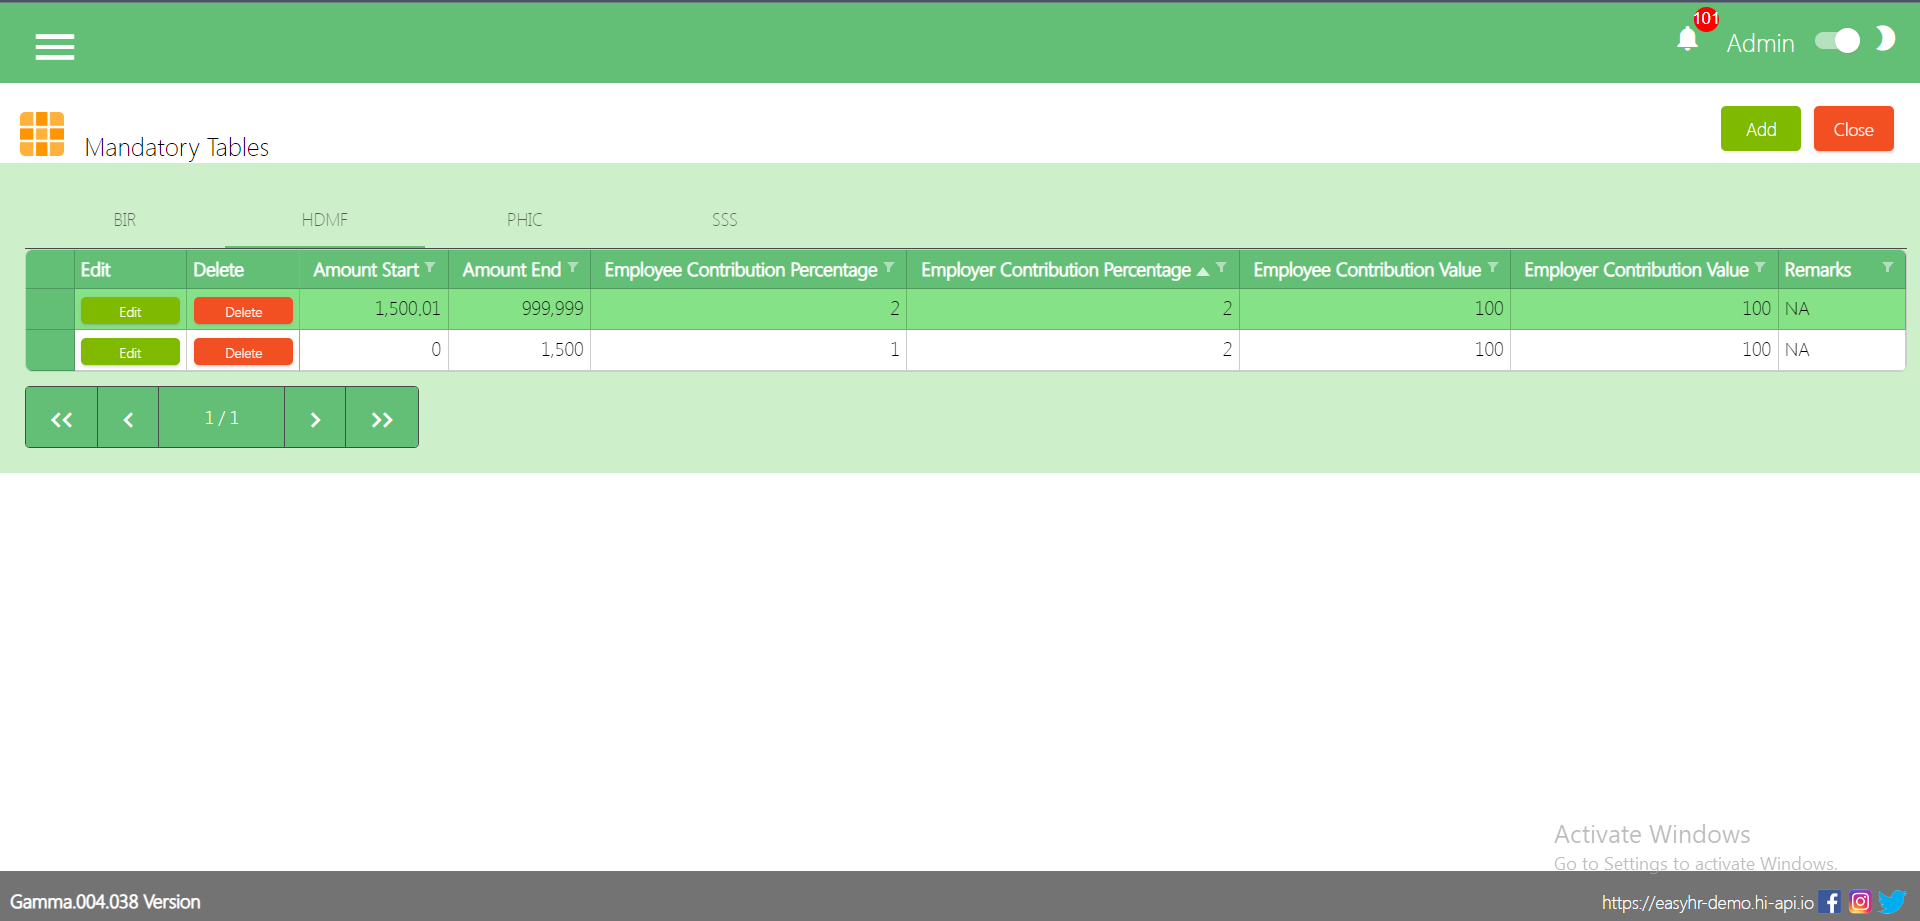
HDMF Mandatory
HDMF Mandatory is based on the Employee’s Payroll Rate
Column Table
Edit: This is a button that has the function to edit the mandatory per line
Delete: This is a button that has the function to Delete the mandatory per line
Amount Start: This is the Range for the Employees Payroll Rate
Amount End: This is the Range for the Employees Payroll Rate
Employee Contribution Percentage: Contribution Percentage according to the Employees Payroll Range
Employer Contribution Percentage: Contribution Percentage according to the Employer’s Payroll Range
Employee Contribution Value: Contribution Value according to the employees Payroll Range
Employer Contribution Value: Contribution Value according to the employer’s Payroll Range
Remarks: You can input any remarks
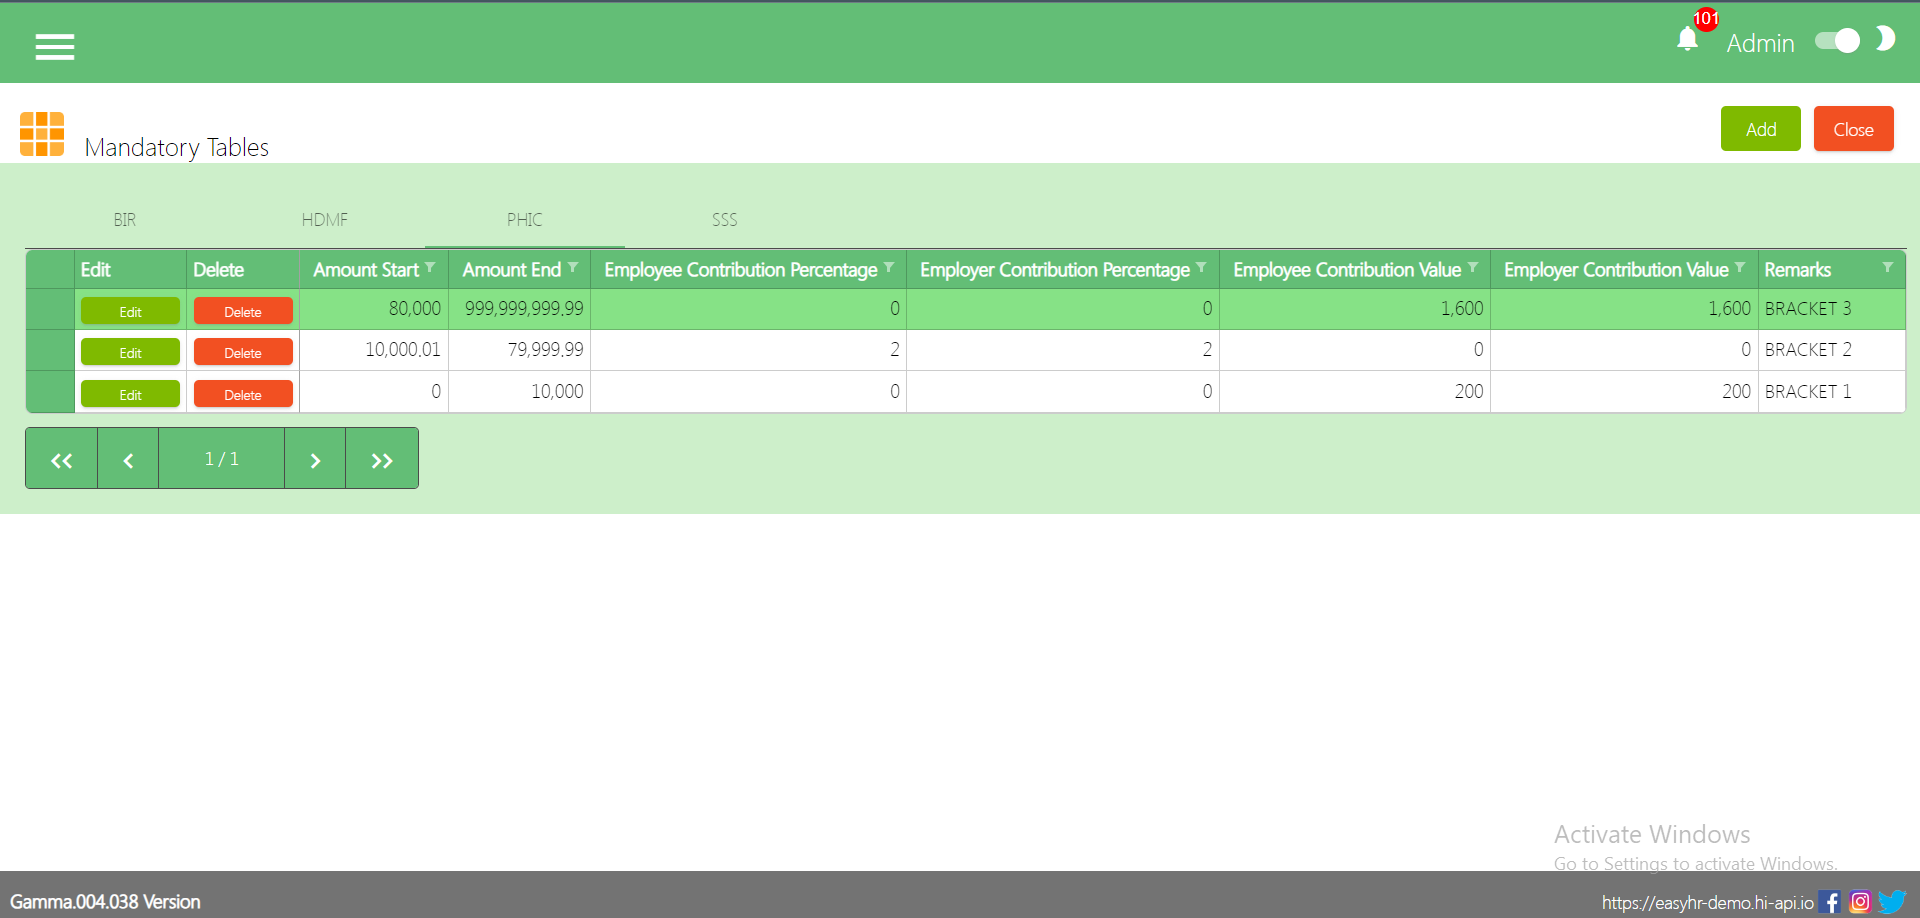
PHIC Mandatory
PHIC Mandatory is based on the Employee’s Payroll Rate
Column Table
Edit: This is a button that has the function to edit the mandatory per line
Delete: This is a button that has the function to Delete the mandatory per line
Amount Start: This is the Range for the Employees Payroll Rate
Amount End: This is the Range for the Employees Payroll Rate
Employee Contribution Percentage: Contribution Percentage according to the Employees Payroll Range
Employer Contribution Percentage: Contribution Percentage according to the Employer’s Payroll Range
Employee Contribution Value: Contribution Value according to the employees Payroll Range
Employer Contribution Value: contribution Value according to the employer’s Payroll Range
Remarks: You can input any remarks
SSS Mandatory
SSS Mandatory is based on the Employee’s Payroll Rate
Column Table
Edit: This is a button that has the function to edit the mandatory per line
Delete: This is a button that has the function to Delete the mandatory per line
Amount Start: This is the Range for the Employees Payroll Rate
Amount End: This is the Range for the Employees Payroll Rate
Employee Contribution Value: Contribution Value according to the employees Payroll Range
Employer Contribution Value: contribution Value according to the employer’s Payroll Range
Employer EC Value: This is also part of the Employers Contribution
Remarks: You can input any remarks
Shift
Overview
Shift setup is used for Shift schedule for employees and also the user can add more shift base in company shift schedule.
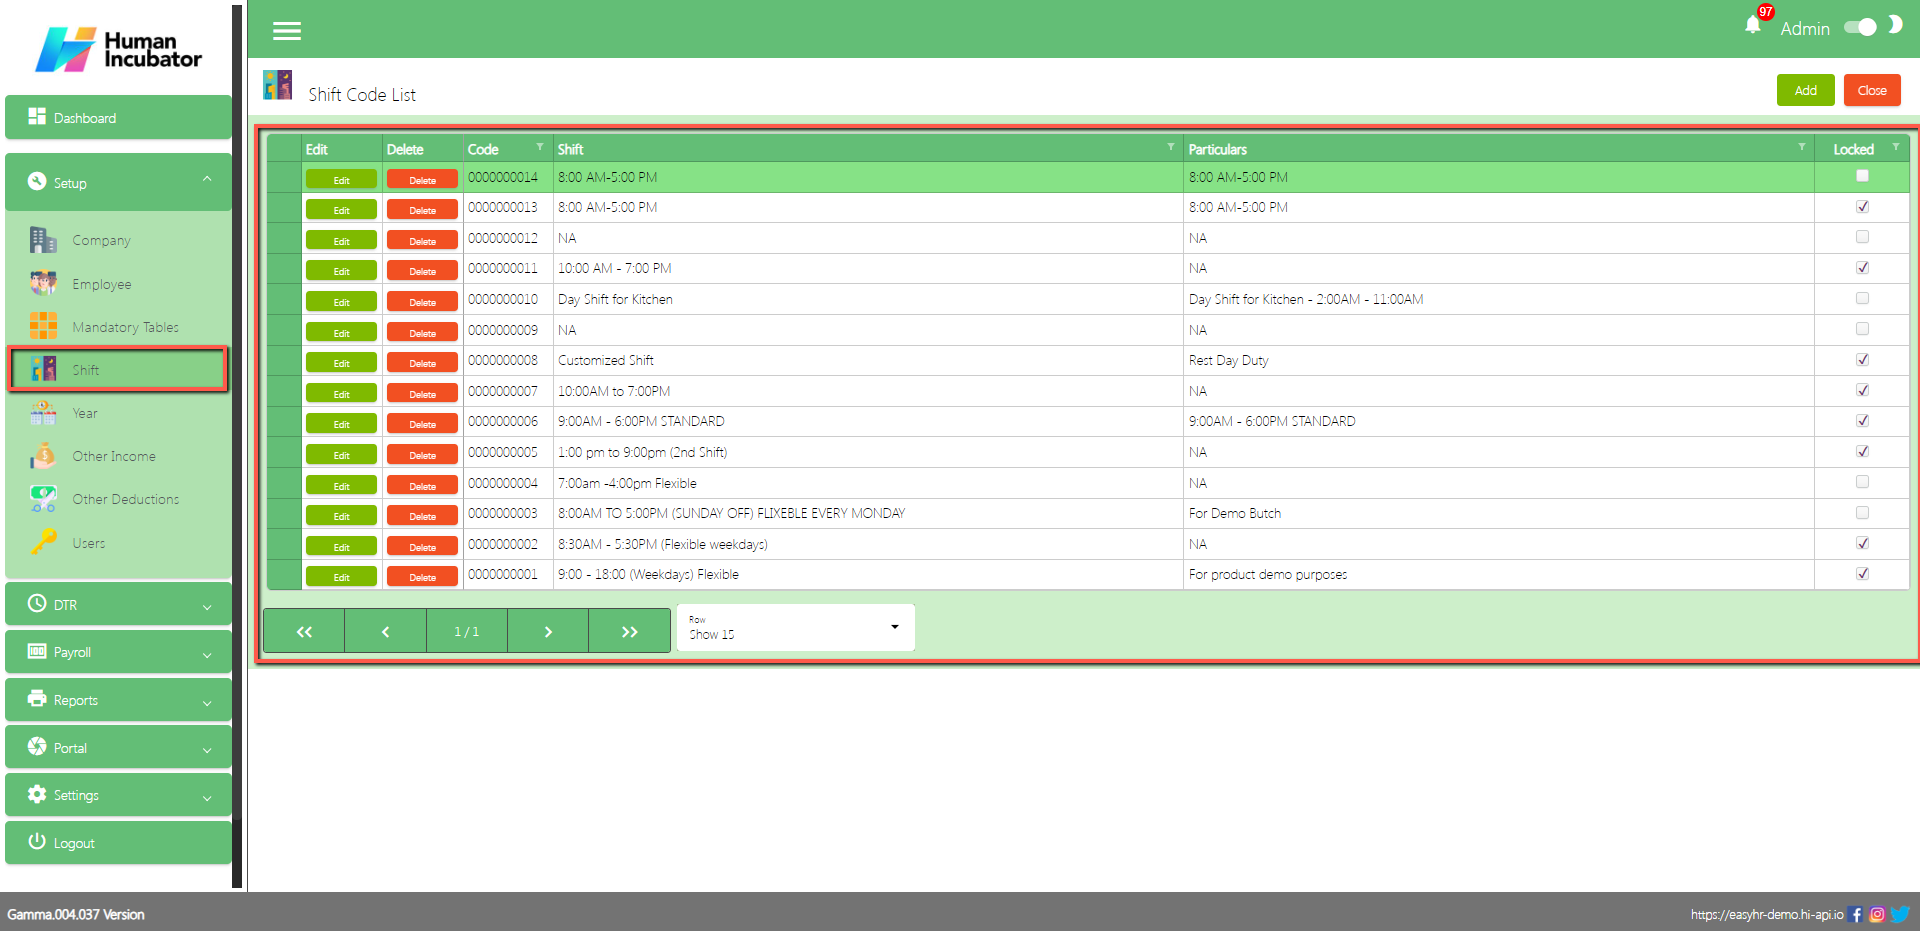
Shift Code List
Shows all list of shift schedule
Column Table:
Edit: This has a function to Edit the Shift
Delete: This has a function to Delete the Shift
Code: This code will automatically generate according to the sequence of the added shift
Shift: The name of the shift
Particulars: in the Particulars this is just like the remarks you can input any details
Locked: If the Checkbox is checked then it is locked but if uncheck then it is unlocked. (Note: If the Shift is unlocked it will not show in the other module)
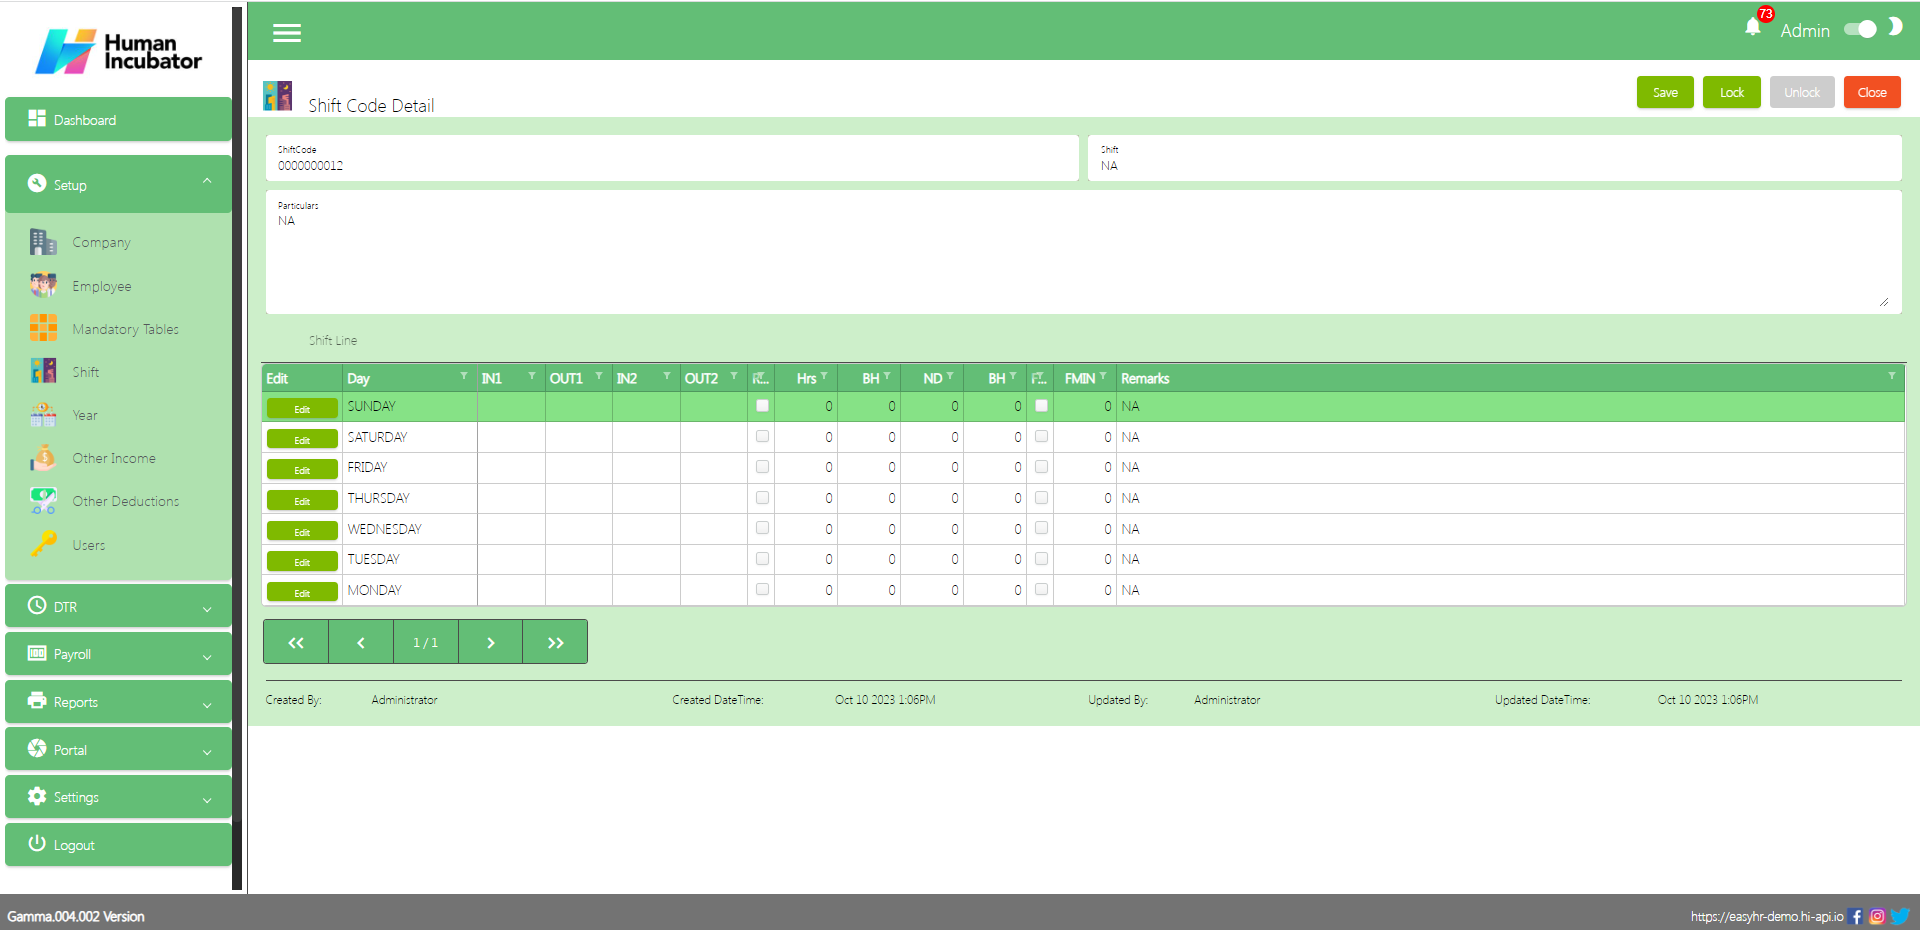
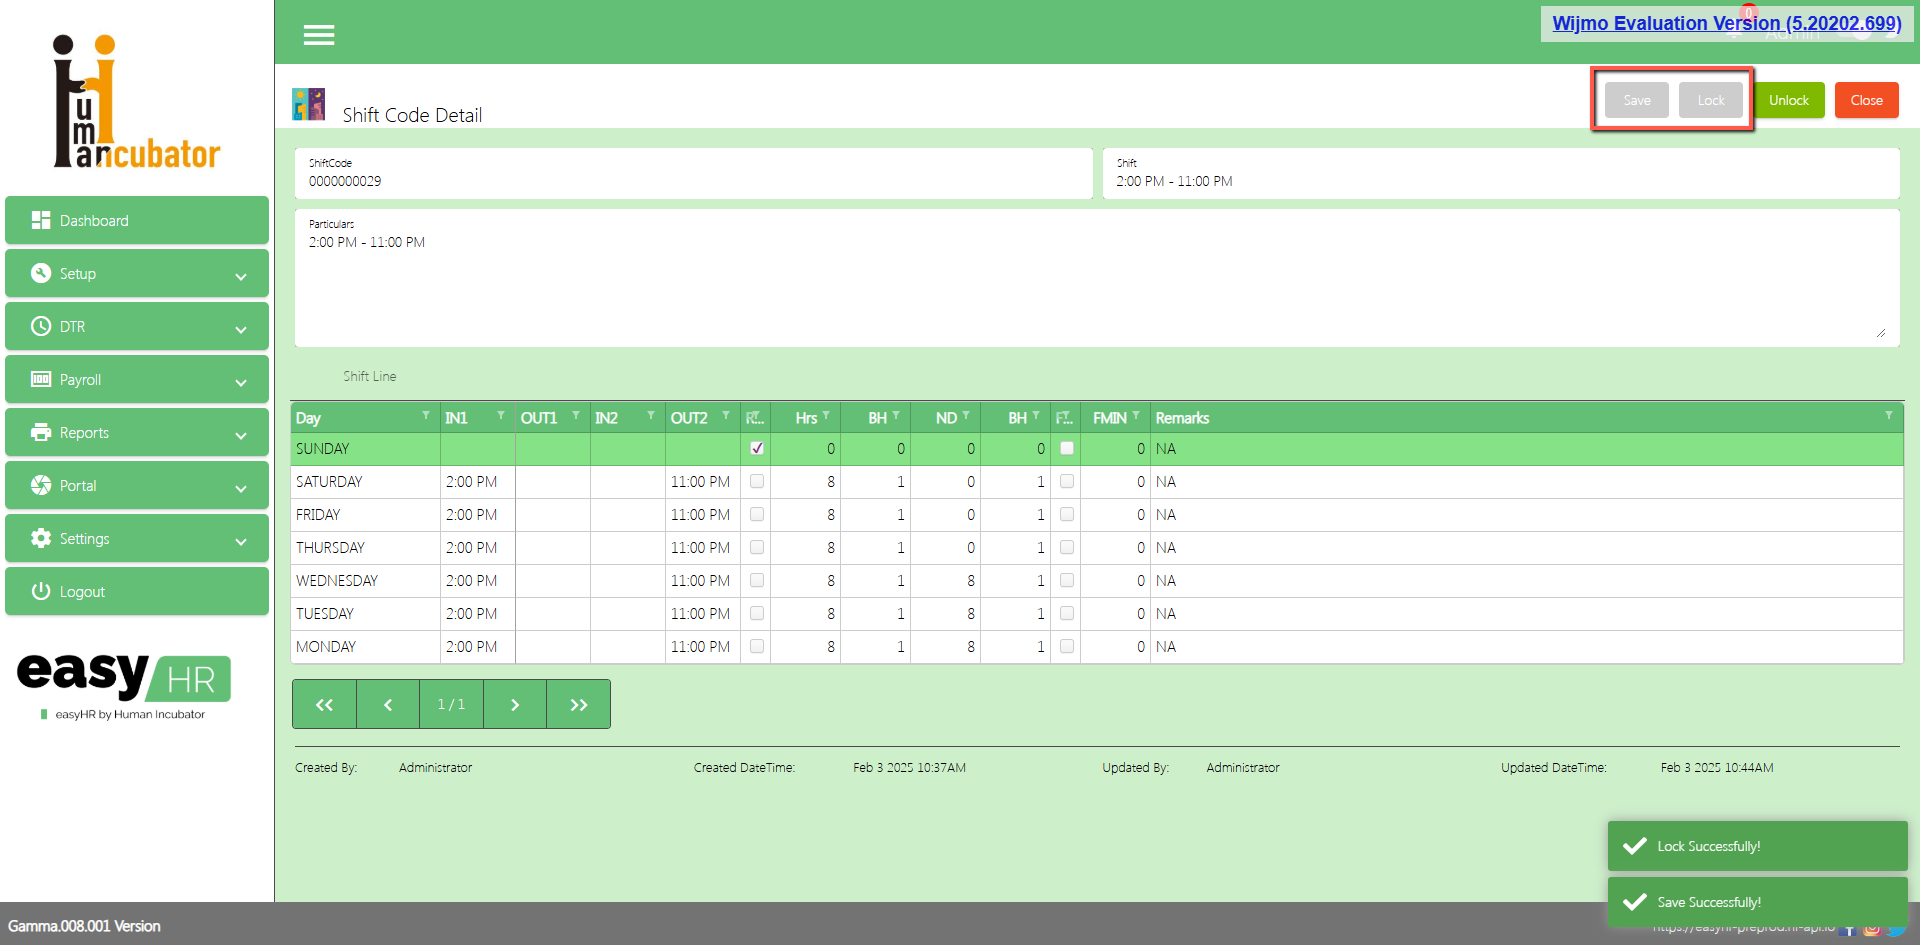
Shift Code Detail
Assumption: To Add a new shift, click the Add button that can be seen on the right side of the screen
Fill all the important fields for Shift Code Detail like:
Shift
Particulars
Shift Line
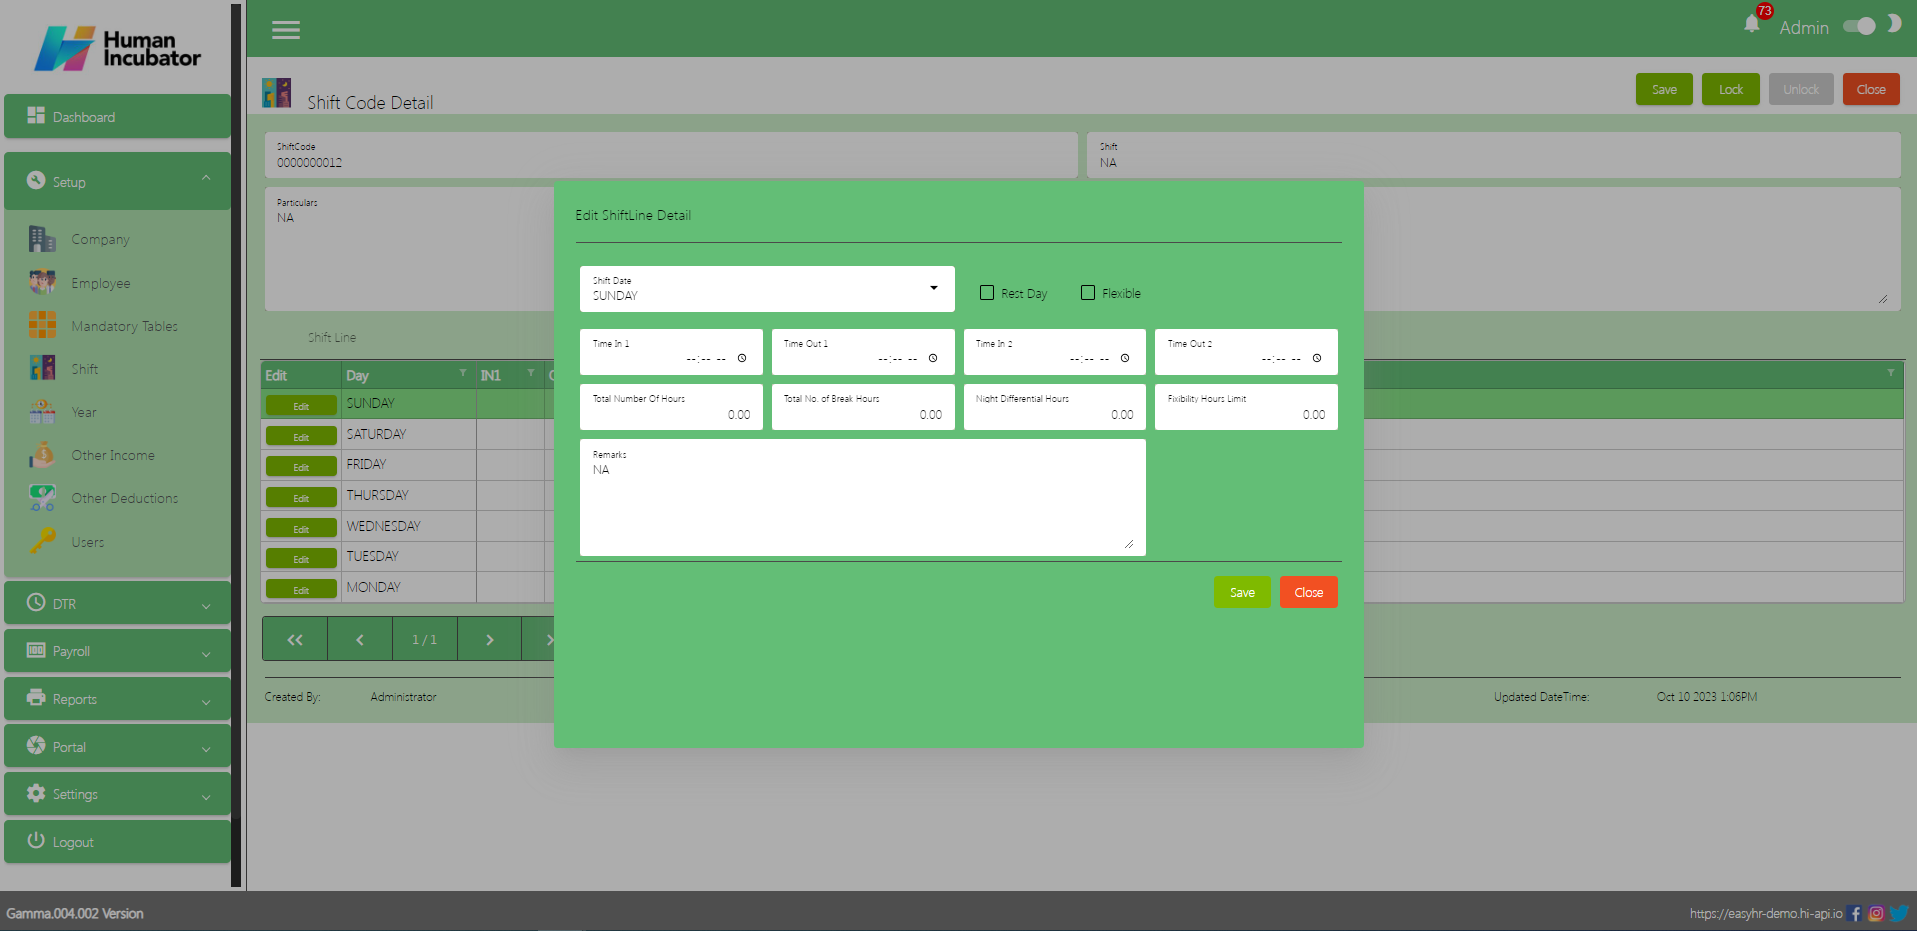
In Shift line the user need to click Edit to set the shift schedule of the employee ( Edit Sunday to Monday and set the Rest Day of employee )
Input the Time In 1 hour and Time Out 2
Input the Total Number of Hours
Input the Total Number of break Hours
Input the Night Differential Hours if necessary
Input the Fix Hours Limit if necessary
Remarks
Click Save button to add in table
Save/Lock
Make sure to save/lock the record so that in every transaction the Shift will show.
Year
Overview
Year setup is used for setting up a holiday in that particular year and also to add leave credits per employee.
(Note: Always make sure the current Year is locked)
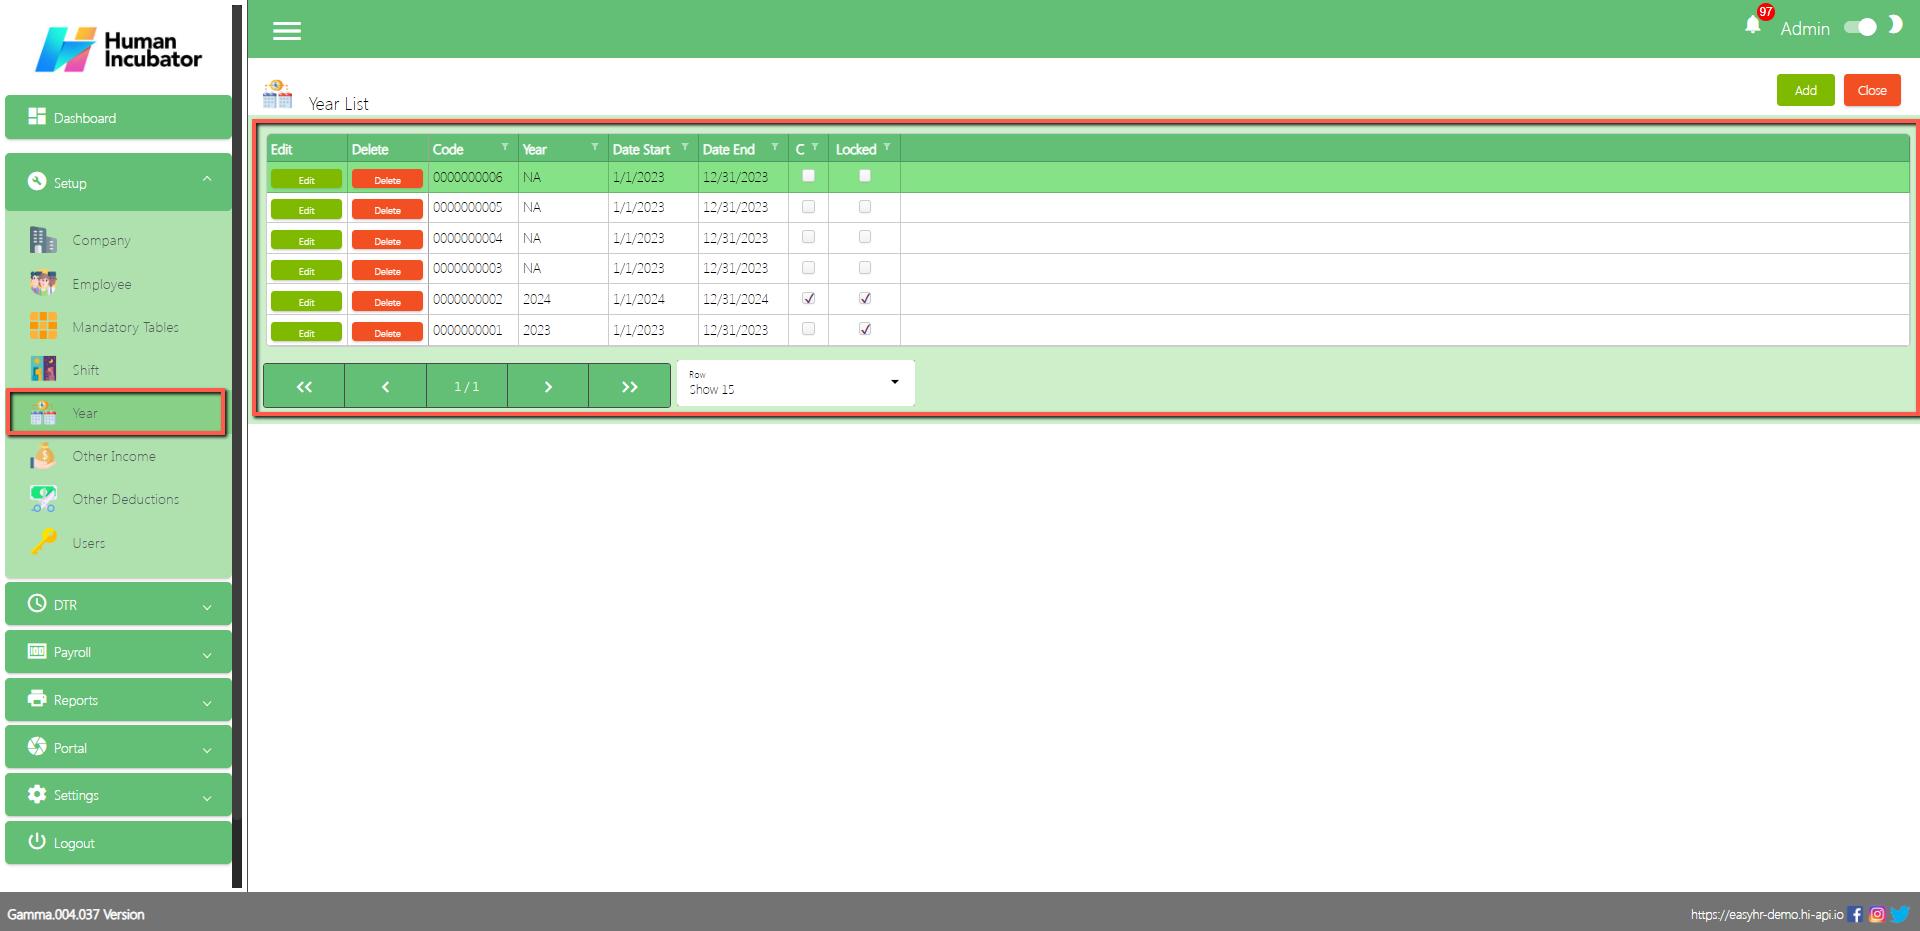
Year List
Shows all list of year
Column Table
Edit: This has the function to edit the Year
Delete: This has a function to delete the Year
Code: This code will automatically generate according to the sequence of the added shift
Year: The is an input on what year added
Date Start: Date Start of the Year
Date End: Date End of the Year
Closed: You can no longer select if the year is closed.
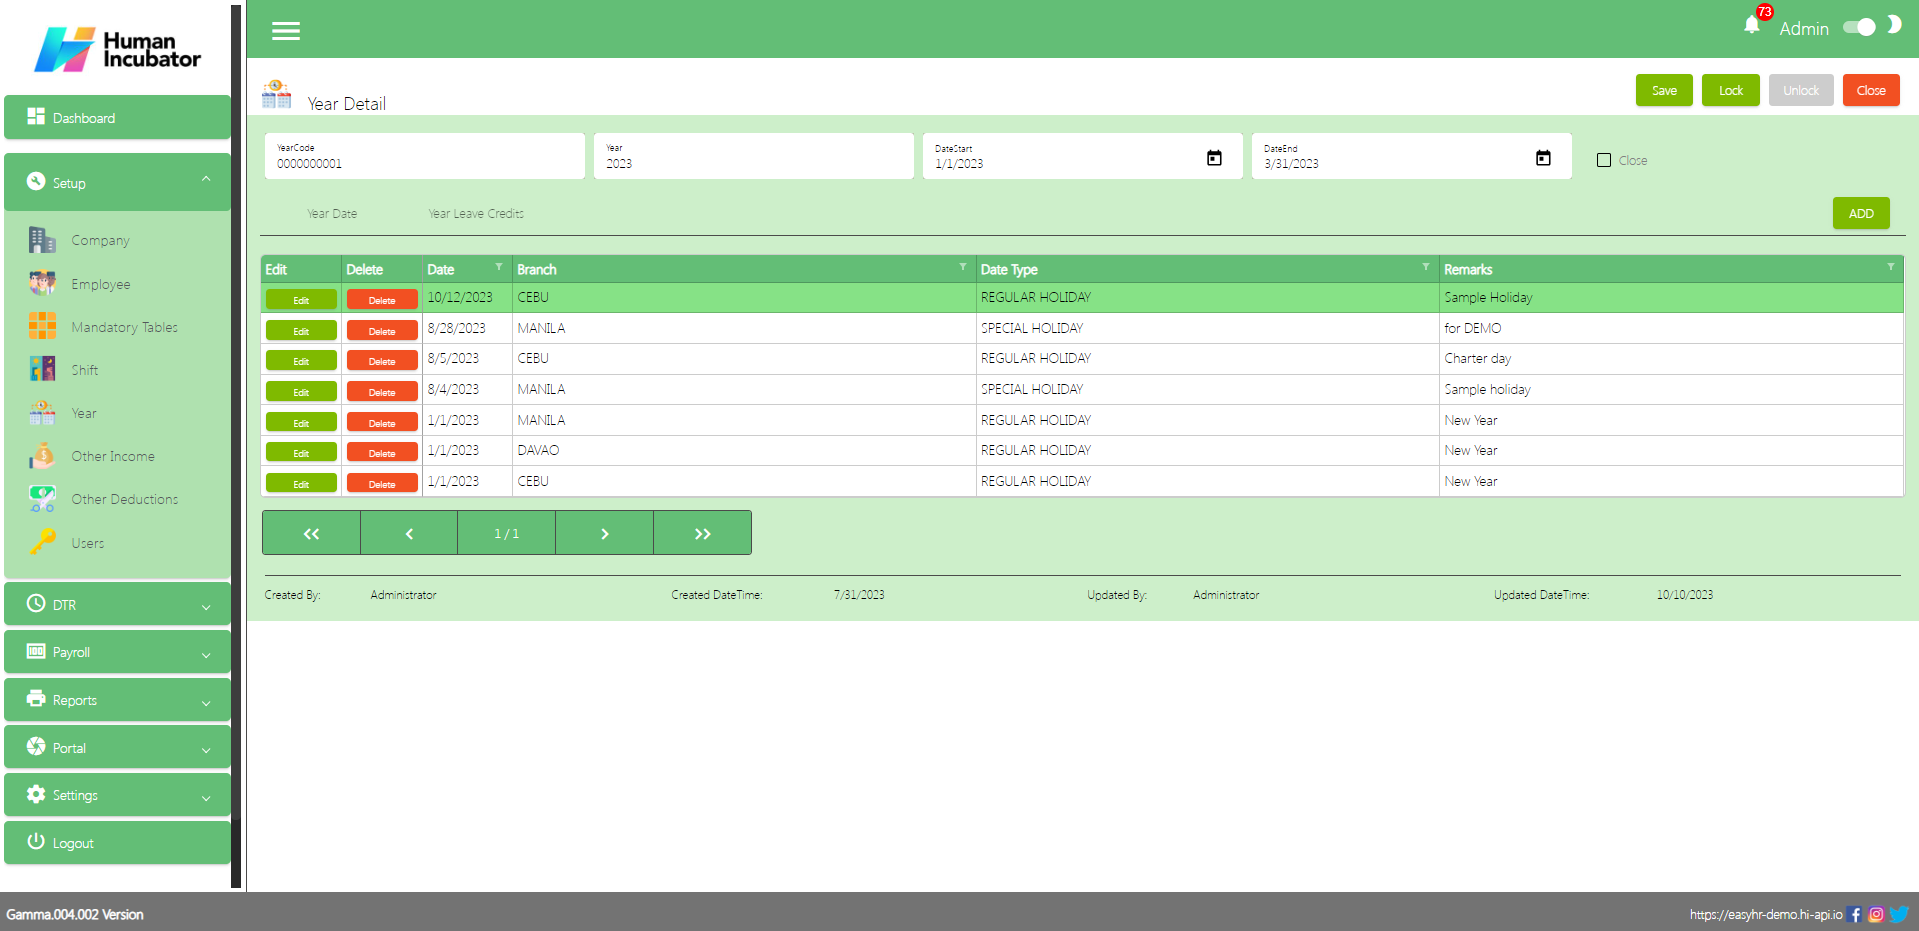
Year Detail
Assumption: To Add a new year, click the Add button that can be seen on the right side of the screen
There are 2 tabs that show in year detail
Year Date
Year Leave Credits
Fill all the important fields for Year Detail like:
Year
Select Date Start
Select Date End
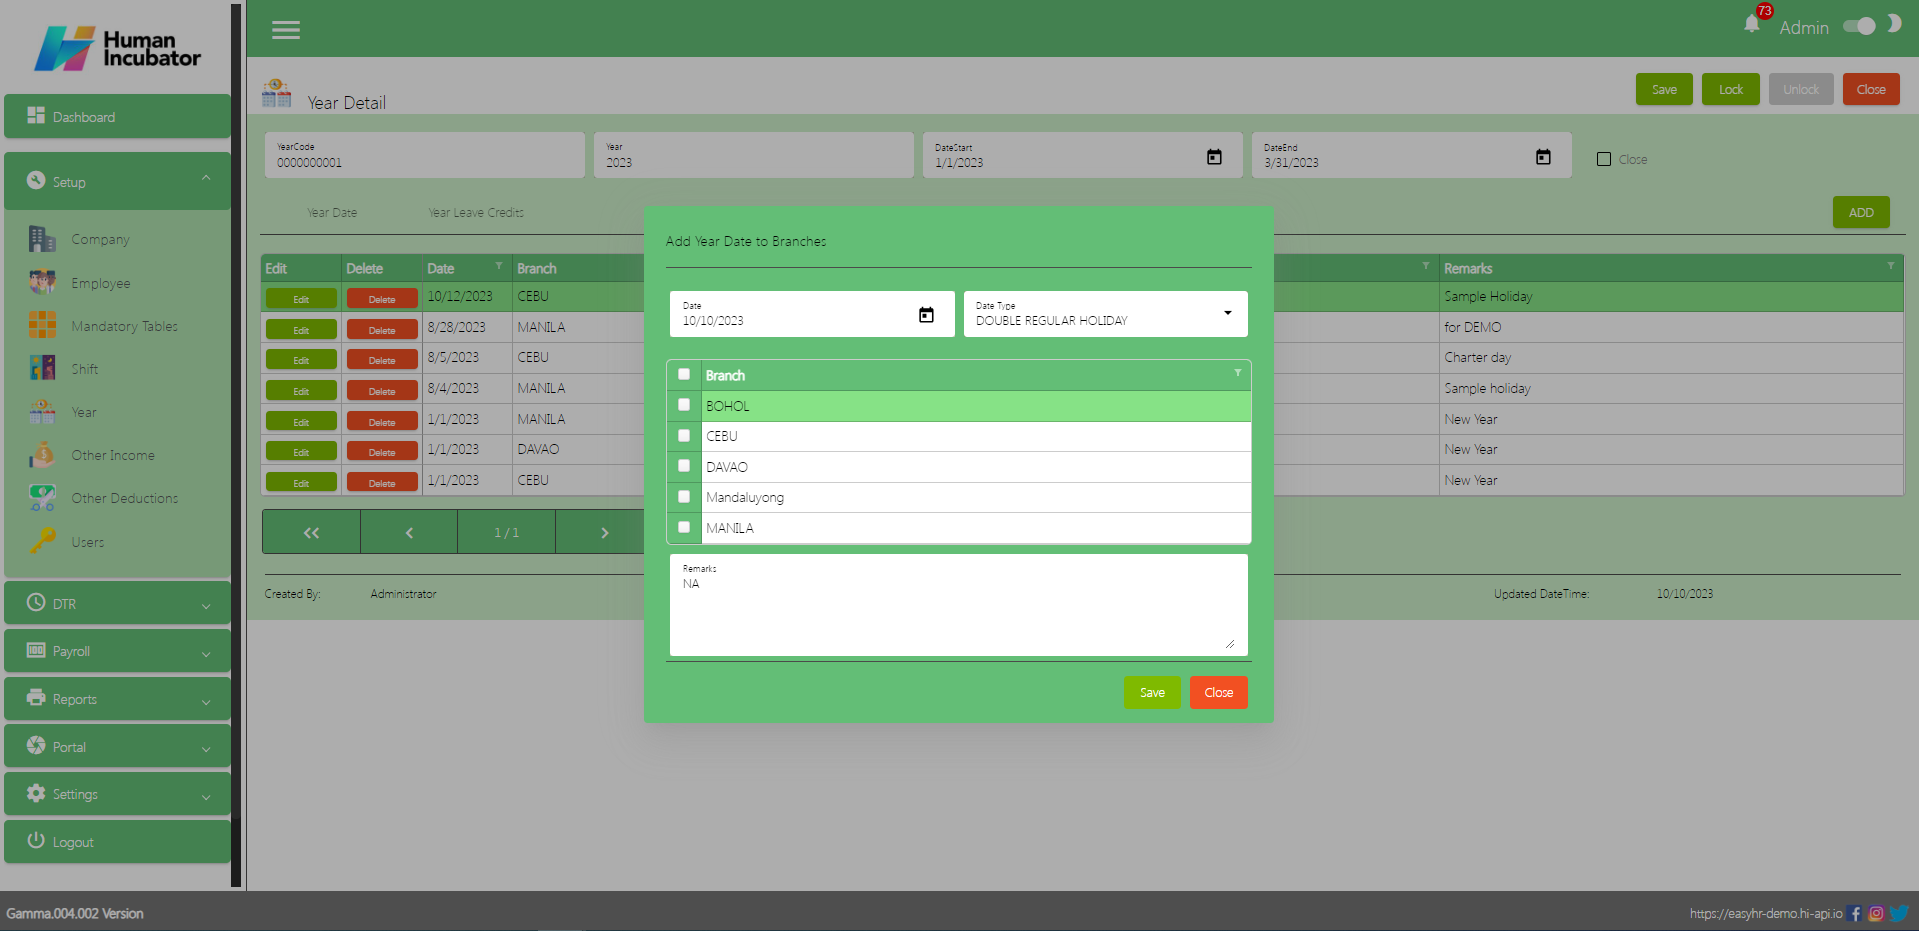
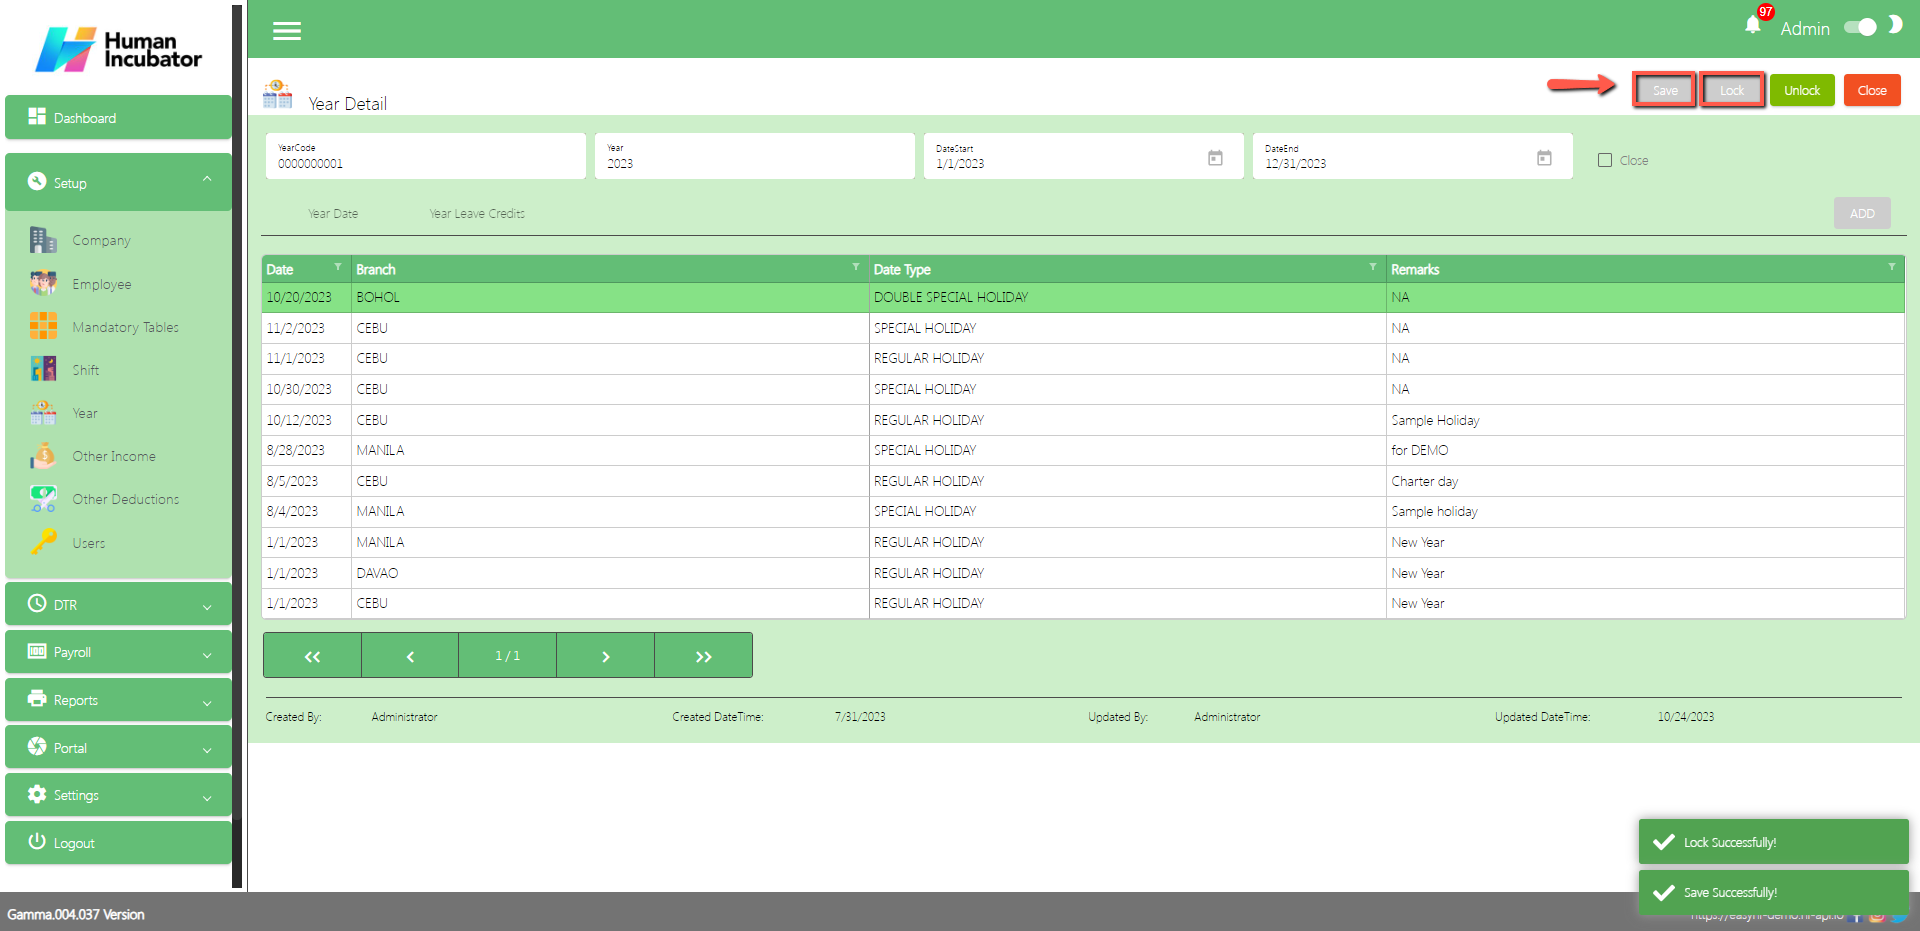
Year Date
In Year Date tab the user can Add all the regular holiday in that particular year
Click Add button
Select Date
Select Date Type
Select Branch
Input remarks
Click Save button to Add in table
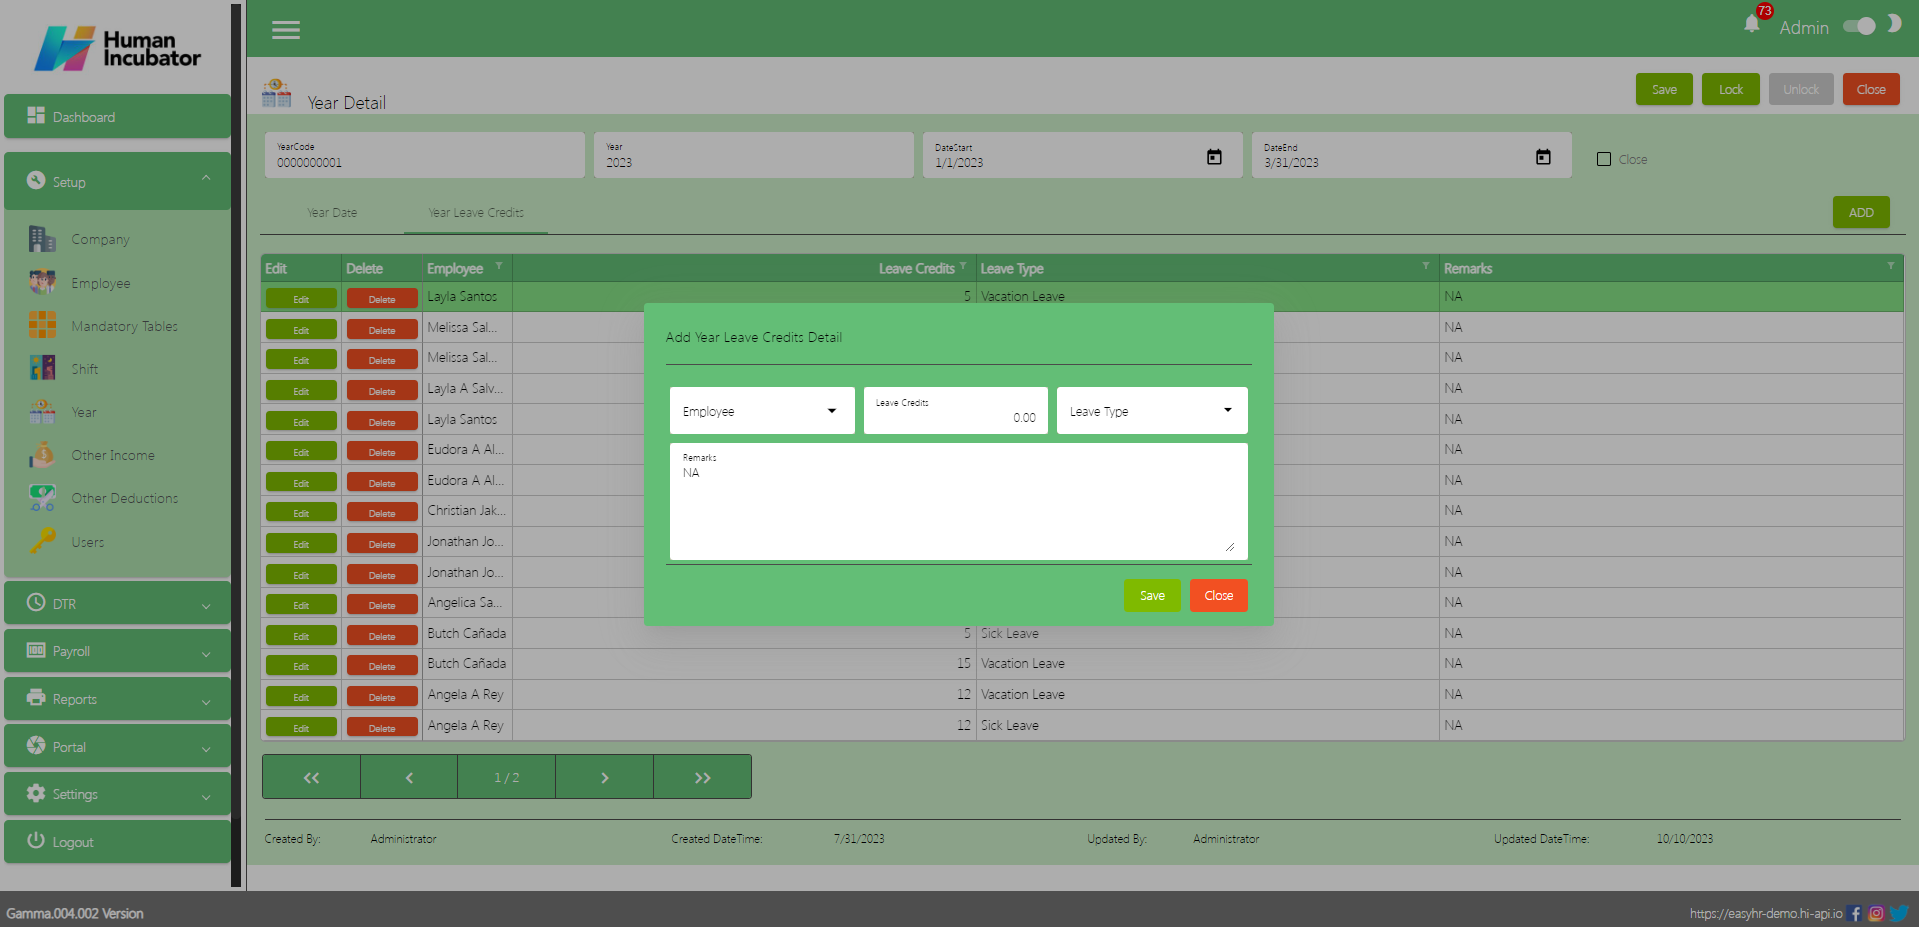
Year Leave Credits
In Year Leave Credits tab the user can add the leave credits per employee
Click Add button
Select Employee, Input leave credits and Select Leave Type
Remarks
Click Save button to Add in table
Save/Lock
Make sure to save/lock the record so that in every transaction the Year details will show.
Other Income
Overview
Other Income setup is used for Making other income just like allowances of the company and also can add if Taxable or Non-taxable
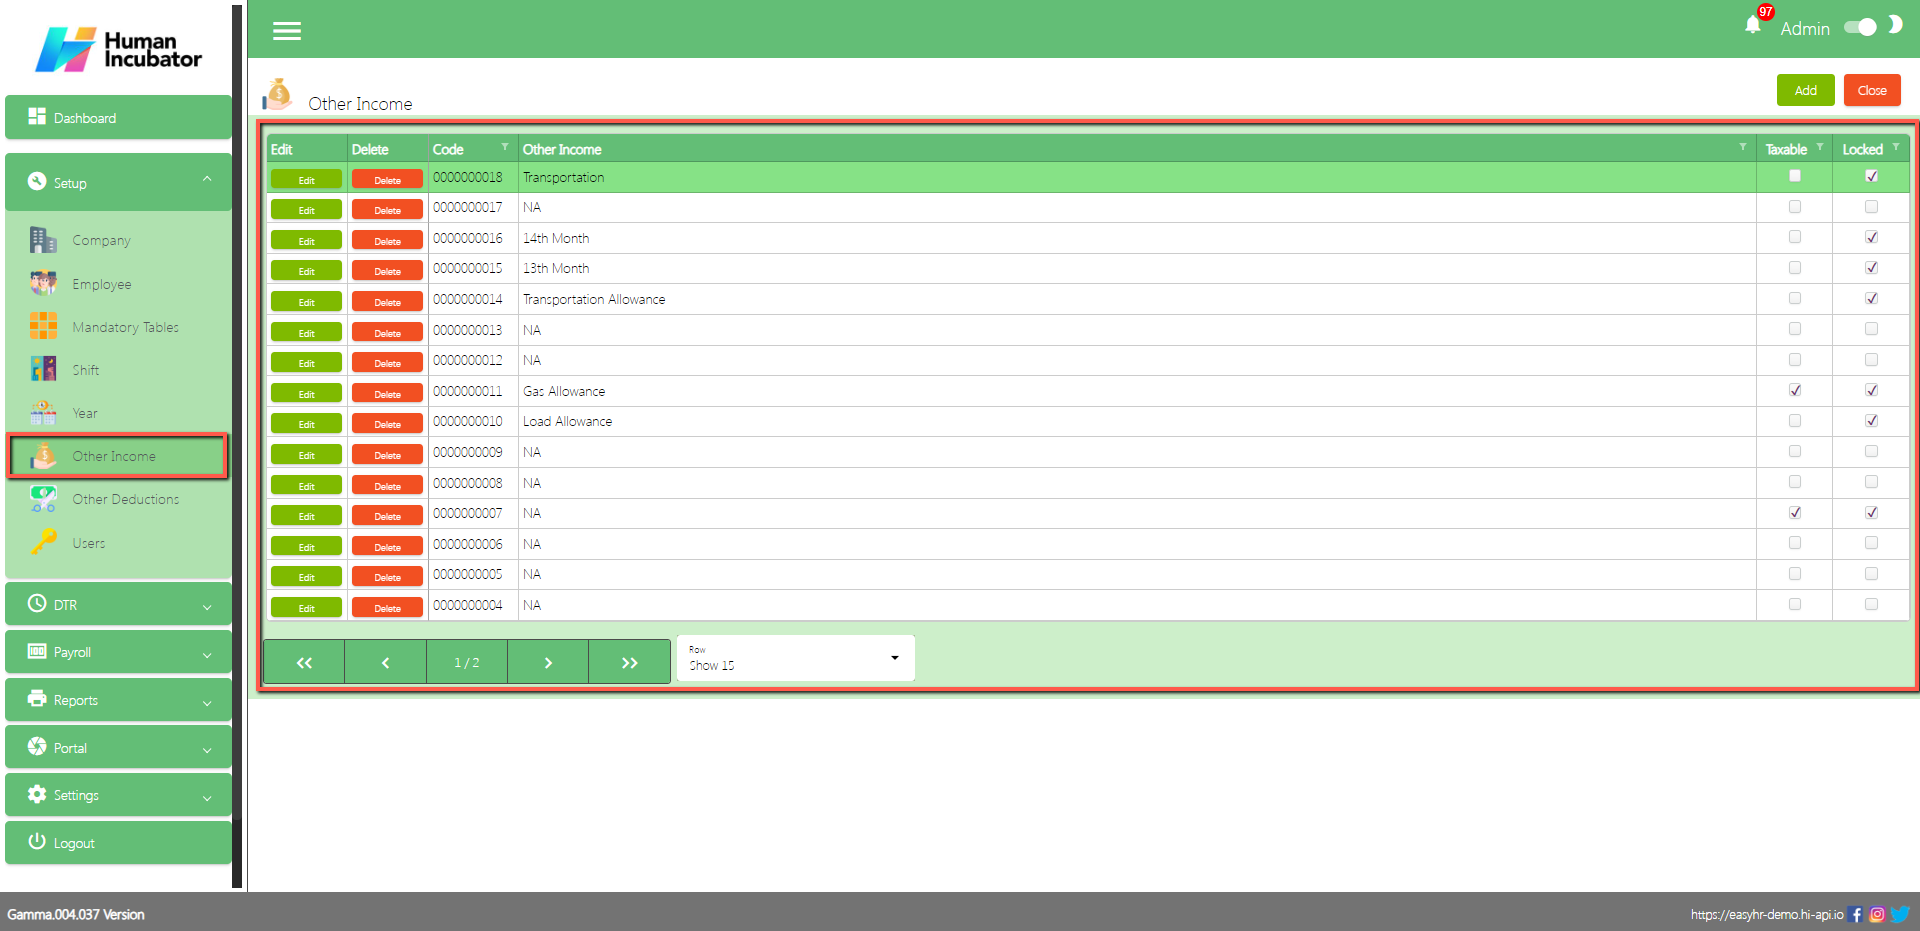
Other Income List
Shows all list of Other Income
Table Column
Edit: This has the function to edit the Other Income
Delete: This has the function to Delete the Other Income
Other Income: Name of the Other Income
Taxable: Check if the Other Income is taxable, uncheck if not
Locked: If locked you can now select this type of other income
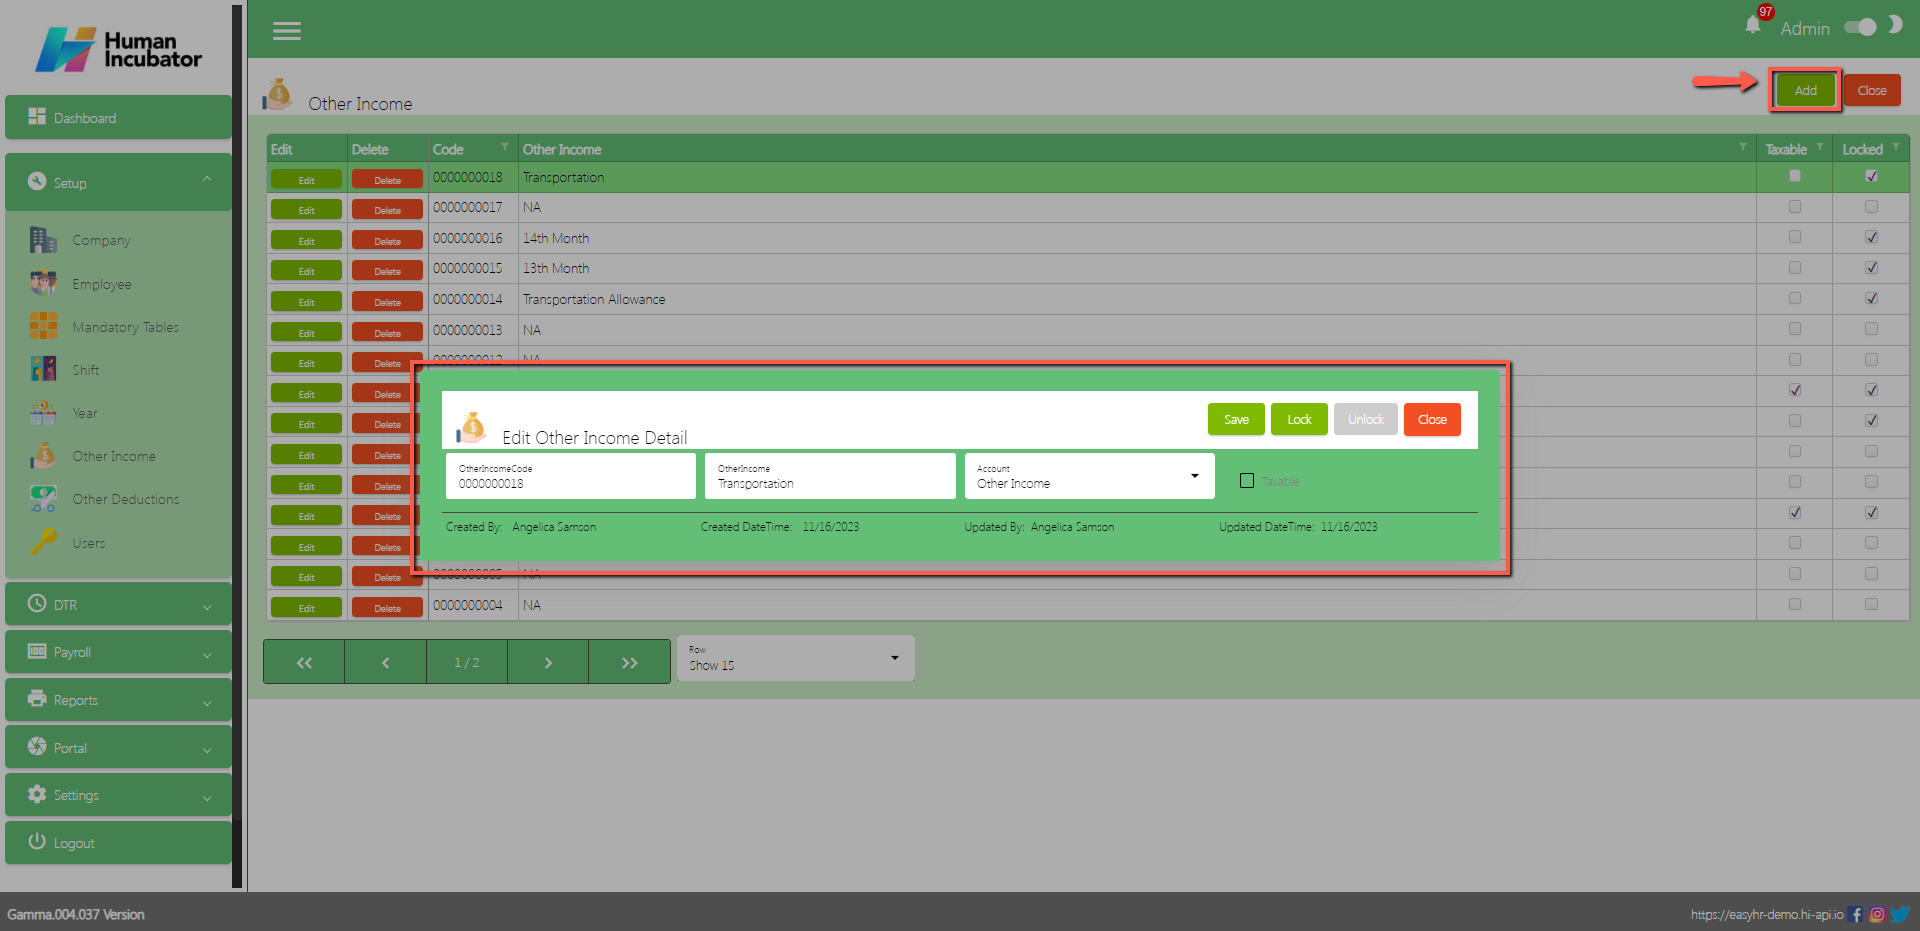
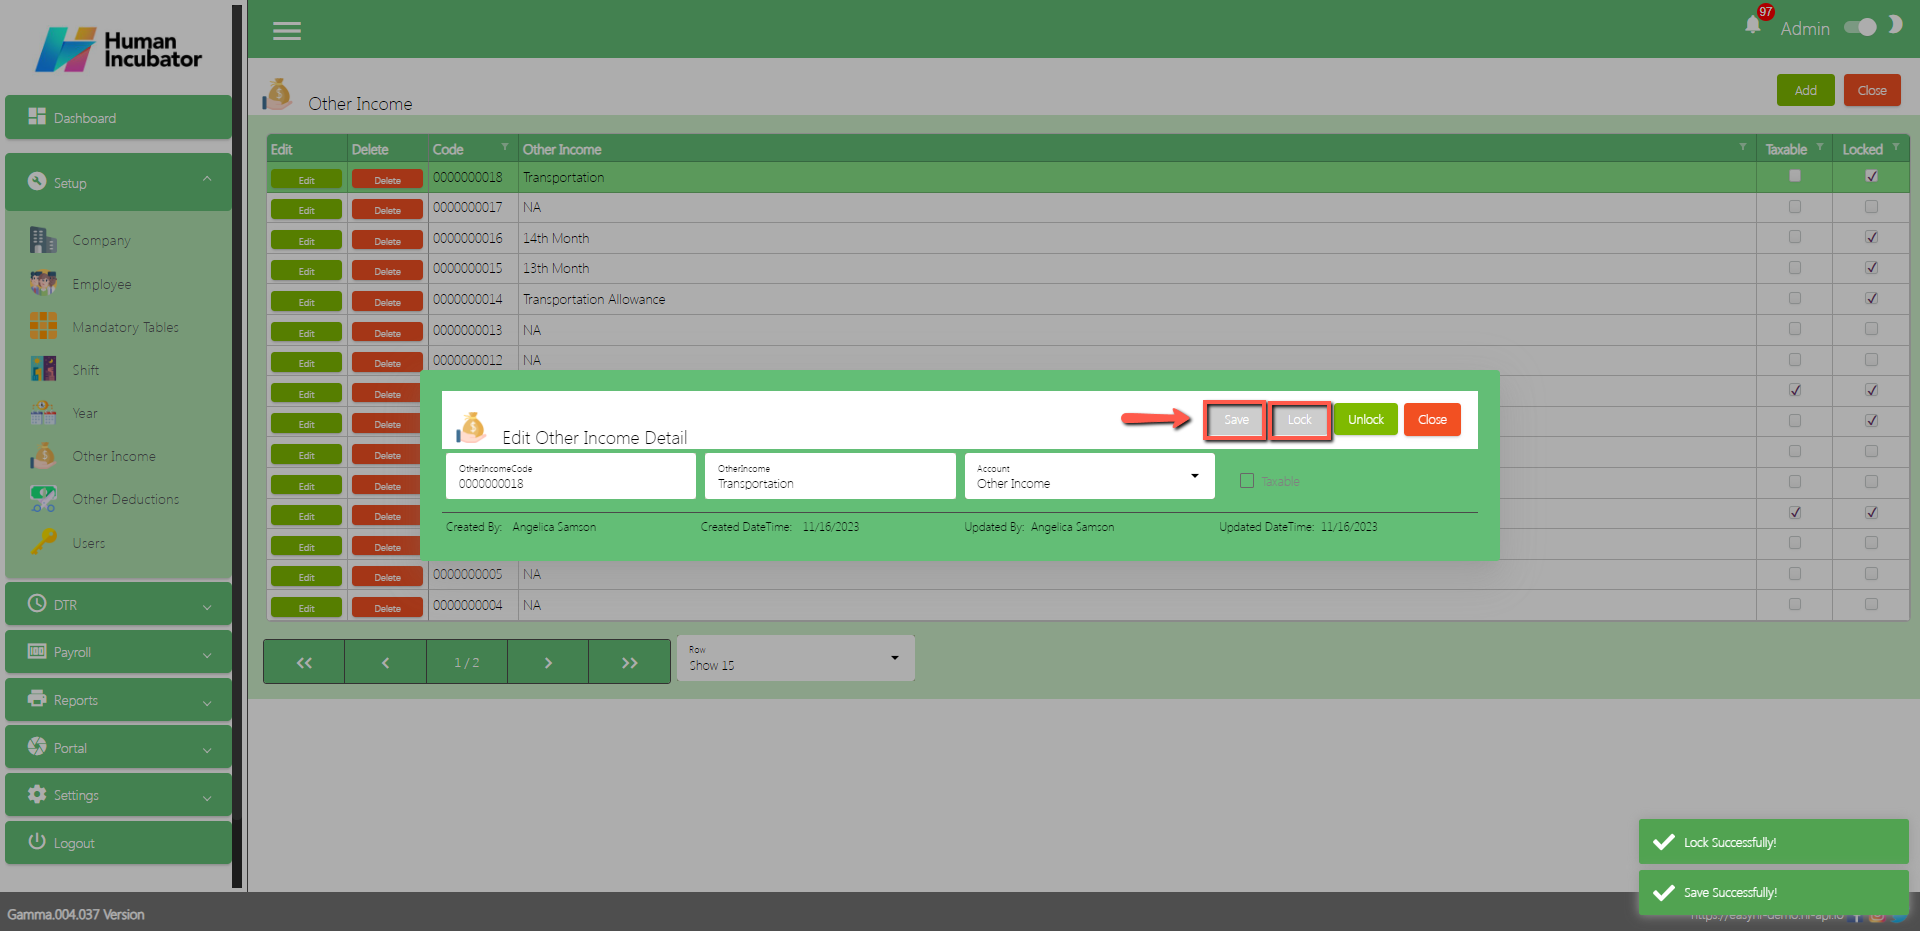
Other Income Detail
Assumption: To Add a new other income, click the Add button that can be seen on the right side of the screen
Fill all the important fields in Other Income detail like:
Input Other Income name
Select Other Income account
Check the Check Box if taxable or non-taxable
Save/Lock
Make sure to save/lock the record so that in every transaction the Other Income will show.
Other Deductions
Overview
Other Deductions setup is used for making other deductions just like Salary loans and all loans in company.
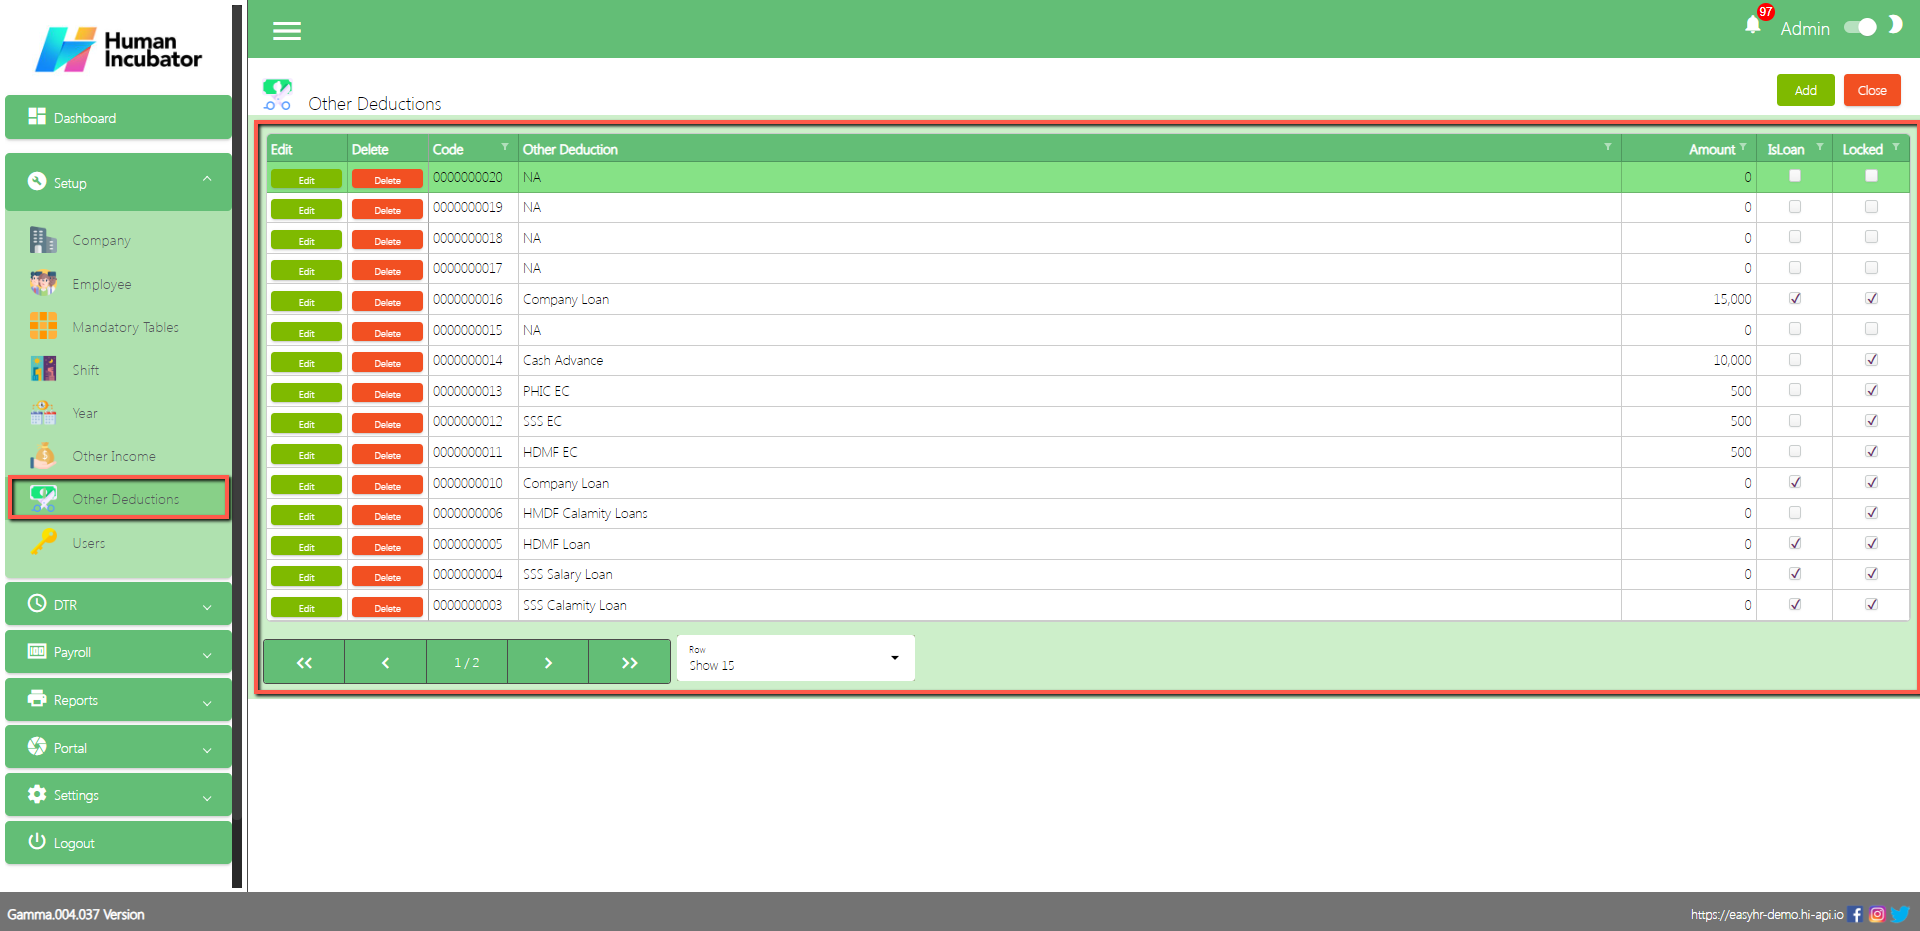
Other Deductions List
Shows all list of Other Deductions
Other Deductions
Edit: This has the function to edit the Other Deductions
Delete: This has the function to Delete the Other Deductions
Other Deduction: Name of the Other Deduction
Amount: This is optional you can either put and amout or not
IsLoan: Check if this Other Deduction is a Loan Type
Locked: If locked you can now select this type of Other Deduction
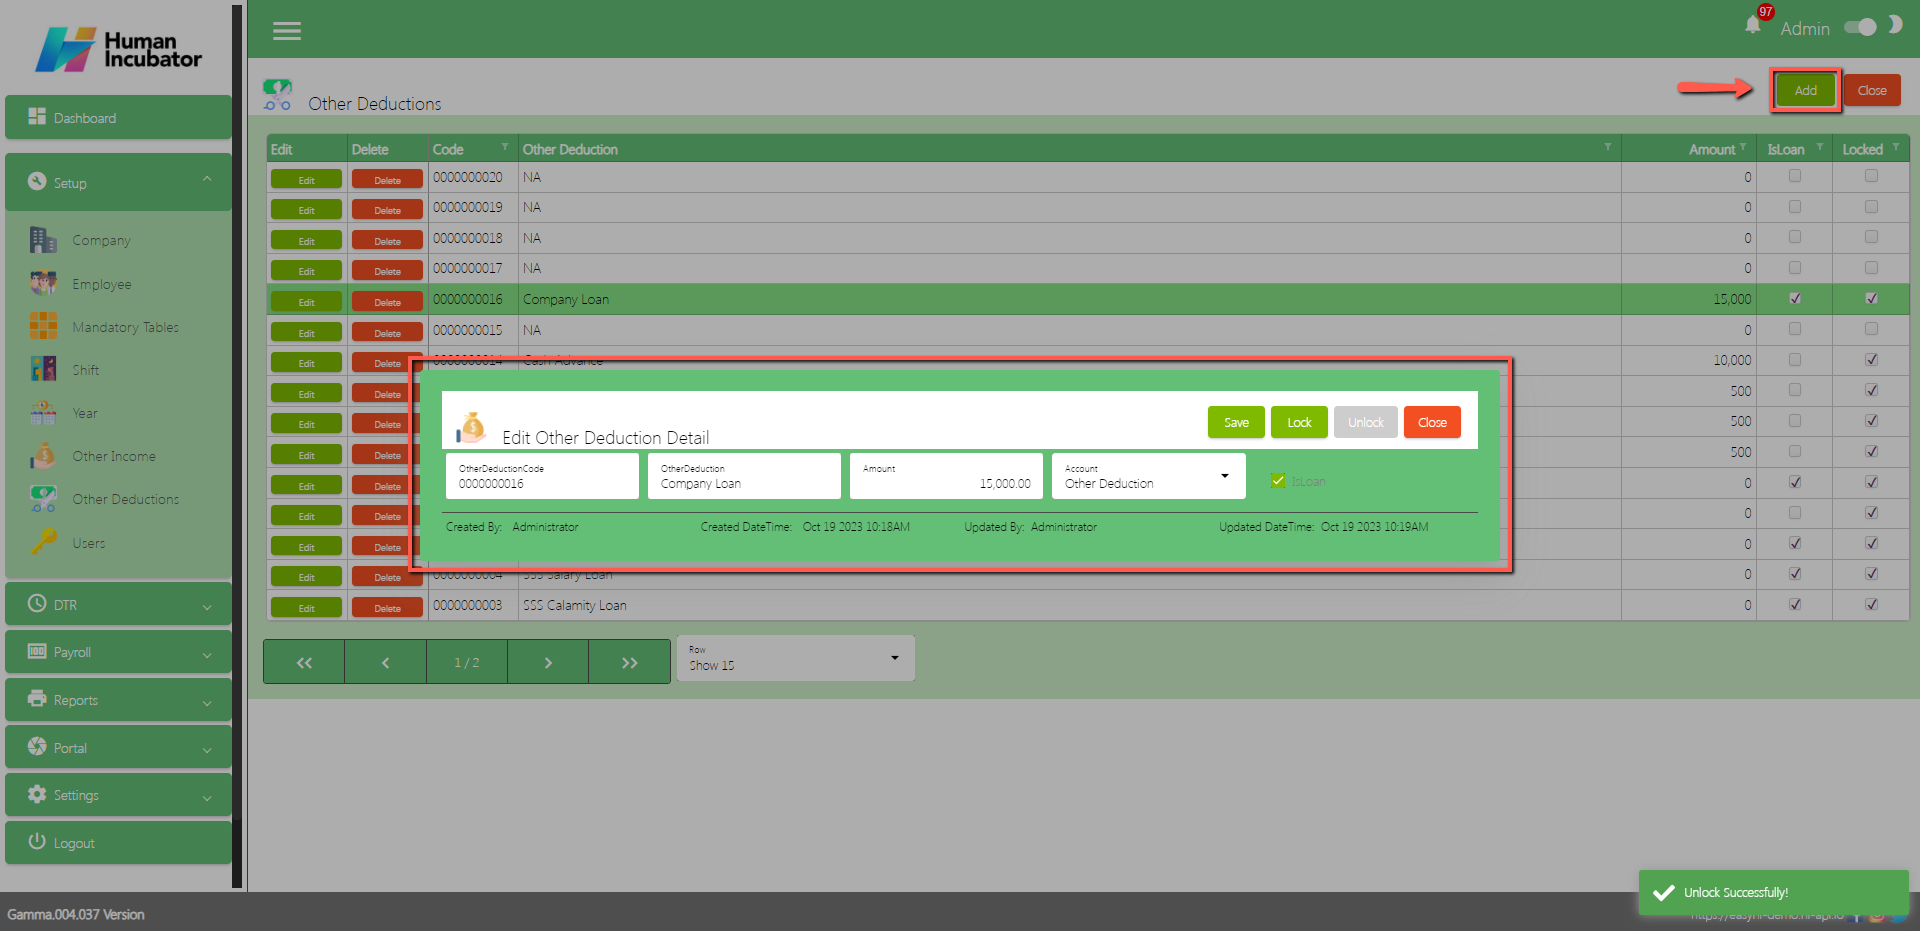
Other Deductions Detail
To Add a new other deductions, click the Add button that can be seen on the right side of the screen
Fill all the important fields in Other Deductions detail like:
Input Other Deductions name
Input Amount (Note: Input amount is optional)
Select Other Deductions account
Check the Check Box if IsLoan
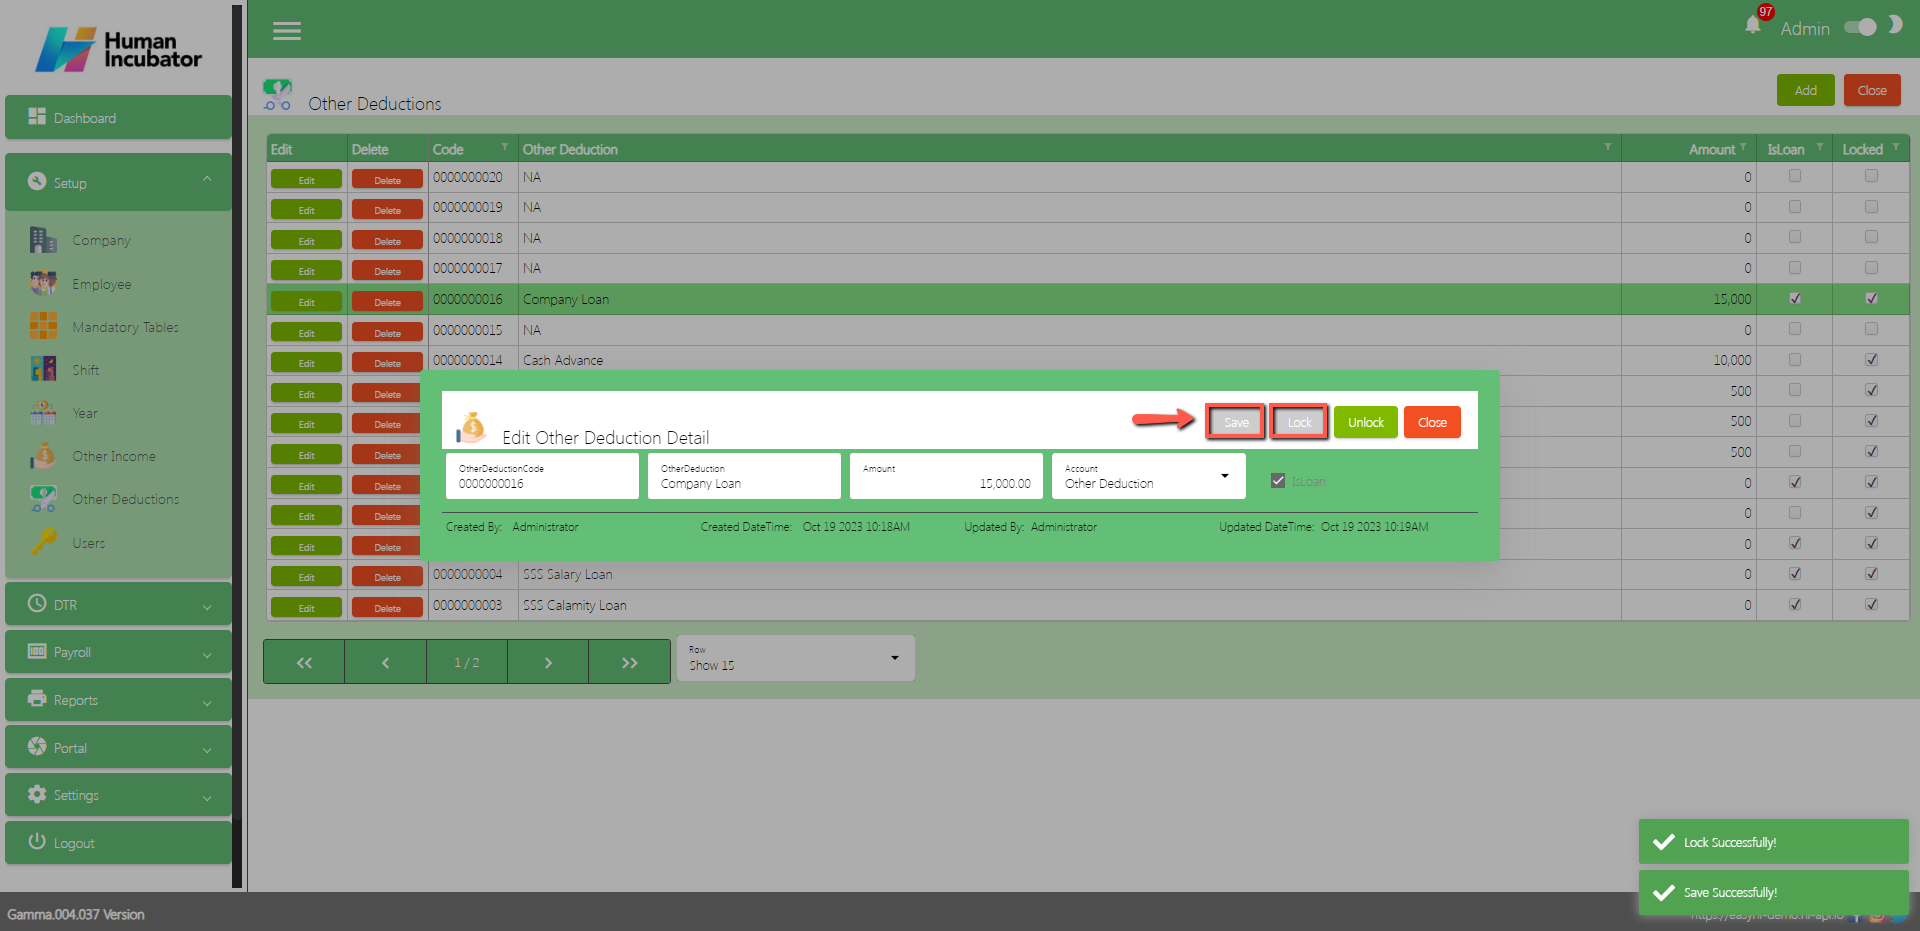
Save/Lock
Make sure to save/lock the record so that in every transaction the Other Deductions will show. (Note: There should be at least 1 other deduction that is locked so that you can add a loan)
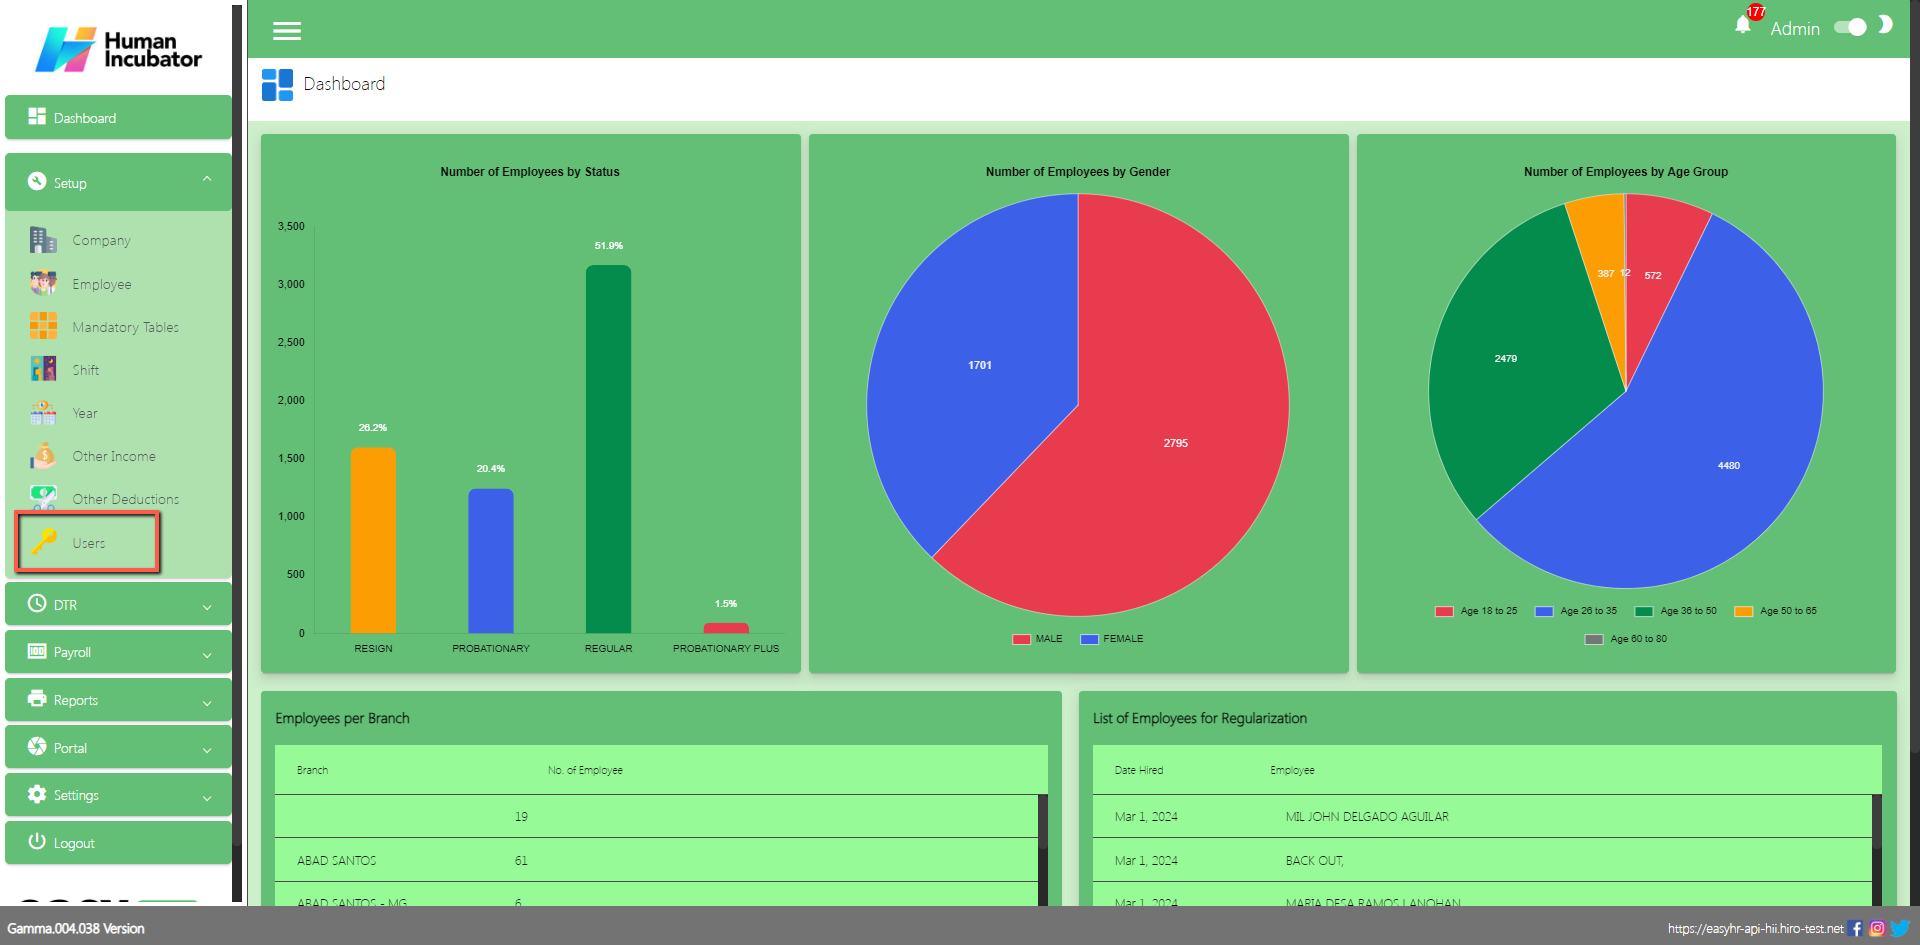
Users
Overview
Users setup is used for making the credentials of employees, user rights and also can upload more users.
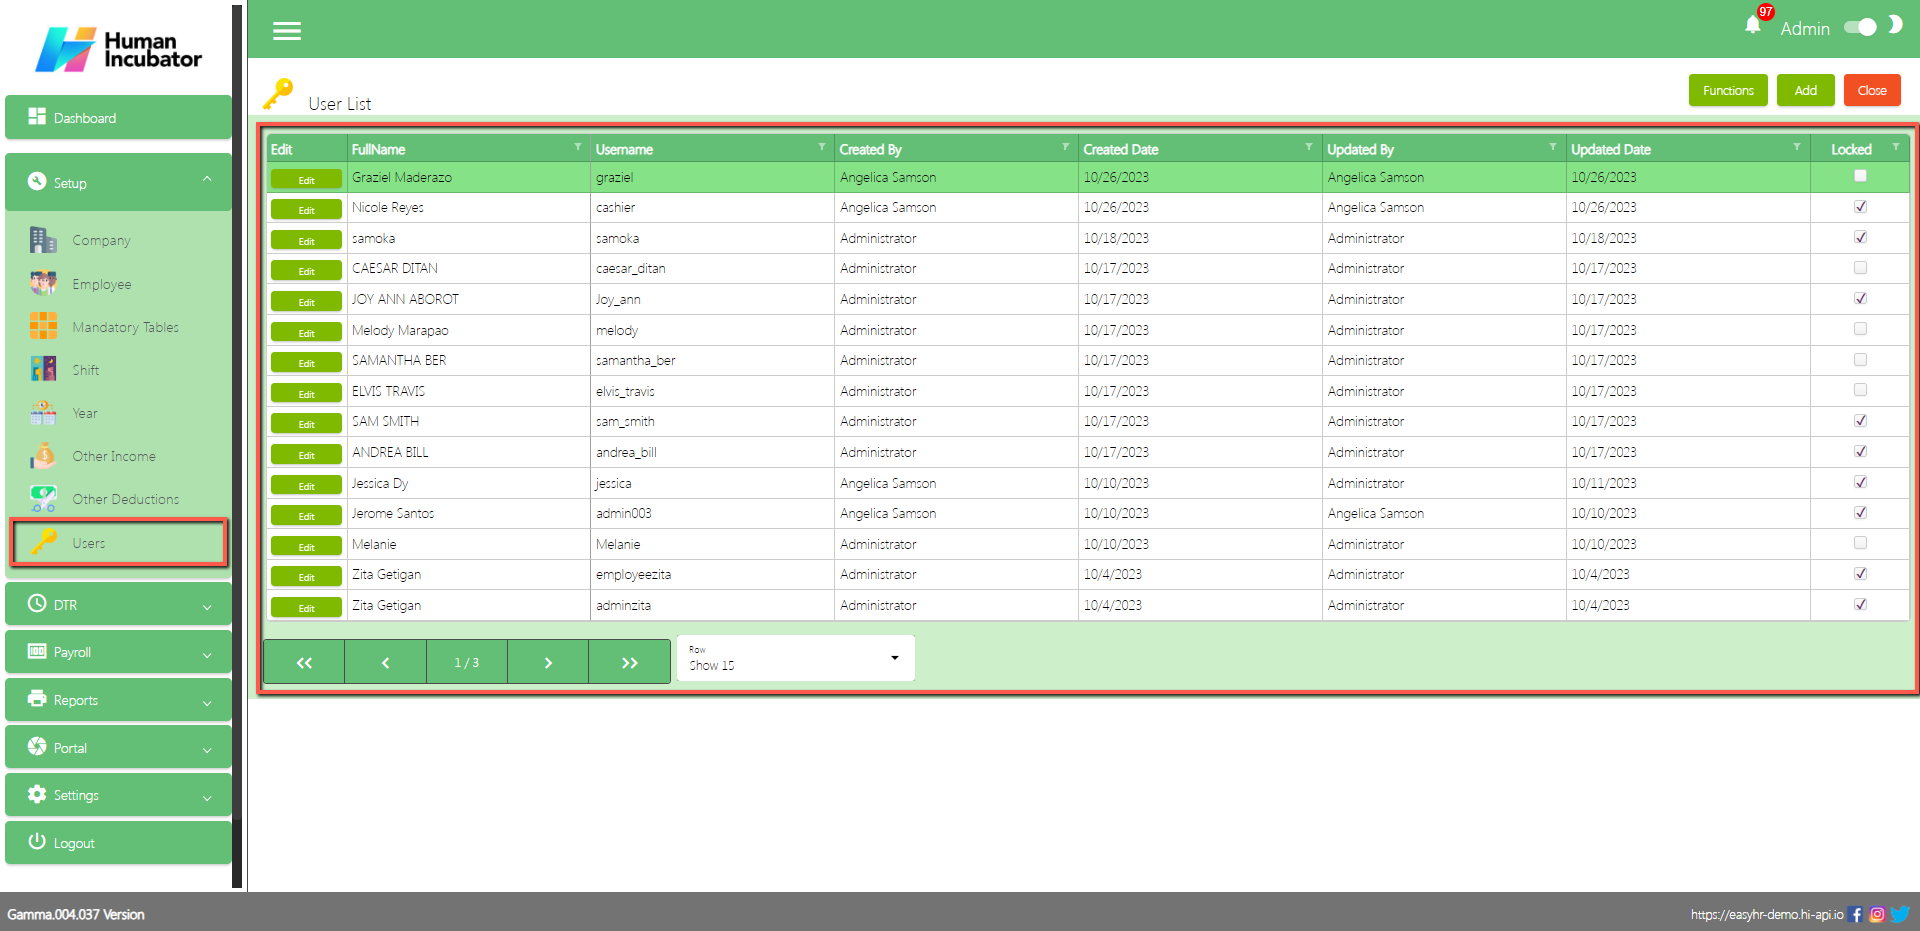
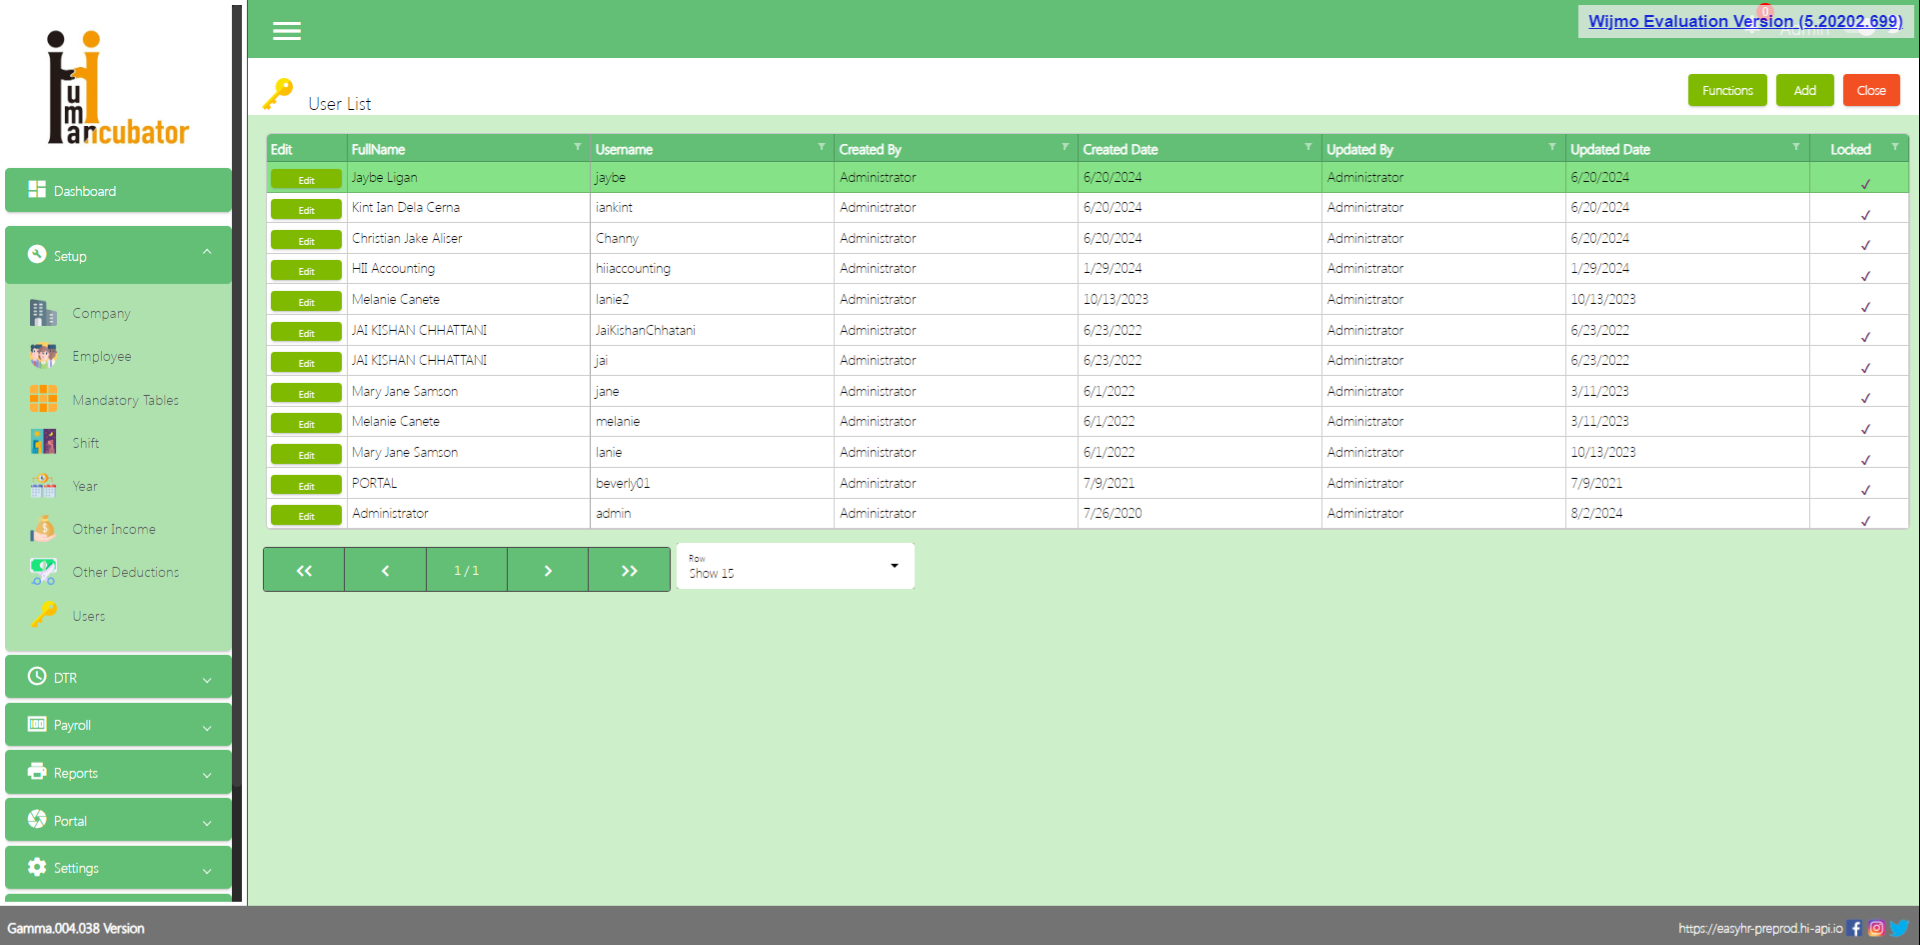
User list
Shows all list of Users
Table Column
Edit: This has the function to edit the User
FullName: Fullname of the user
Username: Username of the user
Created By: Fullname of the login user who created the user
Created Date: Creation date of the user
Updated By: Fullname of the login user who updated the user
Updated Date: Updated date of the user
Locked: If it is already locked you can now login the account.
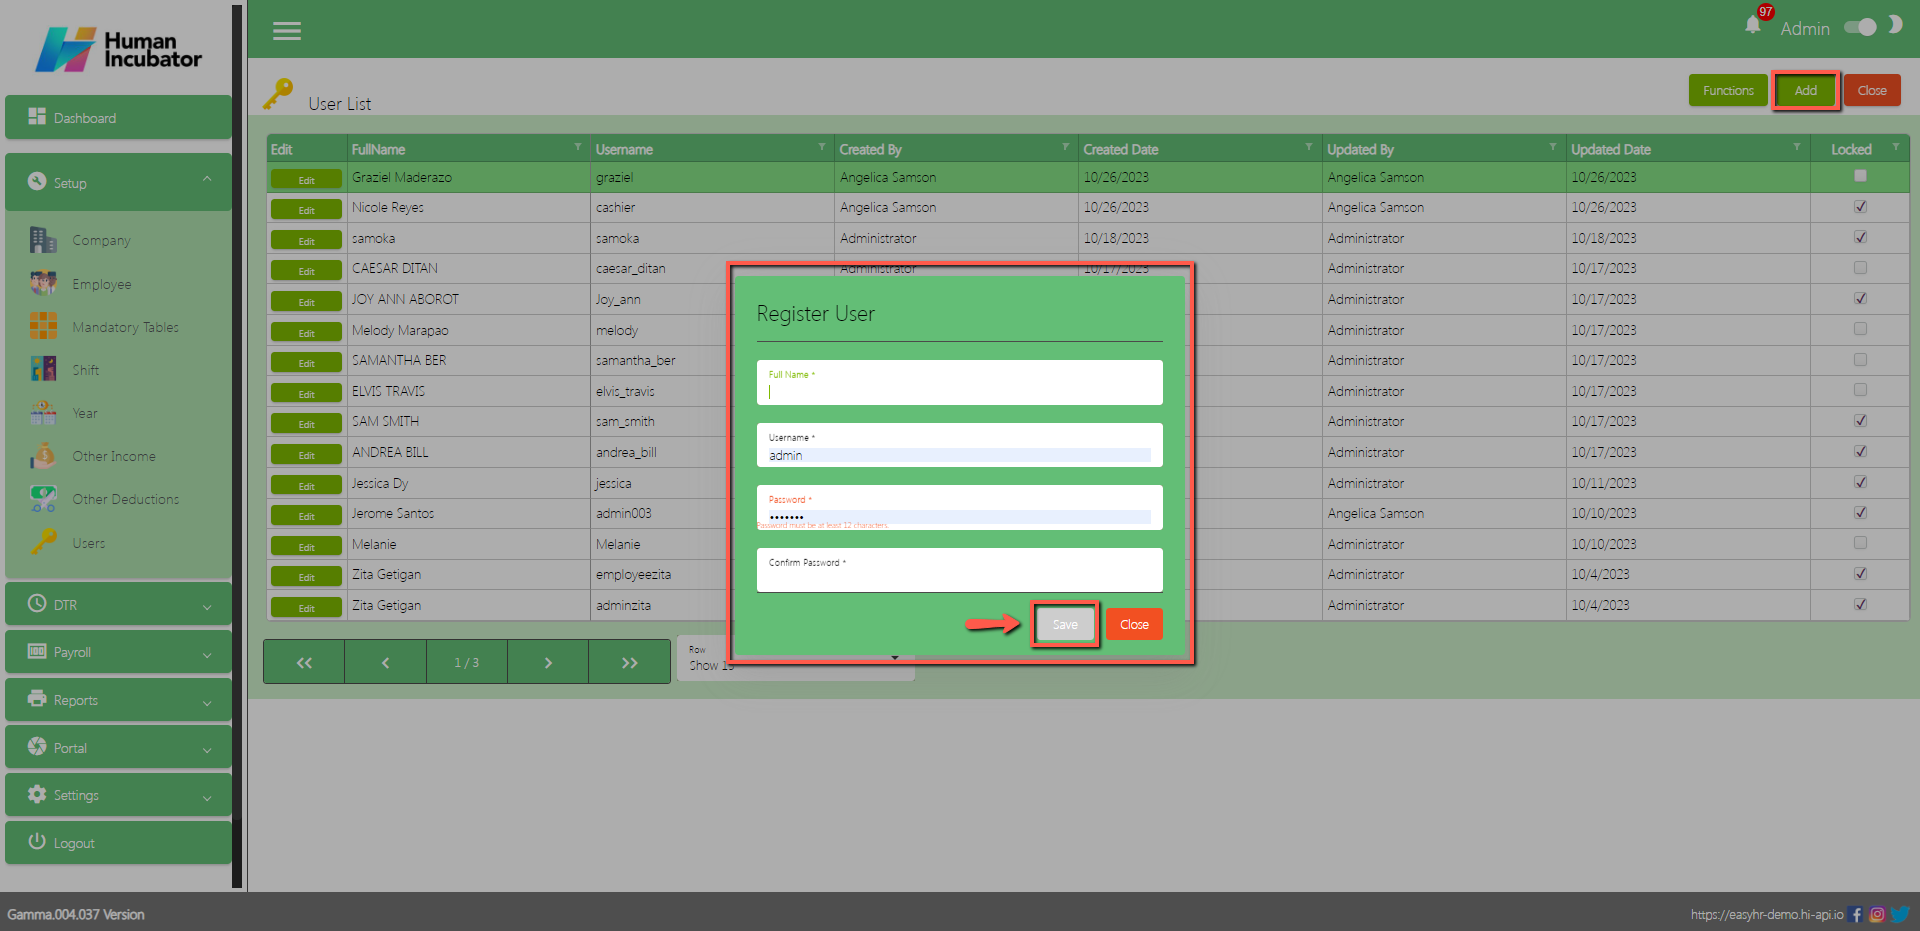
Register User
To Add a new user, click the Add button that can be seen on the right side of the screen
Fill all the important fields in Register User like:
Input Full Name
Input Username
Input Password (Note: Password must require Uppercase, Lowercase, Numbers, Special characters except (=+_-?/{}][\|) and also must be at least 12 characters)
Confirm Password
Click Save button to add in table
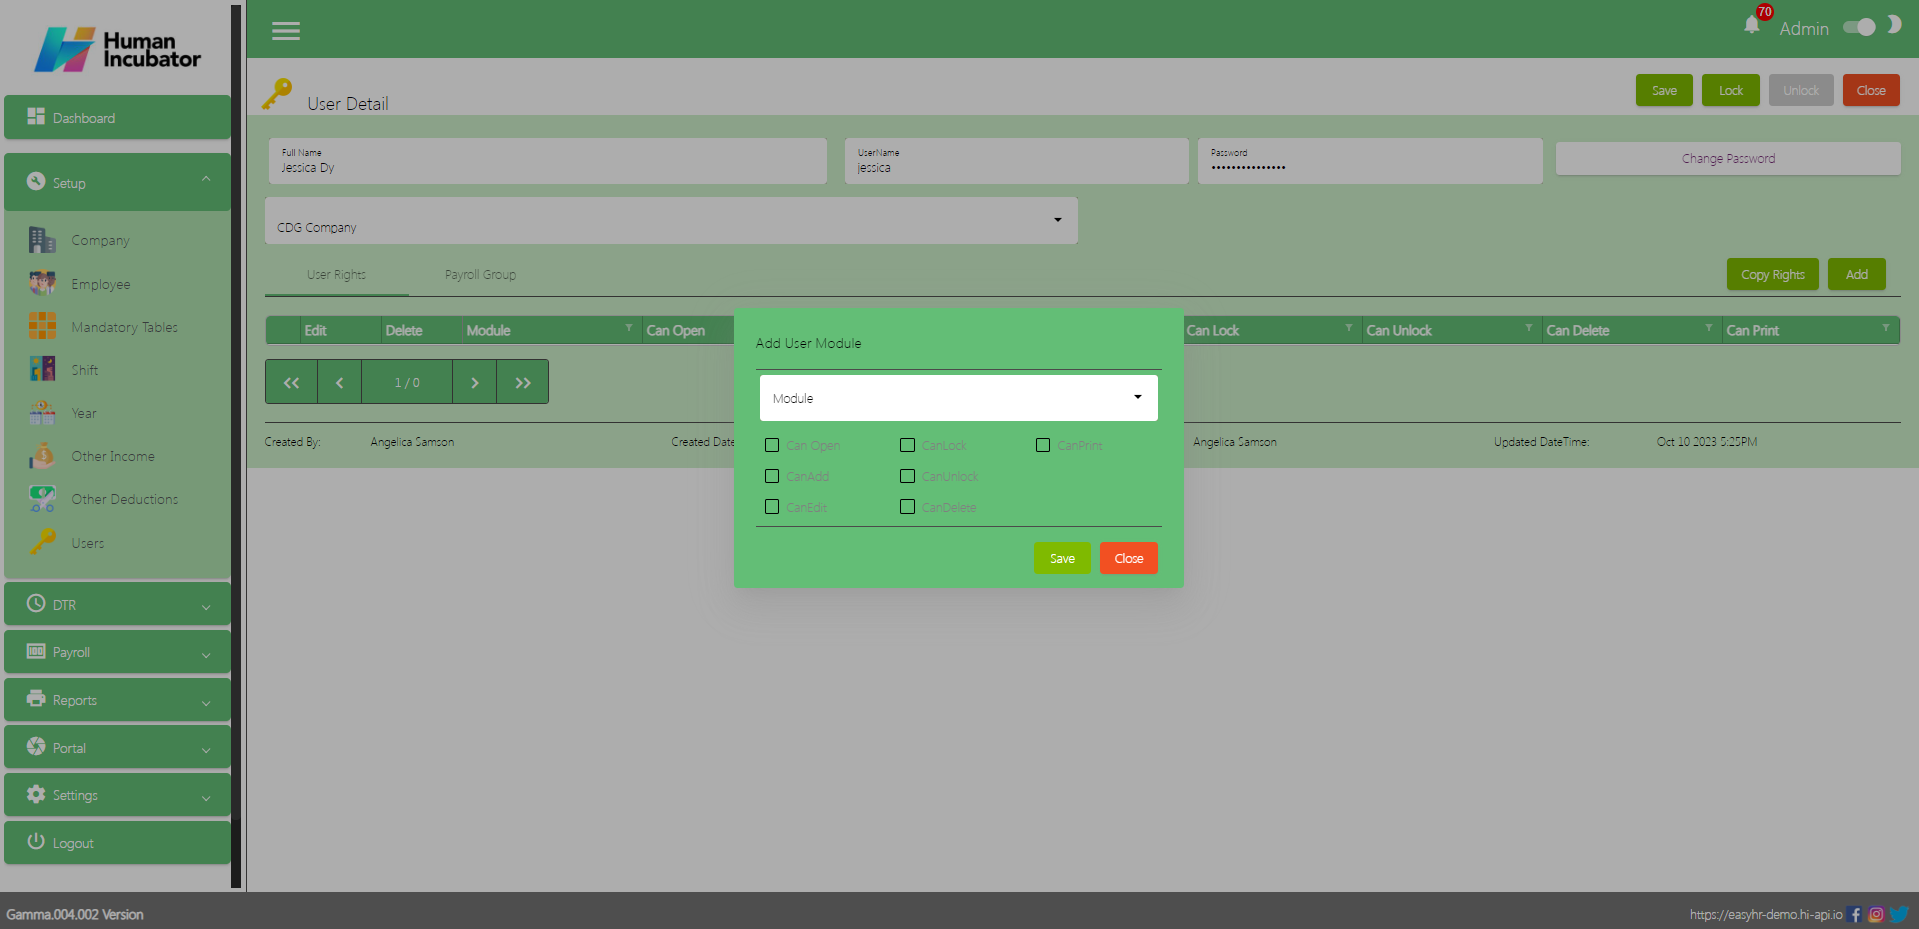
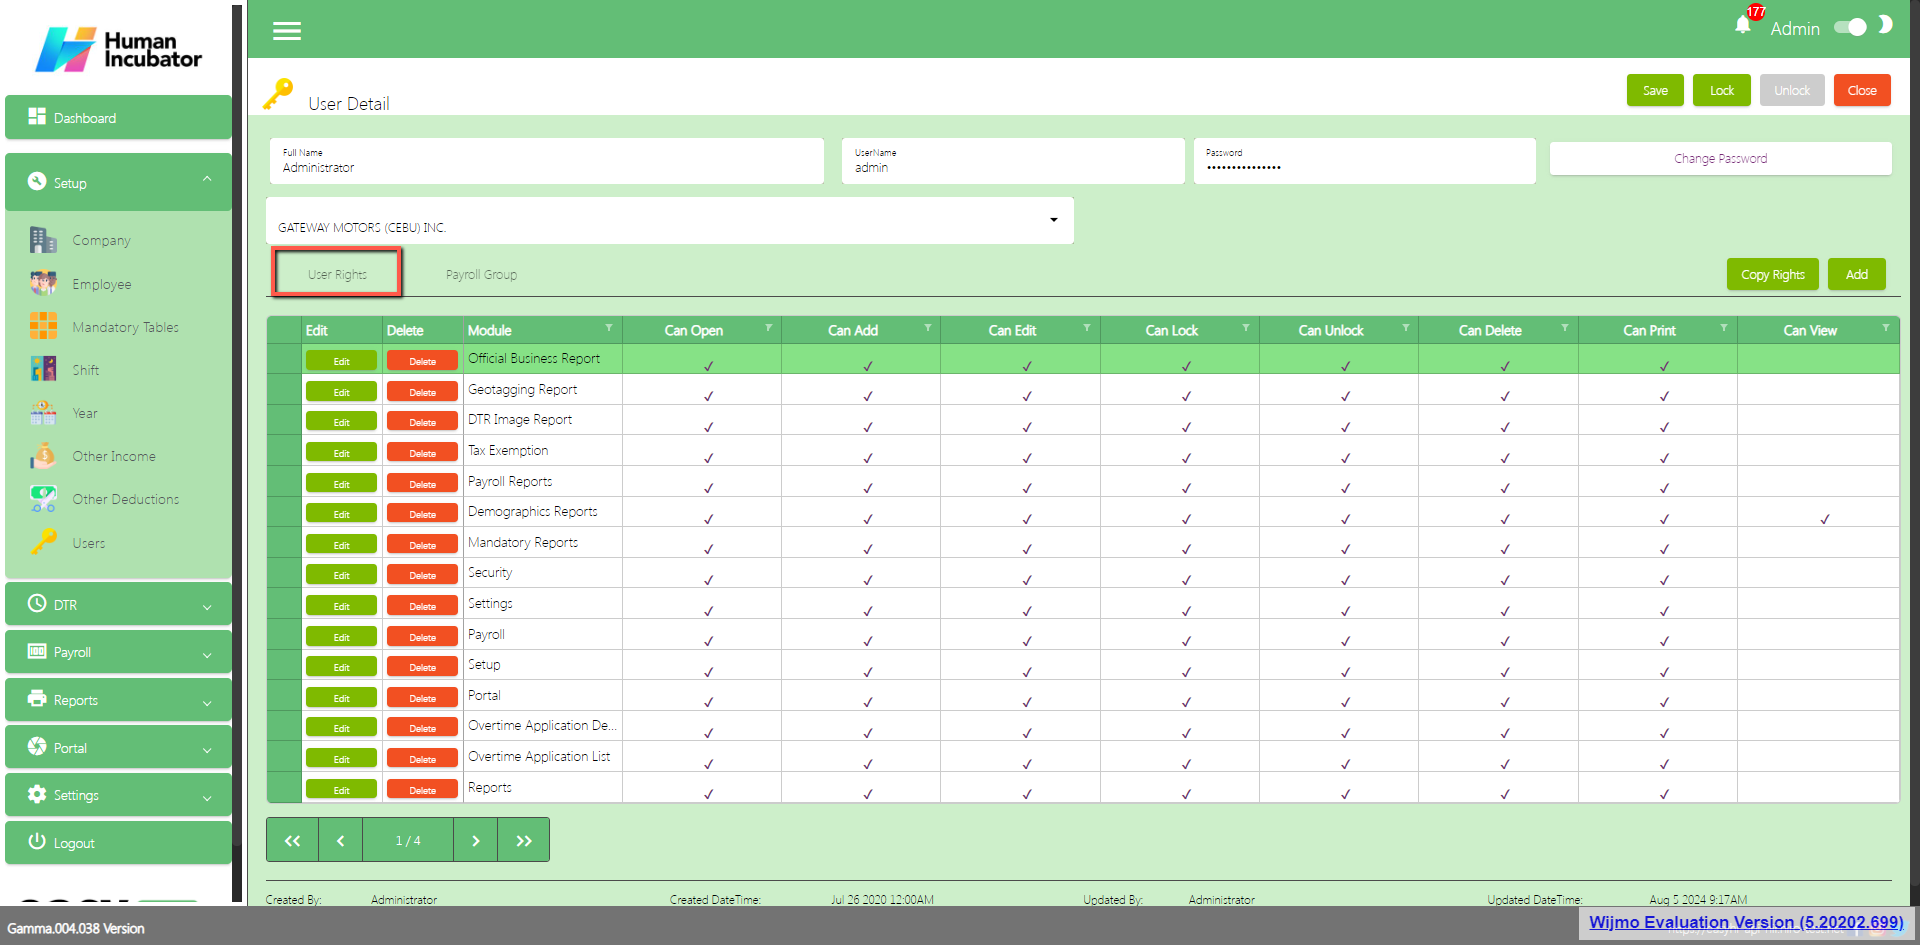
User Detail
Click Edit button to add the user rights of employee
There are 2 tabs in user detail
User Rights and Payroll Group
User Rights
Click Add button to add the user rights what module to access
Select Module
Check the Check Box
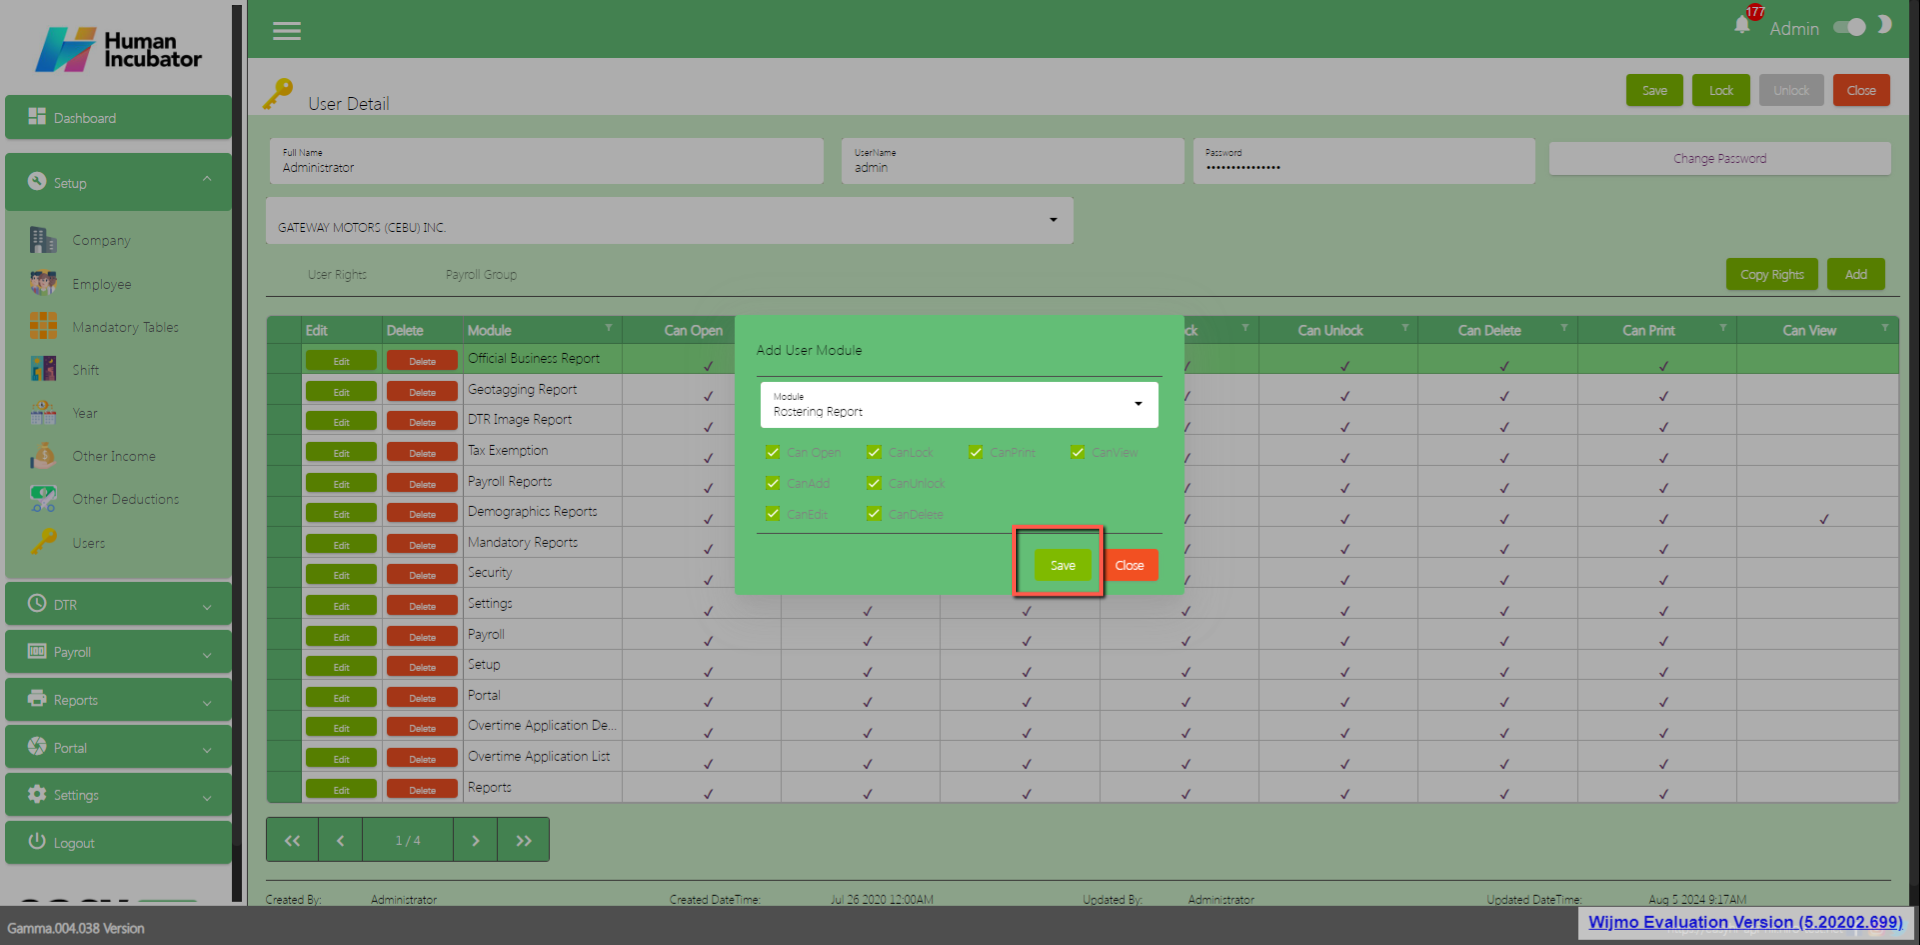
Click Save button to add in table
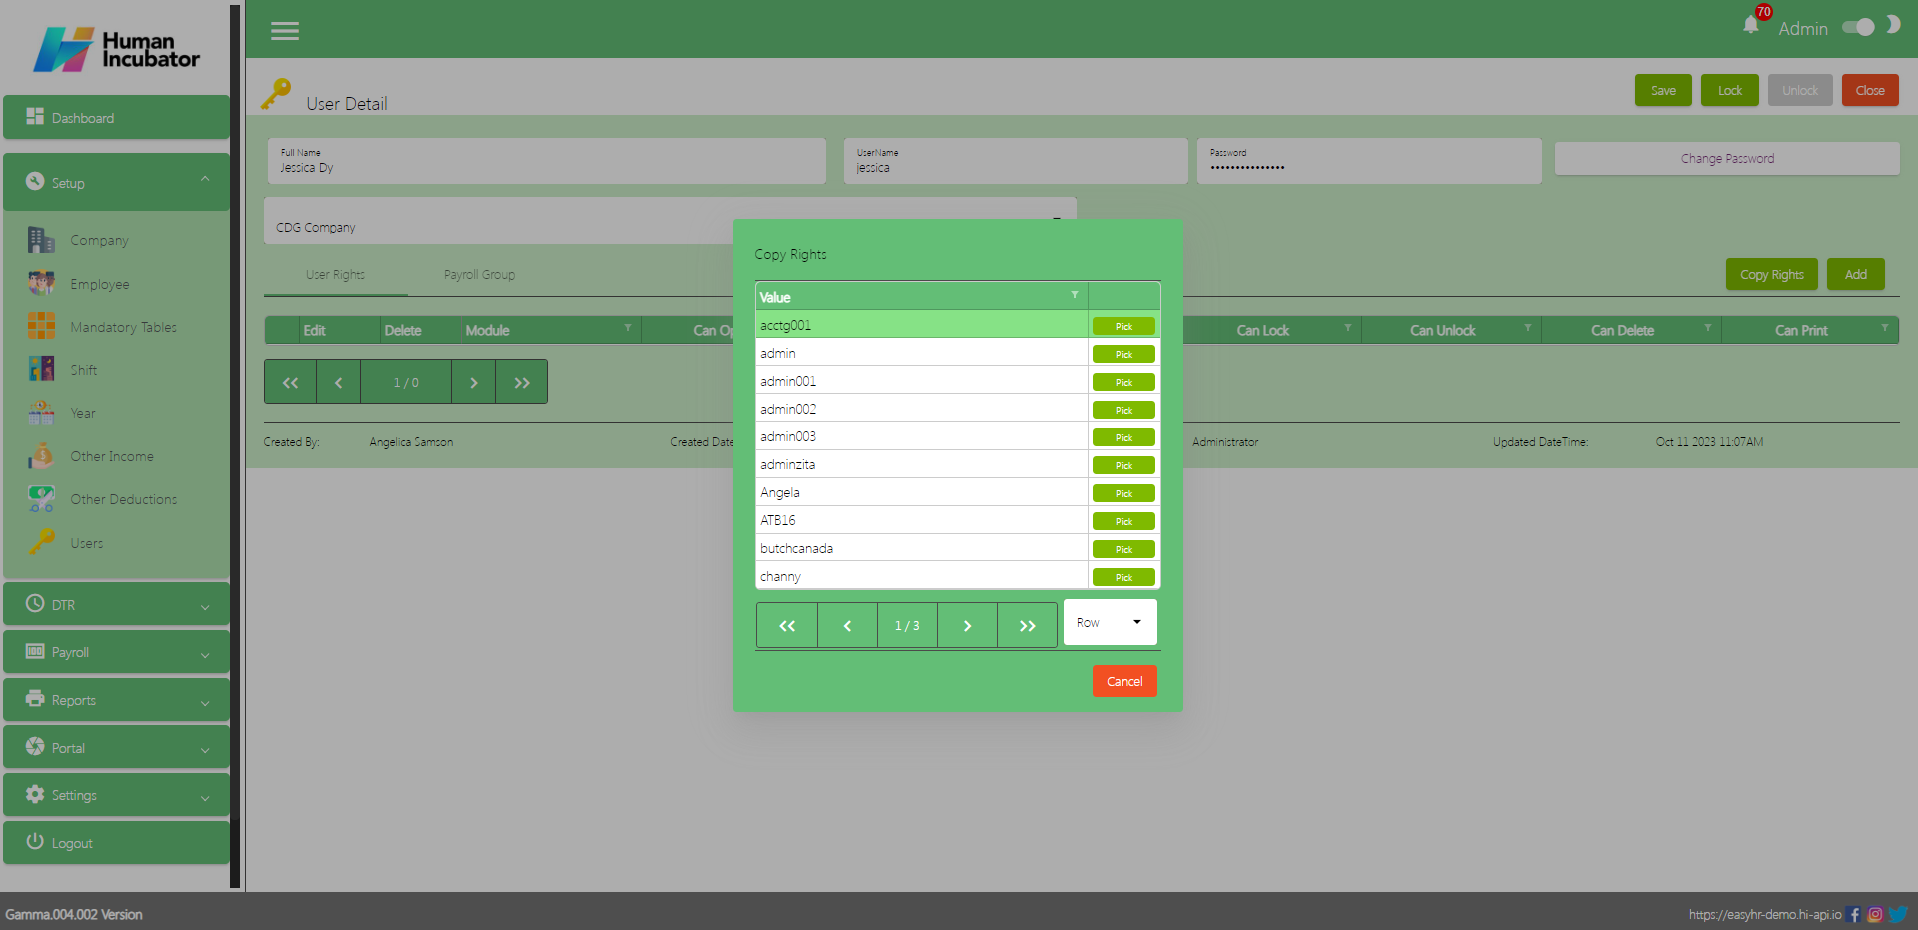
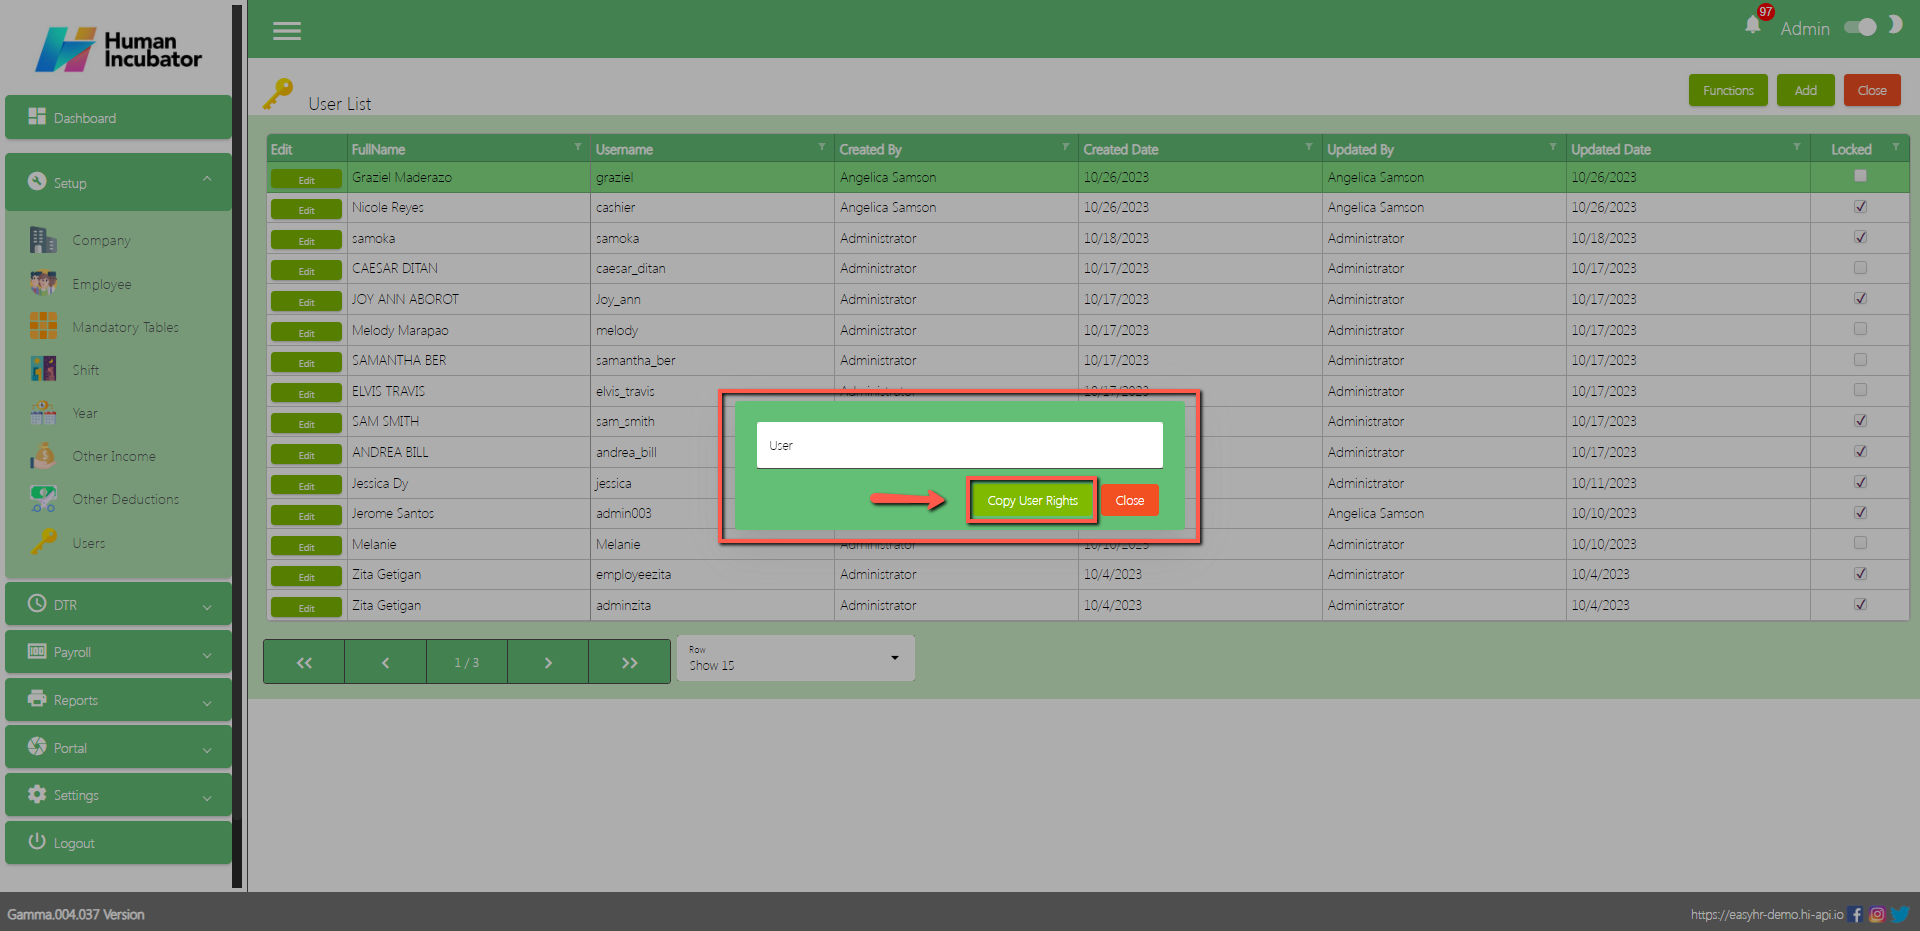
Click Copy Rightsbutton to copy the rights of employee
Select the User need to copy rights
Click Pick button to add in table
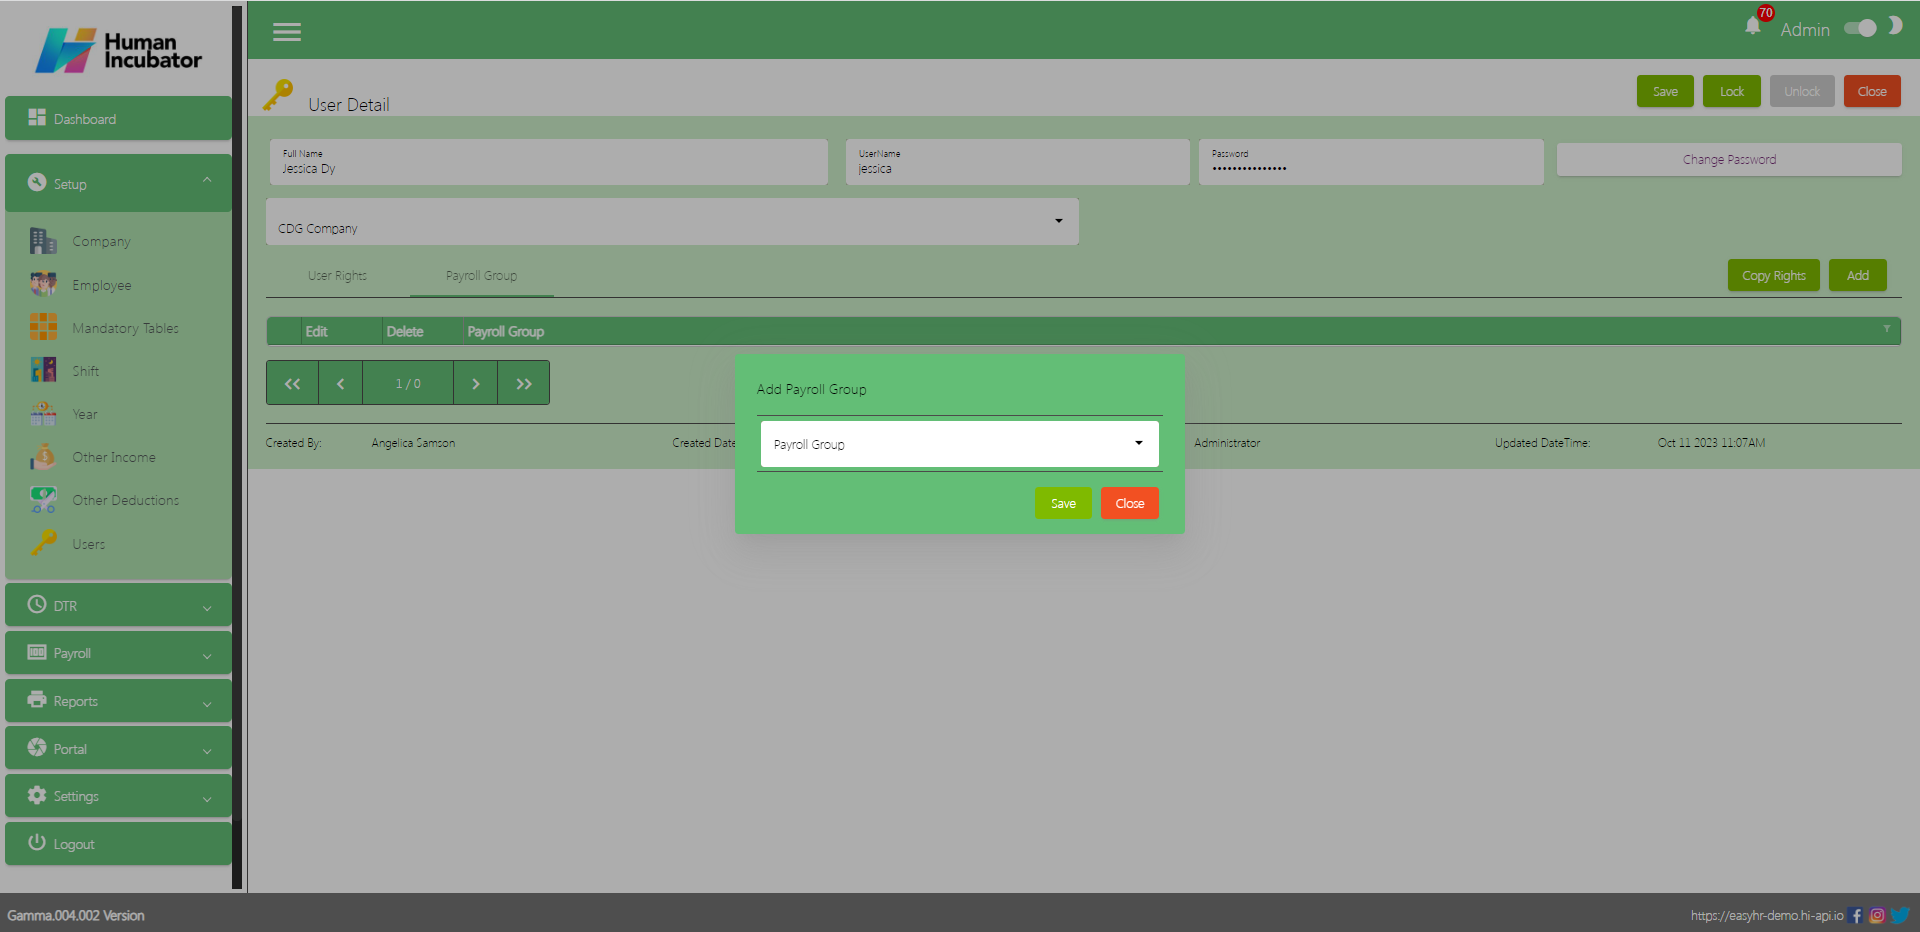
Payroll Group
Click Add button to add what payroll group to access
Select Payroll Group
Click Save button to add in table
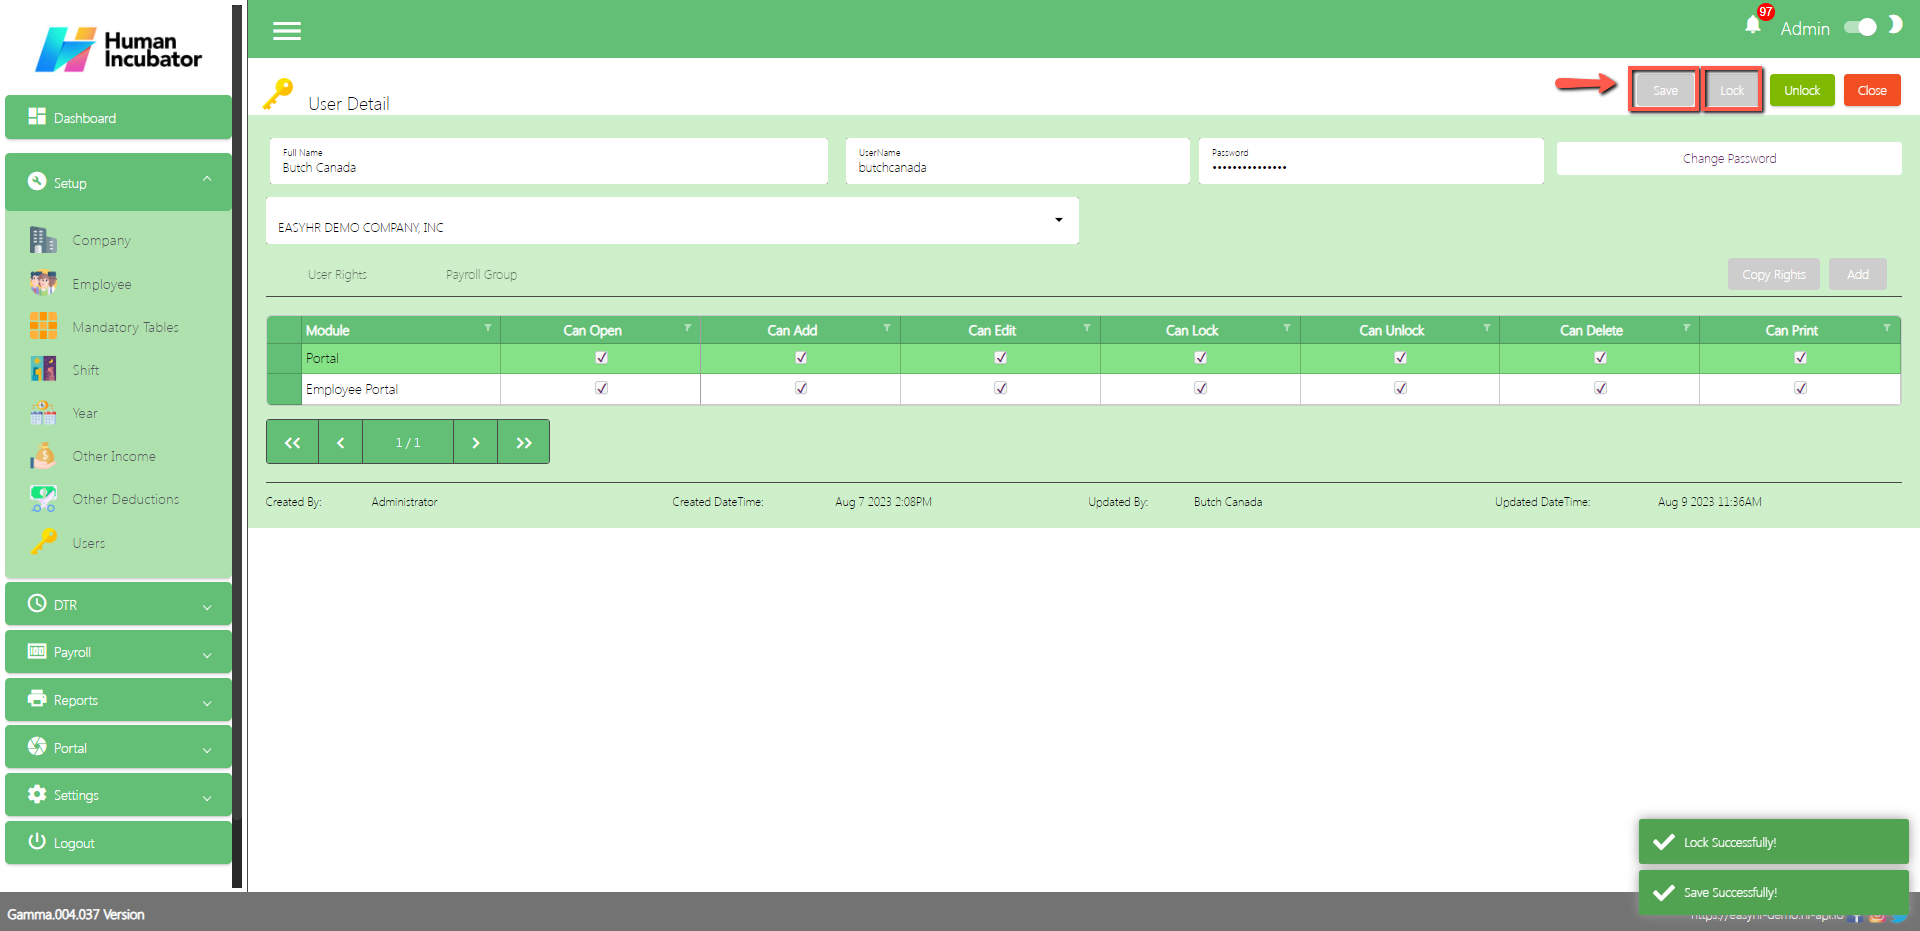
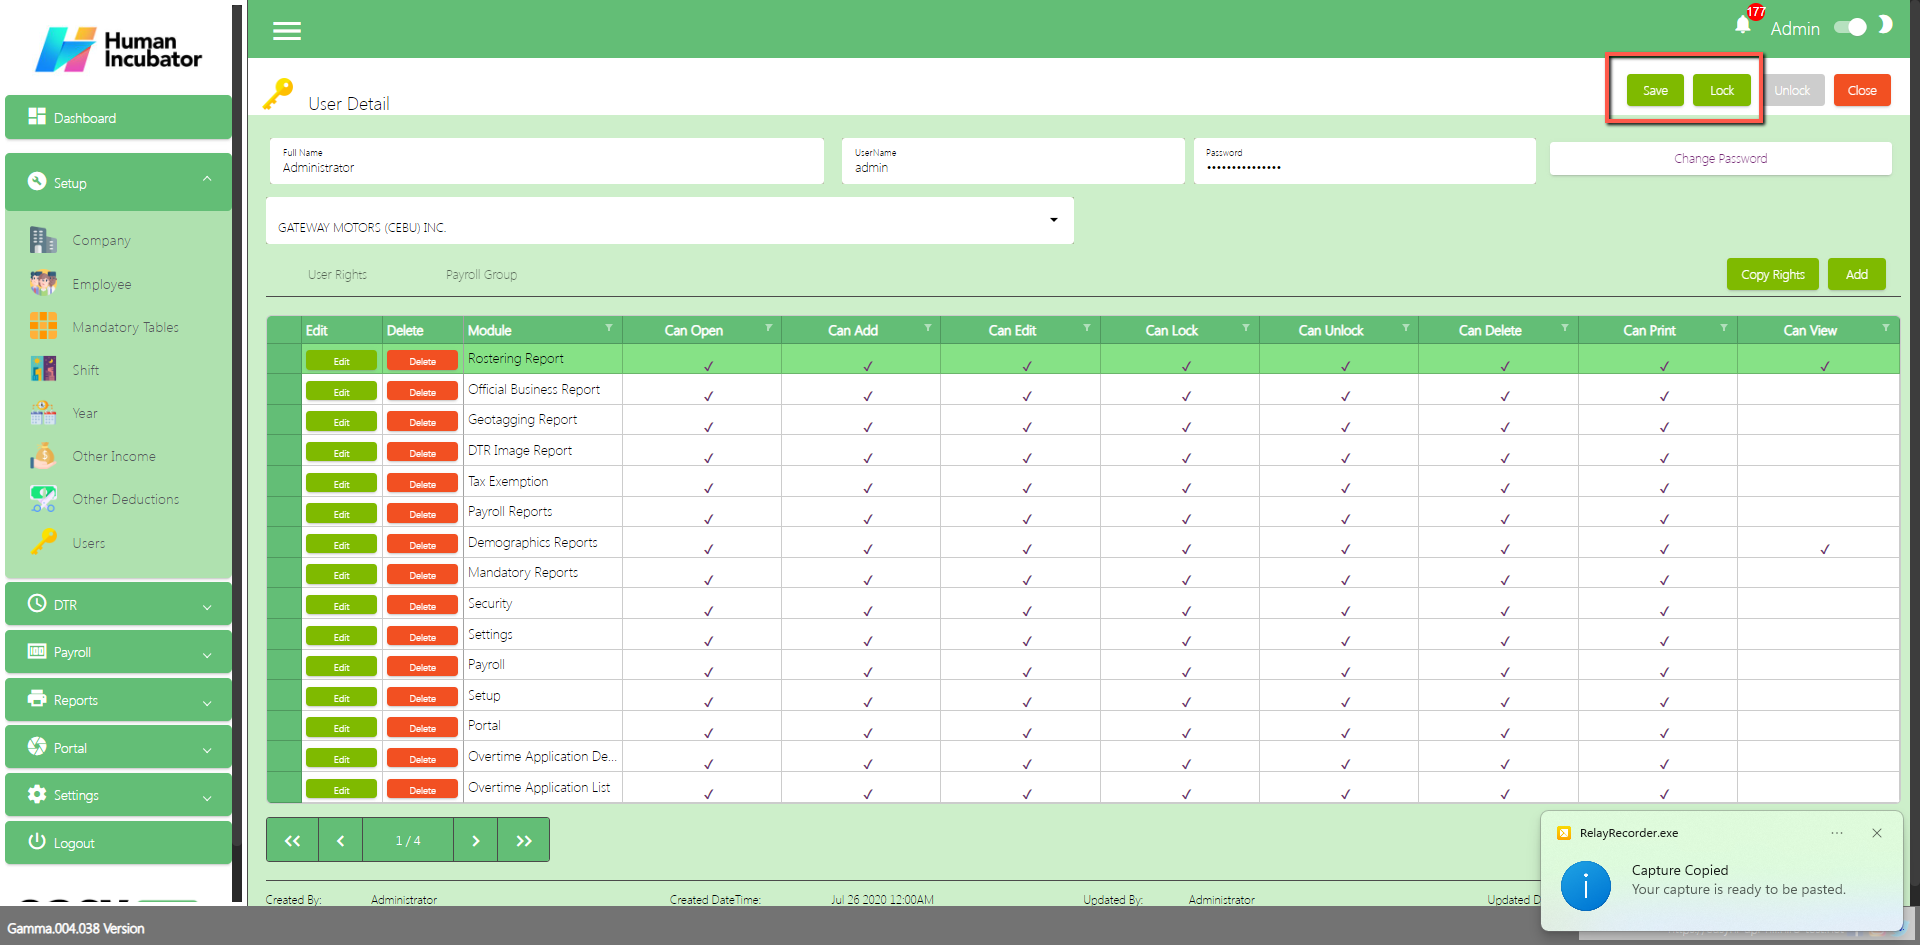
Save/Lock
Make sure to save/lock the record so that it can access the user every transaction.
Click Close button to go back in User List
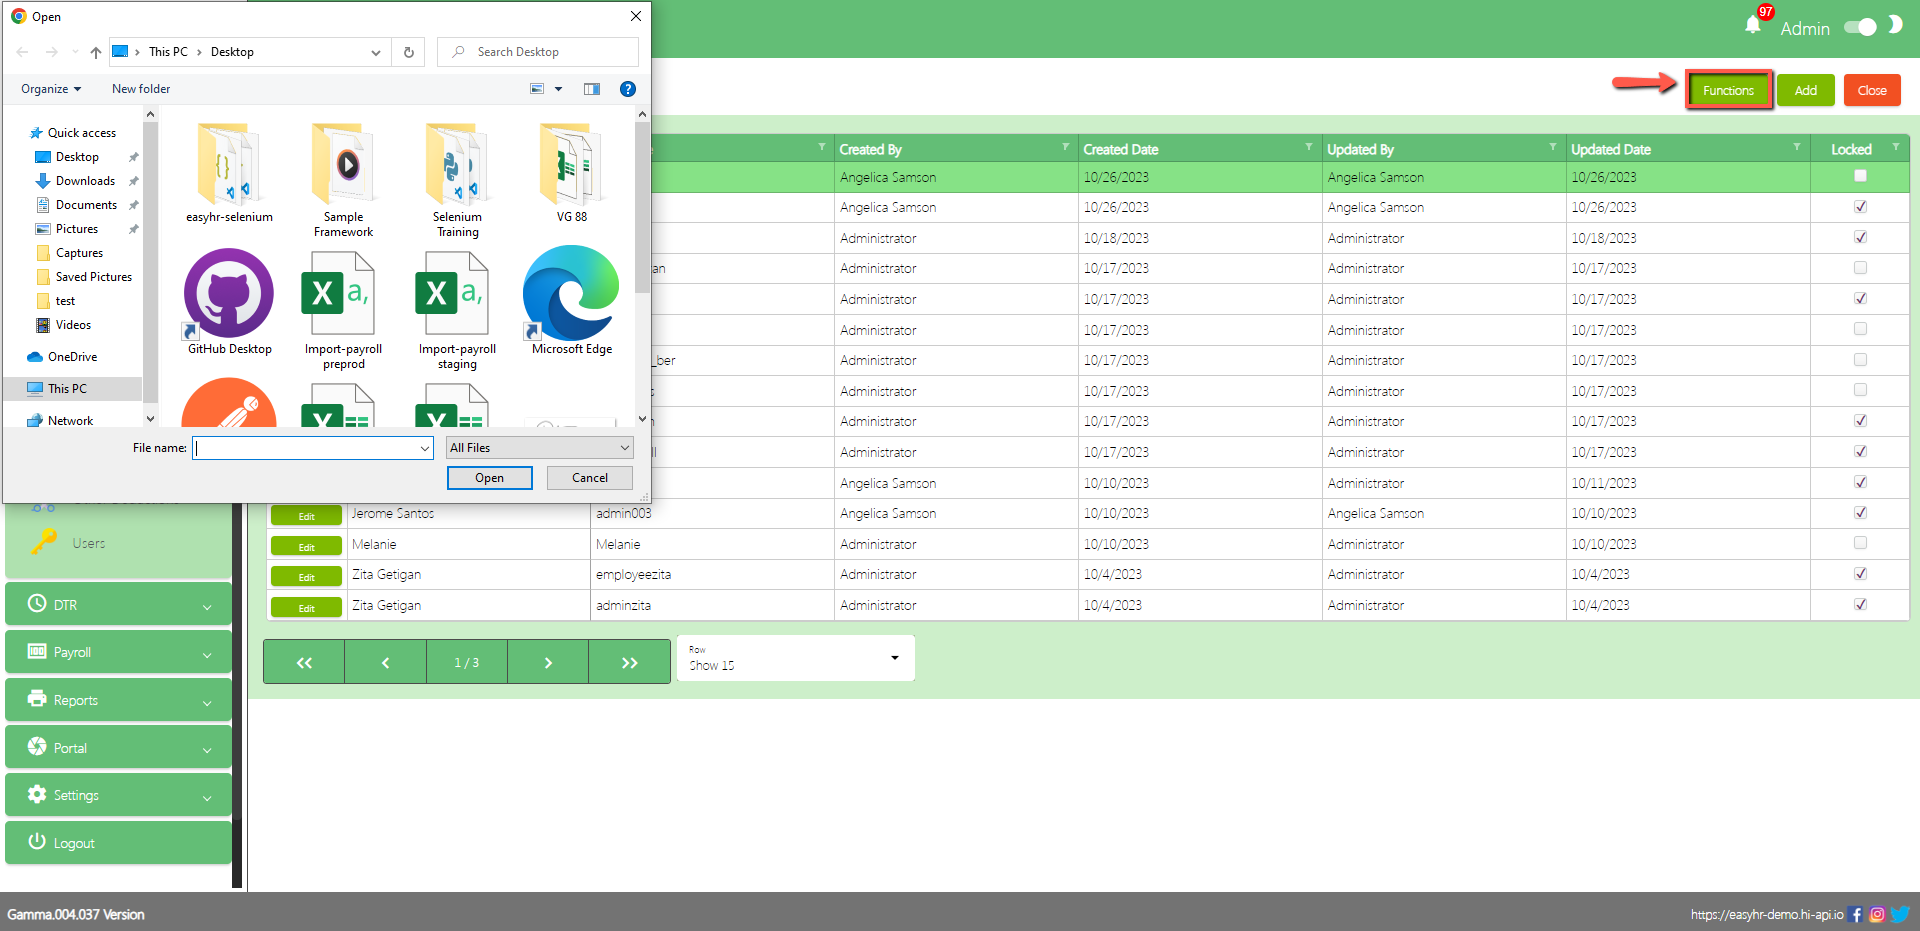
Upload User
To Upload User, click Functions button that can be seen on the right side of the screen
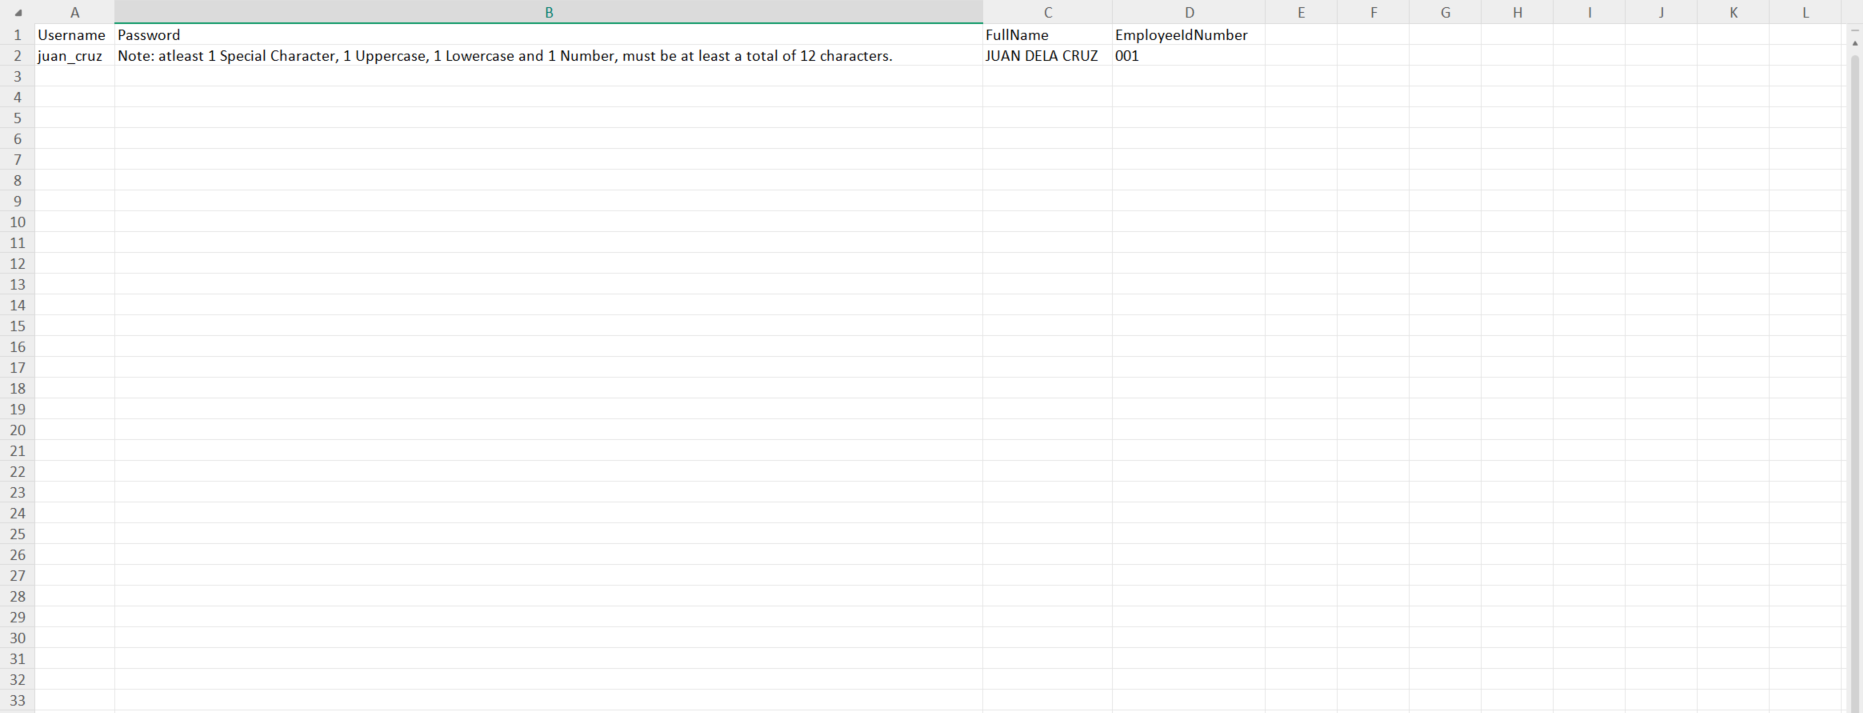
To Download file format
To Edit the format
To Input Username
To Input Password (Note: There is a Password requirements stated)
To Input Fullname
To Input EmployeeIDNumber
Click Upload User to select master file and click Open
Select User and Click Copy User Rights button to copy the rights for the previous User
Uploading Master file Successfully
File uploaded add to table
Rostering
Steps
1. In the Setup module click Users
2. Edit User
3.Go to the User Rights Tab
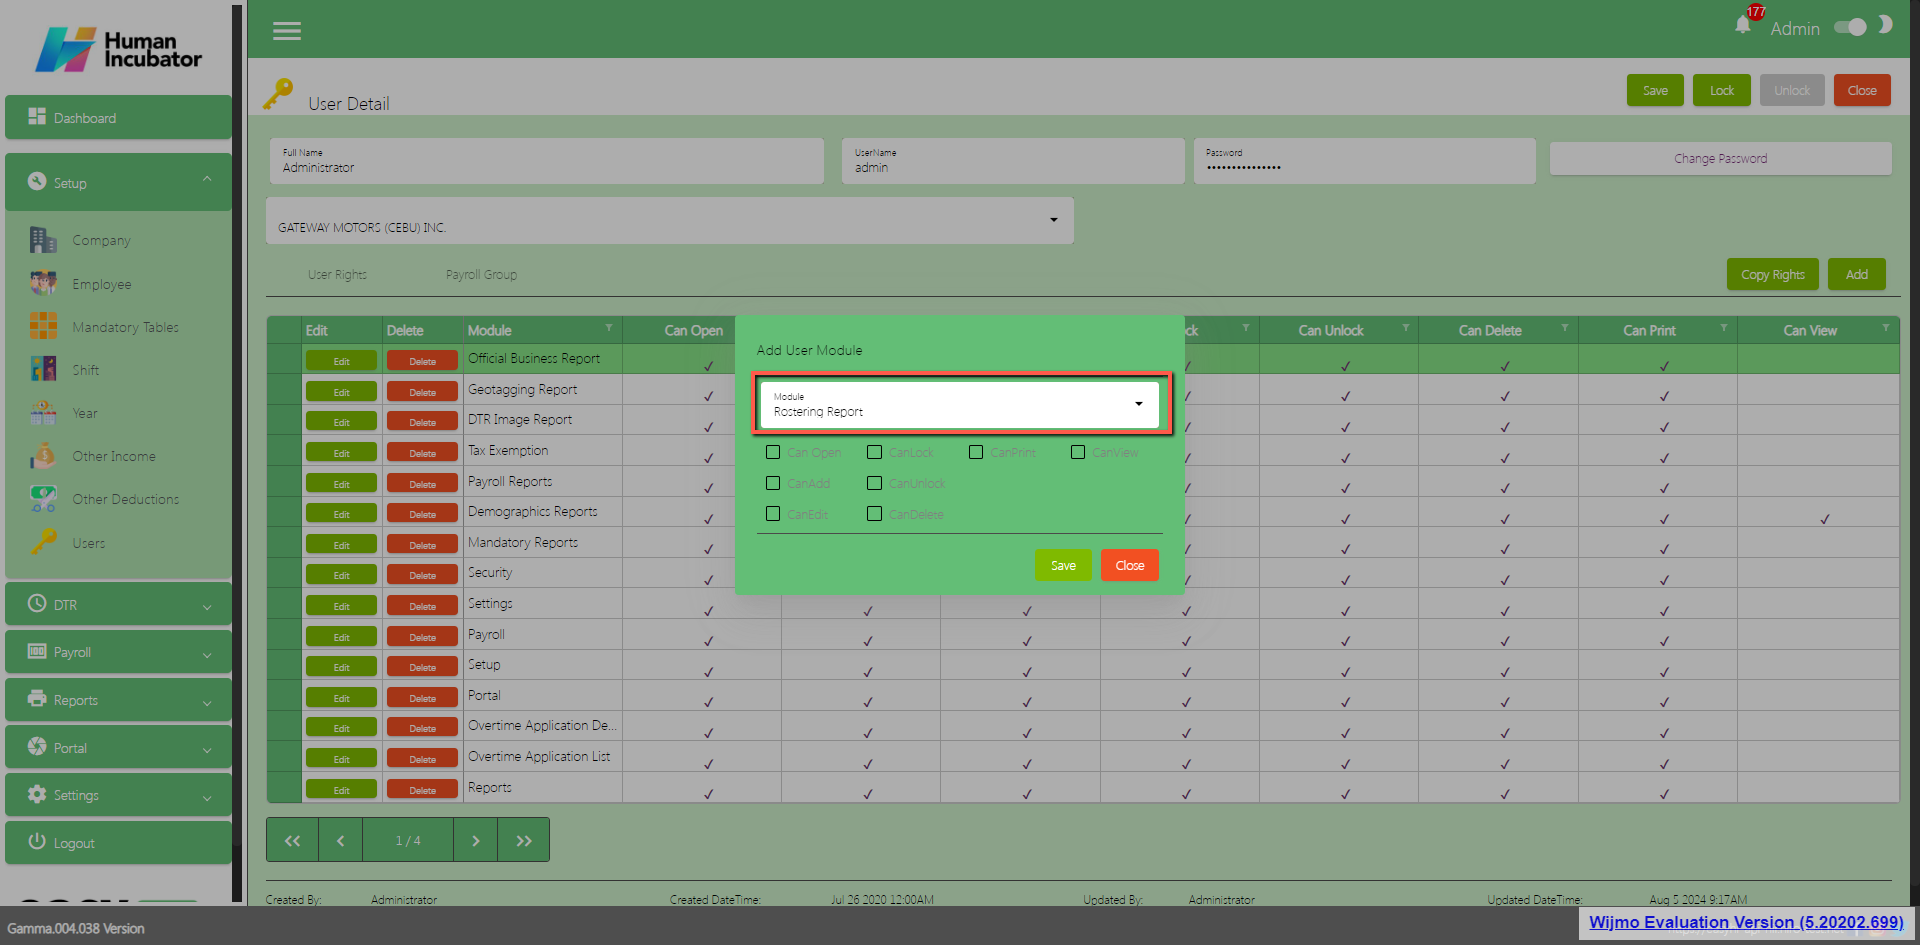
4. Click Add
5. Select Rostering Report
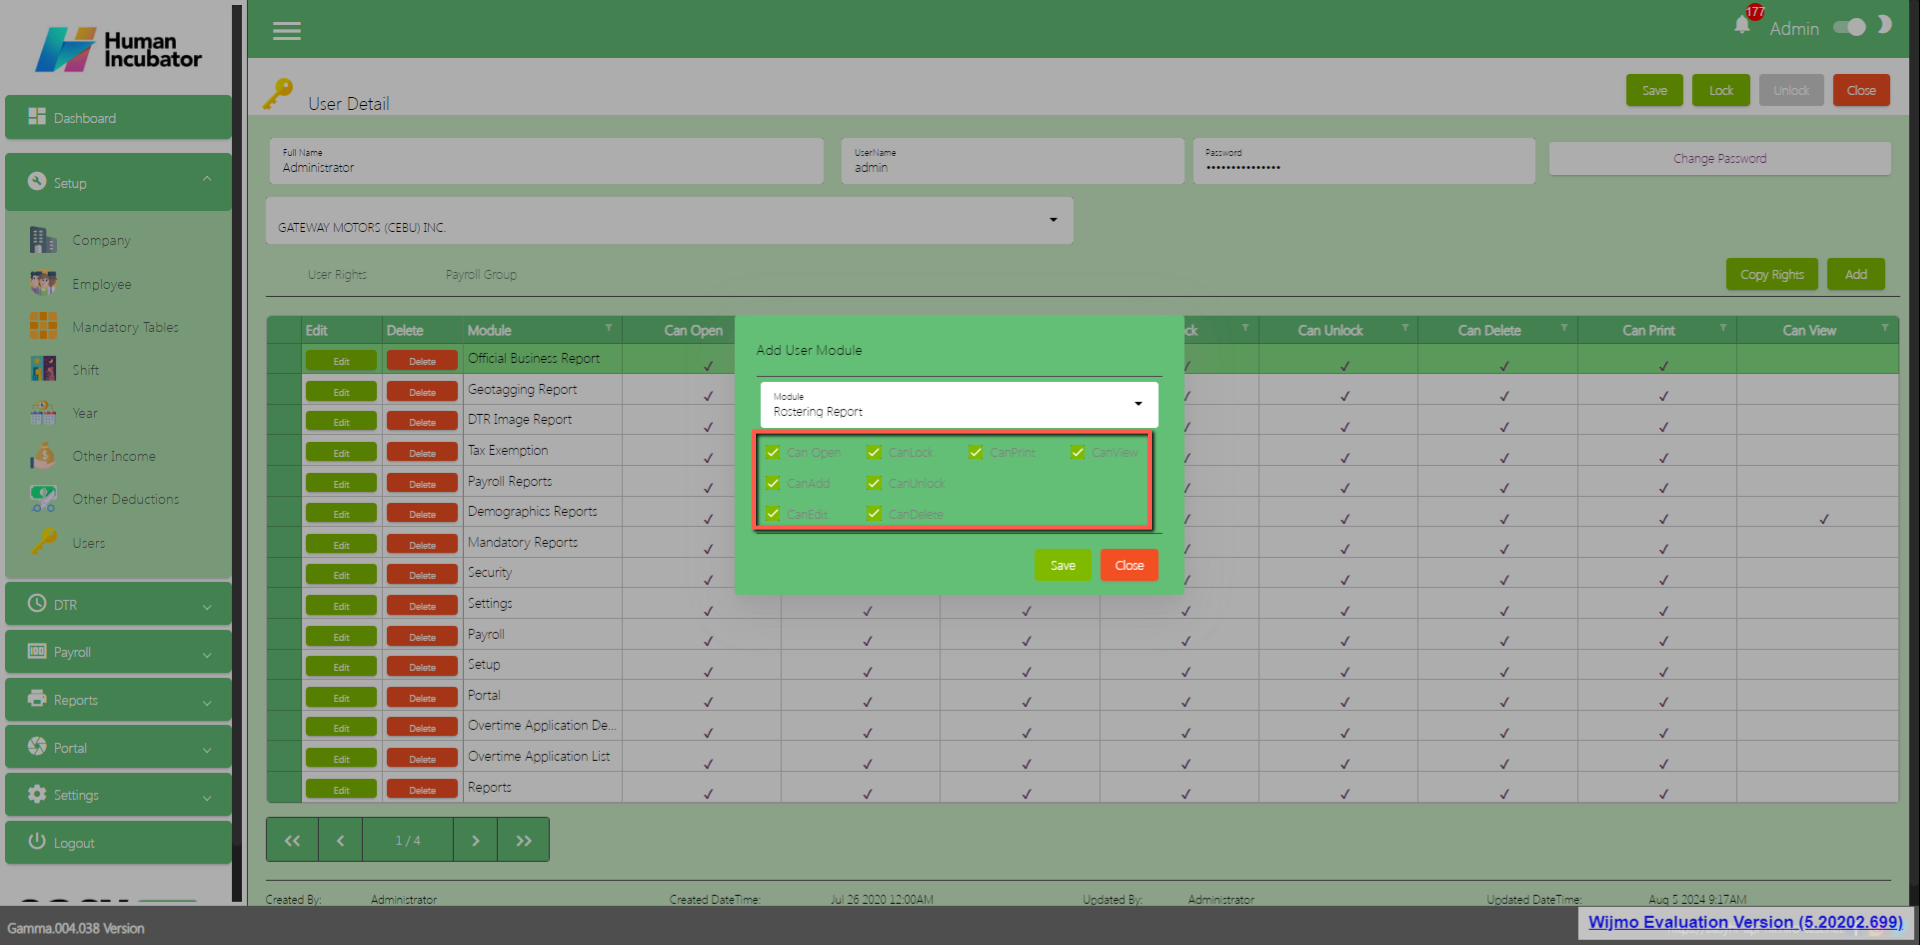
6. Click Rights Can Open, Can Add, Can Edit, Can Lock, Can Lock, Can Unlock, Can Print and Can View
Struggling to accept online payments? Discover how HII Online Payment Service solves your credit card merchant dilemma. HII Online Payment Service. Coming soon!
Struggling to accept online payments? Discover how HII Online Payment Service solves your credit card merchant dilemma. HII Online Payment Service. Coming soon!
Take advantage of Free easyFS Usage for Accounting Firms in the Philippines. Contact Us at +639176280355 or email at hiisales@humedit.ph
Take advantage of Free easyFS Usage for Accounting Firms in the Philippines. Contact Us at +639176280355 or email at hiisales@humedit.ph
Struggling to accept online payments? Discover how HII Online Payment Service solves your credit card merchant dilemma. HII Online Payment Service. Coming soon!
Struggling to accept online payments? Discover how HII Online Payment Service solves your credit card merchant dilemma. HII Online Payment Service. Coming soon!
Take advantage of Free easyFS Usage for Accounting Firms in the Philippines. Contact Us at +639176280355 or email at hiisales@humedit.ph
Take advantage of Free easyFS Usage for Accounting Firms in the Philippines. Contact Us at +639176280355 or email at hiisales@humedit.ph
Struggling to accept online payments? Discover how HII Online Payment Service solves your credit card merchant dilemma. HII Online Payment Service. Coming soon!
Struggling to accept online payments? Discover how HII Online Payment Service solves your credit card merchant dilemma. HII Online Payment Service. Coming soon!
Take advantage of Free easyFS Usage for Accounting Firms in the Philippines. Contact Us at +639176280355 or email at hiisales@humedit.ph
Take advantage of Free easyFS Usage for Accounting Firms in the Philippines. Contact Us at +639176280355 or email at hiisales@humedit.ph
Struggling to accept online payments? Discover how HII Online Payment Service solves your credit card merchant dilemma. HII Online Payment Service. Coming soon!
Struggling to accept online payments? Discover how HII Online Payment Service solves your credit card merchant dilemma. HII Online Payment Service. Coming soon!
Take advantage of Free easyFS Usage for Accounting Firms in the Philippines. Contact Us at +639176280355 or email at hiisales@humedit.ph
Take advantage of Free easyFS Usage for Accounting Firms in the Philippines. Contact Us at +639176280355 or email at hiisales@humedit.ph
Struggling to accept online payments? Discover how HII Online Payment Service solves your credit card merchant dilemma. HII Online Payment Service. Coming soon!
Struggling to accept online payments? Discover how HII Online Payment Service solves your credit card merchant dilemma. HII Online Payment Service. Coming soon!
Take advantage of Free easyFS Usage for Accounting Firms in the Philippines. Contact Us at +639176280355 or email at hiisales@humedit.ph
Take advantage of Free easyFS Usage for Accounting Firms in the Philippines. Contact Us at +639176280355 or email at hiisales@humedit.ph
Struggling to accept online payments? Discover how HII Online Payment Service solves your credit card merchant dilemma. HII Online Payment Service. Coming soon!
Struggling to accept online payments? Discover how HII Online Payment Service solves your credit card merchant dilemma. HII Online Payment Service. Coming soon!
Take advantage of Free easyFS Usage for Accounting Firms in the Philippines. Contact Us at +639176280355 or email at hiisales@humedit.ph
Take advantage of Free easyFS Usage for Accounting Firms in the Philippines. Contact Us at +639176280355 or email at hiisales@humedit.ph
Struggling to accept online payments? Discover how HII Online Payment Service solves your credit card merchant dilemma. HII Online Payment Service. Coming soon!
Struggling to accept online payments? Discover how HII Online Payment Service solves your credit card merchant dilemma. HII Online Payment Service. Coming soon!
Take advantage of Free easyFS Usage for Accounting Firms in the Philippines. Contact Us at +639176280355 or email at hiisales@humedit.ph
Take advantage of Free easyFS Usage for Accounting Firms in the Philippines. Contact Us at +639176280355 or email at hiisales@humedit.ph
Struggling to accept online payments? Discover how HII Online Payment Service solves your credit card merchant dilemma. HII Online Payment Service. Coming soon!
Struggling to accept online payments? Discover how HII Online Payment Service solves your credit card merchant dilemma. HII Online Payment Service. Coming soon!

 Log in to Messenger