1.3 Purpose of this User Manual
1.4 Who Should Use This Manual
1.4 Best Practices and System Limitations
1.4.1 Setting up the Master Files
4.1.1.1 How to Add an Item Manually
4.1.1.2 Add Item Via Import Function
4.1.2.2 Add Customer Via Import Function
4.1.3.2 Add Supplier Via Import Function
List of All Users that were added to the System
4.1.6.1 Chart of Accounts Lists
4.1.6.2 Manual Add Chart of Accounts
4.1.6.2 Add Chart of Accounts via Upload Account
4.1.8.2 Manual Add of Currency
4.2.1.1 Manual Update Item Detail
4.2.1.2 Update Item Detail in Bulk
4.2.2.1 Manual Update Supplier Detail
4.2.2.1 Update Supplier Detail in Bulk
4.2.3.1 Manual Update Customer Detail
4.2.3.1 Update Customer Detail in Bulk
5.2 Purchases Transaction Module
Cancel Purchase Request Transaction
Purchase Order Transaction via Upload Template
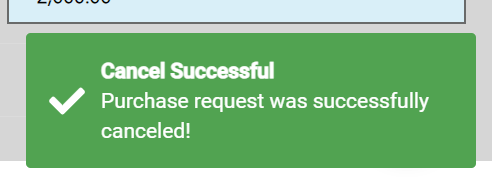
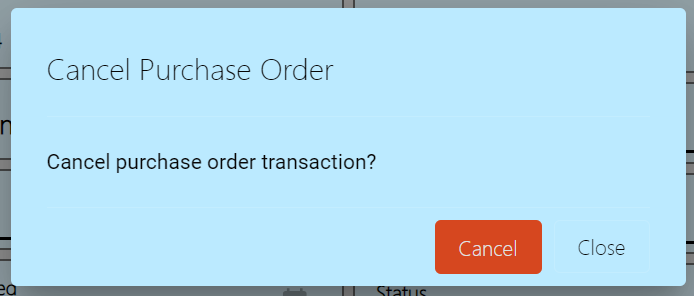
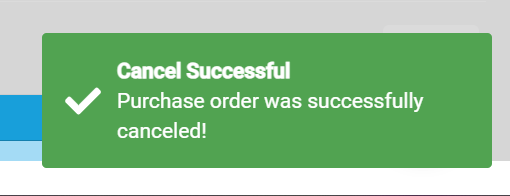
Cancel Purchase Order Transaction
Cancel Receiving Receipt Transaction
Cancel Disbursement Transaction
Debit Memo Transaction via Upload Template
Sales Order Transaction via Upload Template
Cancel Sales Order Transaction
Sales Invoice Transaction via Upload Template
Cancel Sales Invoice Transaction
Collection Transaction via Upload Template
Scenario 3: Extra-Ordinary Activities
Scenario 4: Multi-Branch with EasyPOS Integration
Accounts Payable Voucher Report
Accounts Payable By Currency Report
Purchase Request Summary Report
Purchase Request Detail Report
Purchase Order Detail With Balance Report
Receiving Receipt Summary Report
Receiving Receipt Detail Report
Print or Download the PDF Report
Available Item Per Batch Report
Cancelled Purchase Request Report
Cancelled Purchase Order Report
Cancelled Receiving Receipt Report
Accounts Receivable Summary Report
Accounts Receivable by Term Report
Accounts Receivable by Currency Report
Accounts Receivable Report (One Month)
Statement of Account (By Date Range)
Collection Summary by PayType Report
Cancelled Sales Invoice Report
Sales Invoice Detail Report with Cost
Stock Transfer Detailed Report
13.1.1 Benefits of Integration
13.2.1 EasyPOS Integration Overview
13.3 How to Set Up Integrations
.toc-wrapper .c27{margin-left: 6pt}.toc-wrapper .c46{margin-left:14pt}.toc-wrapper .c46 .c14 a,.toc-wrapper .c50 a{font-size:13px}.toc-wrapper .c50{margin-left:18pt;} .manual-content table td, .manual-content table th{padding:0;border: 1px #aaa solid;padding: 10px;} .manual-content table td span,.manual-content table td p,.manual-content table td li{font-size:11px!important;}Accounting transactions is a financial activity or event that involves the exchange of money or something of value between two parties. These events are recorded to keep track of how much money a business makes, spends, and owns. Every transaction affects the financial health of the business, and accountants use these records to create reports and make sure everything adds up correctly. For example, when a business sells a product, it’s an accounting transaction because money is exchanged for a product, and both the sale and the money received are recorded.
Our EasyFS system has the following transactions:
The purchasing process in accounting involves a series of steps that outline the flow of a procurement transaction, from the identification of a need to the payment of suppliers.
Supplier Creation/Management
Purchase Request
Purchase Order
Receiving Receipt
Accounts Payable
Disbursement (Payment)
Debit Memo (if necessary)
Purchasing Module Reporting and Analytics
This is where you input the entire purchase request needed.
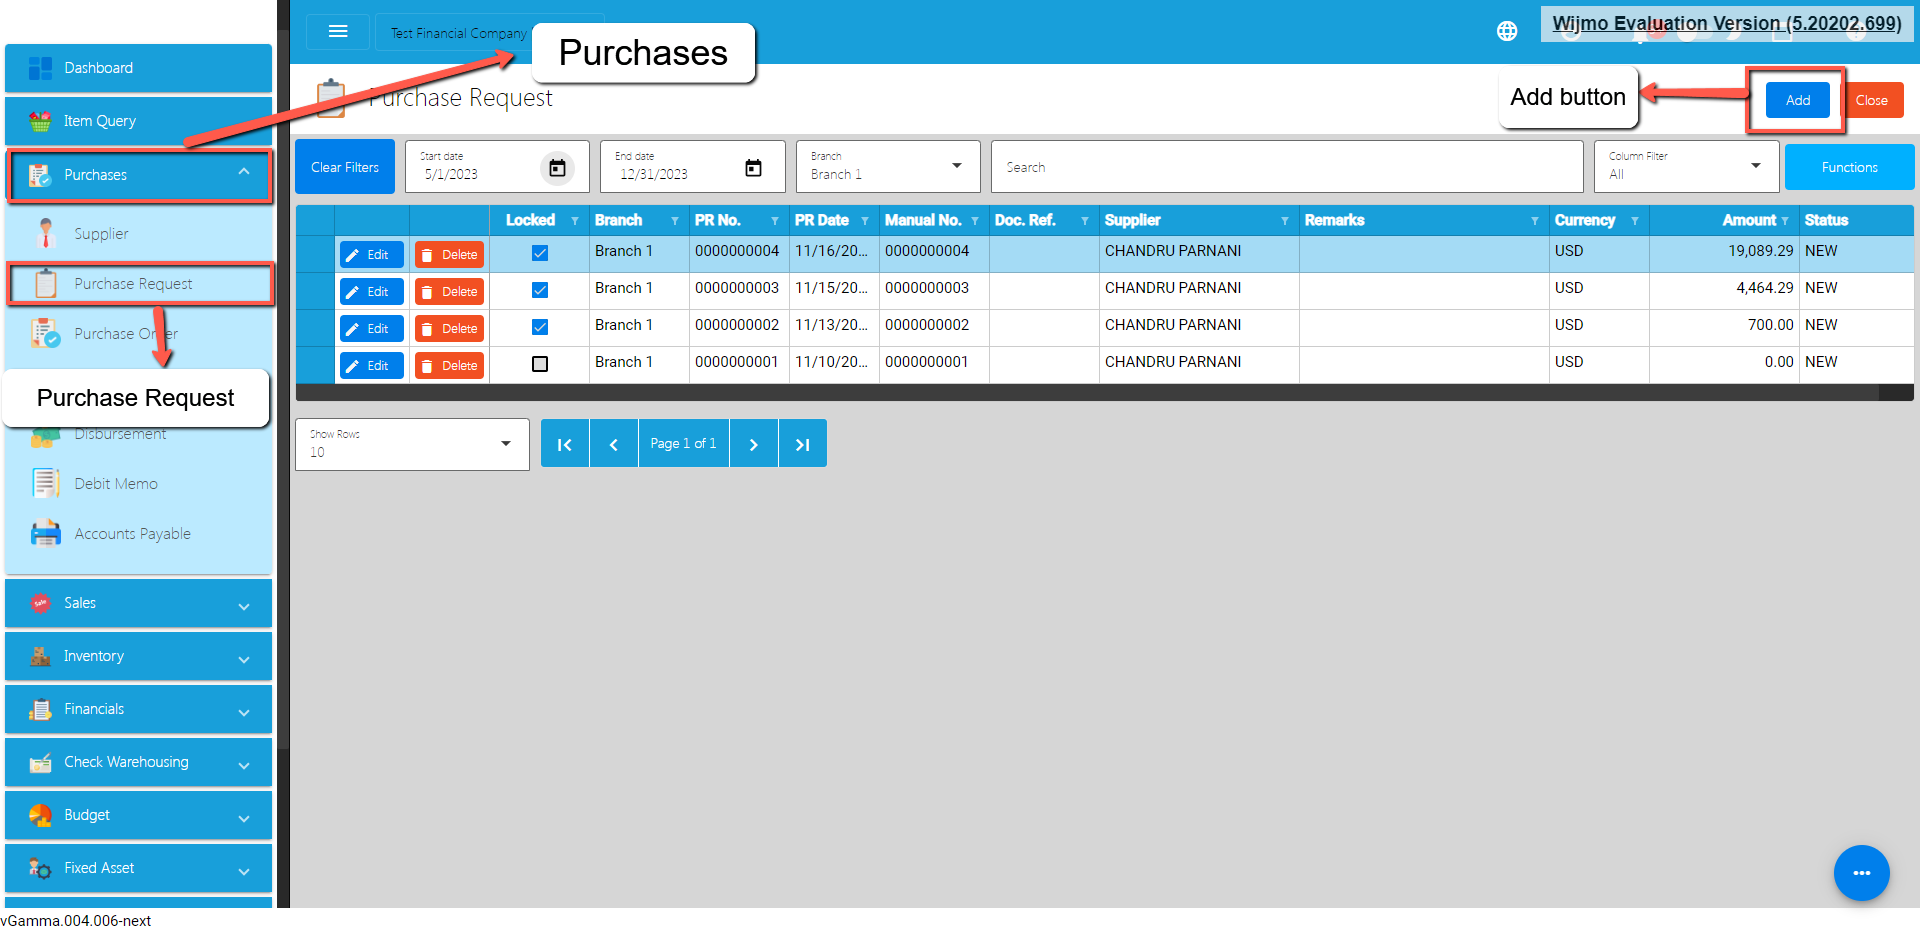
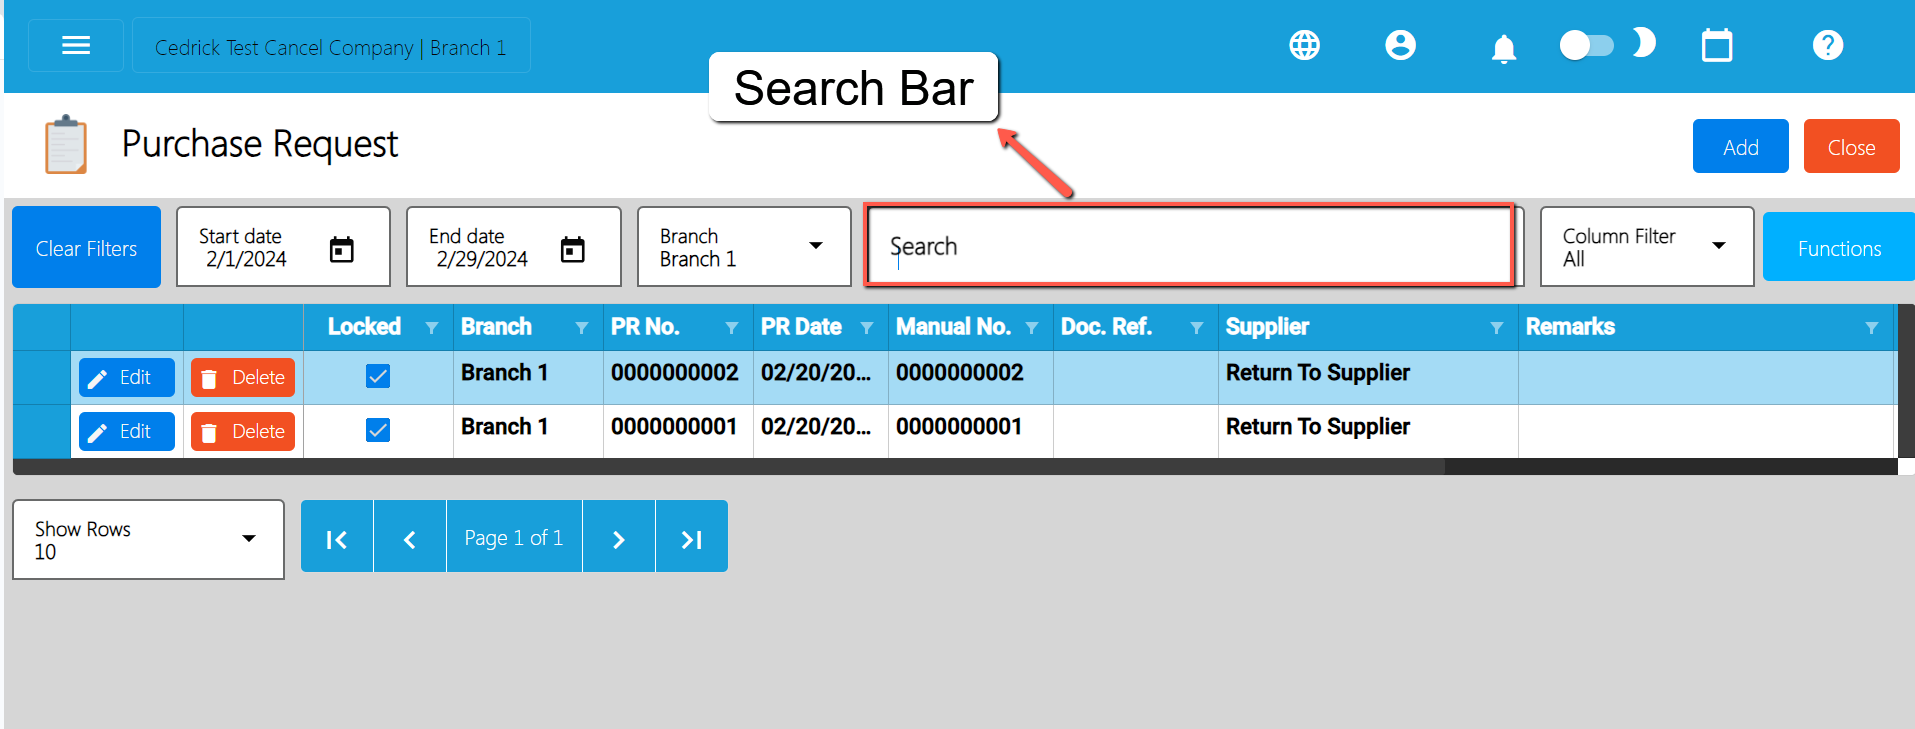
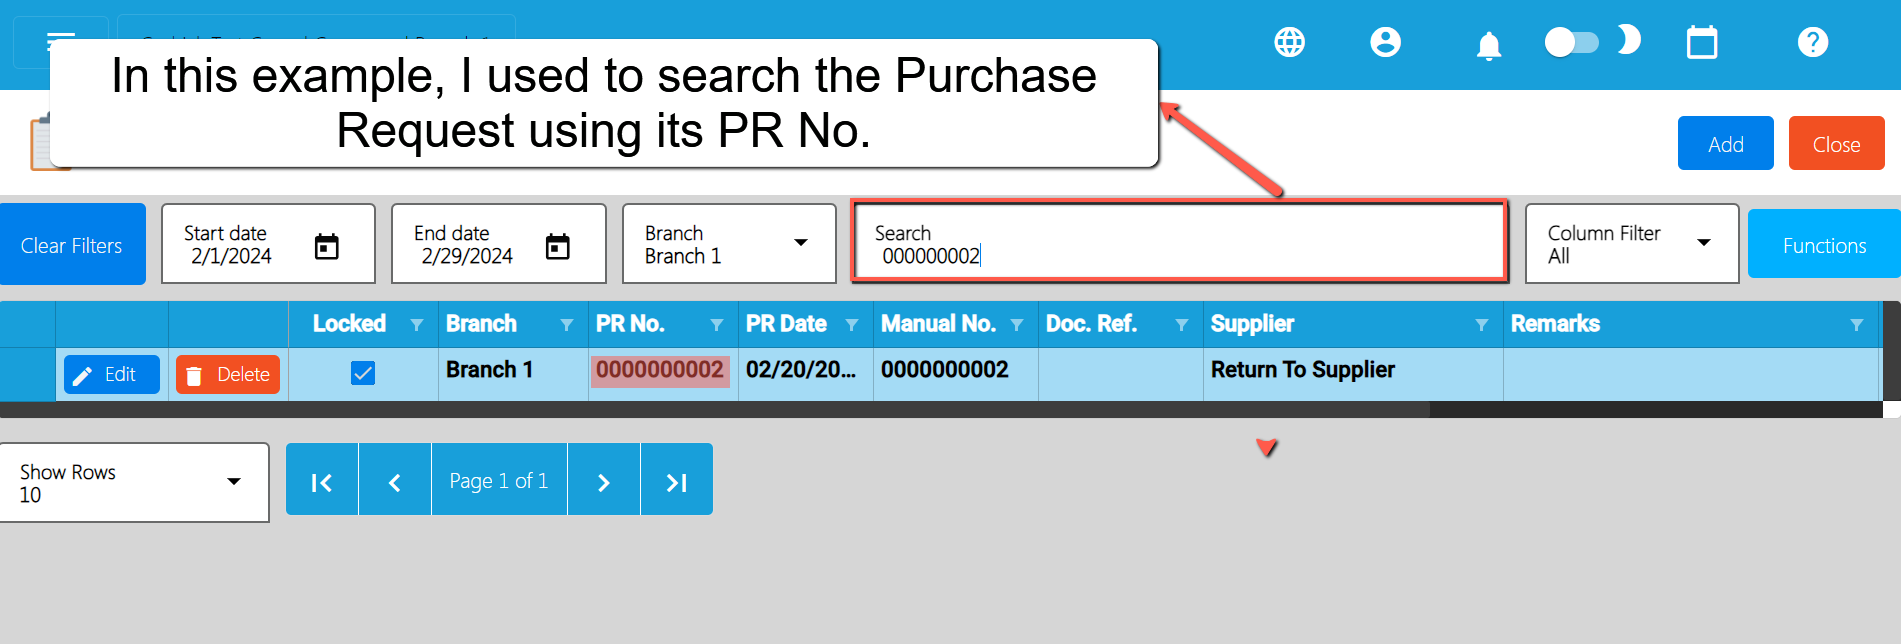
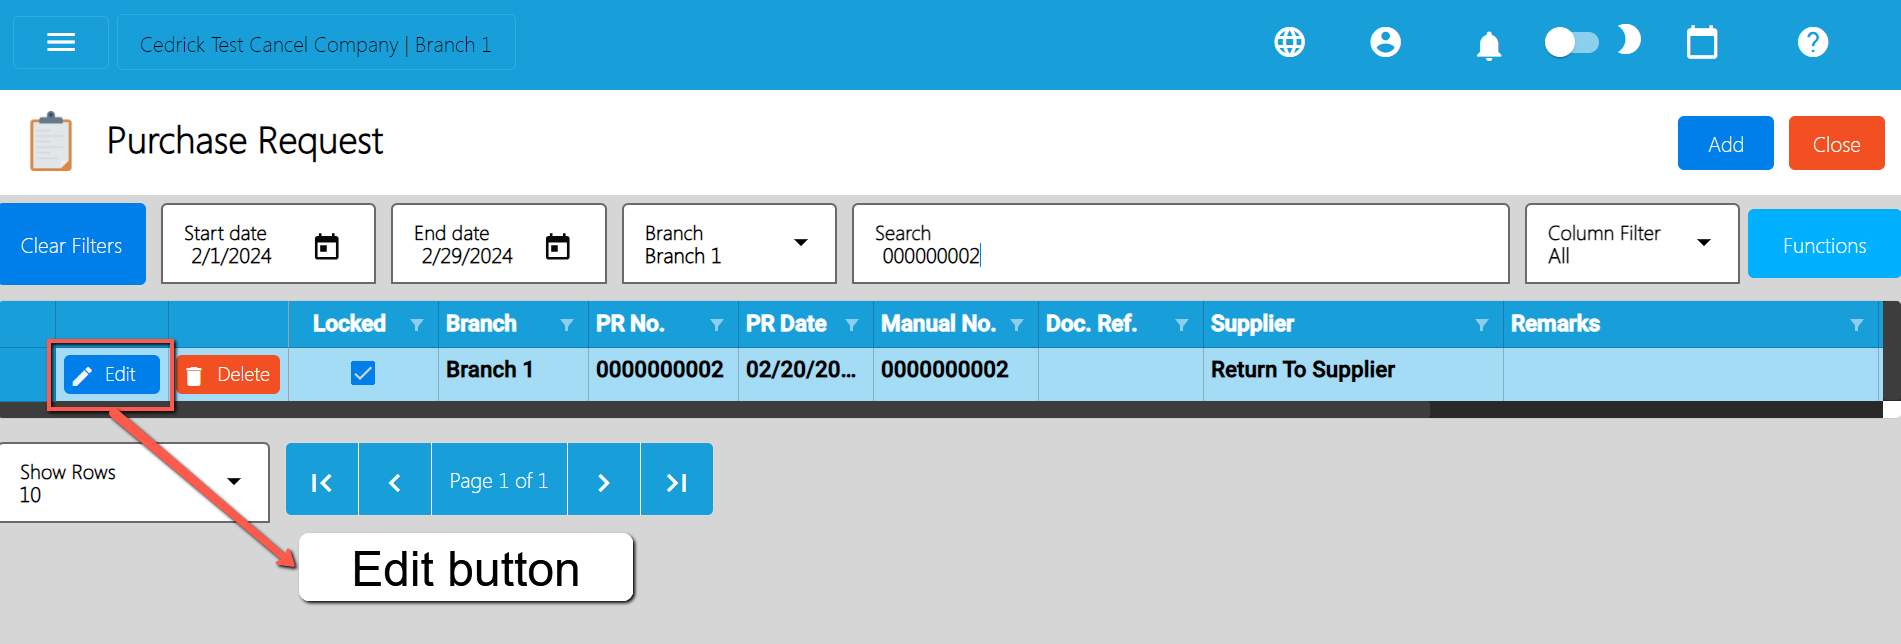
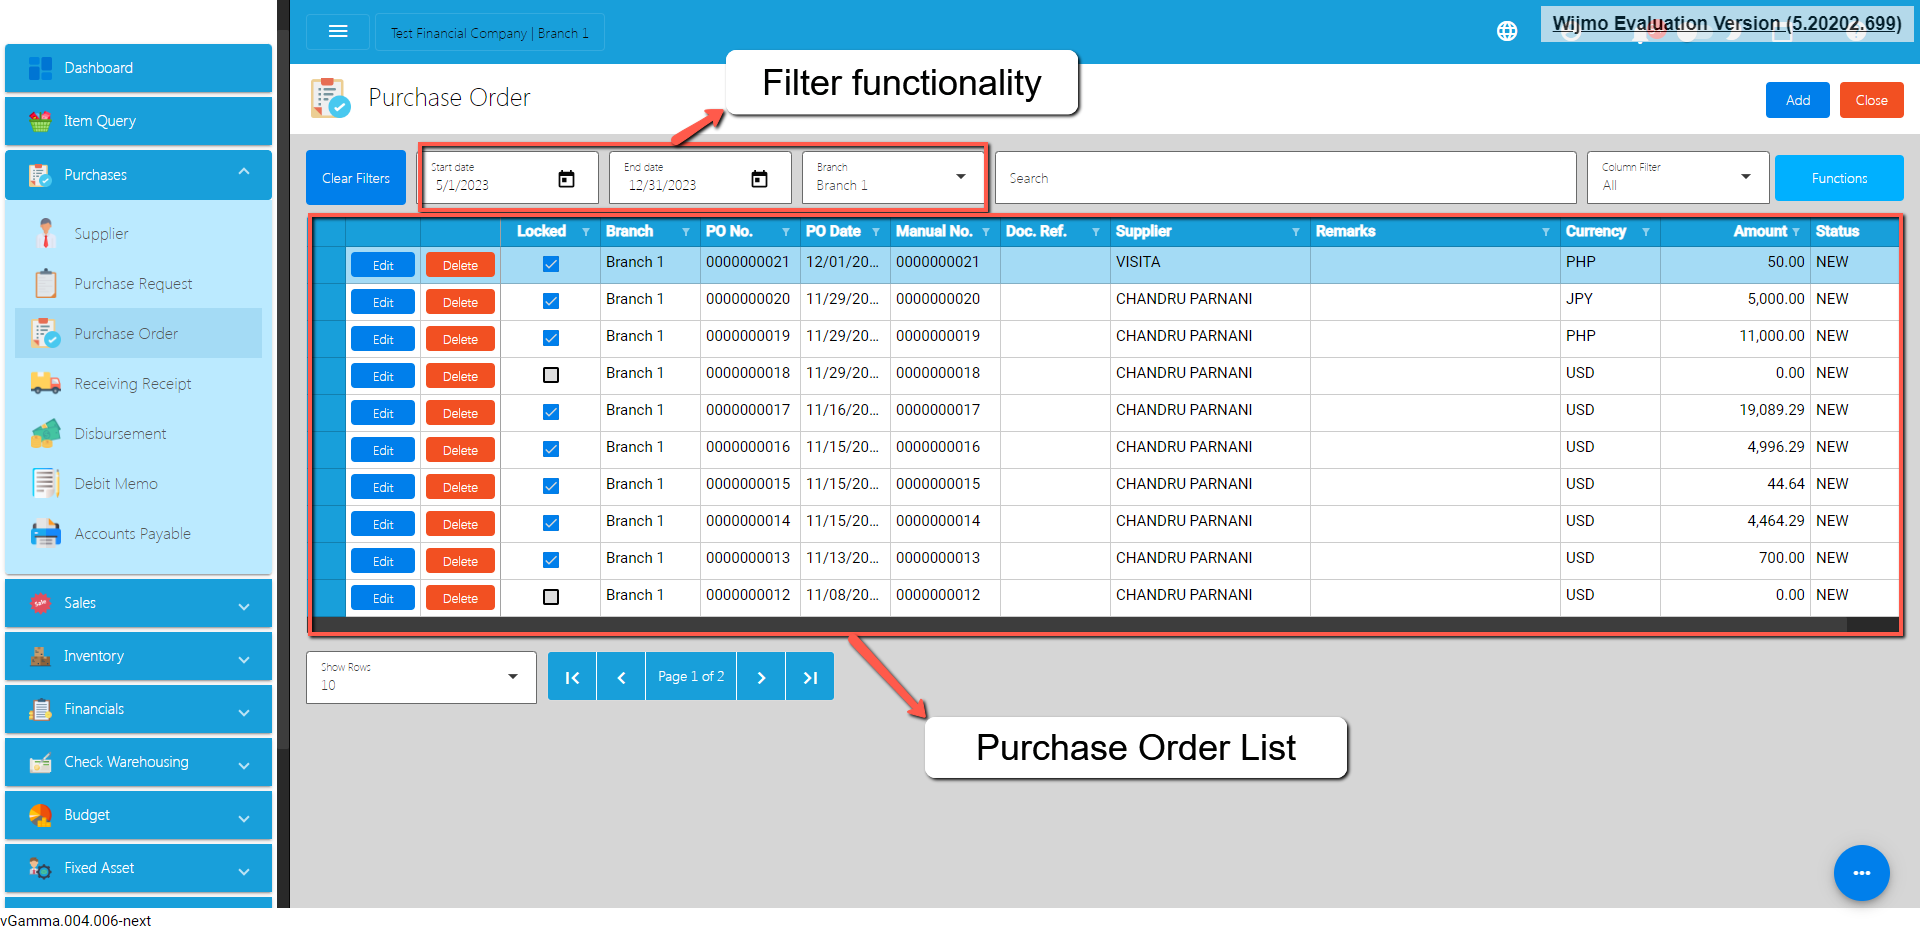
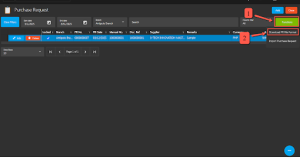
List of all the PR (Purchase Request) and will also show the overview of the transaction. In addition, it also has filter functionality where you can select the Start and End Date of the transaction.
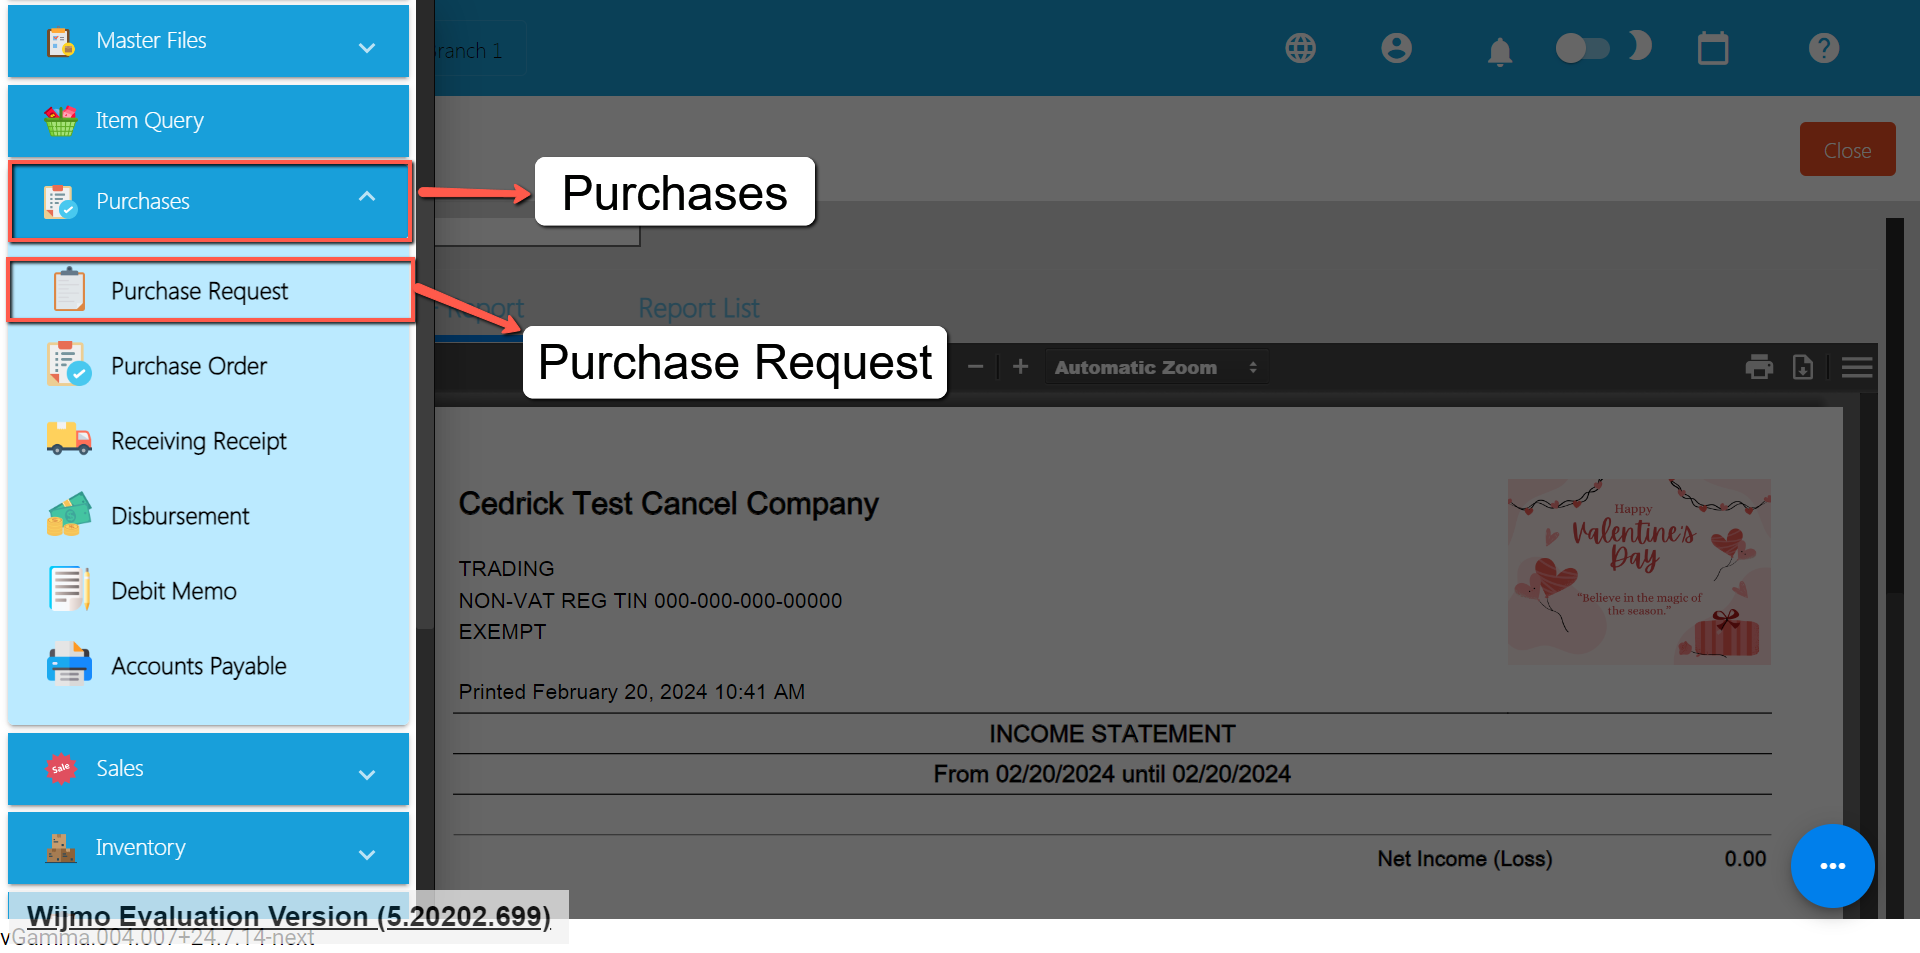
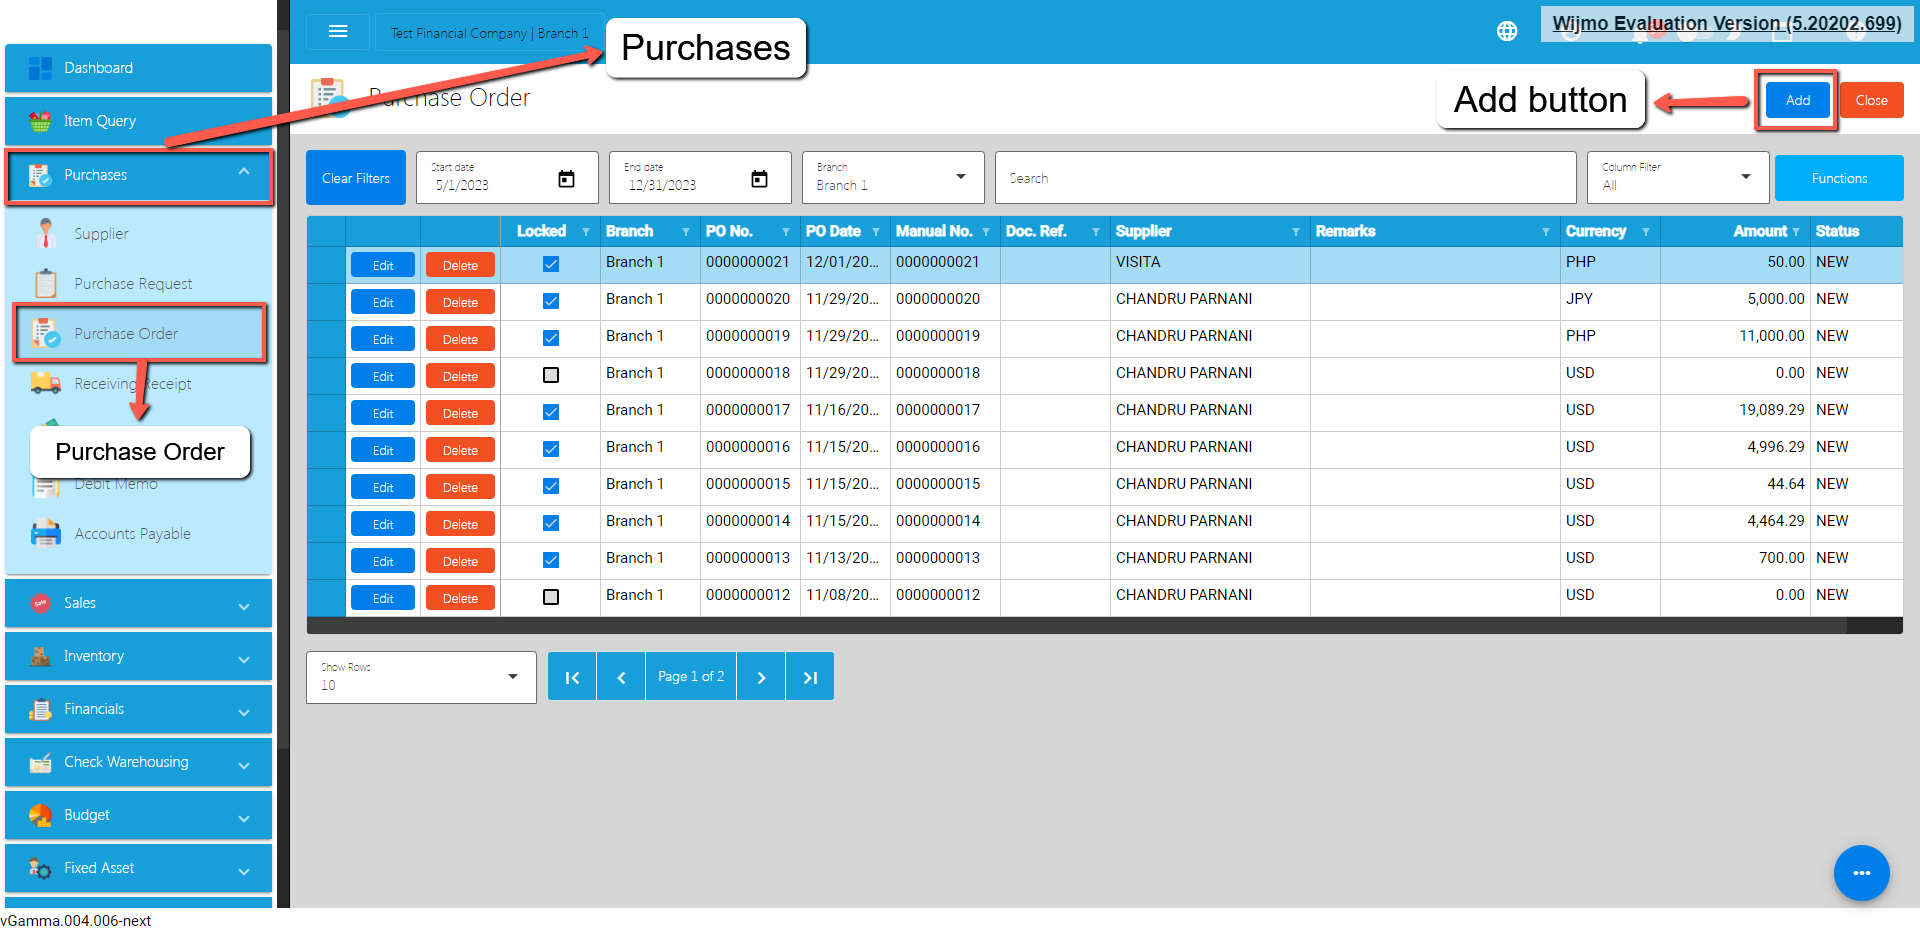
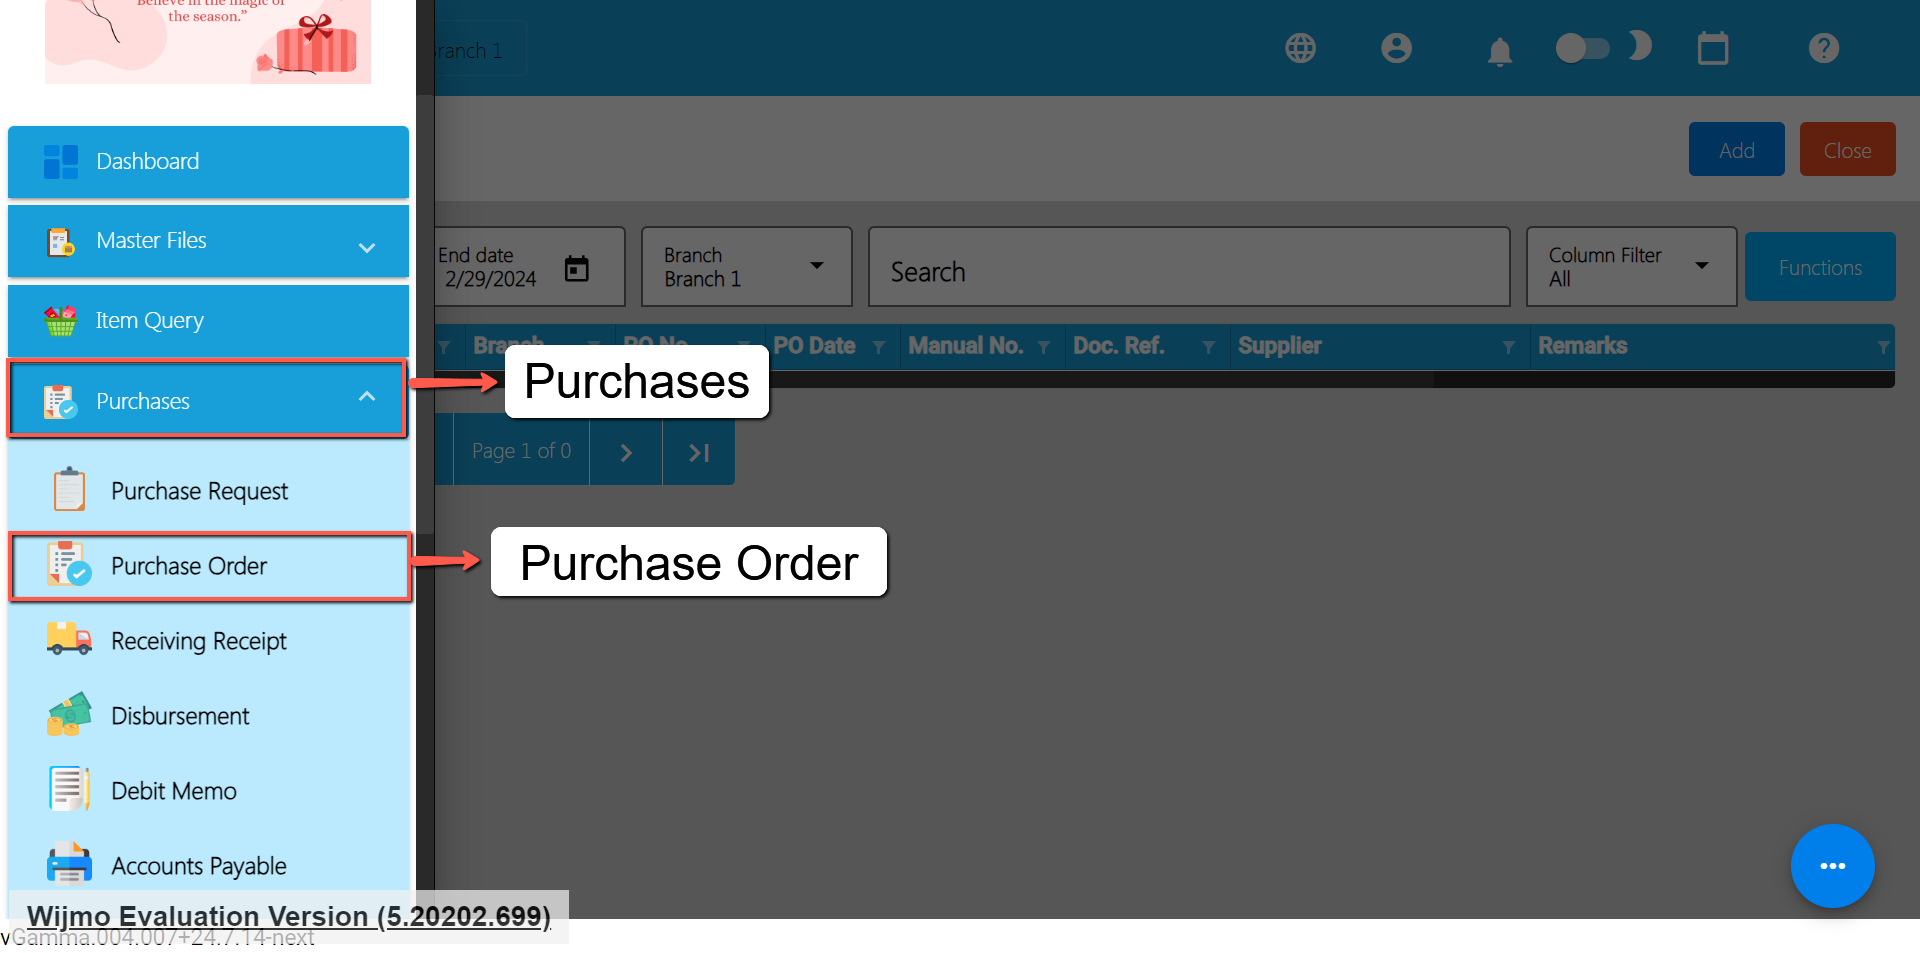
To add a new Purchase Request, go to Purchases then click Purchase Request. After that, click the Add that can be seen in the Purchase Request list.
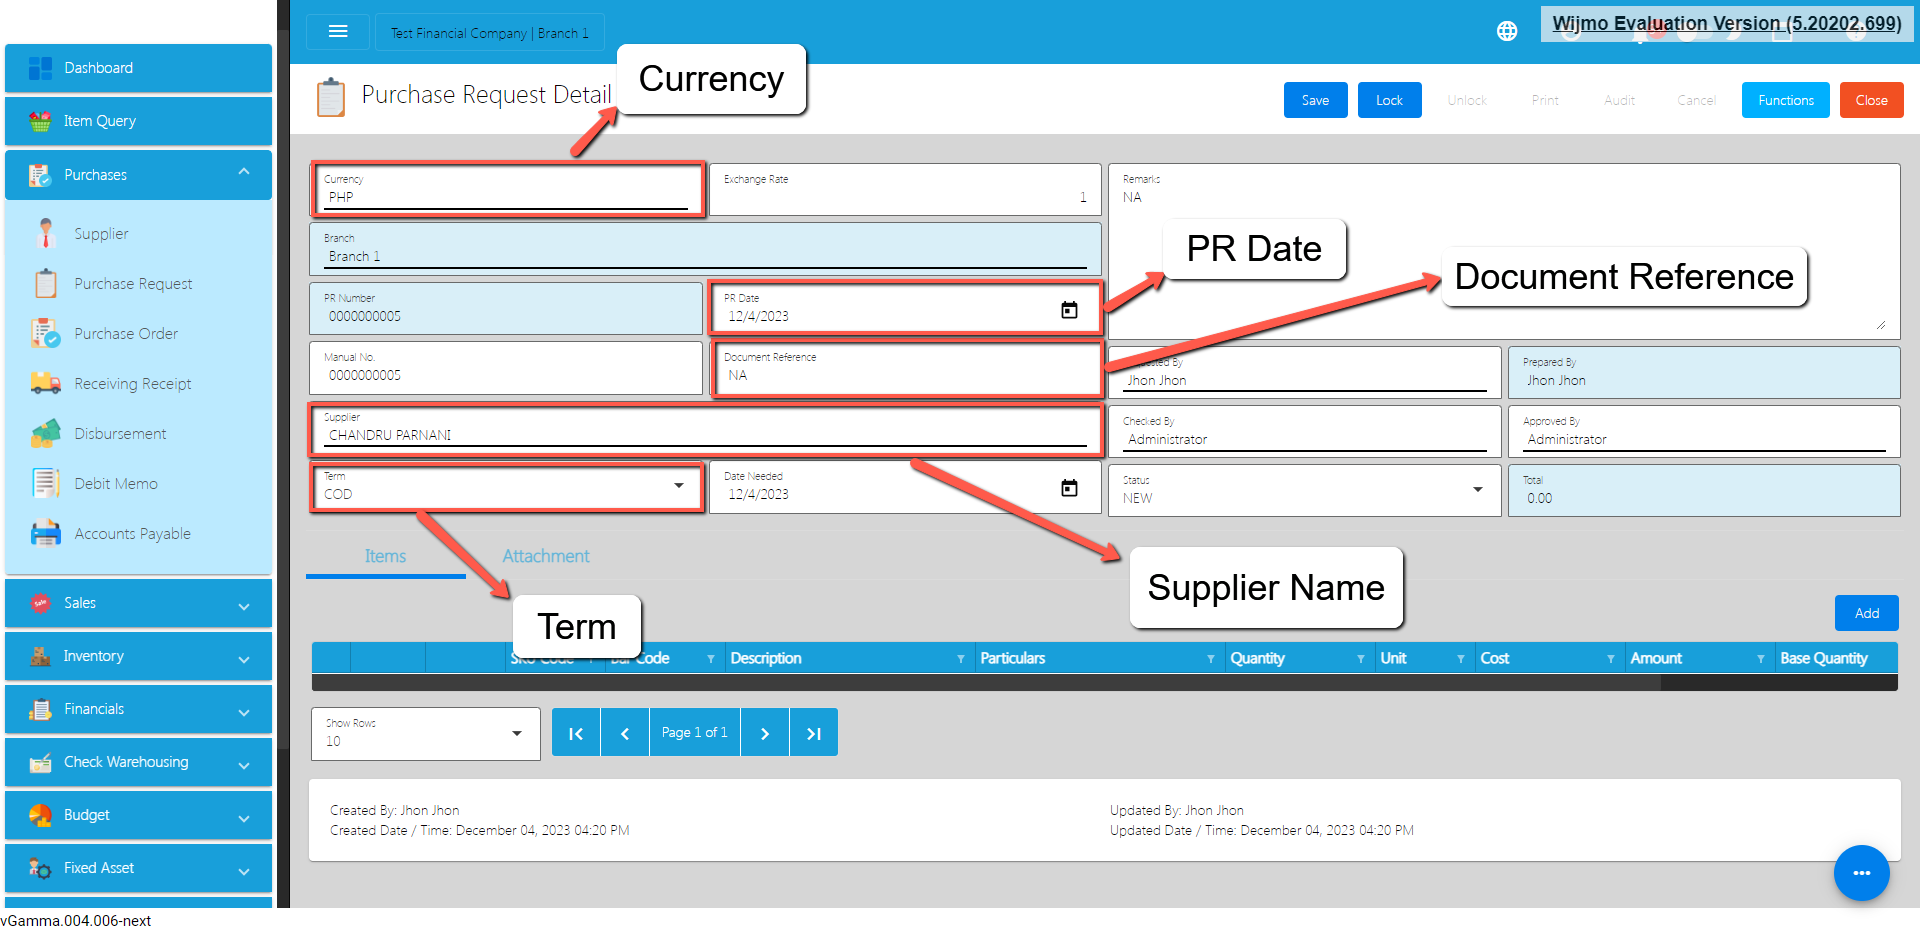
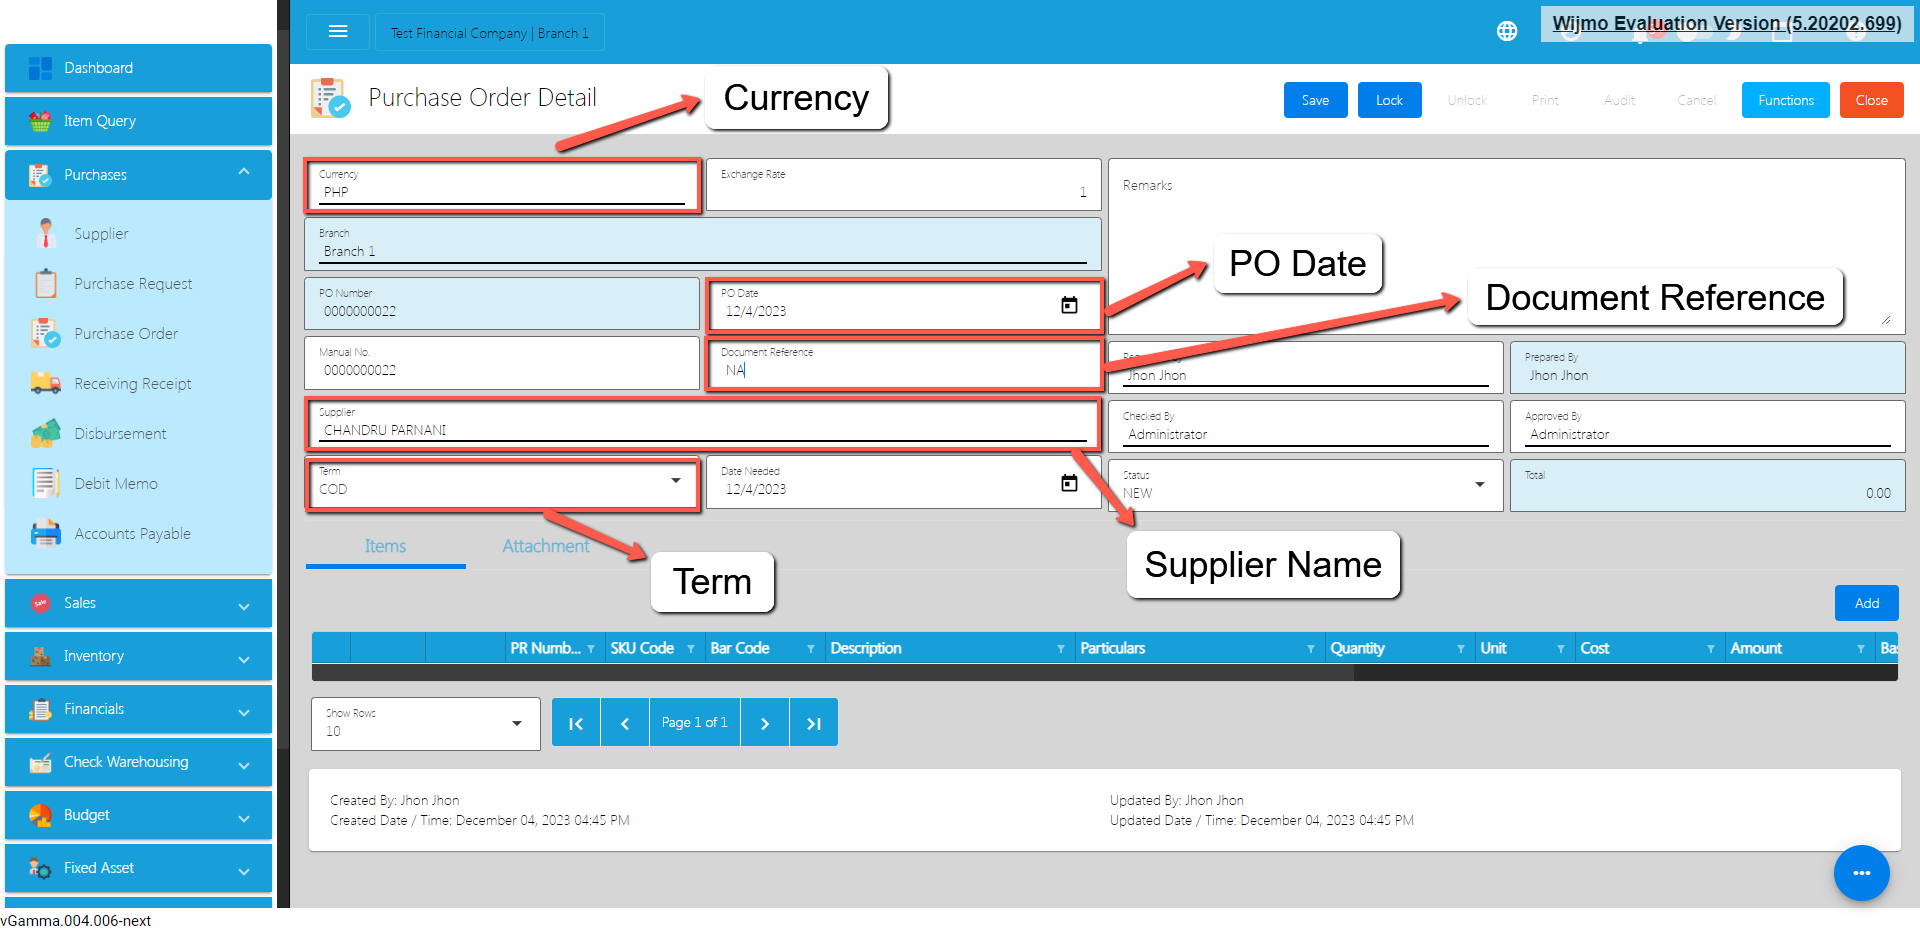
Fill out all the needed information for the Purchase Request Detail like,
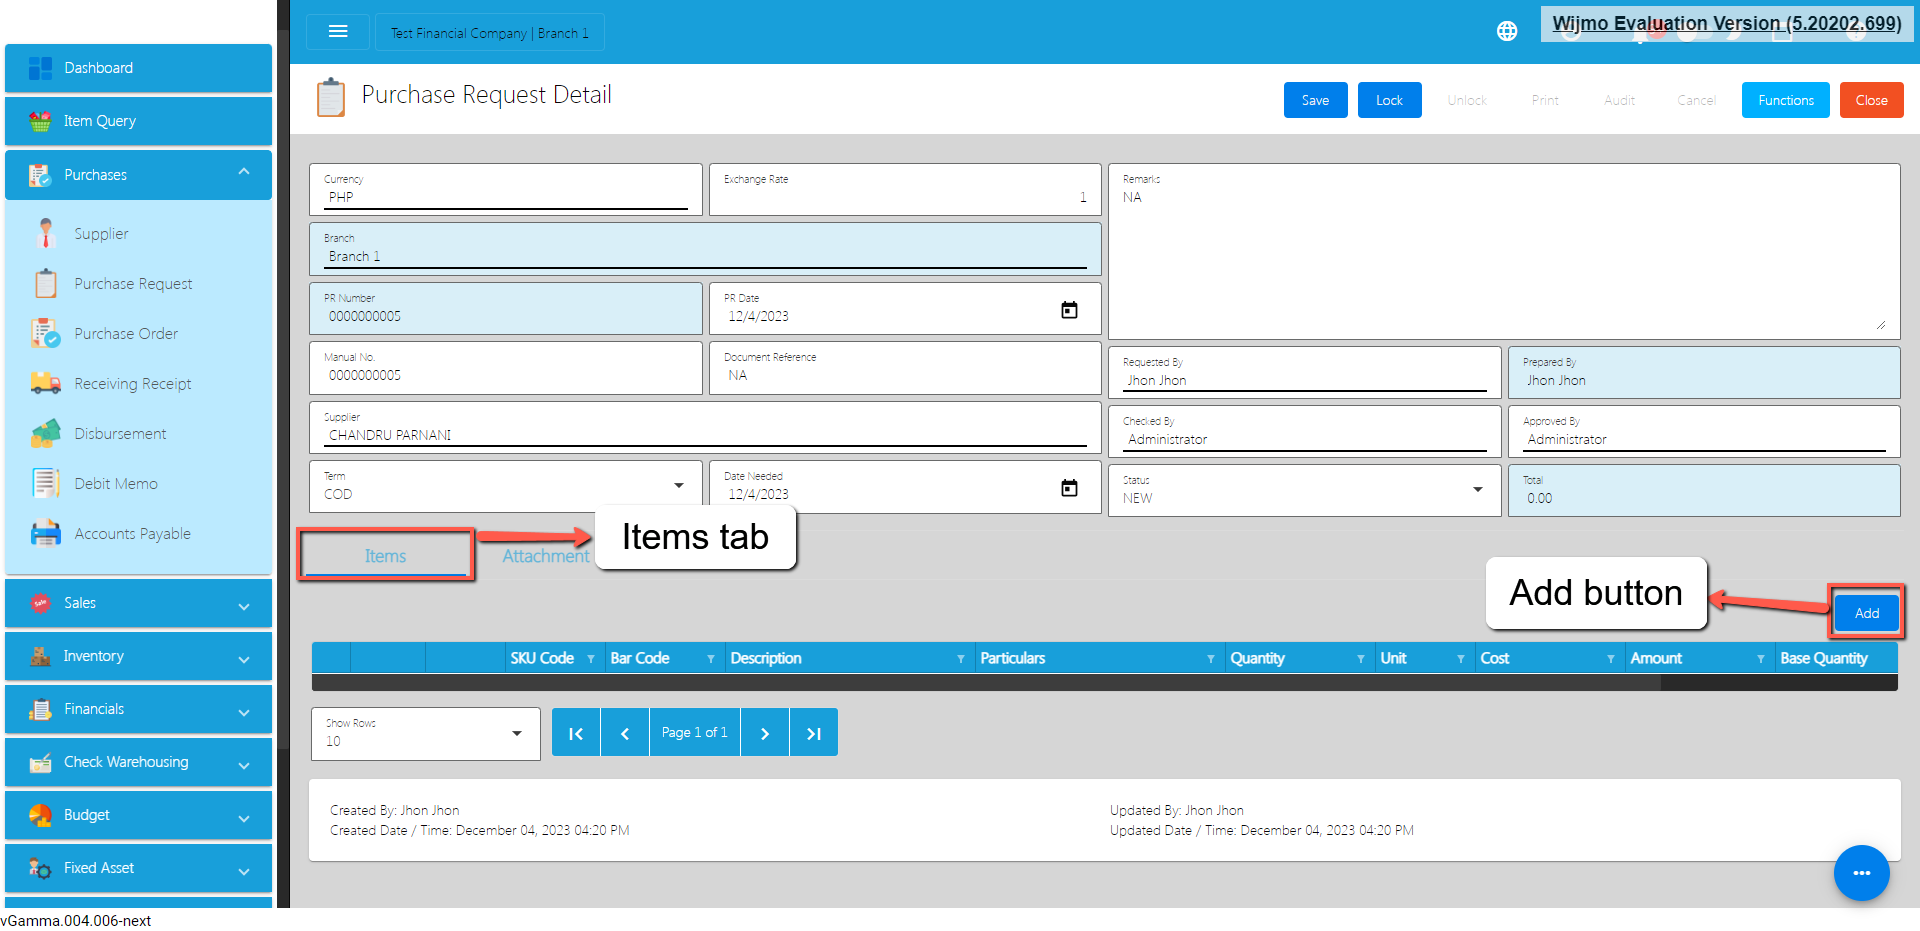
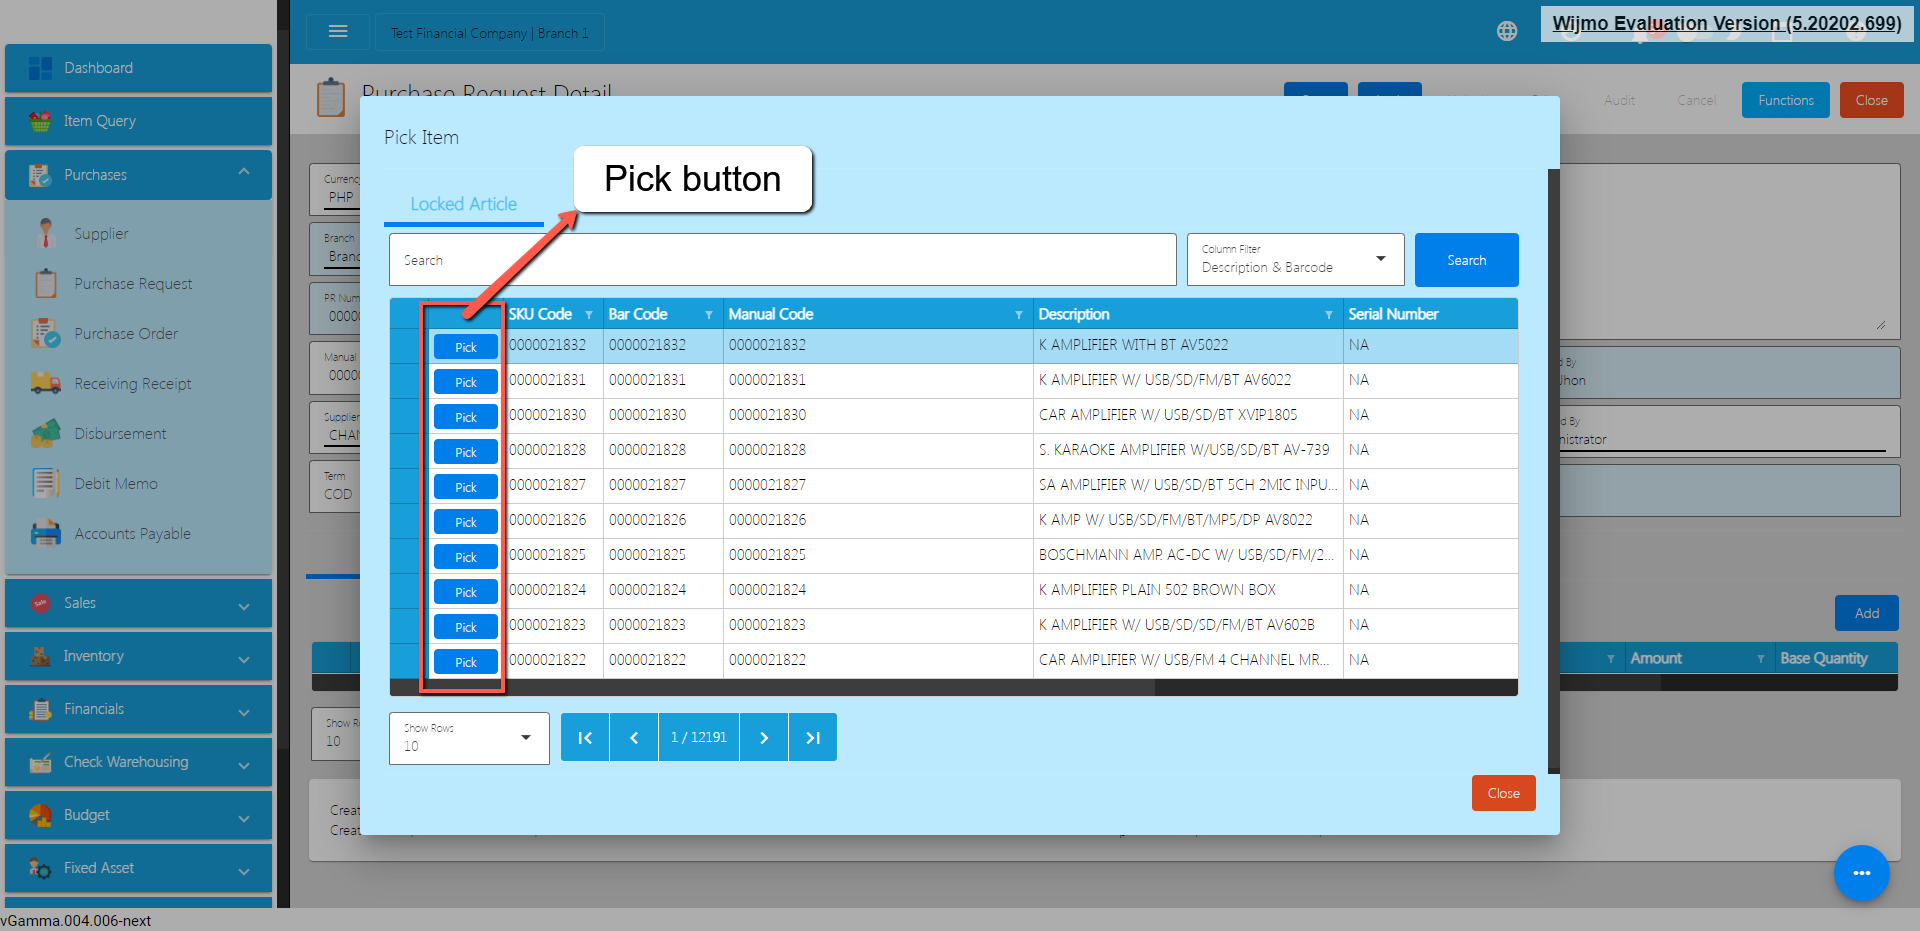
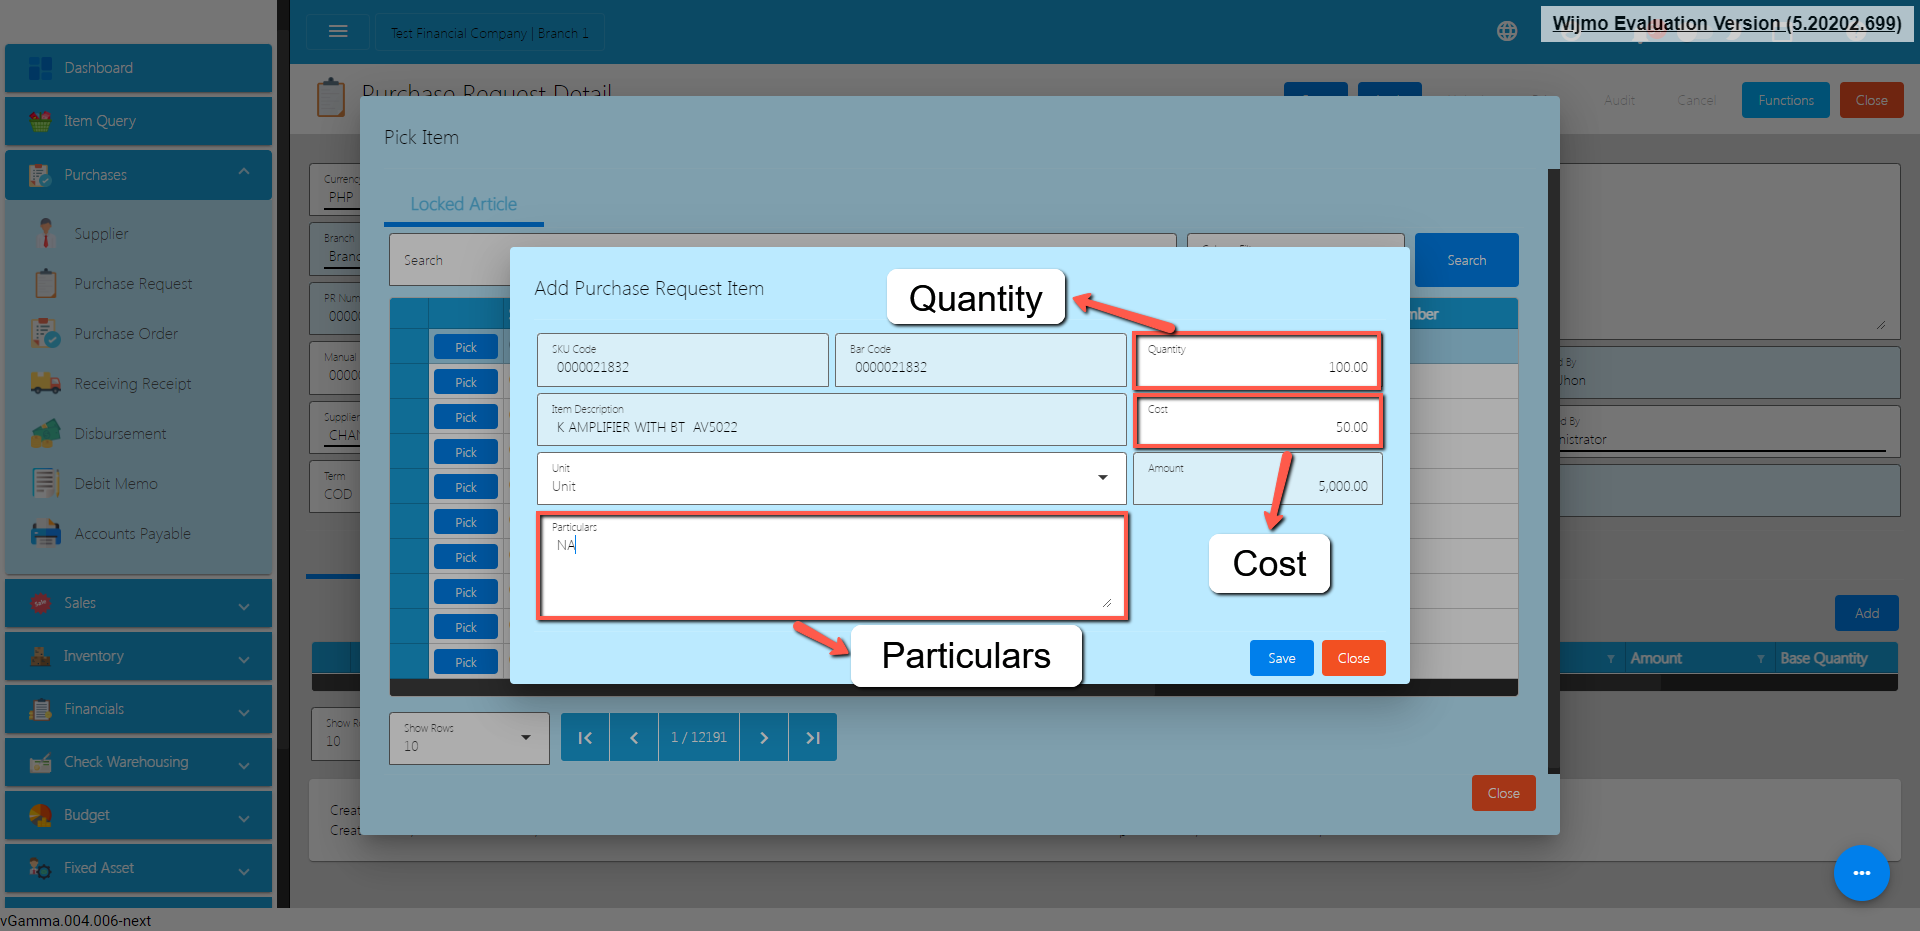
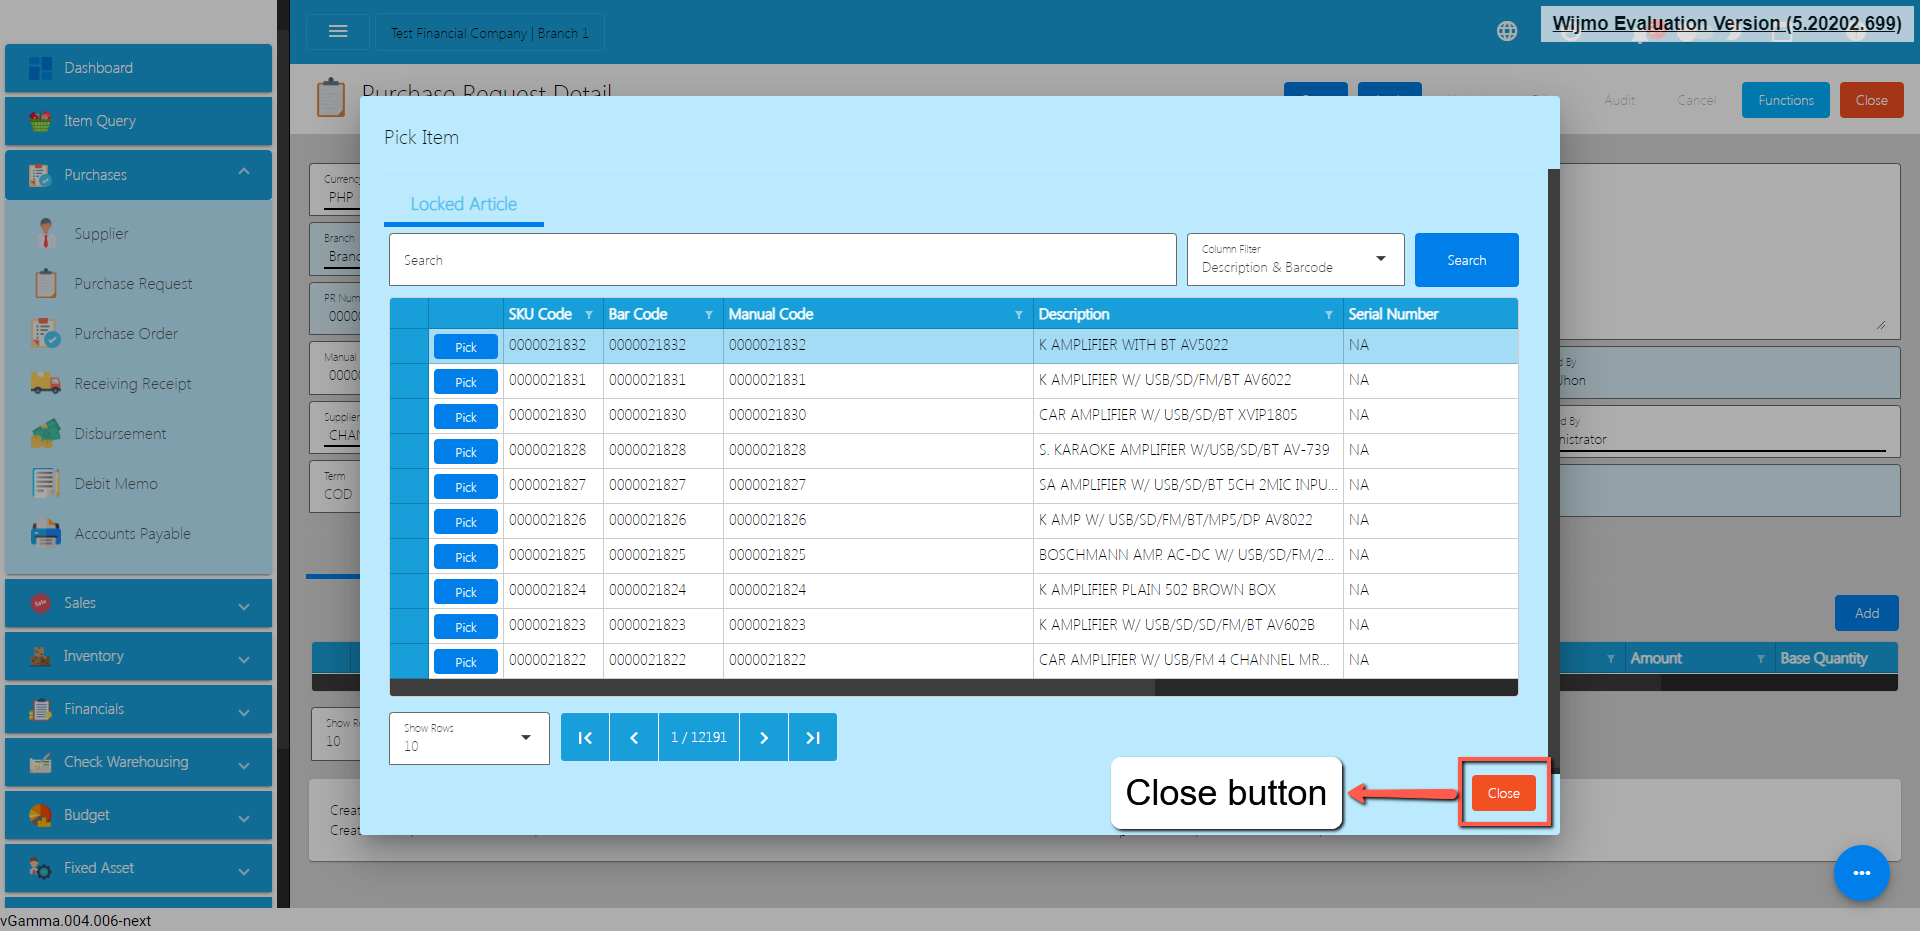
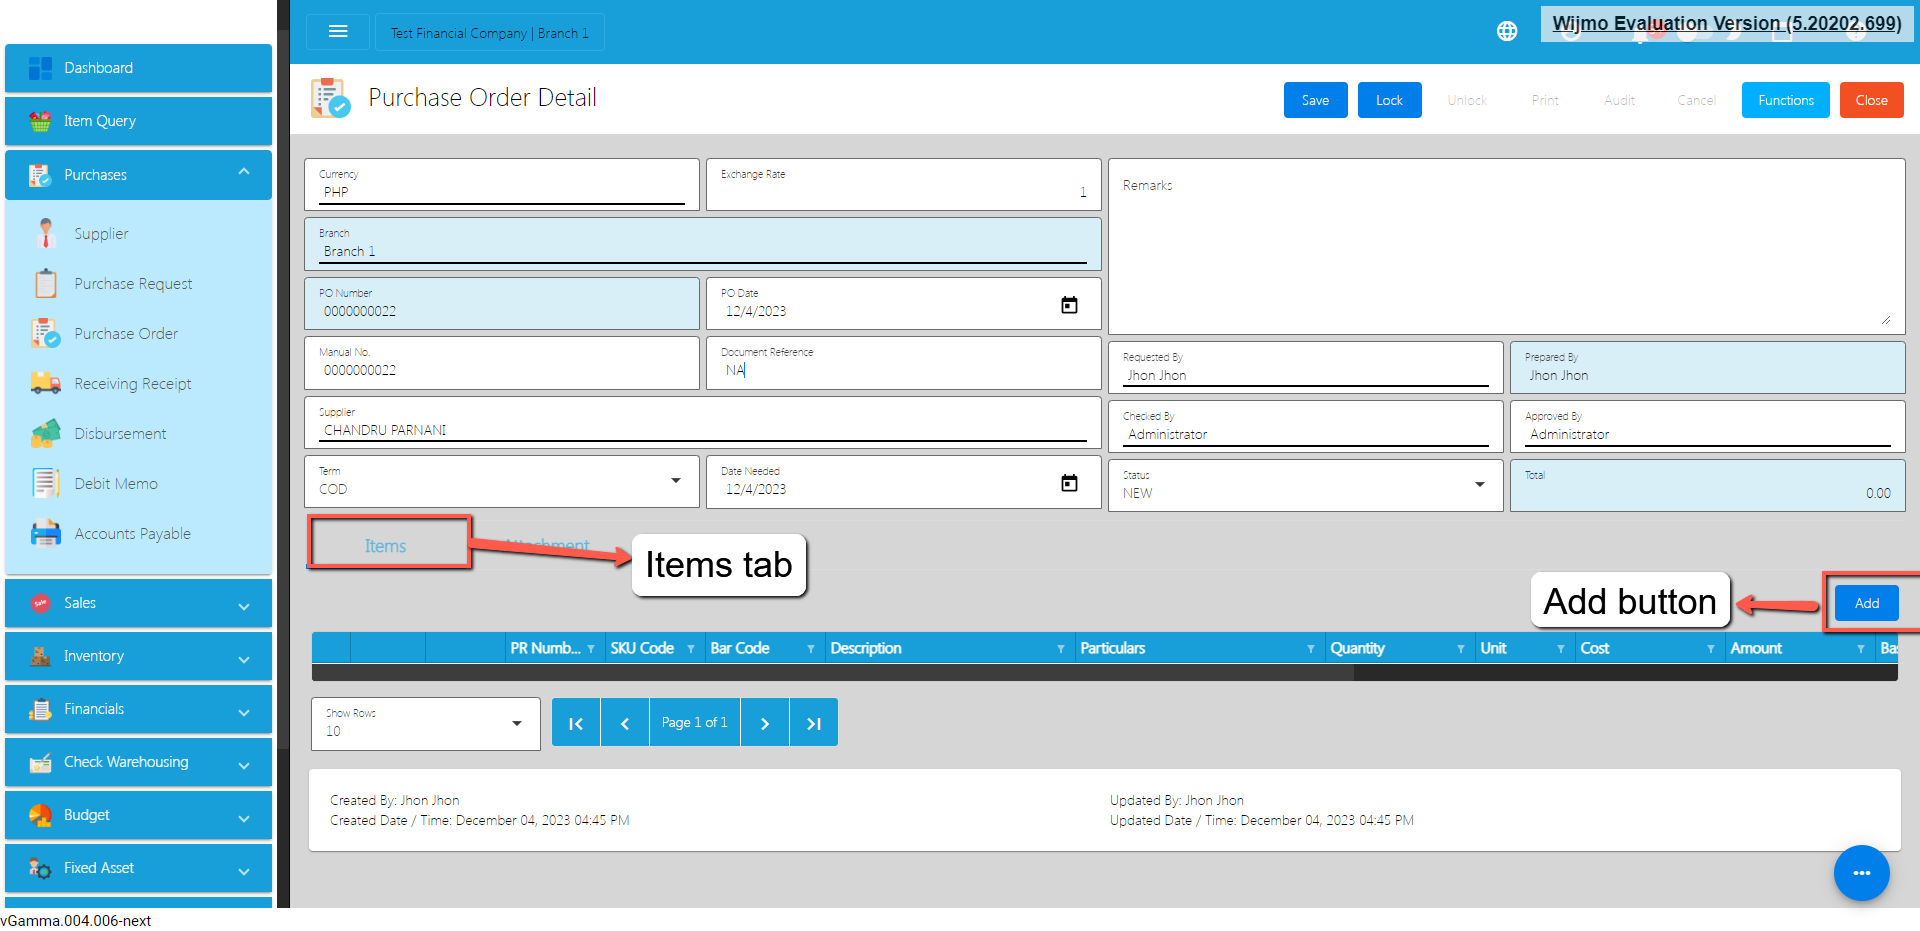
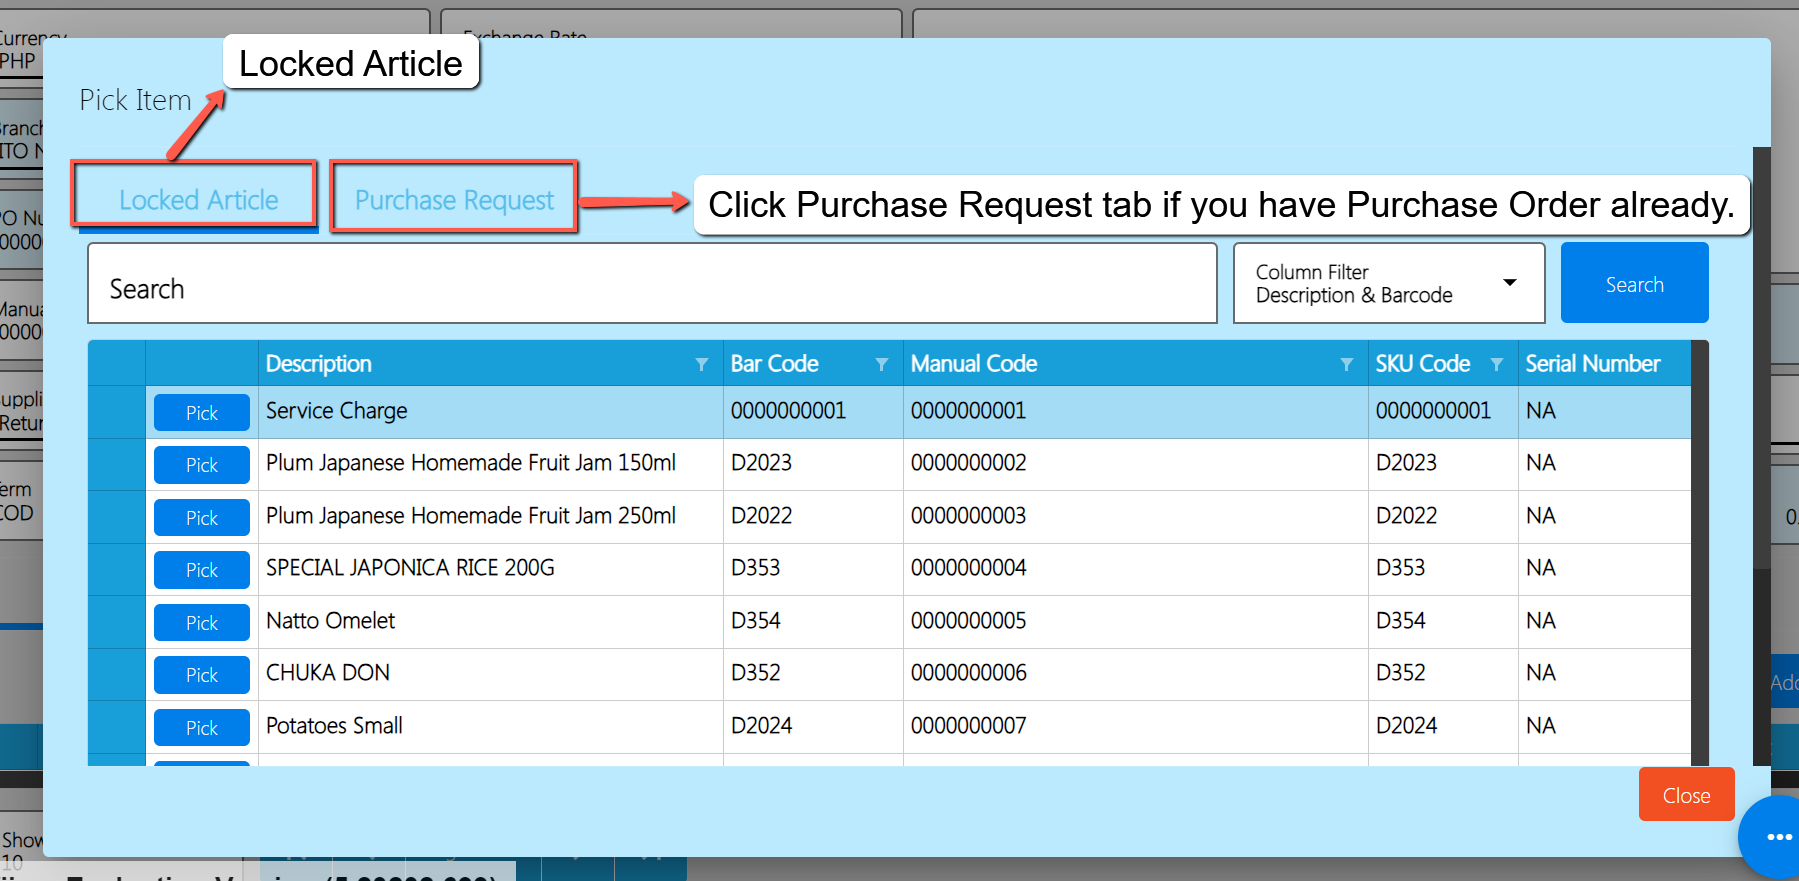
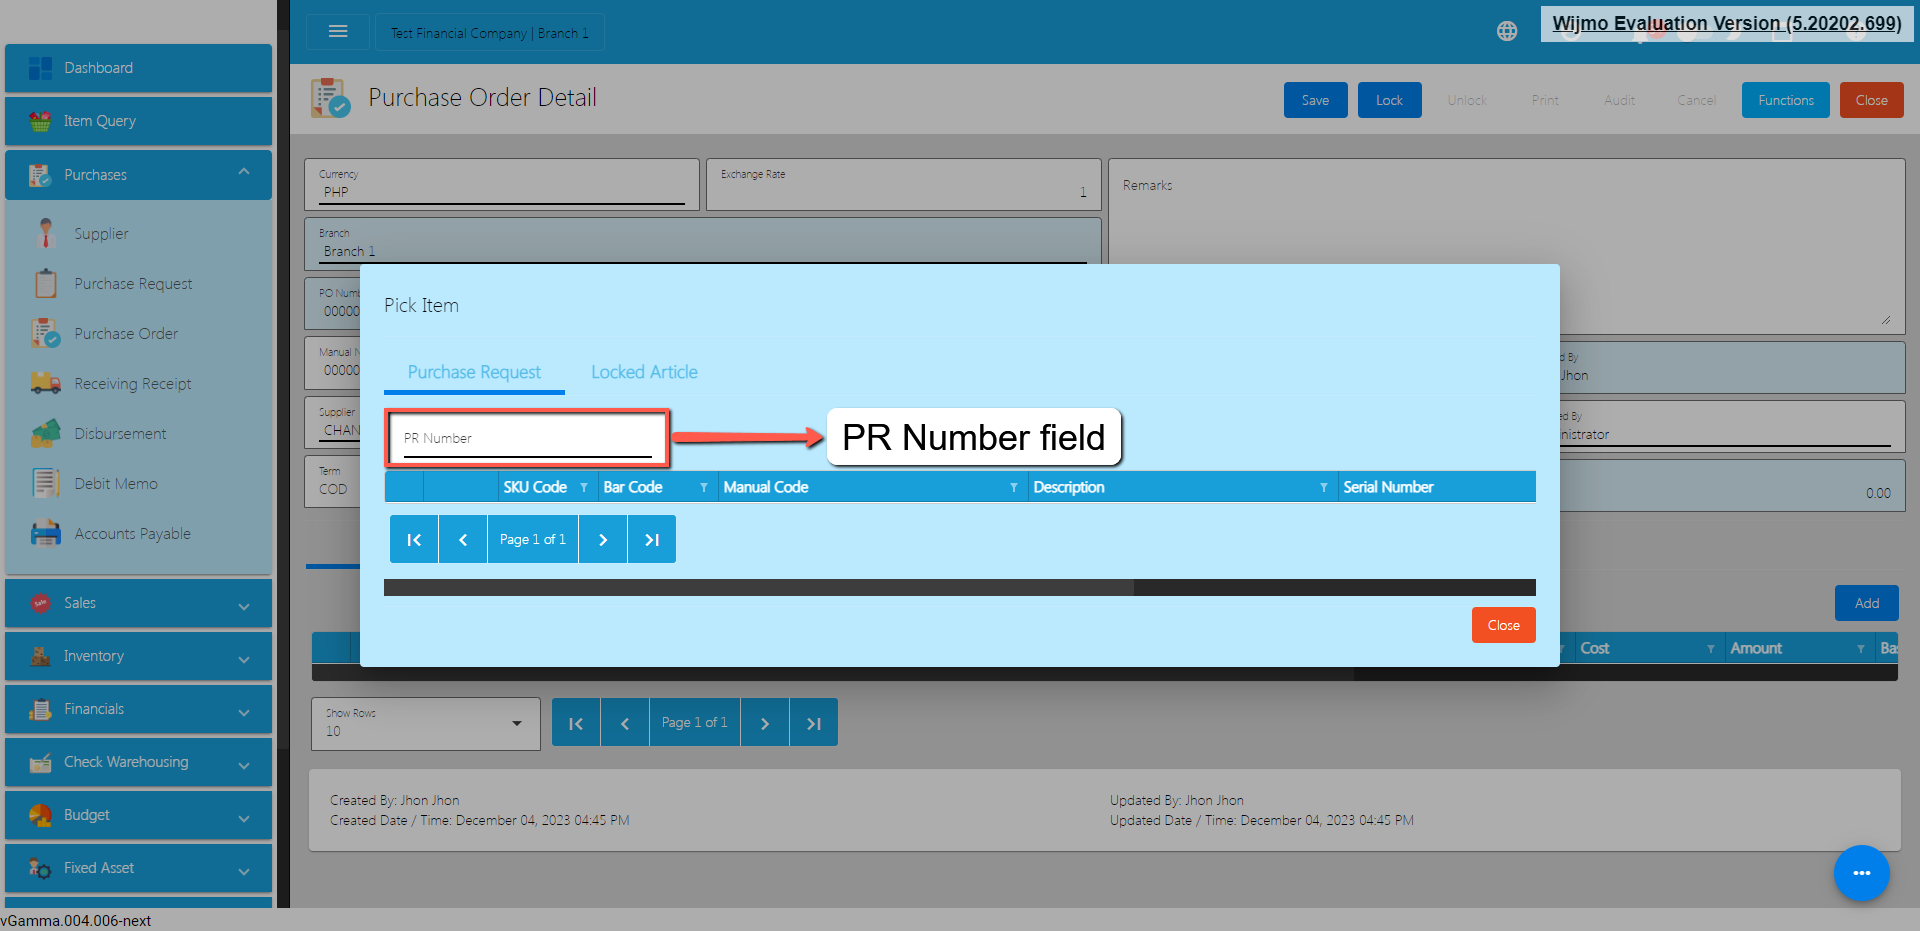
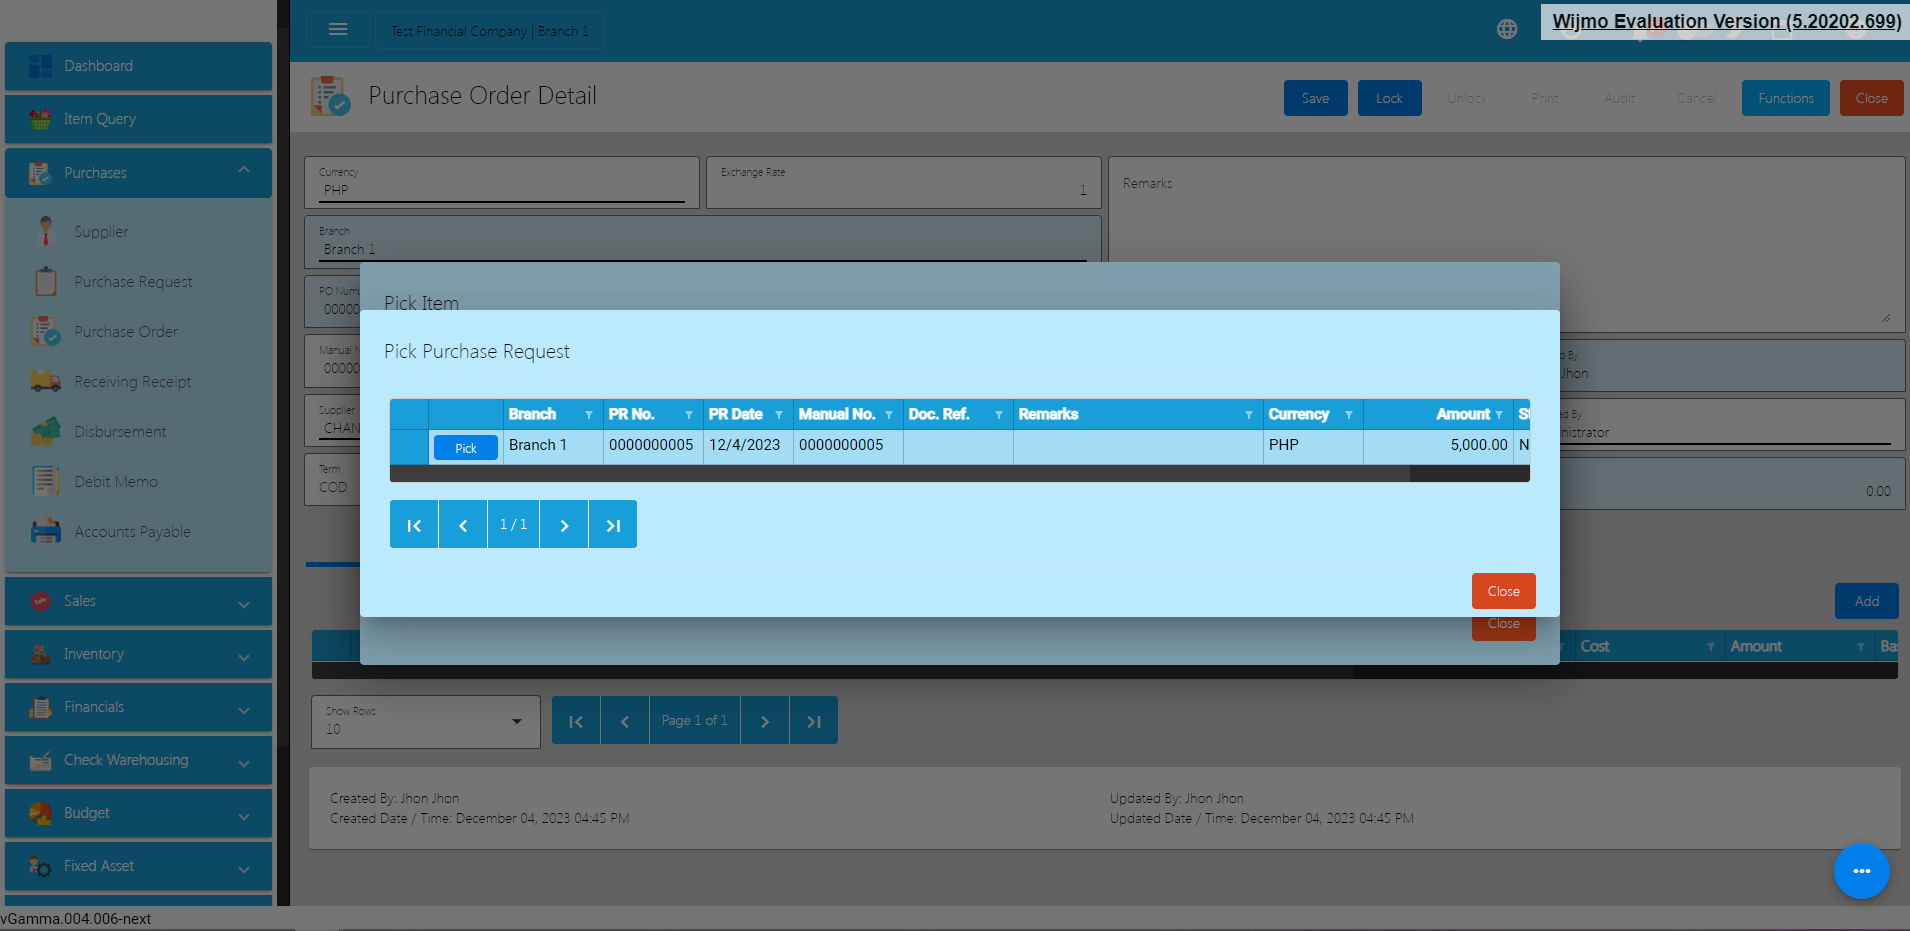
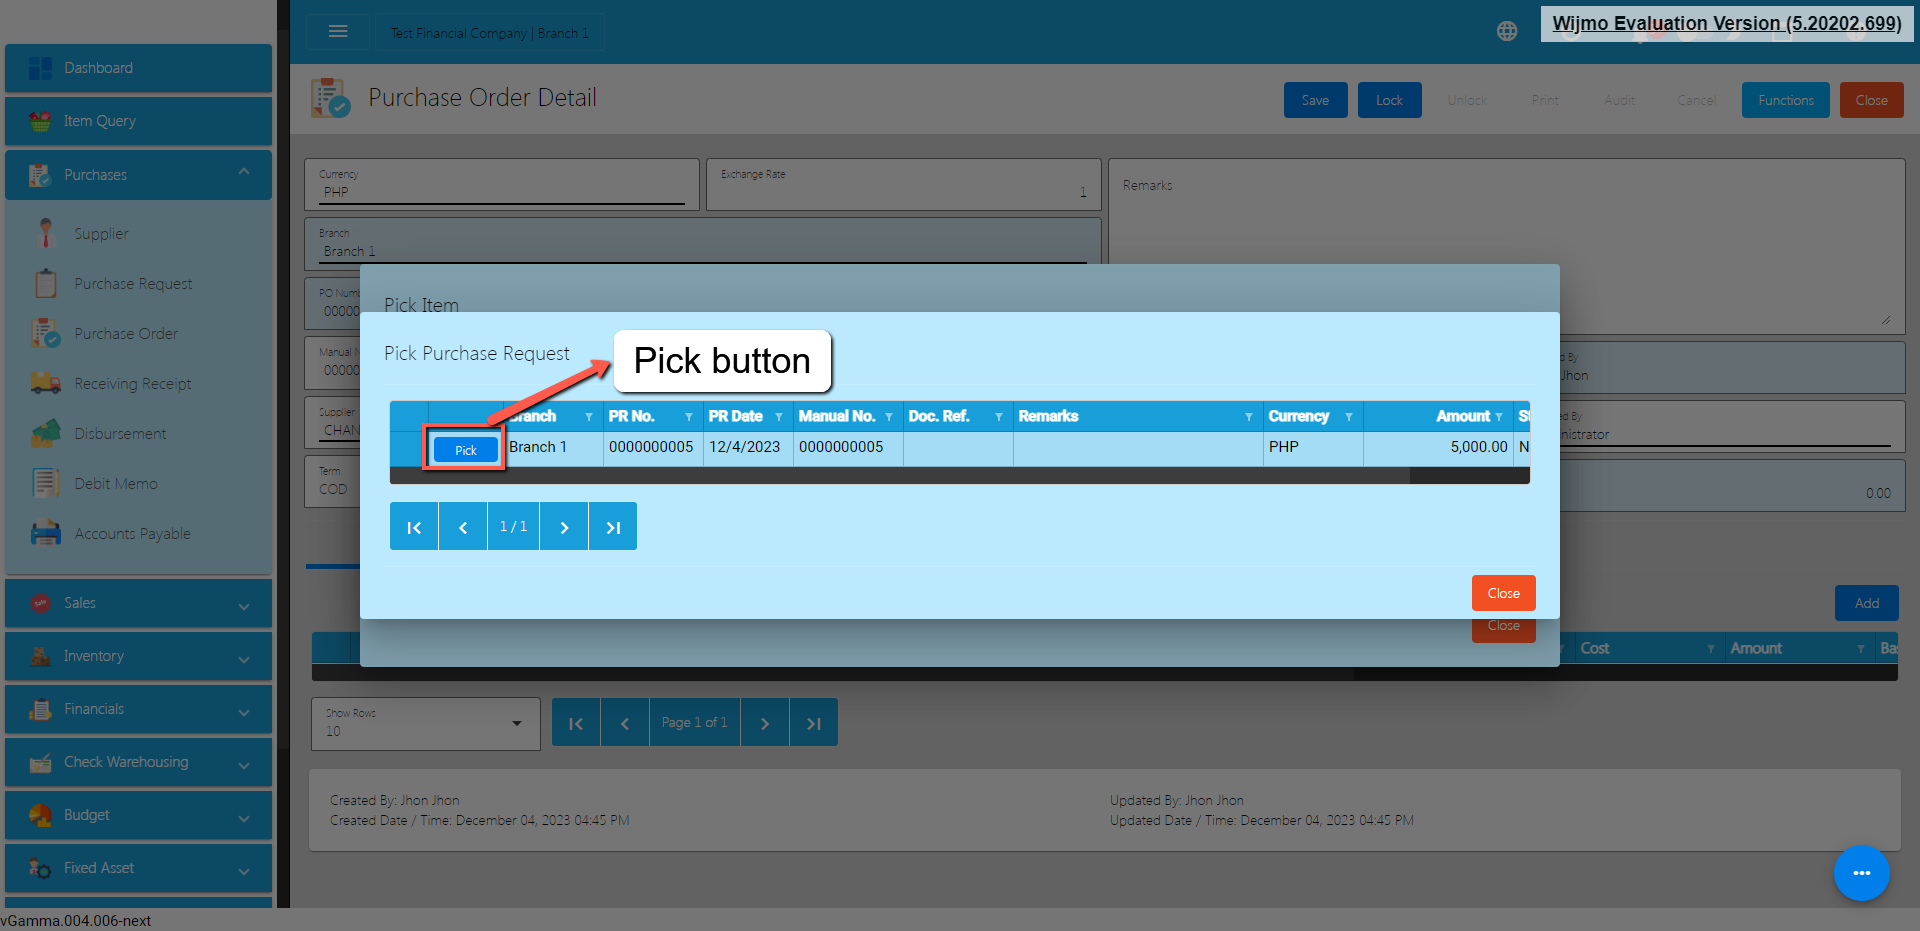
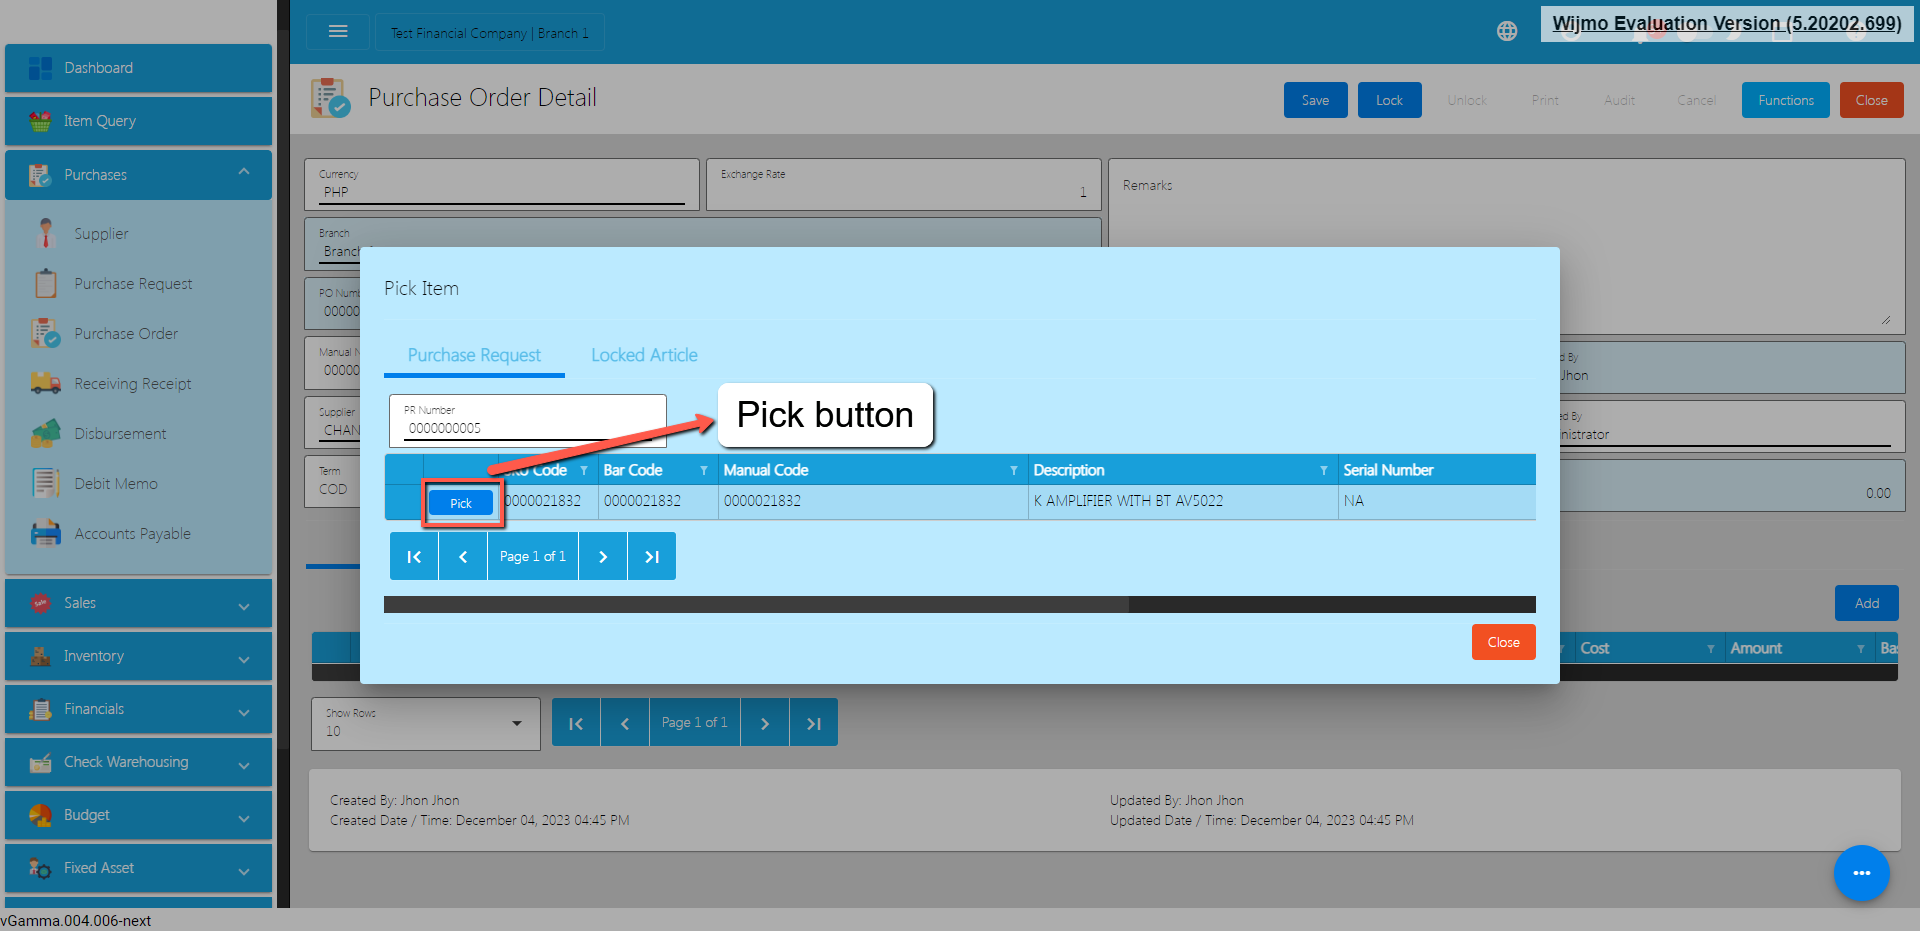
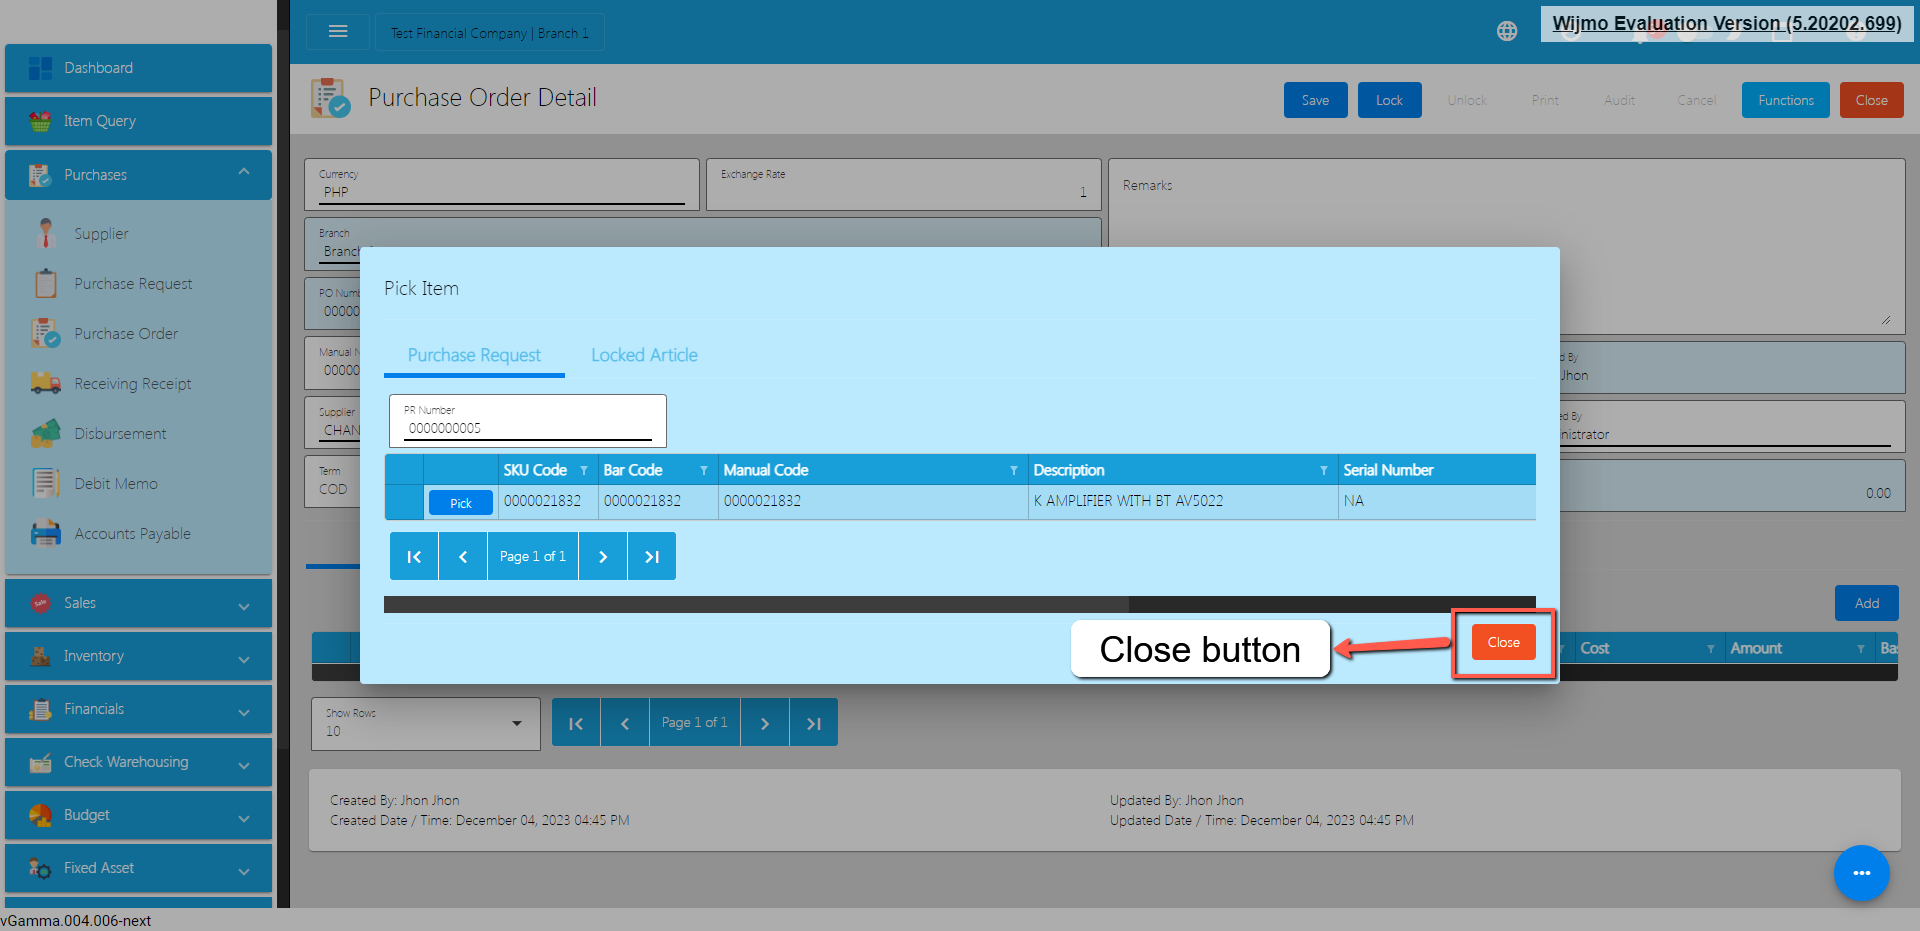
2. Select the items, by clicking the Pick button.
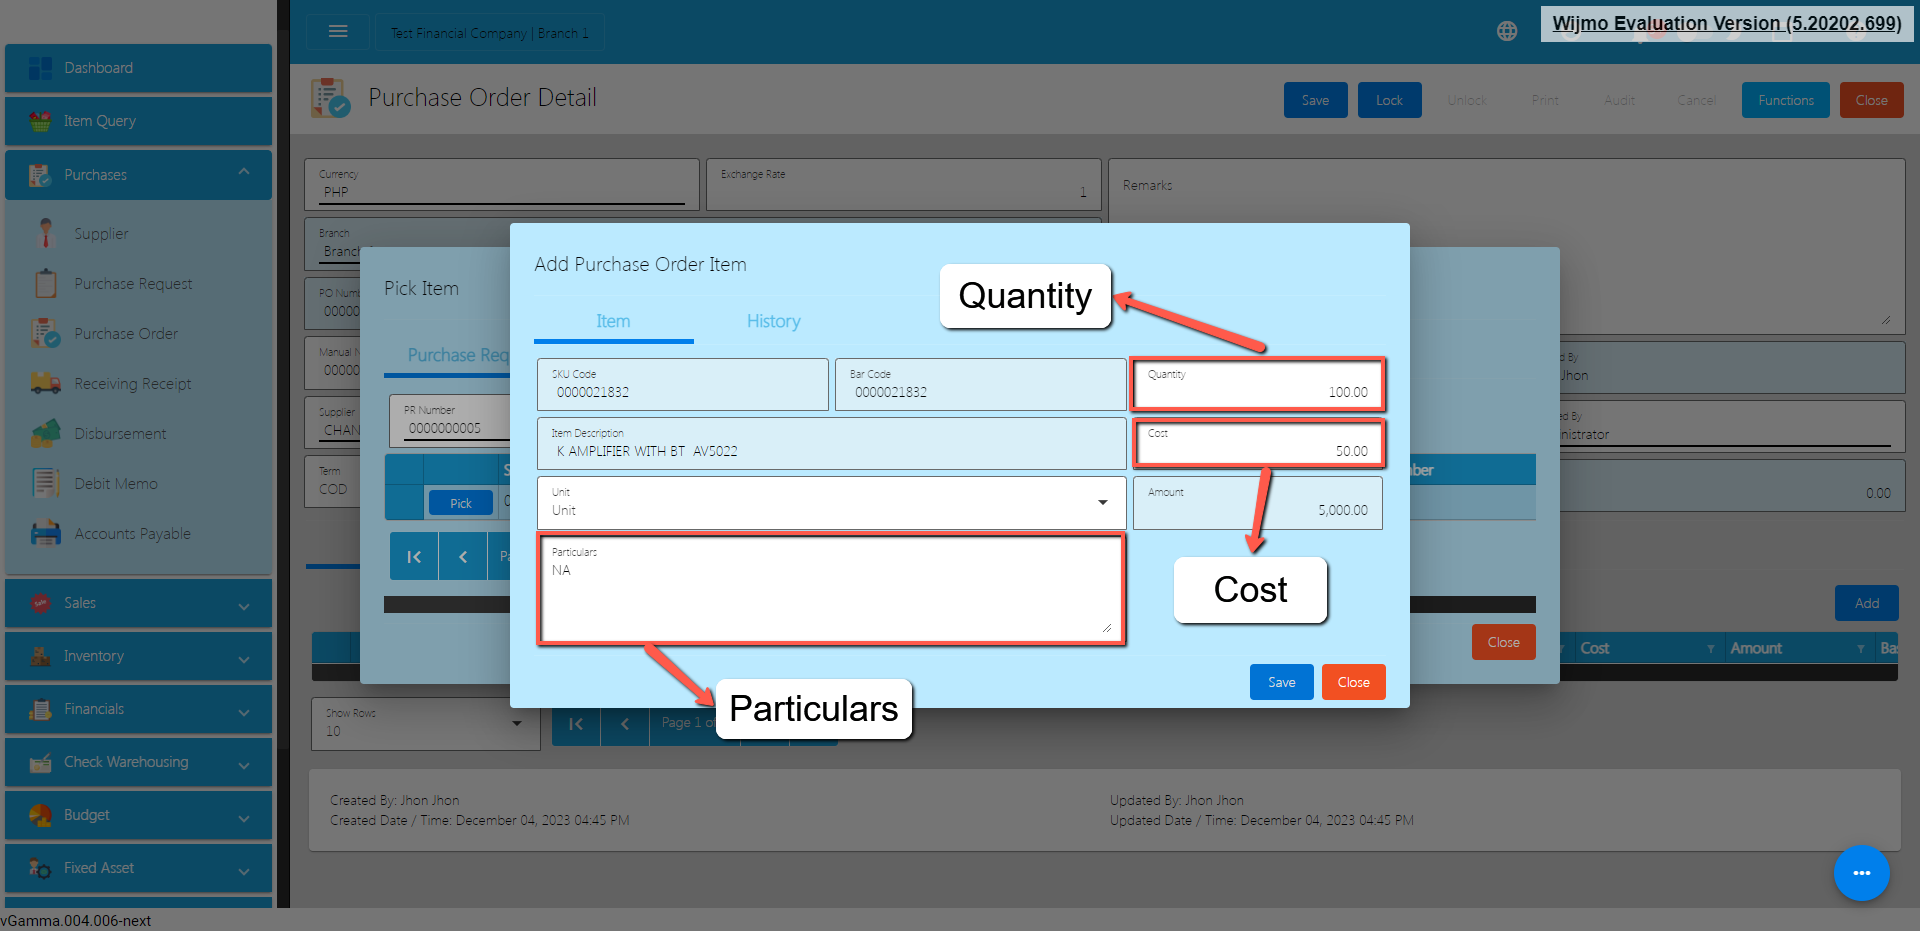
3. Once the Pick button is clicked, fill out the quantity and the cost. For Particulars, put NA if nothing to provide.
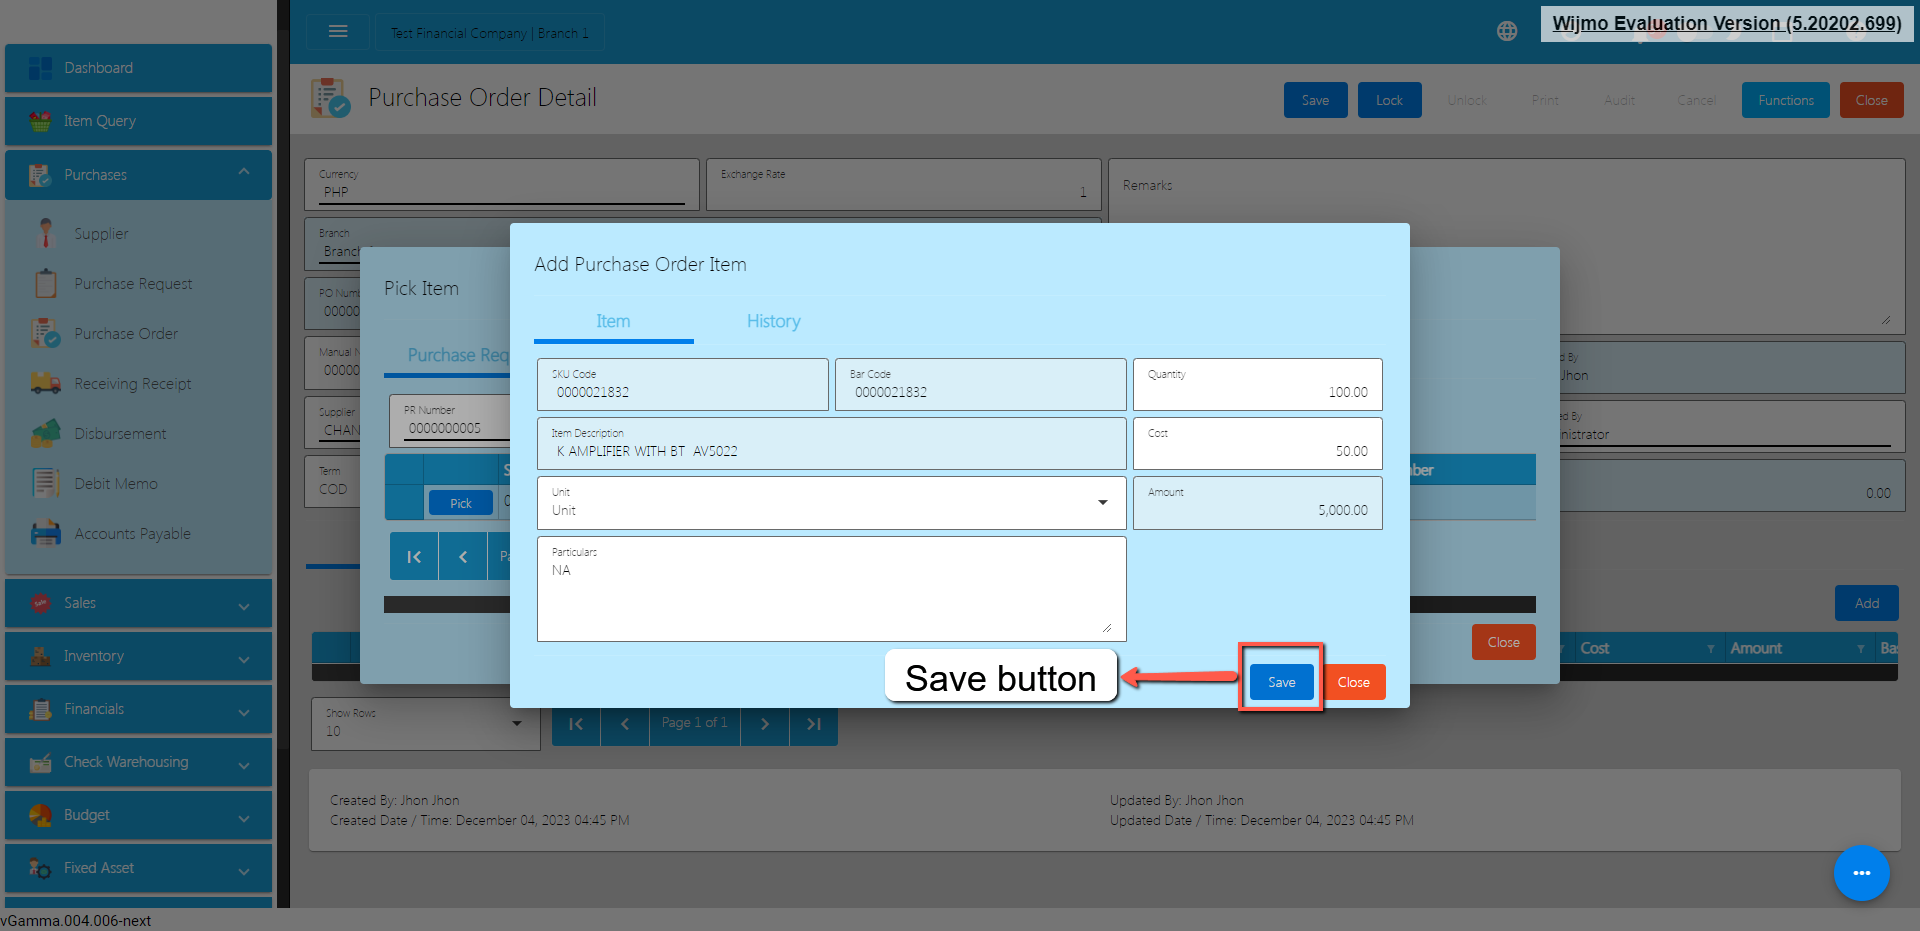
4. After providing the Quantity, Cost and Particulars, click the Save button.
5. If you wish to add additional items, repeat Steps 4 up to 6.
6. If you’re done adding line items, just click the Close button to hide the popup.
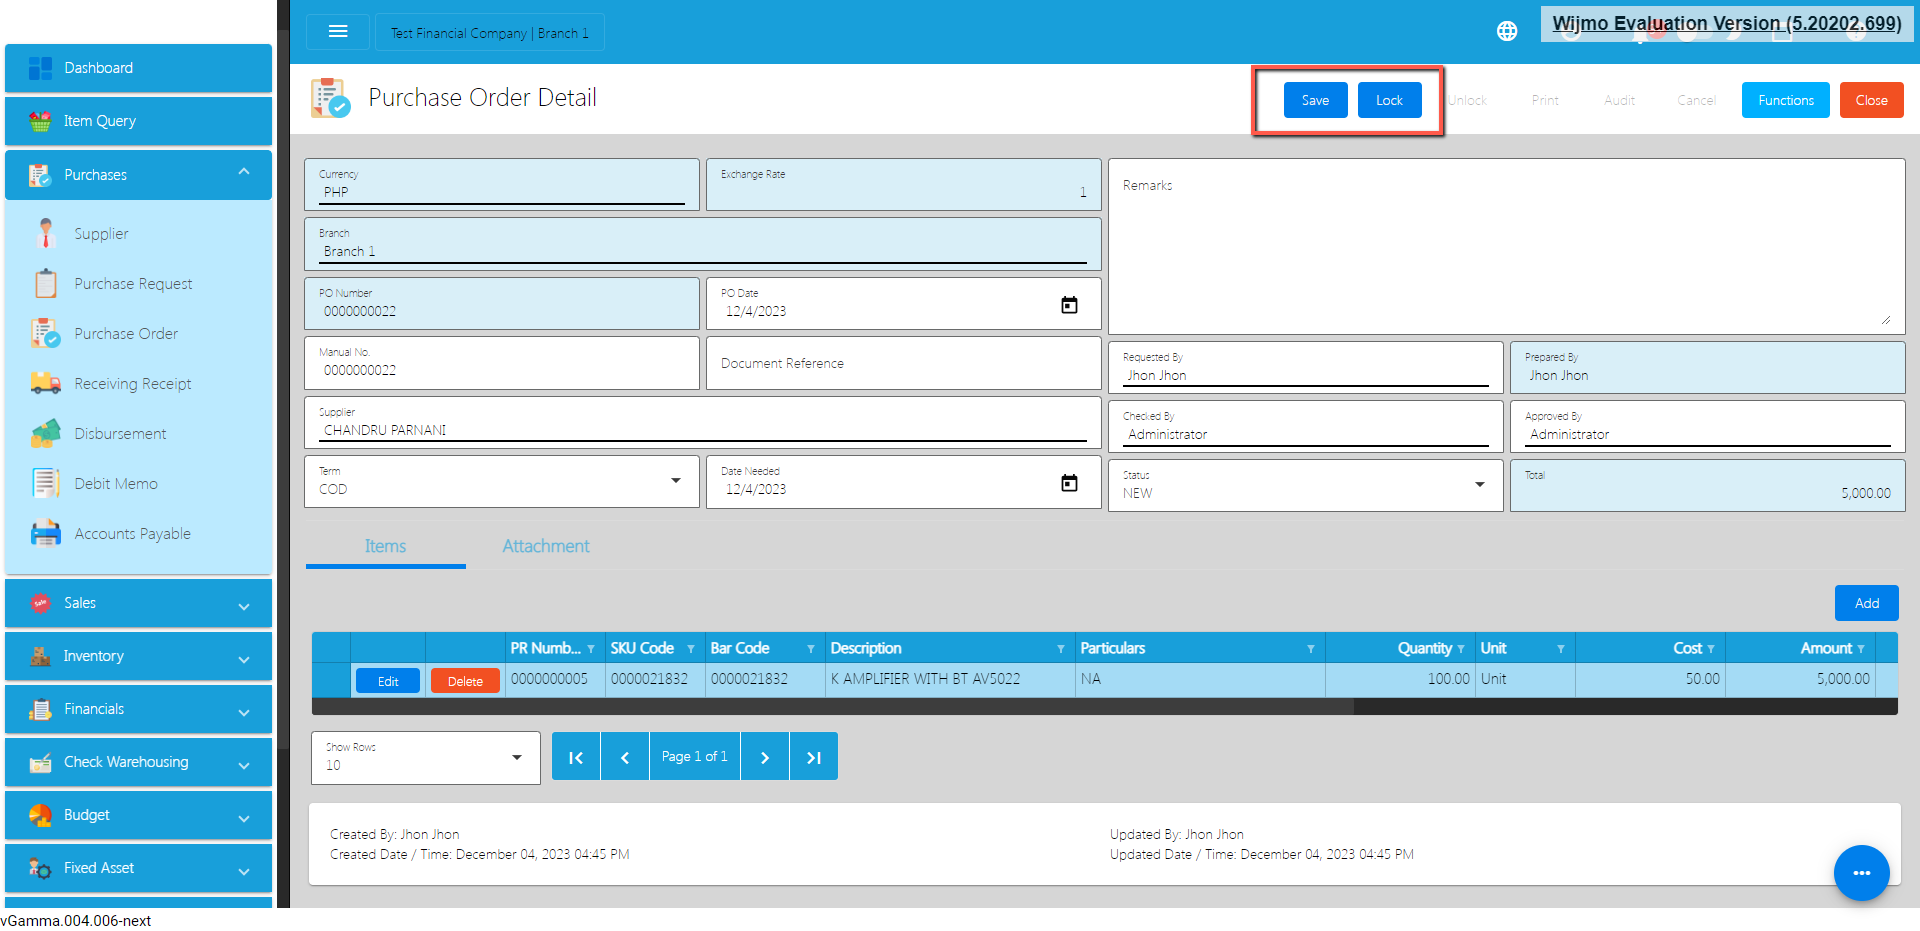
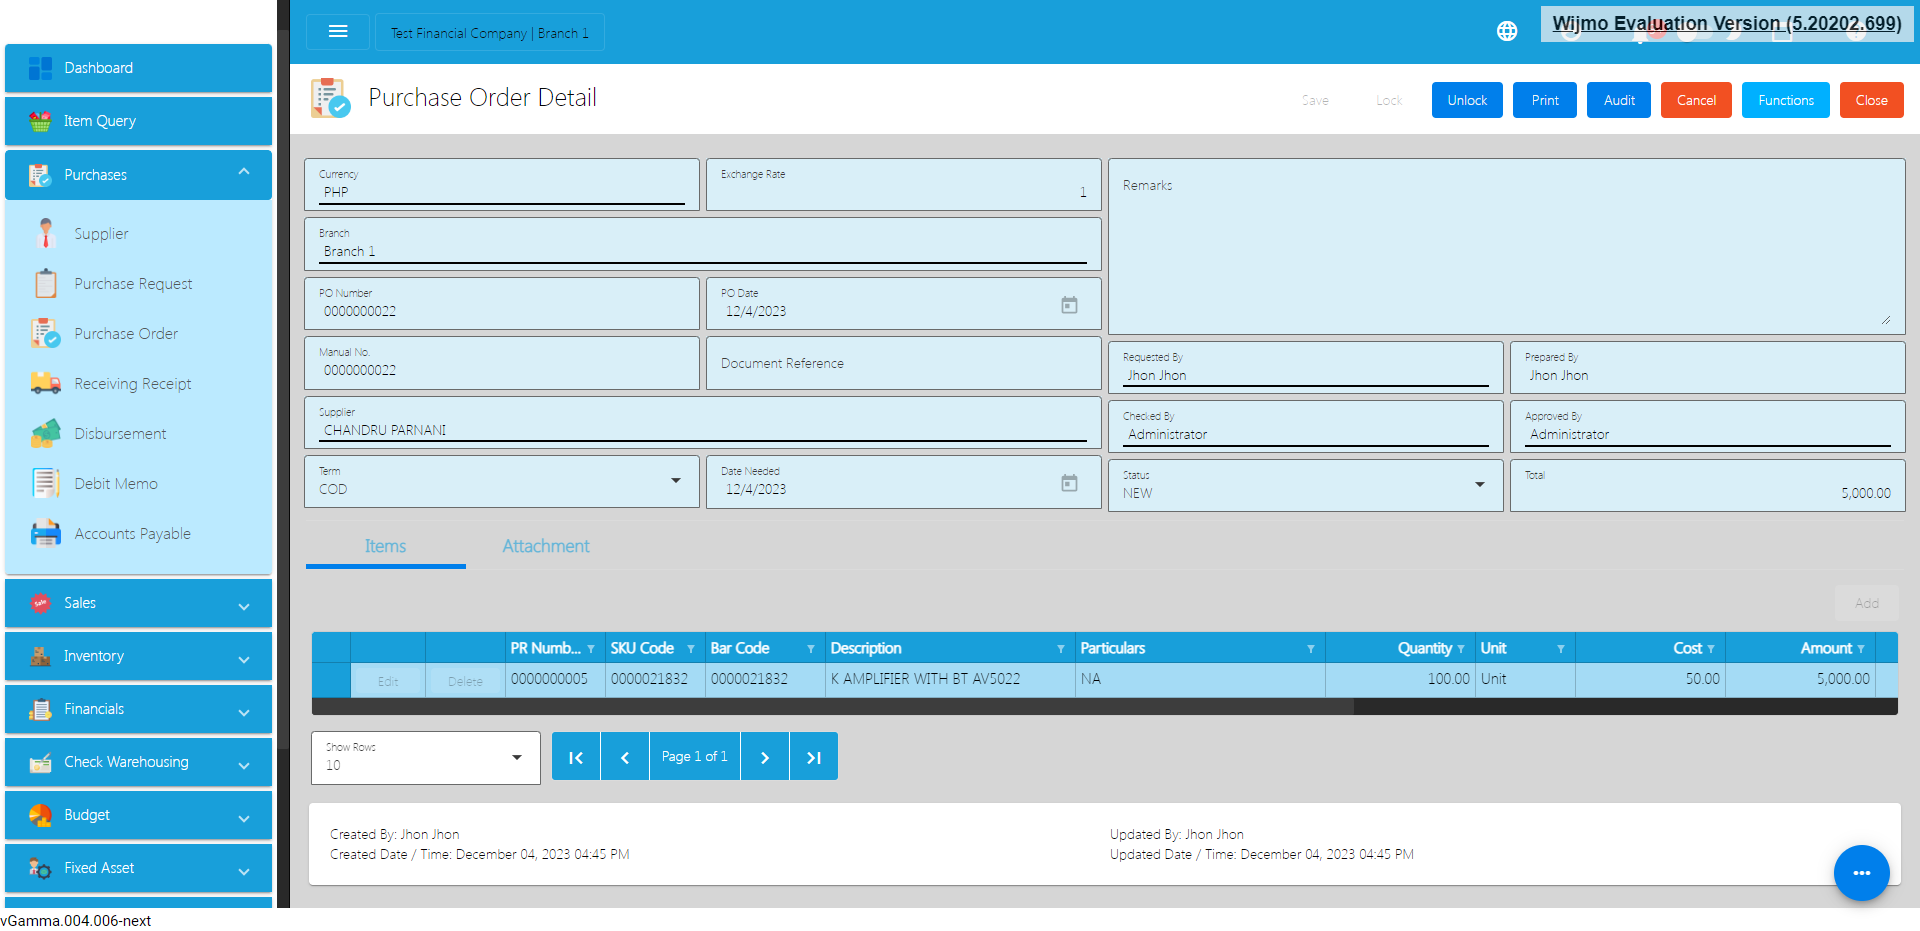
Review the Purchase Request you created. If it is all good, click the Save button, then Lock button.
A. Manual Code – should be unique per transaction, alphanumeric and Special Characters, should not exceed 255 characters.
Example : 1‘23`4!5@6#7$8%9^0&a*b(c)d_e+f=g{h}i[j]k|l\m/n:o;p”q<r>st?u v.w
Example : ‘00000111231414
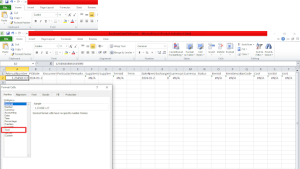
Steps on how to change the format to Text:
B. Document Reference – should be unique per transaction, alphanumeric and special Characters should not exceed 255
Example: 1‘23`4!5@6#7$8%9^0&a*b(c)d_e+f=g{h}i[j]k|l\m/n:o;p”q<r>st?u v.w
– if the Document Reference starts with 000, don’t forget to put an apostrophe (‘) at the beginning of the Manual Code.
Example: ‘00000111231414
– if the Document Reference starts with a number but exceeds
more than 10 digits, format the cell to Text to show all the
Numbers. Follow the steps in manual number.
C. Particulars – in this column this is basically the remarks for each item line, it can be alphanumeric and Special Characters, should not exceed 255 Characters.
D. Remarks – in this column this is basically remarks for the whole transaction, it can be alphanumeric and Special Characters should not exceed 255 characters.
E. Transaction Date and Date Needed – Transaction Date Is the date of PR or when it was created. Date Needed it can be after or on the date of the PR, the format of both Transaction and Date needed should be (yyyy-mm-dd)
F. TermCode – on this column you have to input the manual code of the Term. The manual code of the term can be found in the system tables then select terms.
G. Supplier Code – on this column you have to input the manual code of the suppliers. The manual code of the supplier can be found in the supplier list or supplier detail.
H. CurrencyCode and Exchange Rate – On CurrencyCode you have to input the manual code of the currency which can be found in the Currency Setup. Exchange Rate needs to input the exchange rate of that specific currency of the day.
I. BarCode, Quantity and Cost – BarCode is the code for each item that is added in the system, Quantity is the quantity of each item on how many quantities need to purchase and the Cost is the cost when purchasing the item.
NOTE : The Maximum Number of Lines that can be uploaded via importing is only up to 1000 Lines.
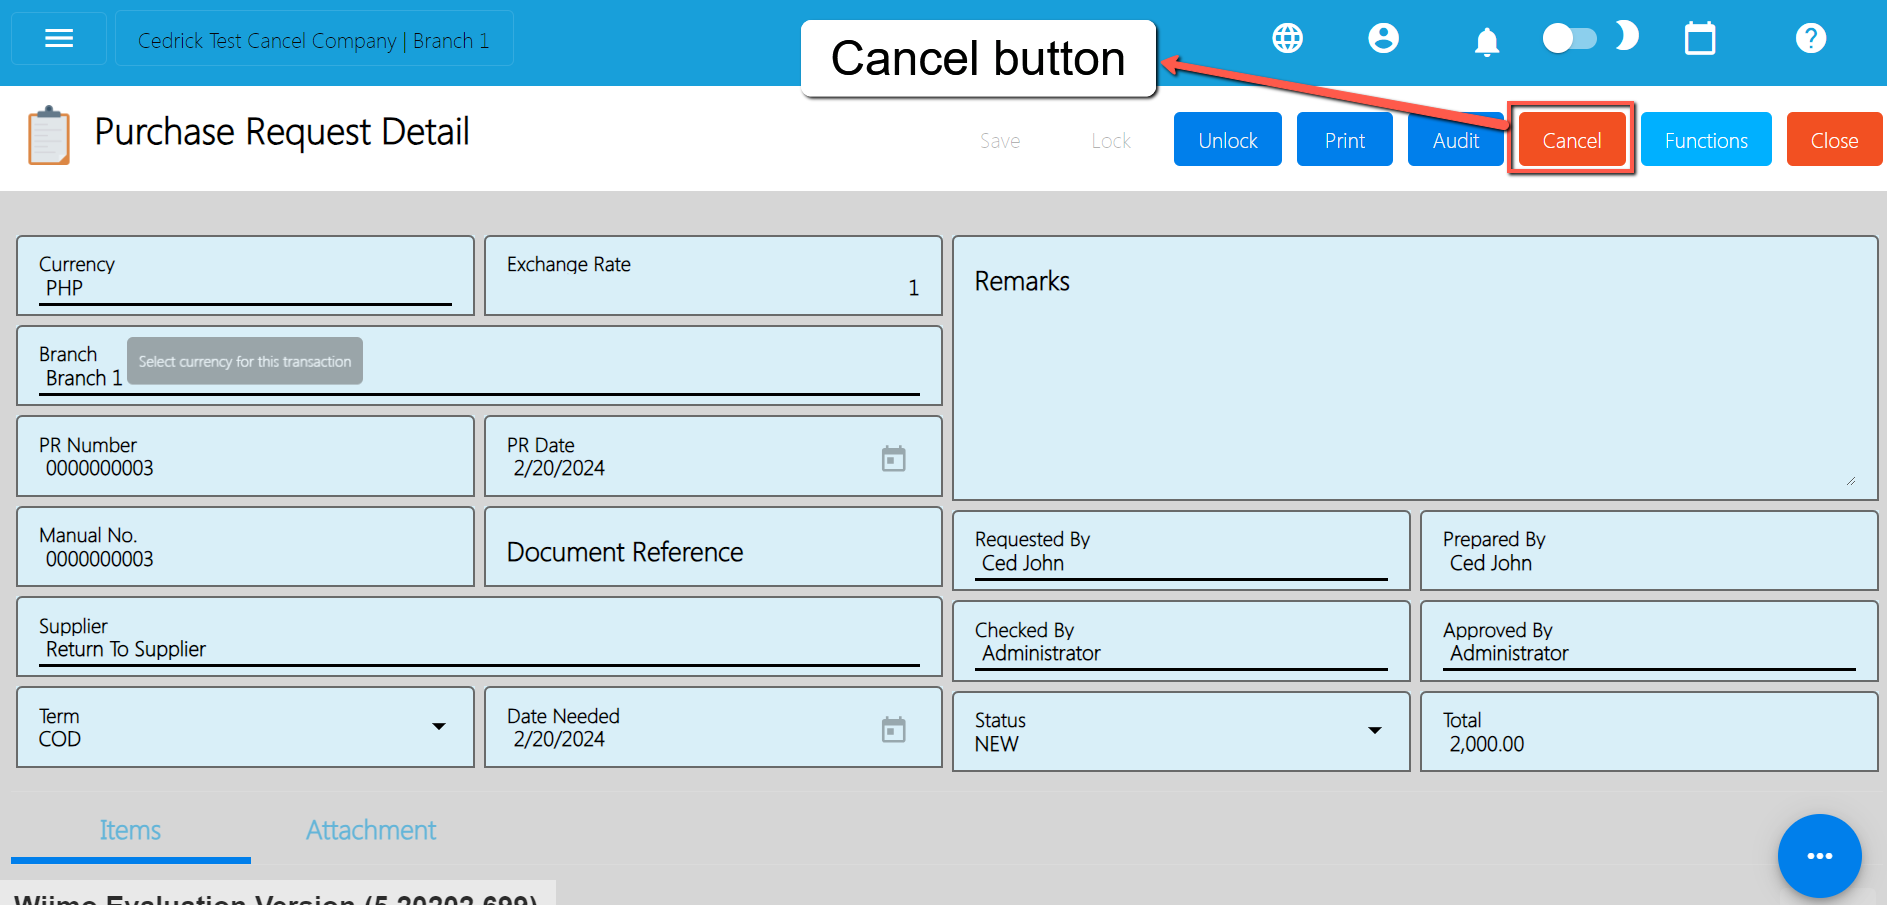
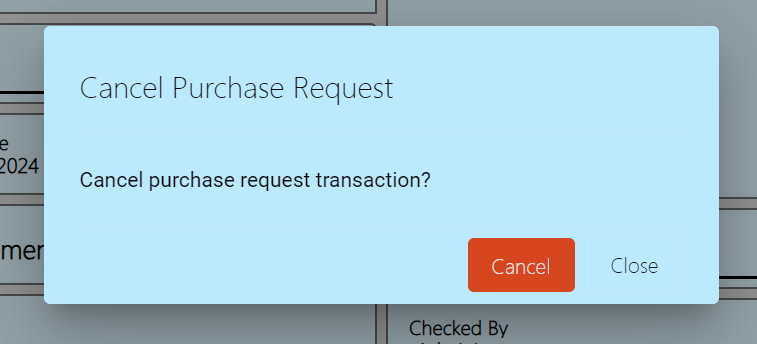
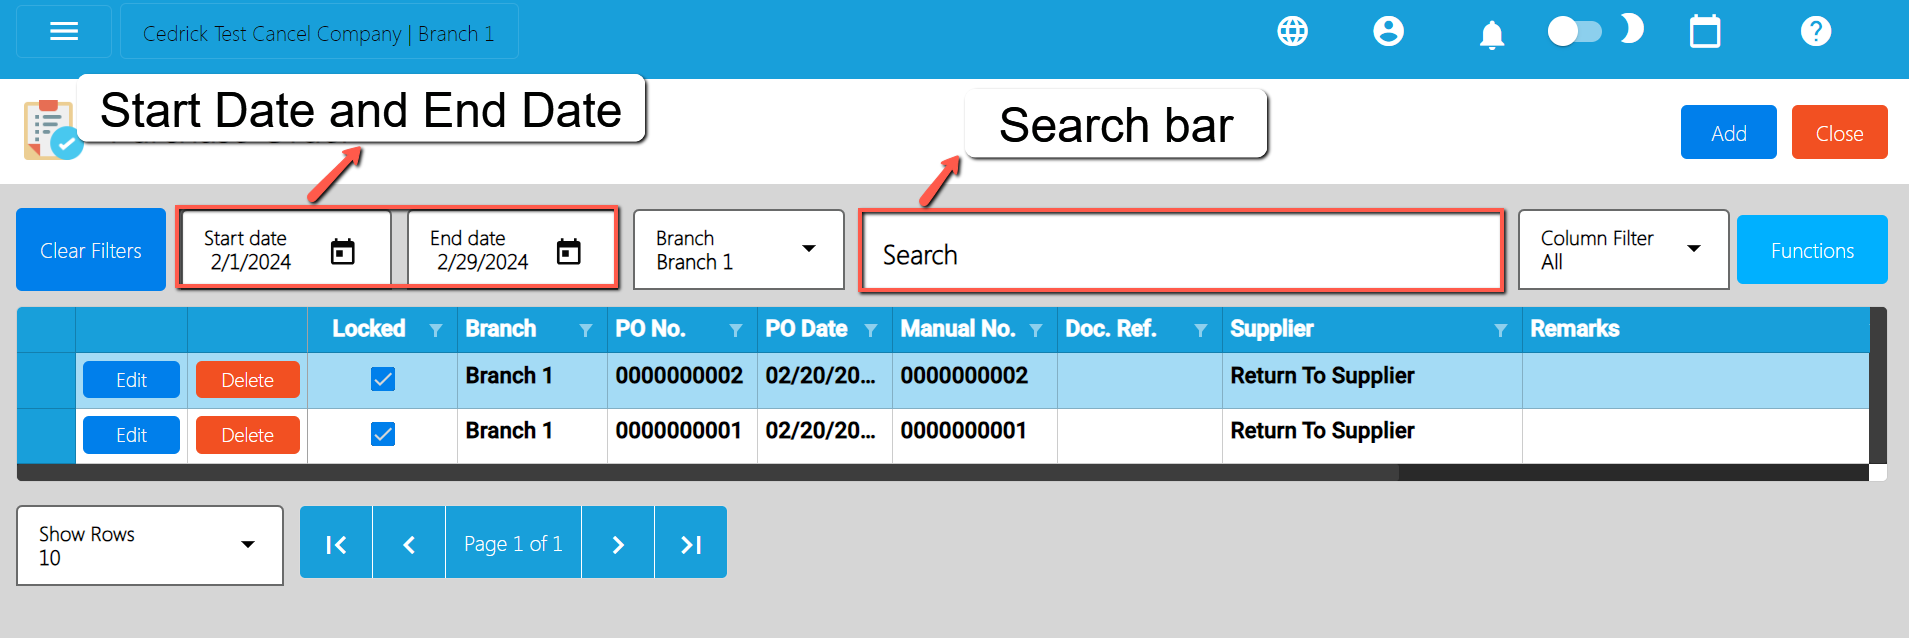
When you need to cancel a purchase request, it’s important to follow these simple steps:
Take note: Don’t forget to change the Start Date and End Date to your Purchase Request’s transaction date to display the correct result.
This is to finalize the purchases for the company.
Purchase Order Transaction via Upload Template
Example: 1‘23`4!5@6#7$8%9^0&a*b(c)d_e+f=g{h}i[j]k|l\m/n:o;p”q<r>st?u v.w
– if the Manual Code starts with 000, don’t forget to put an apostrophe (‘) at the beginning of the Manual Code.
Example: ‘00000111231414
– if the Manual Code starts with a number but exceeds more than 10 digits, format the cell to Text to show all the numbers.
Steps on how to change the format to Text:
1. Right Click the Cell
2. Click Format Cell
3. Choose Text
4. Click OK
5. Then reselect the field
B. Document Reference should be unique per transaction,alphanumeric and special characters should not exceed 255 characters.
Example: 1‘23`4!5@6#7$8%9^0&a*b(c)d_e+f=g{h}i[j]k|l\m/n:o;p”q<r>st?u v.w
– if the Document Reference starts with 000, don’t forget to put an apostrophe (‘) at the beginning of the Manual Code.
Example: ‘00000111231414
– if the Document Reference starts with a number but exceeds more than 10 digits, format the cell to Text to show all the numbers.
Steps on how to change the format to Text:
1. Right Click the Cell
2. Click Format Cell
3. Choose Text
4. Click OK
5. Then reselect the field
C. Particulars – in this column this is basically the remarks for each item line, it should be alphanumeric and Special characters should not exceed 255 characters.
D. Remarks – in this column are basically the remarks for the whole transaction, it should be alphanumeric and Special characters should not exceed 255 characters.
E. Date Needed and PO Date – PO Date is the date of PO or when it was created. Date Needed it can be after or on the date of the PO date, the format of the PO Date and Date Needed should be
( yyyy-mm-dd )
F. Supplier and SupplierID – Select supplier from the dropdown and choose the supplier, SupplierID will correspond to the selected supplier. Never edit the supplierID since it will automatically change after selecting the supplier.
G. Term and TermID – Select term from the dropdown and choose the term, TermID will correspond to the selected Term. Never edit the termID since it will automatically change after selecting the Term.
H. Currency and CurrencyID – Select the Currency from the dropdown and choose the supplier, CurrencyID will correspond to the selected currency. Never edit the CurrencyID since it will automatically change after selecting the currency.
I. Exchange Rate and Status – exchange rate is the rate that is used to convert the currency, Status is the status of the transaction, just select the status from the dropdown.
J. ItemID, Item Description, Cost, UnitID and Unit – all these fields are related to the Item. Once the barcode is selected all these fields will also change depending on the barcode that was selected.
K. Quantity – Input the quantity that needed to be ordered from the supplier.
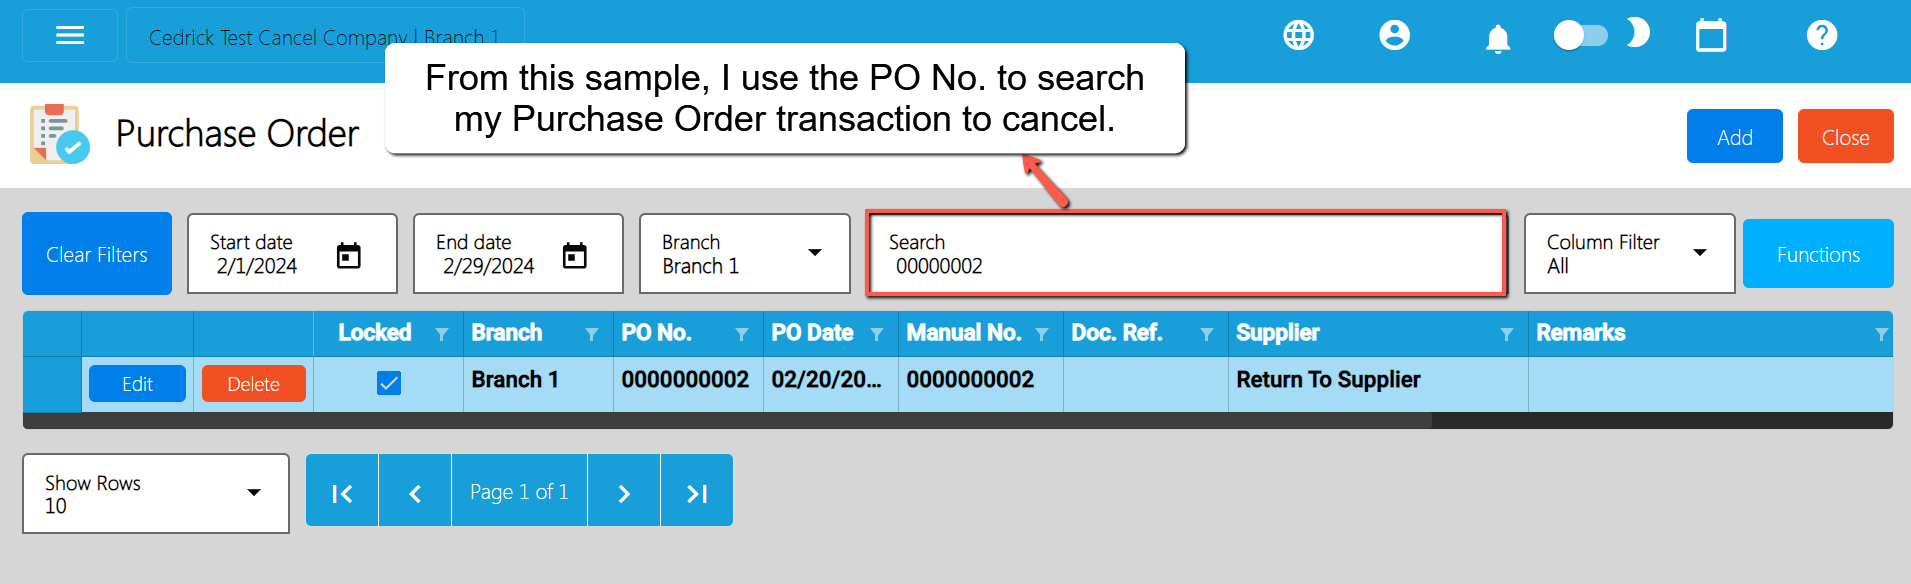
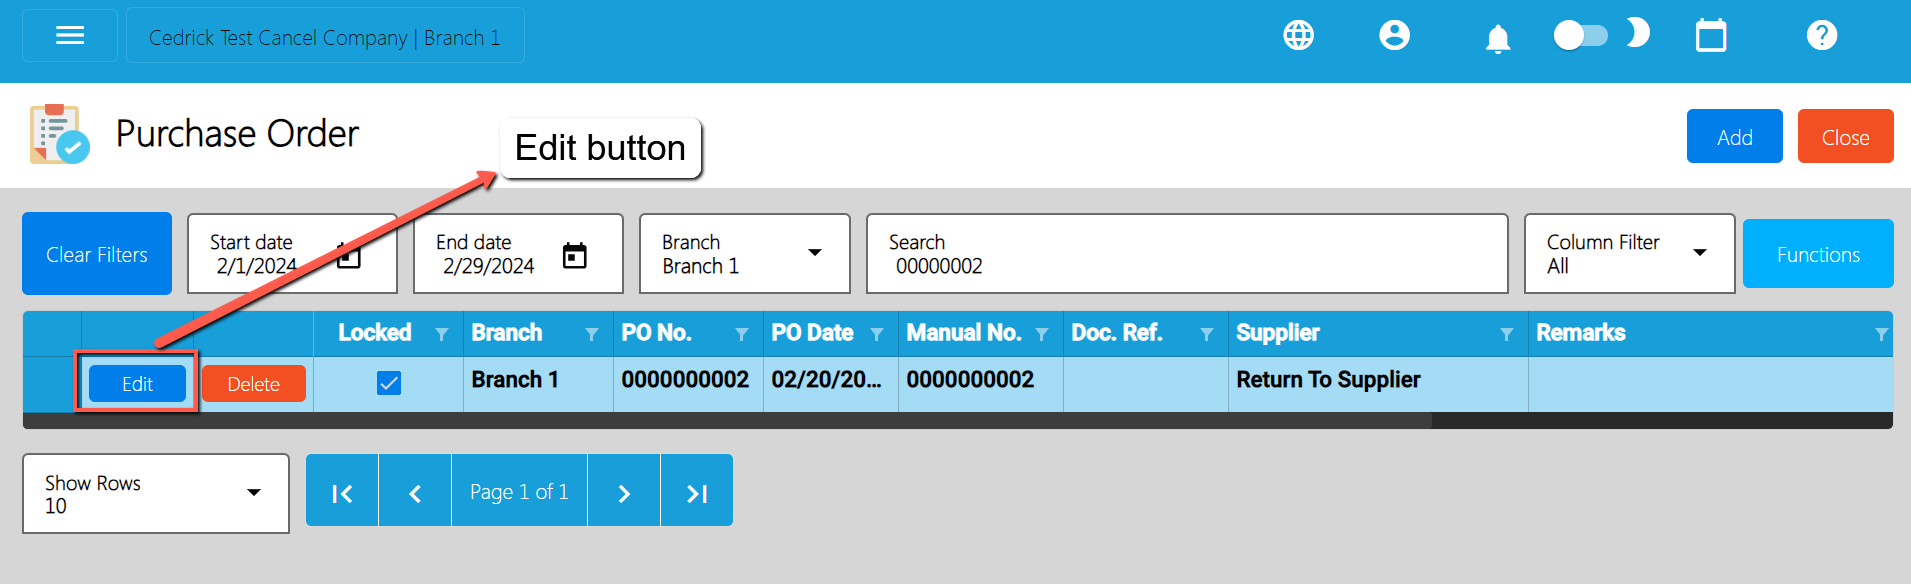
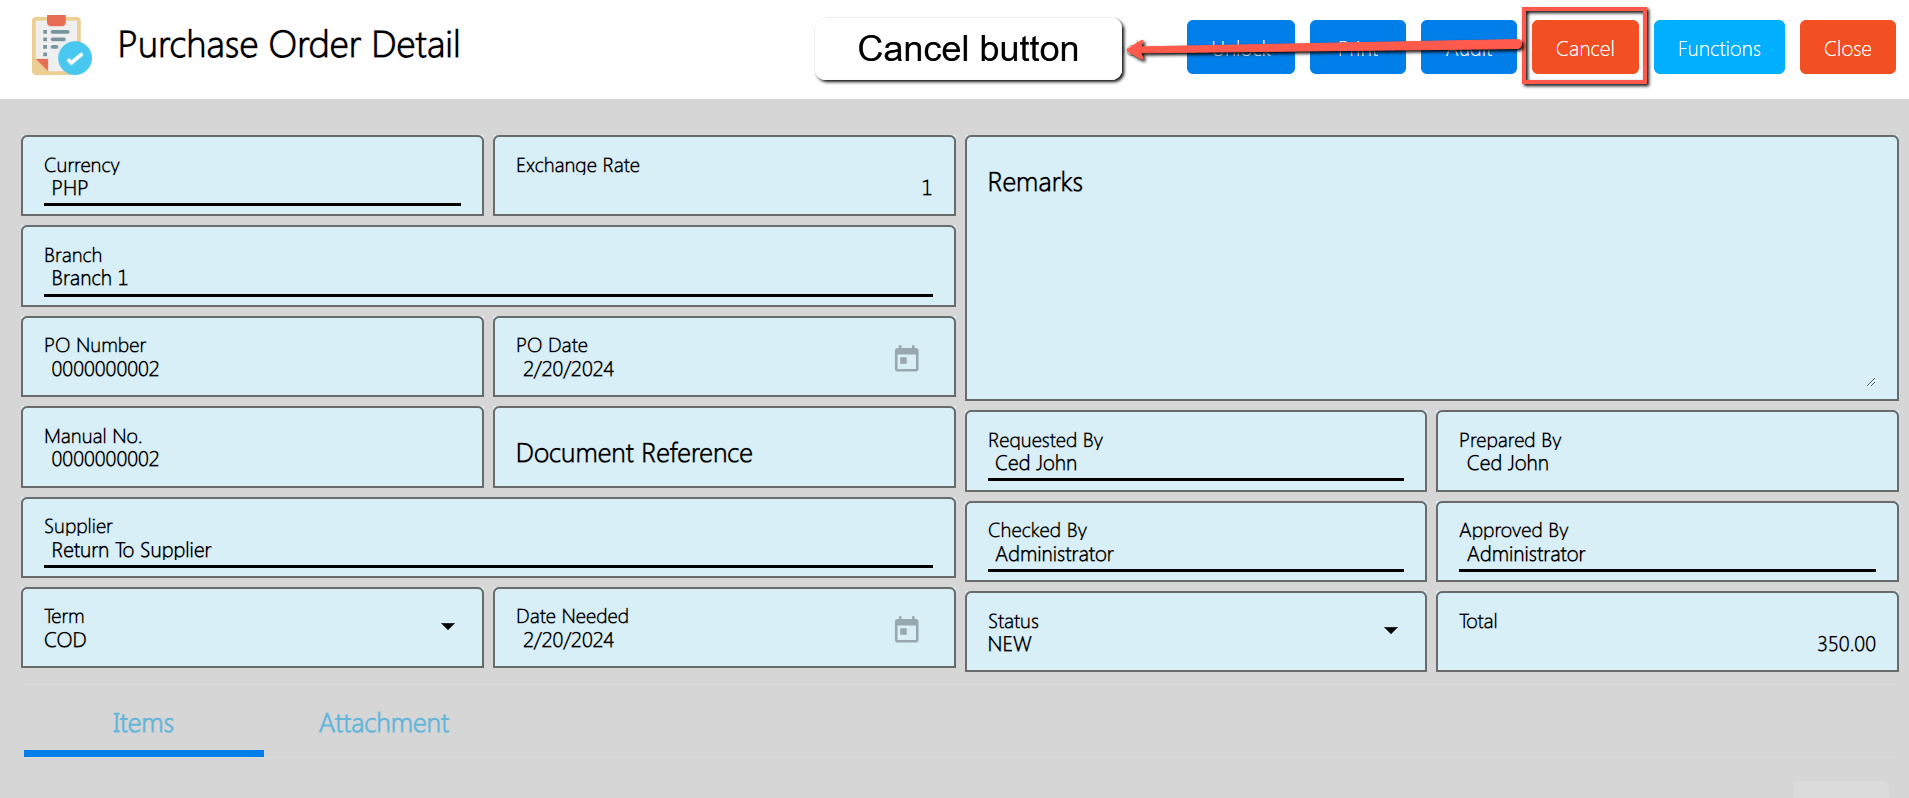
When you need to cancel a purchase order, it’s important to follow these simple steps:
Take note: Don’t forget to change the Start Date and End Date to your Purchase Order’s transaction date to display the correct result.

Typically replies within a few hours
 Log in to Messenger