In this section, I will walk through the process of managing easyPOS transactions using our easyFS:
Go to Apps, then click POS.
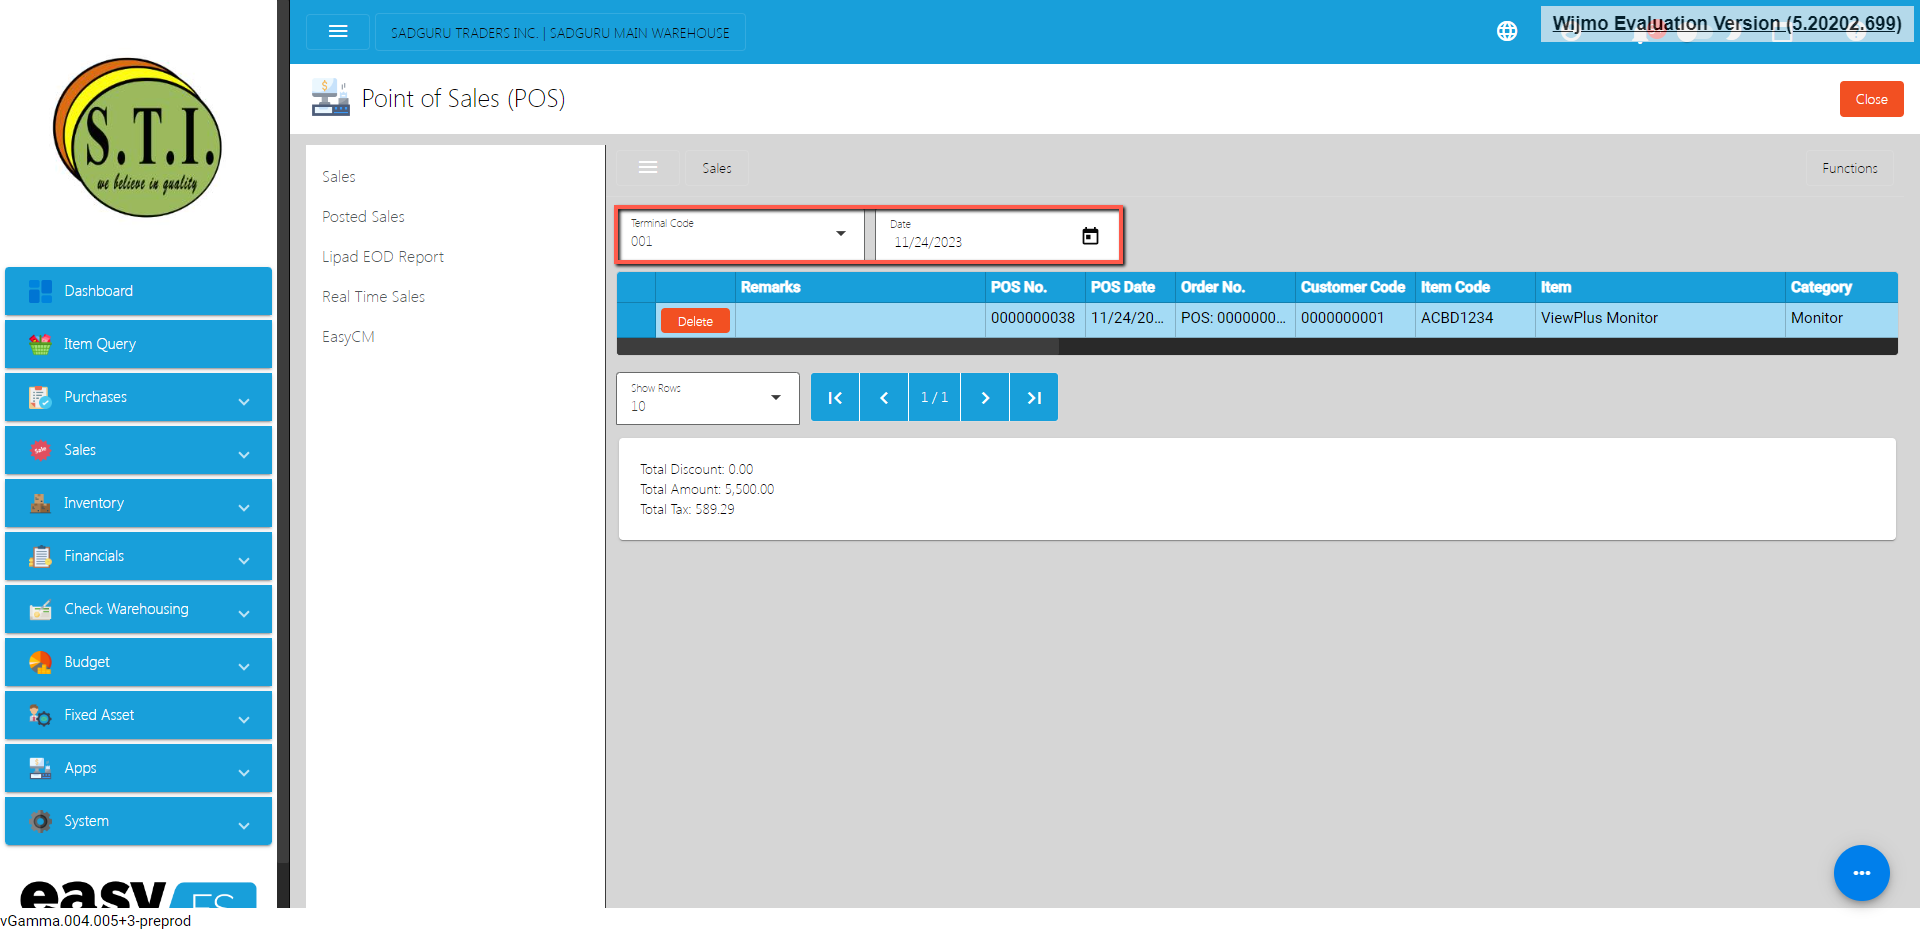
Under the Sales menu, this is where you will monitor the sales transactions from the easyPOS:
Select a correct Terminal Code and Date:
Terminal Code → based on the easyPOS settings
Date → easyPOS sales transaction
After that, Sales transactions from easyPOS will be displayed based on the provided Terminal Code and Date.
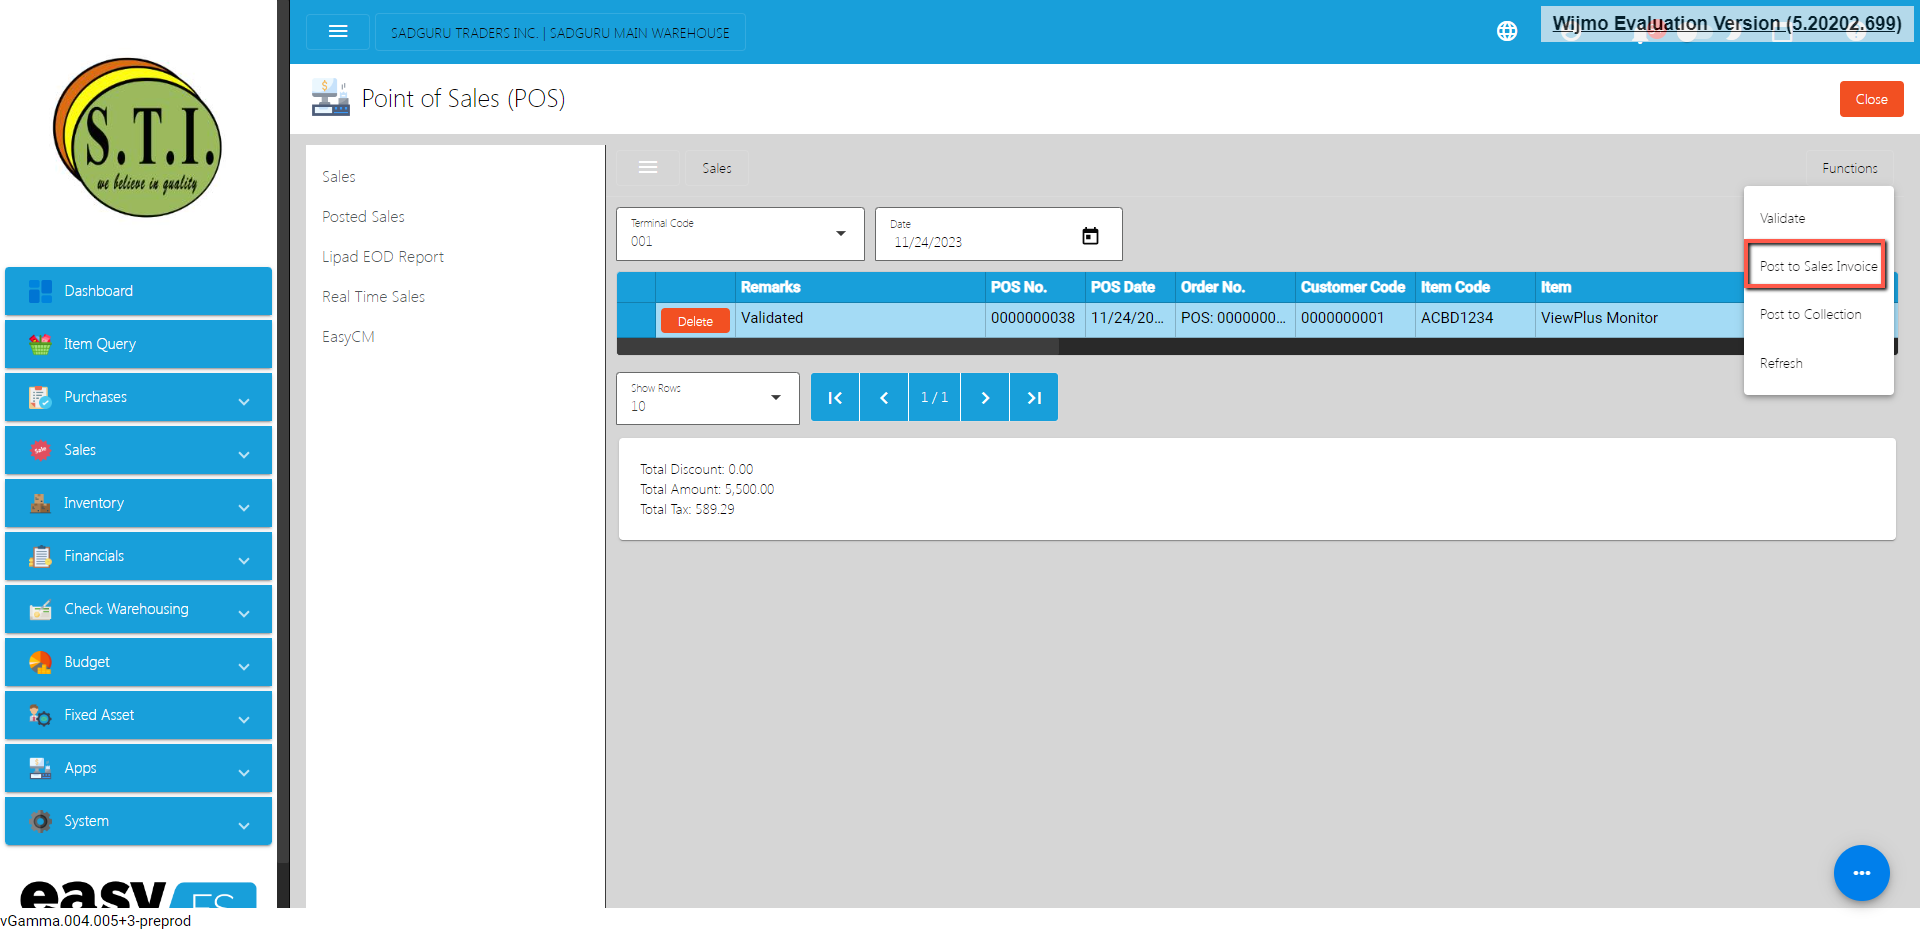
Before posting it to the easyFS Sales Invoice, you need to validate it first.
To validate the sales transactions, click the Functions button then click Validate button.
Once validation is complete, check the Remarks column value:
Remarks is equal to VALIDATED, this means that you can now post this to the Sales Invoice.
Remarks are not equal to VALIDATED. Below are the listed errors along with their explanations and recommended actions for resolution:
Item is Unlock
Explanation: This error indicates that the Item is currently in an unlock.Leaving an item in an unlocked state will result in it being excluded from sales transactions and will not be deducted from inventory. This situation can lead to discrepancies in both sales records and inventory levels between the easyPOS system and the easyFS.
Resolution: To solve this issue, follow these simple steps:
Go to the Master Files, then select Item.
Search the item using the item barcode. The barcode should be found where it says the item is unlocked. Check the screenshot below to see where to find the barcode with the error.
Click the Edit button.
Look for the Lock button, then click.
Customer not Found
Explanation: This error indicates that the Customer is currently unlocked or not added on the easyFS system.
Resolution: To solve this issue, follow these simple steps:
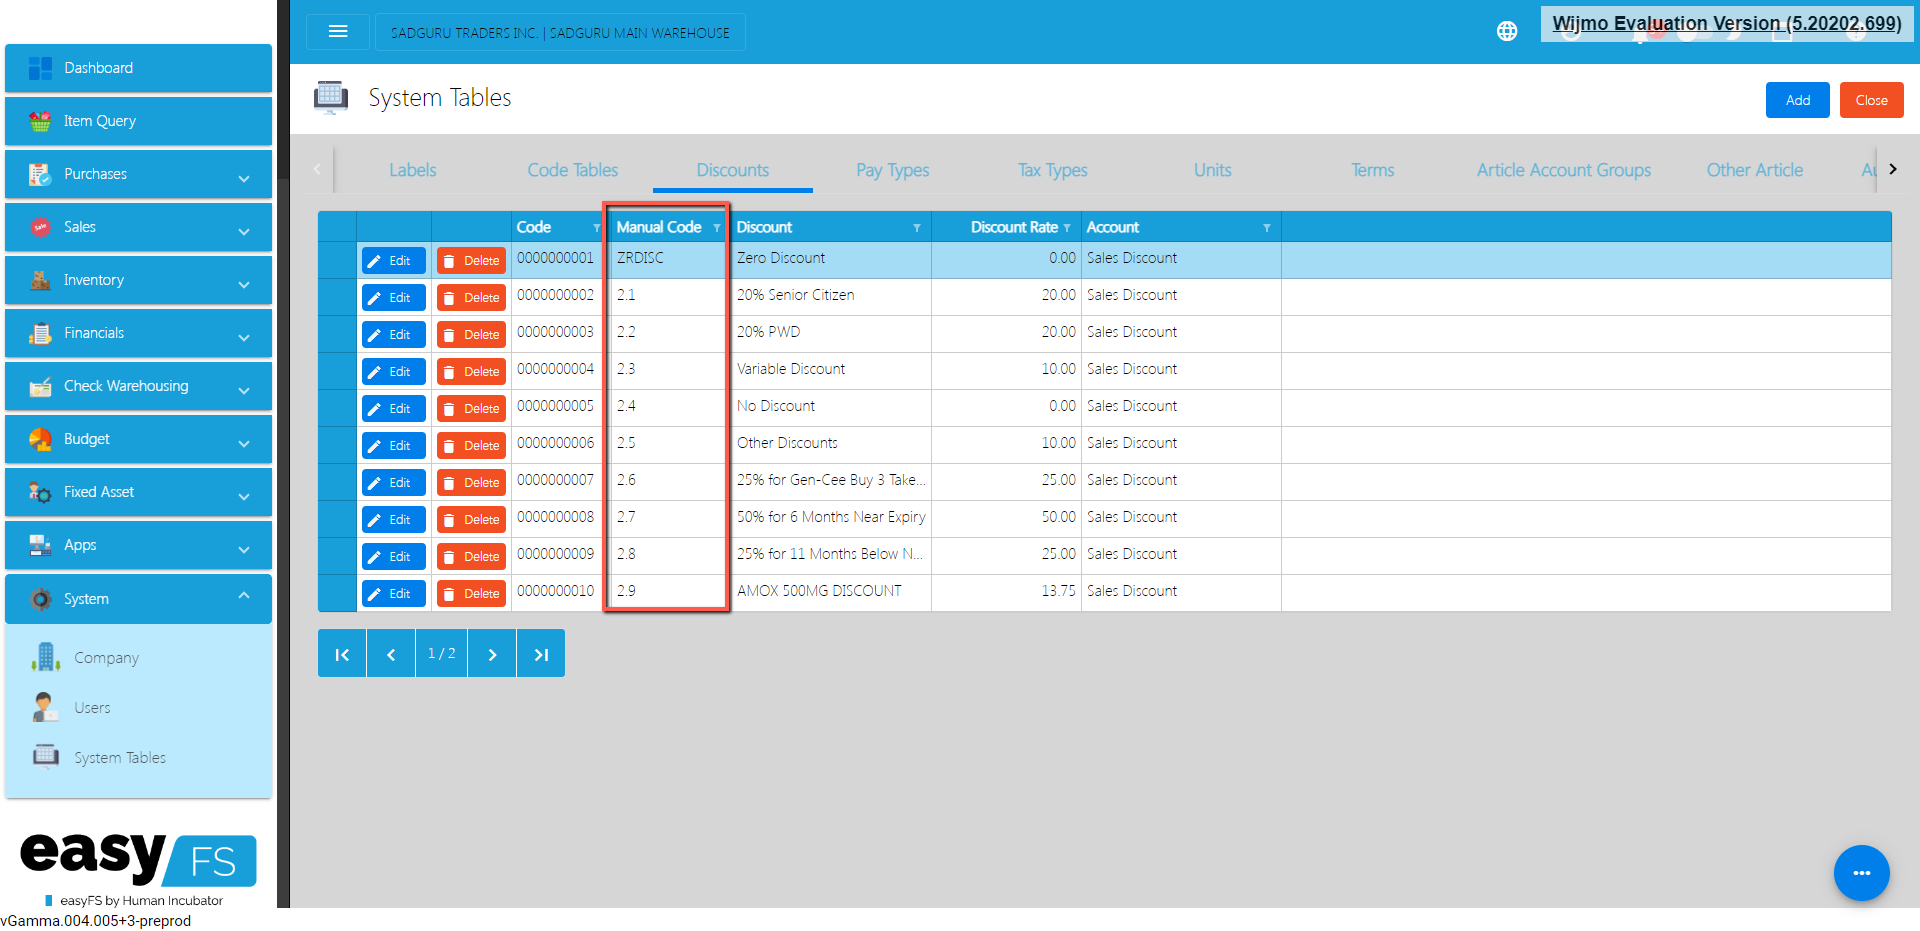
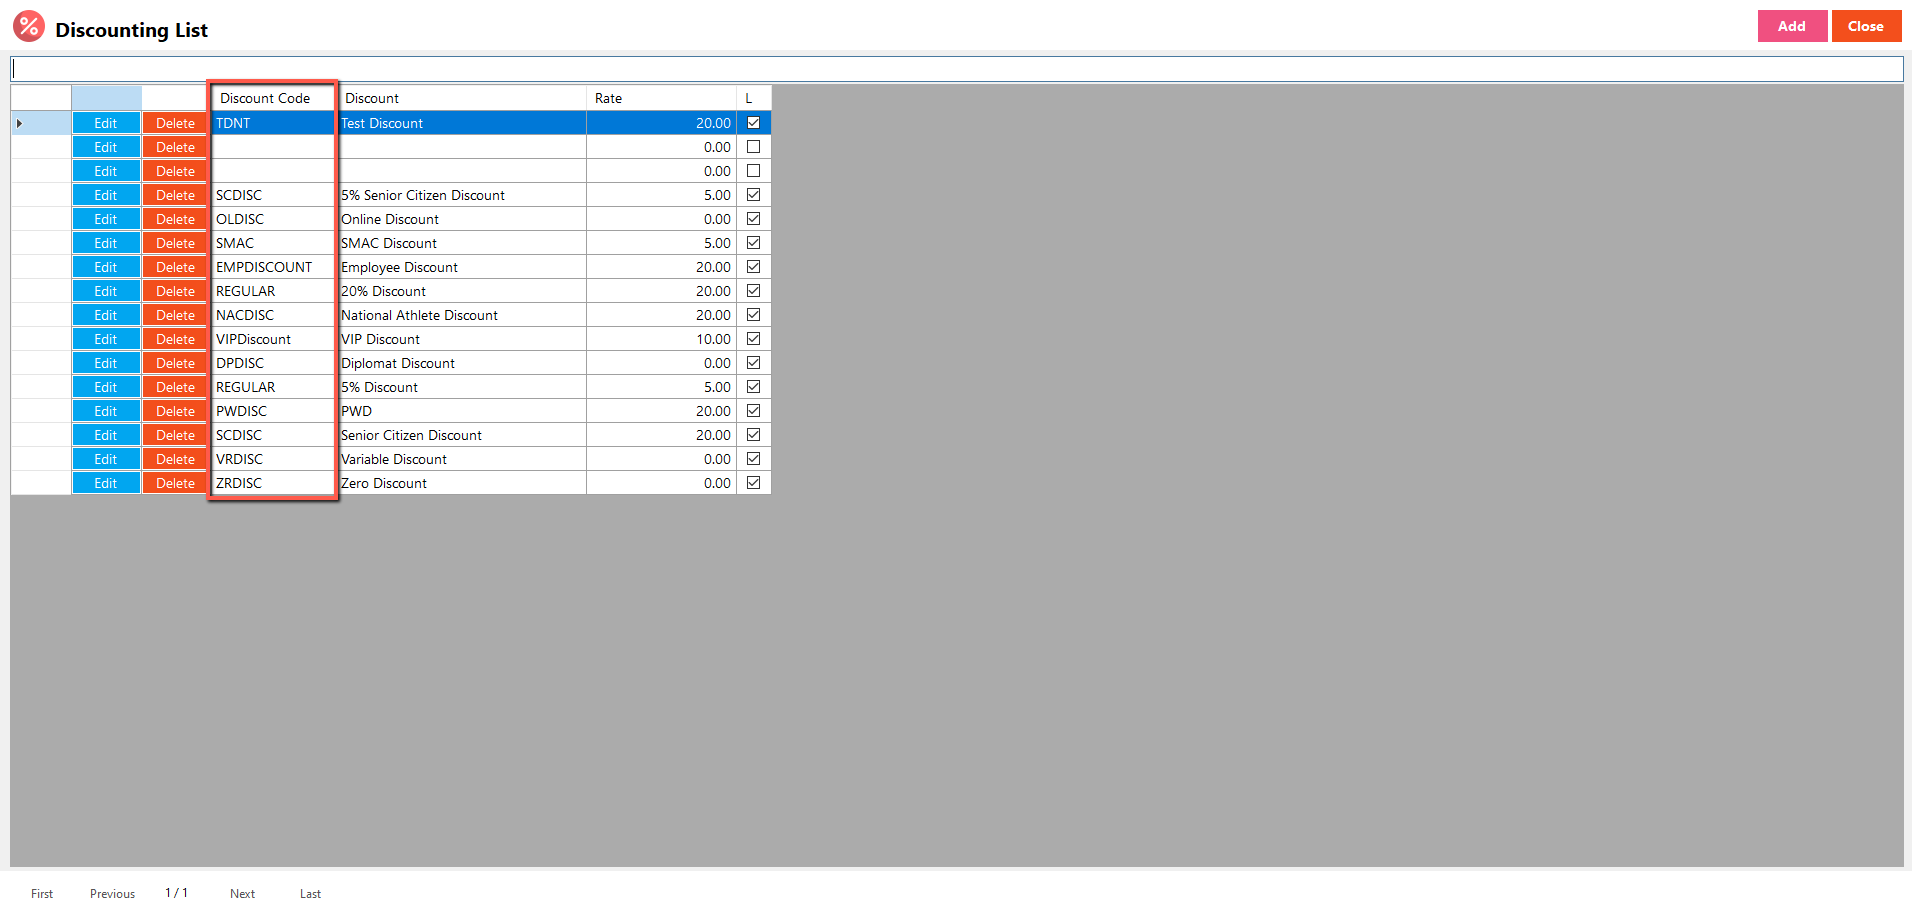
Discount not Found
Explanation: This error indicates that the Discount is not added on the easyFS system or its Manual Code from easyFS does not match to the easyPOS.
Resolution:
Item Barcode not Found
Explanation: This error indicates that the Item Barcode is not added on the easyFS system.
Resolution:
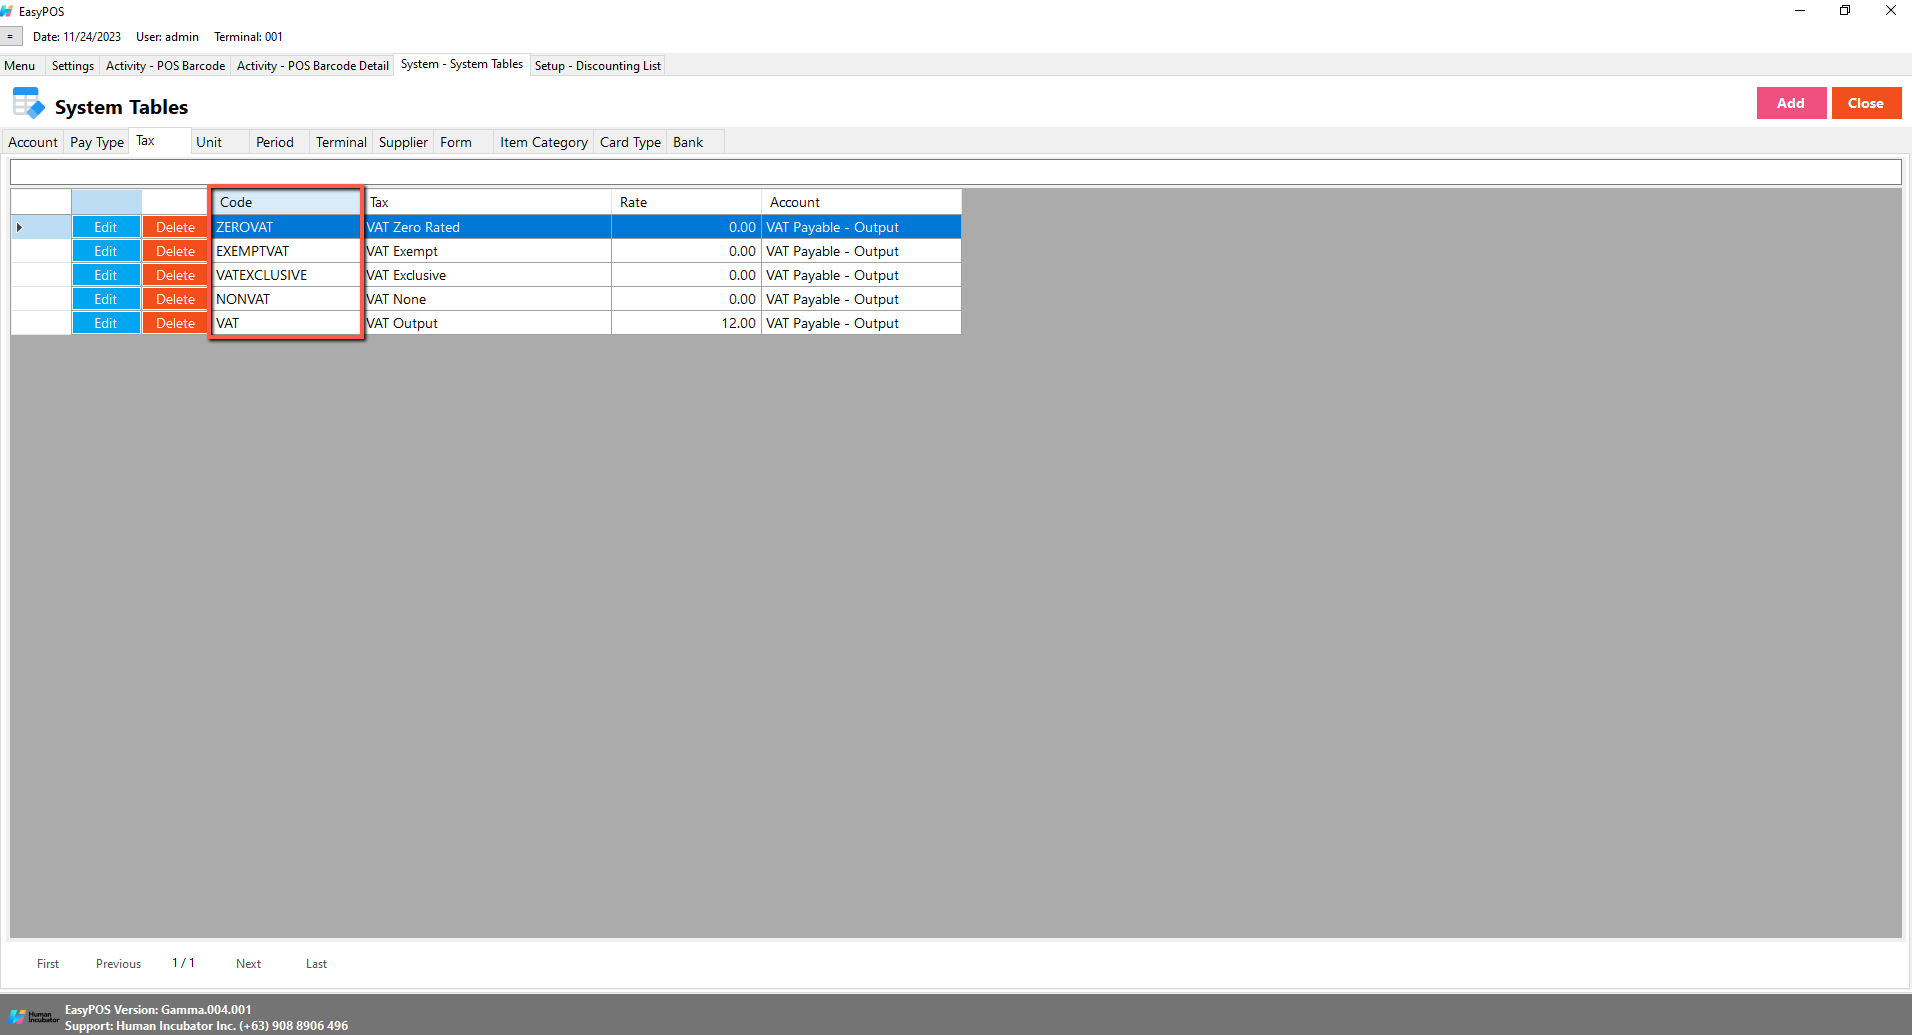
Tax Mismatch
Explanation: This error indicates that the Taxes Manual Code from the easyFS system does not match to the easyPOS.
Resolution:
Service Item not Found
Explanation: This error indicates that the Service Charge item is unlocked or not added on the easyFS system.
Resolution:
To post the validated sales to the Sales Invoice, click again the Functions button, then click the Post to Sales Invoice button.
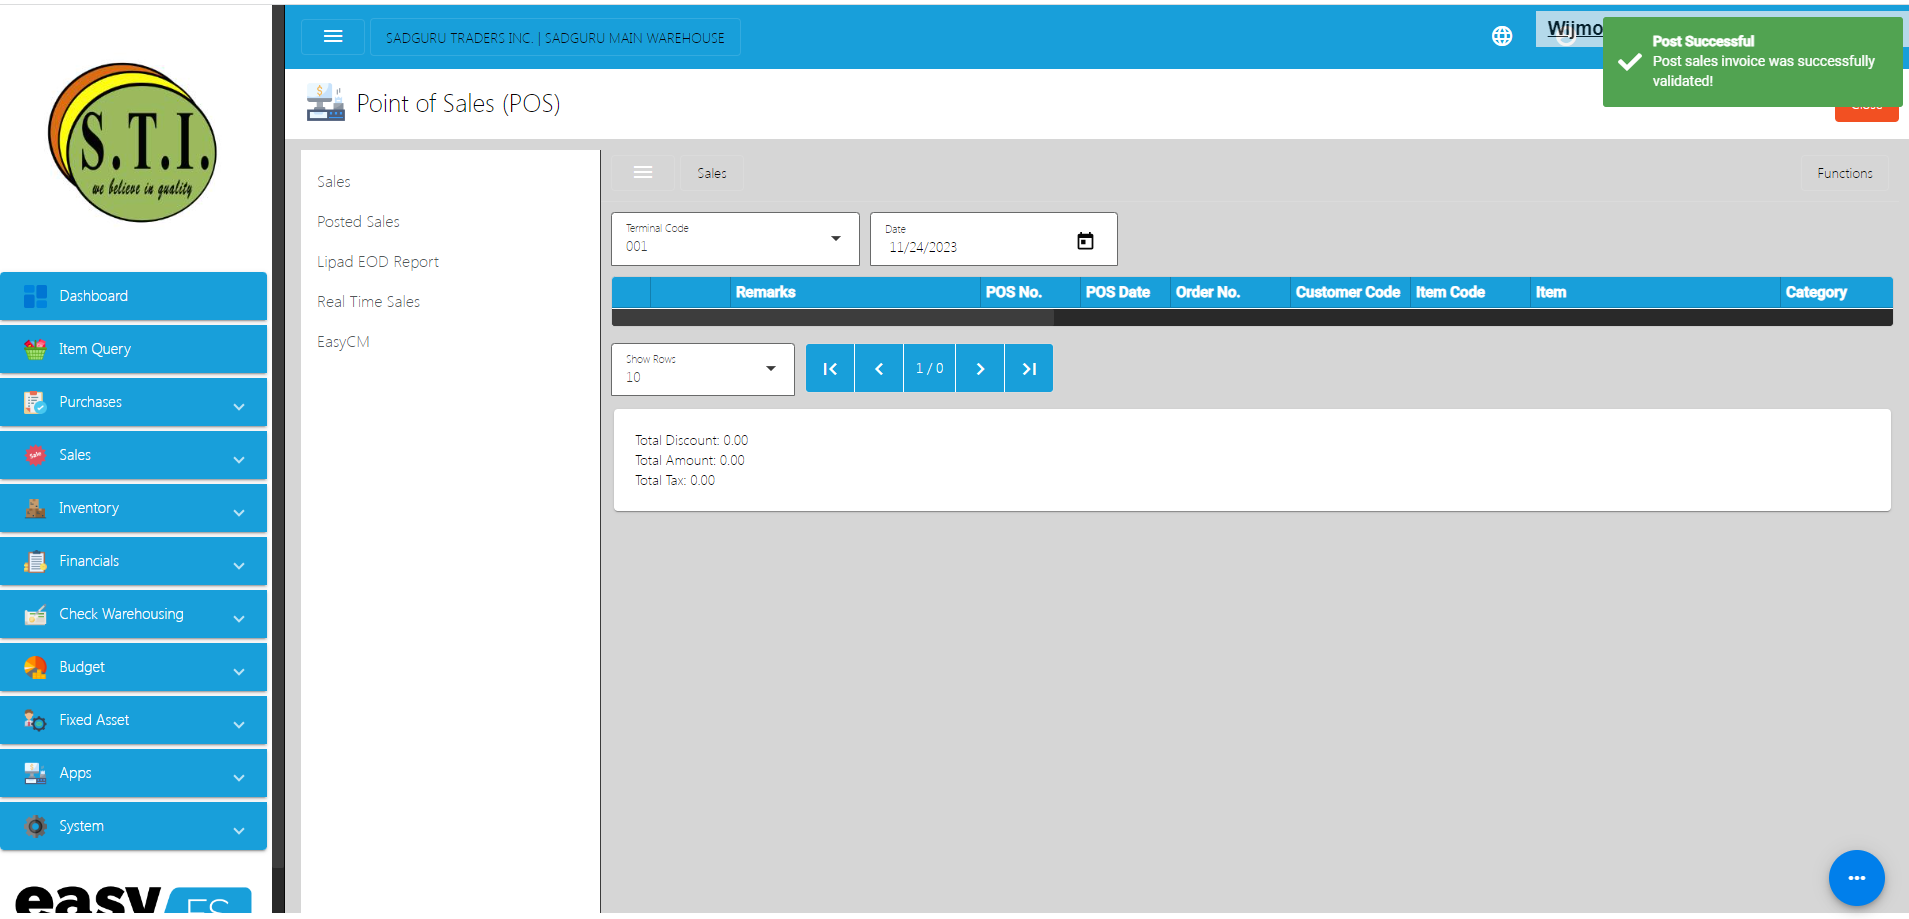
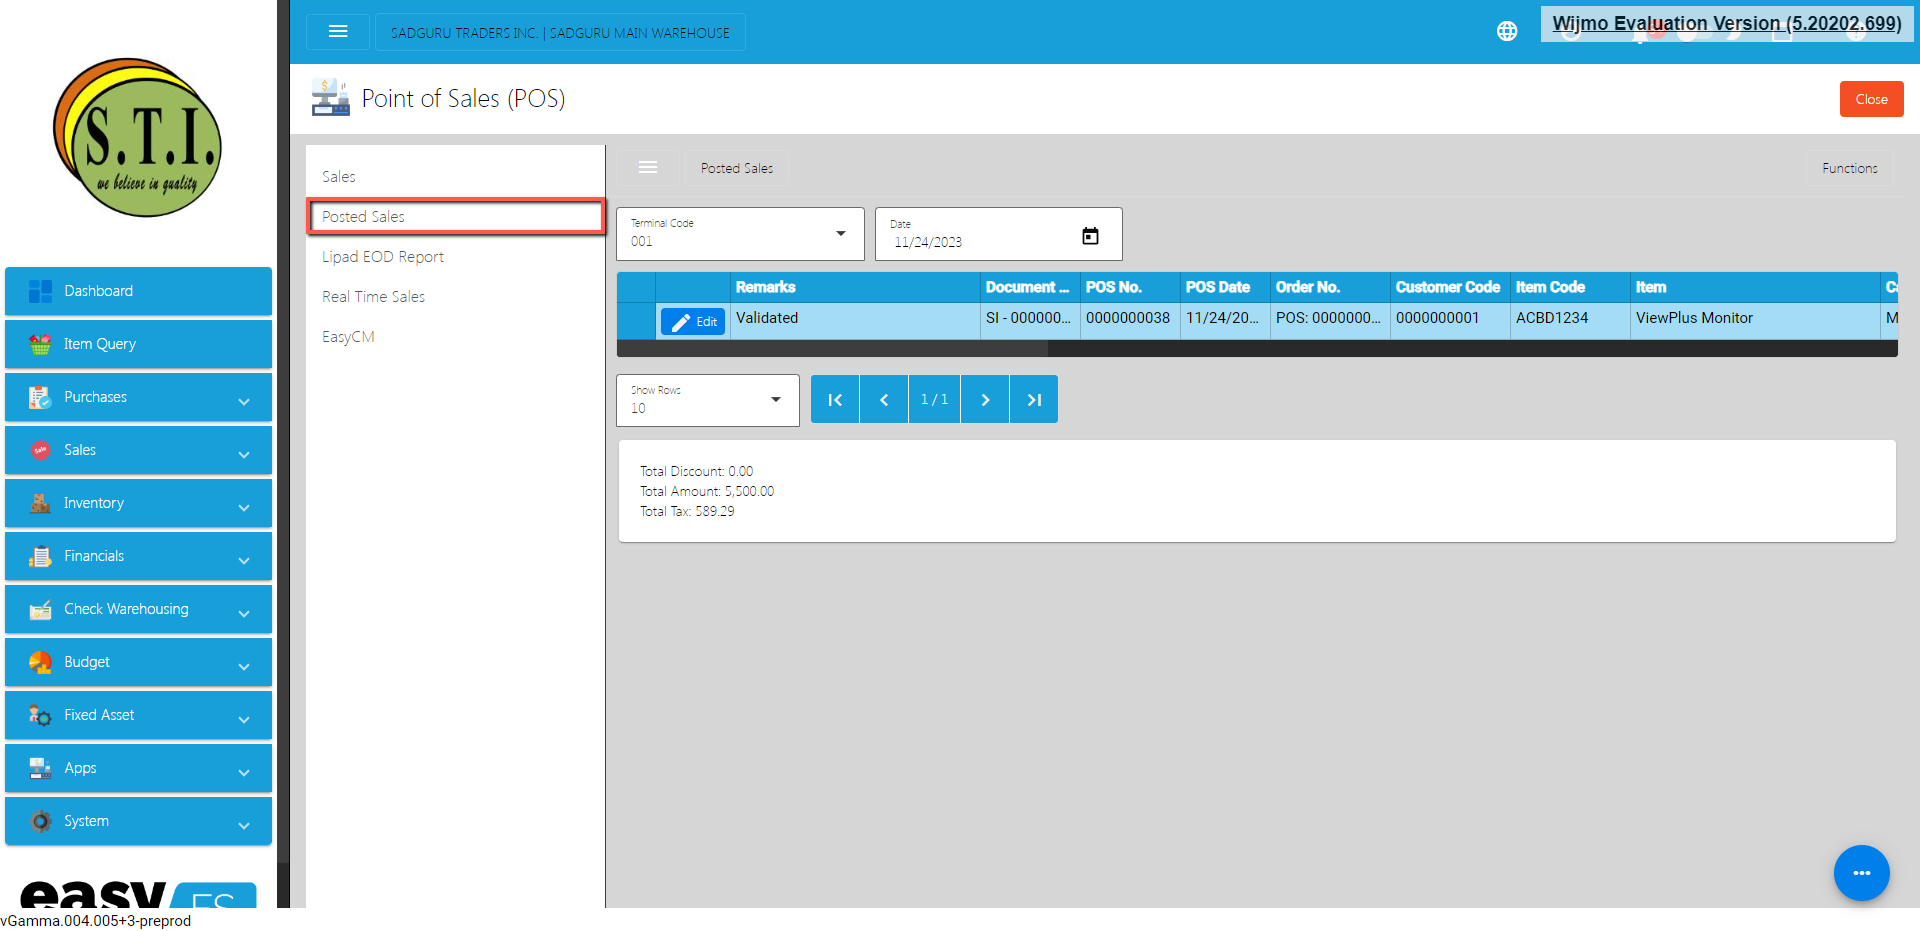
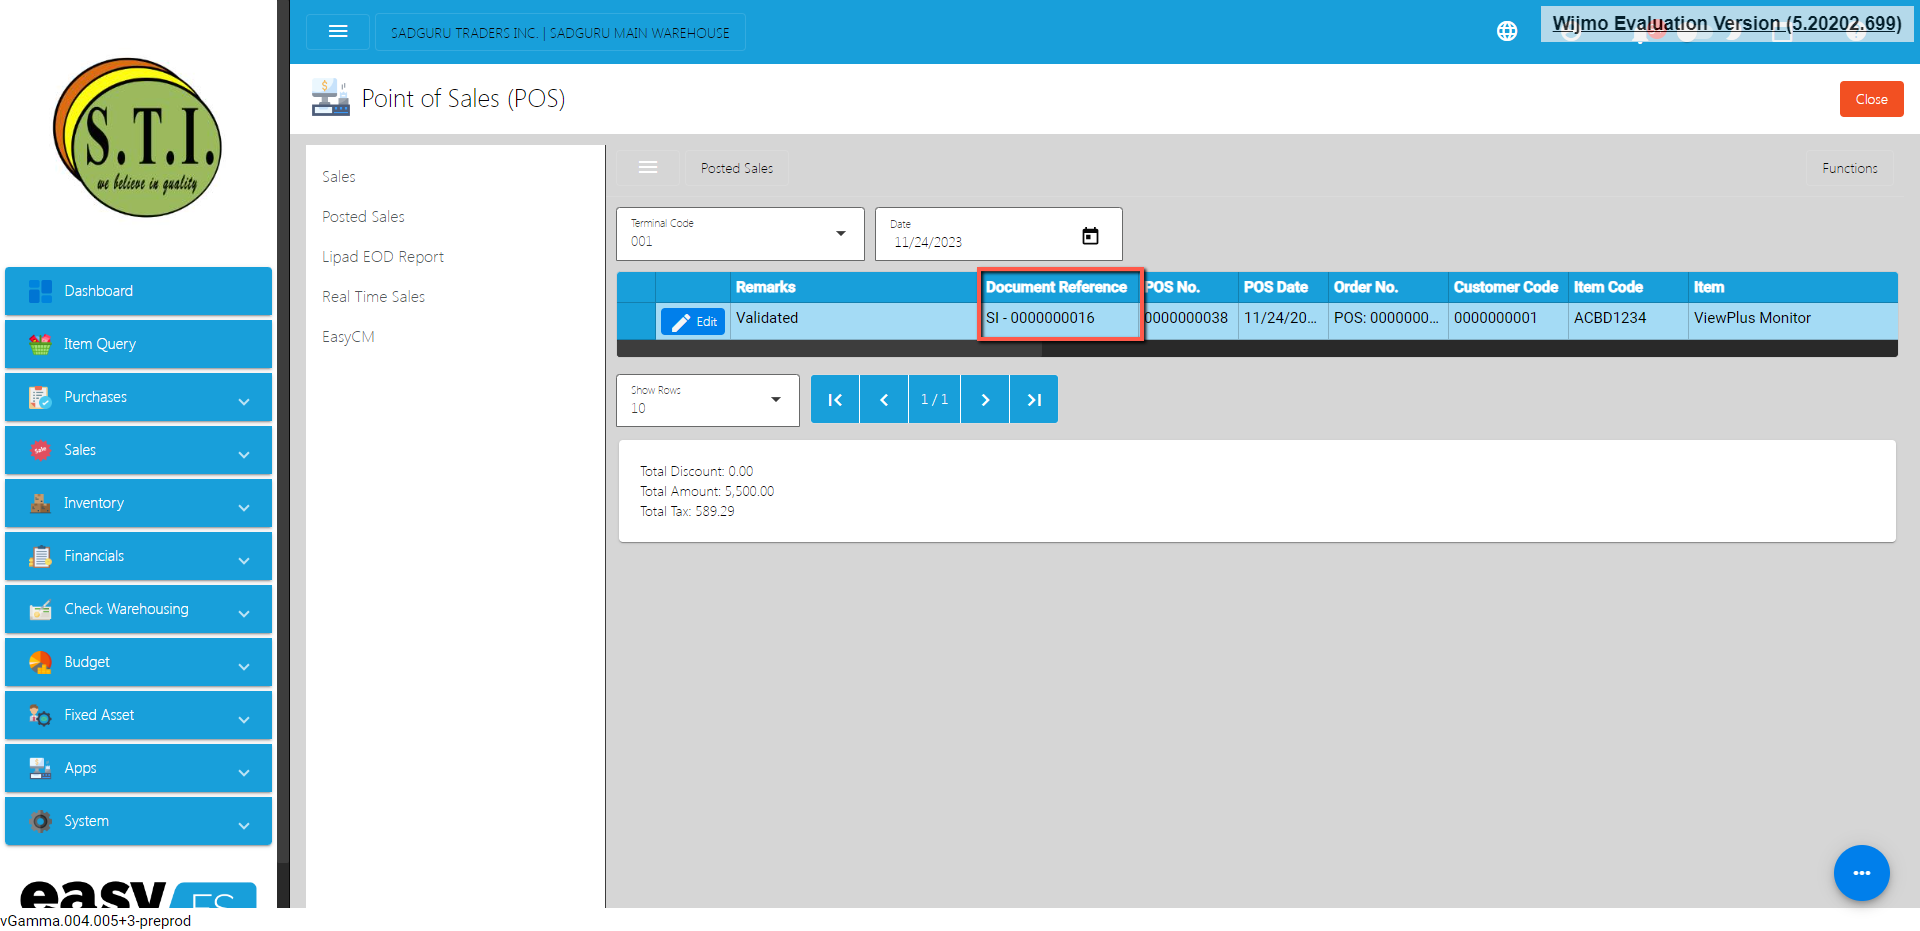
This time, validated sales transactions are removed from the Sales module, and are moved to the Posted Sales module.
Inorder to check if it is successfully posted to the Sales Invoice, check first the Document Reference column under the Posted Sales to get the Sales Invoice No.
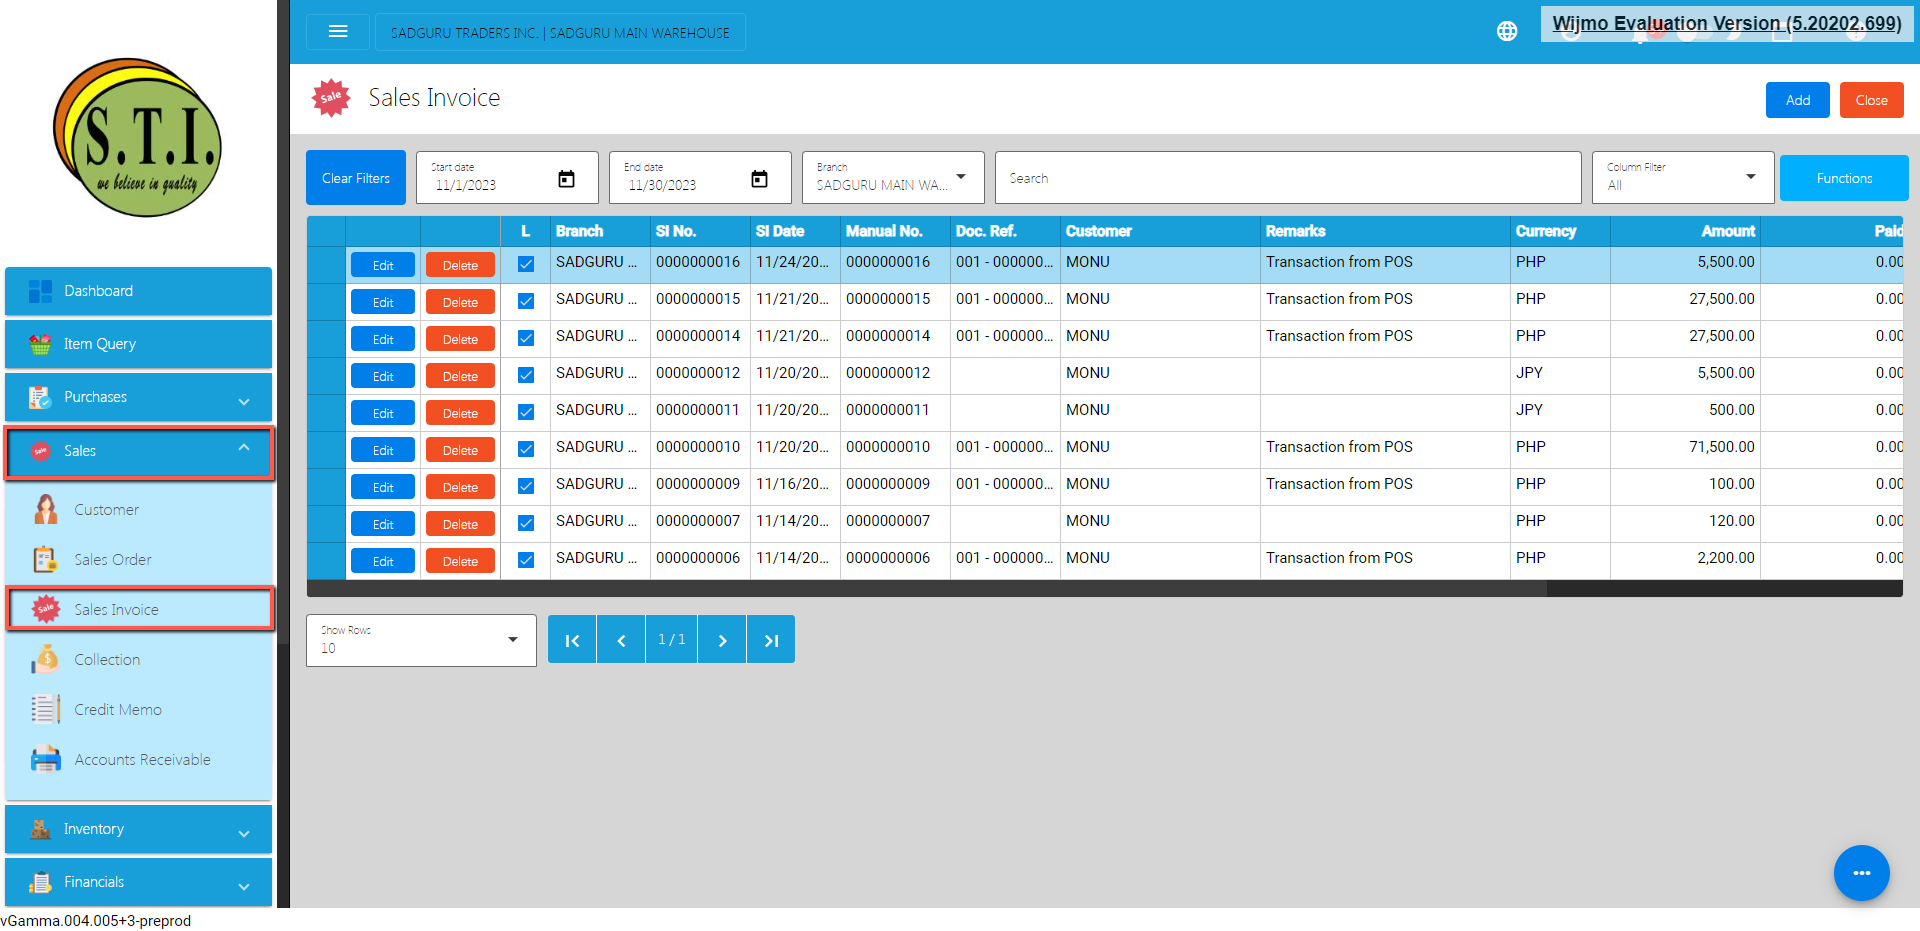
Since you now know the Sales Invoice Number for the easyPOS sales transaction, you may go to the Sales Invoice module by clicking on the Sales, then Sales Invoice.
Look for the Sales Invoice Number or you may use the Search bar to look for the Sales Invoice Number.
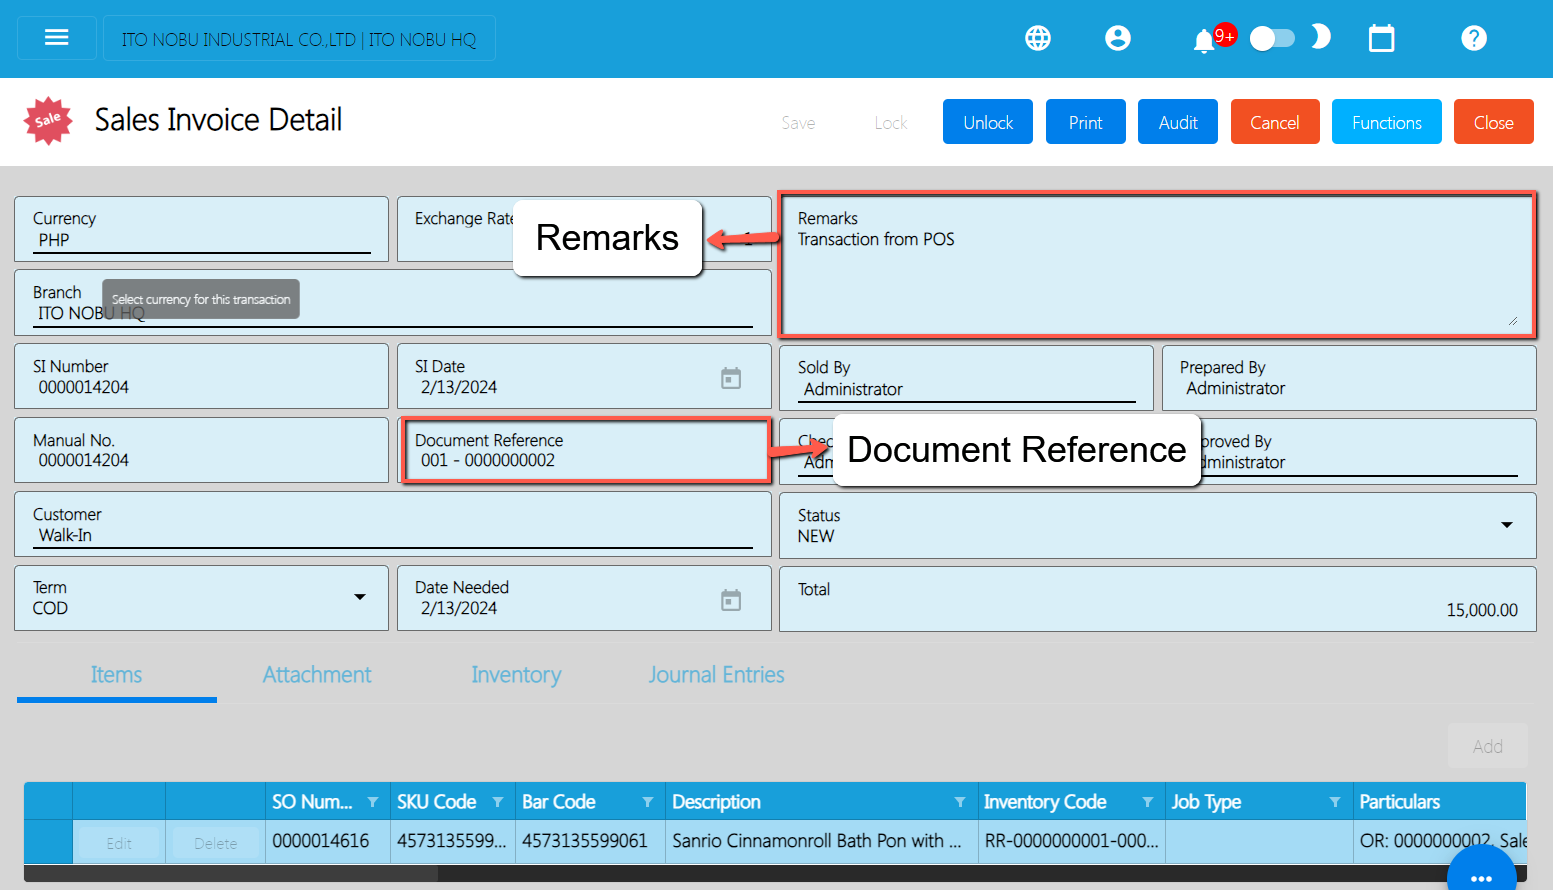
Click the Edit button to review the details. To give you a hint that it is coming from the easyPOS:
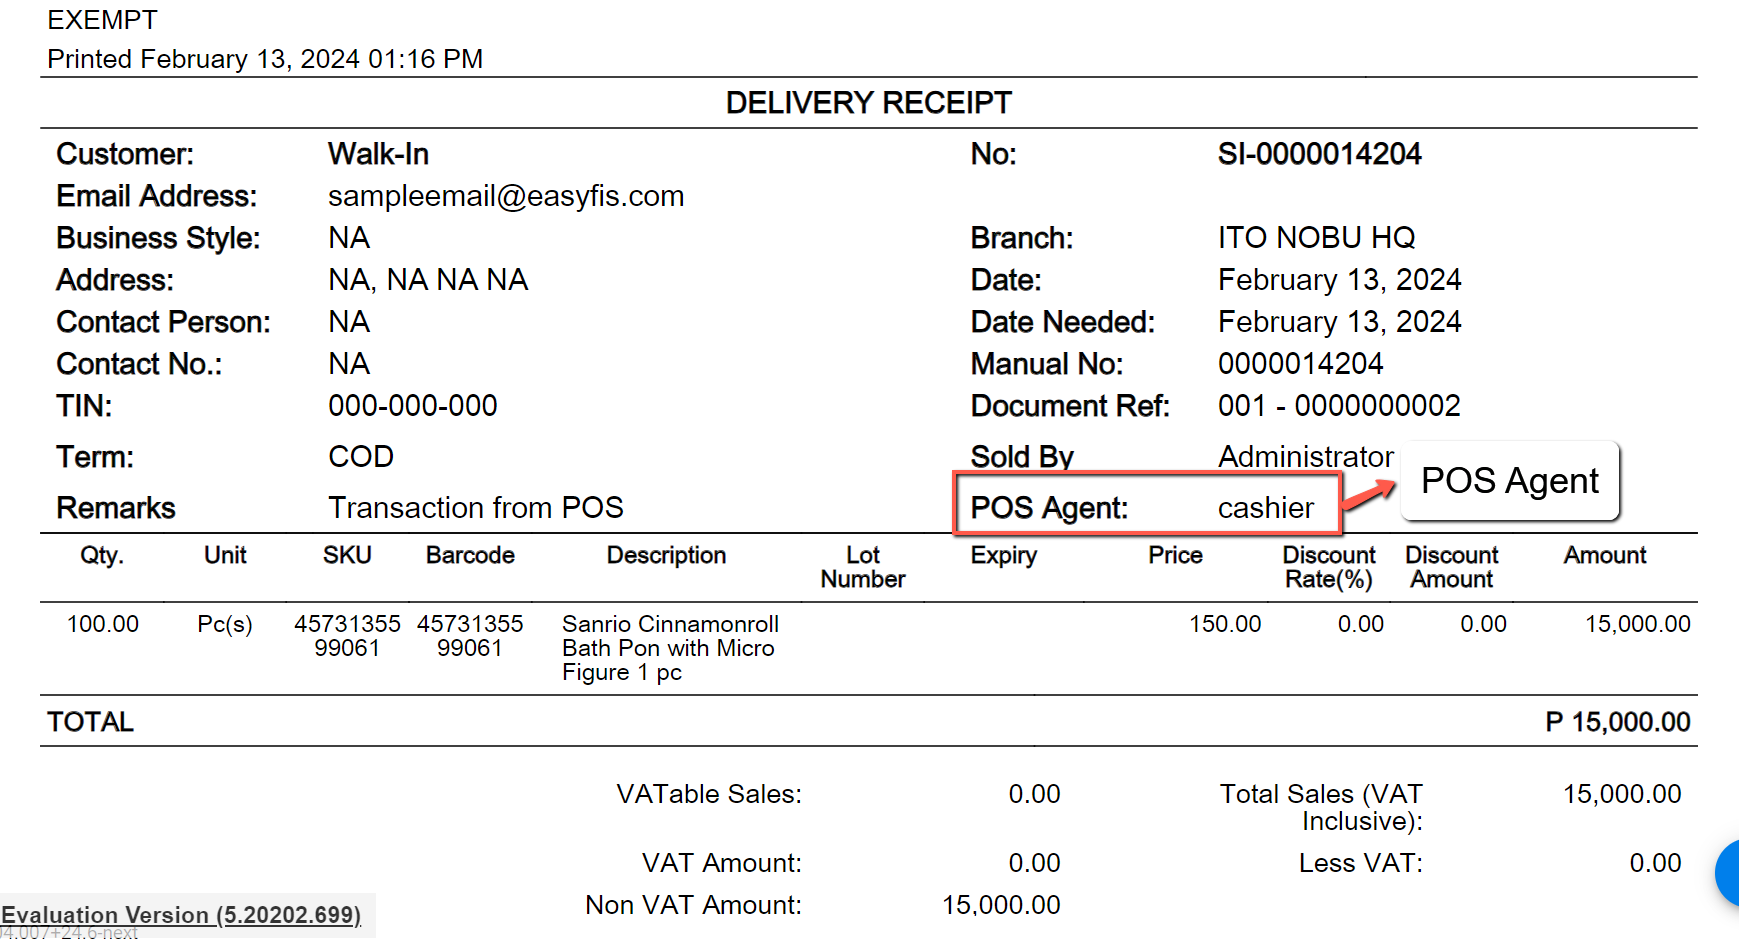
Sales Invoice’s Remarks field is automatically provided with “Transaction from POS”.
Sales Invoice’s Document Reference is automatically provided with this format: {terminalCode} – {OR Number}.
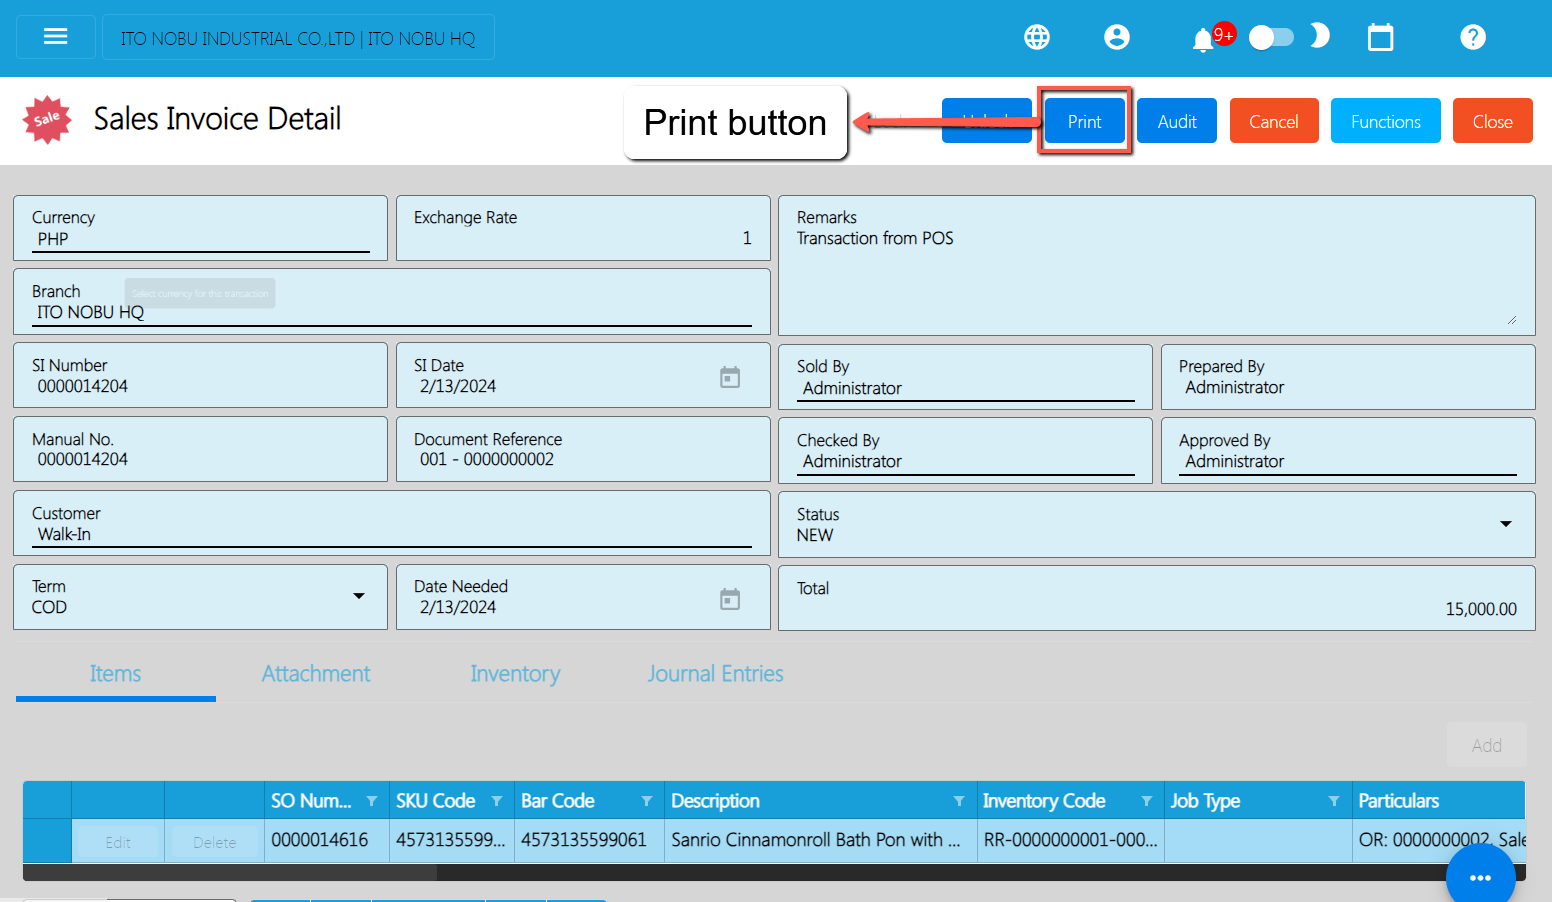
If you want to see who is the POS Agent doing that sales, just click the Printbutton to print the sales invoice and look for the POS Agent.
13.5 Guidelines for Integrations: Do’s and Don’ts
13.5.1 EasyPOS Integration
To prevent errors during integration with easyPOS, adhere to the following steps:
Make sure that the Manual Code for Discounts should be the same on the easyPOS’ Discount Code.
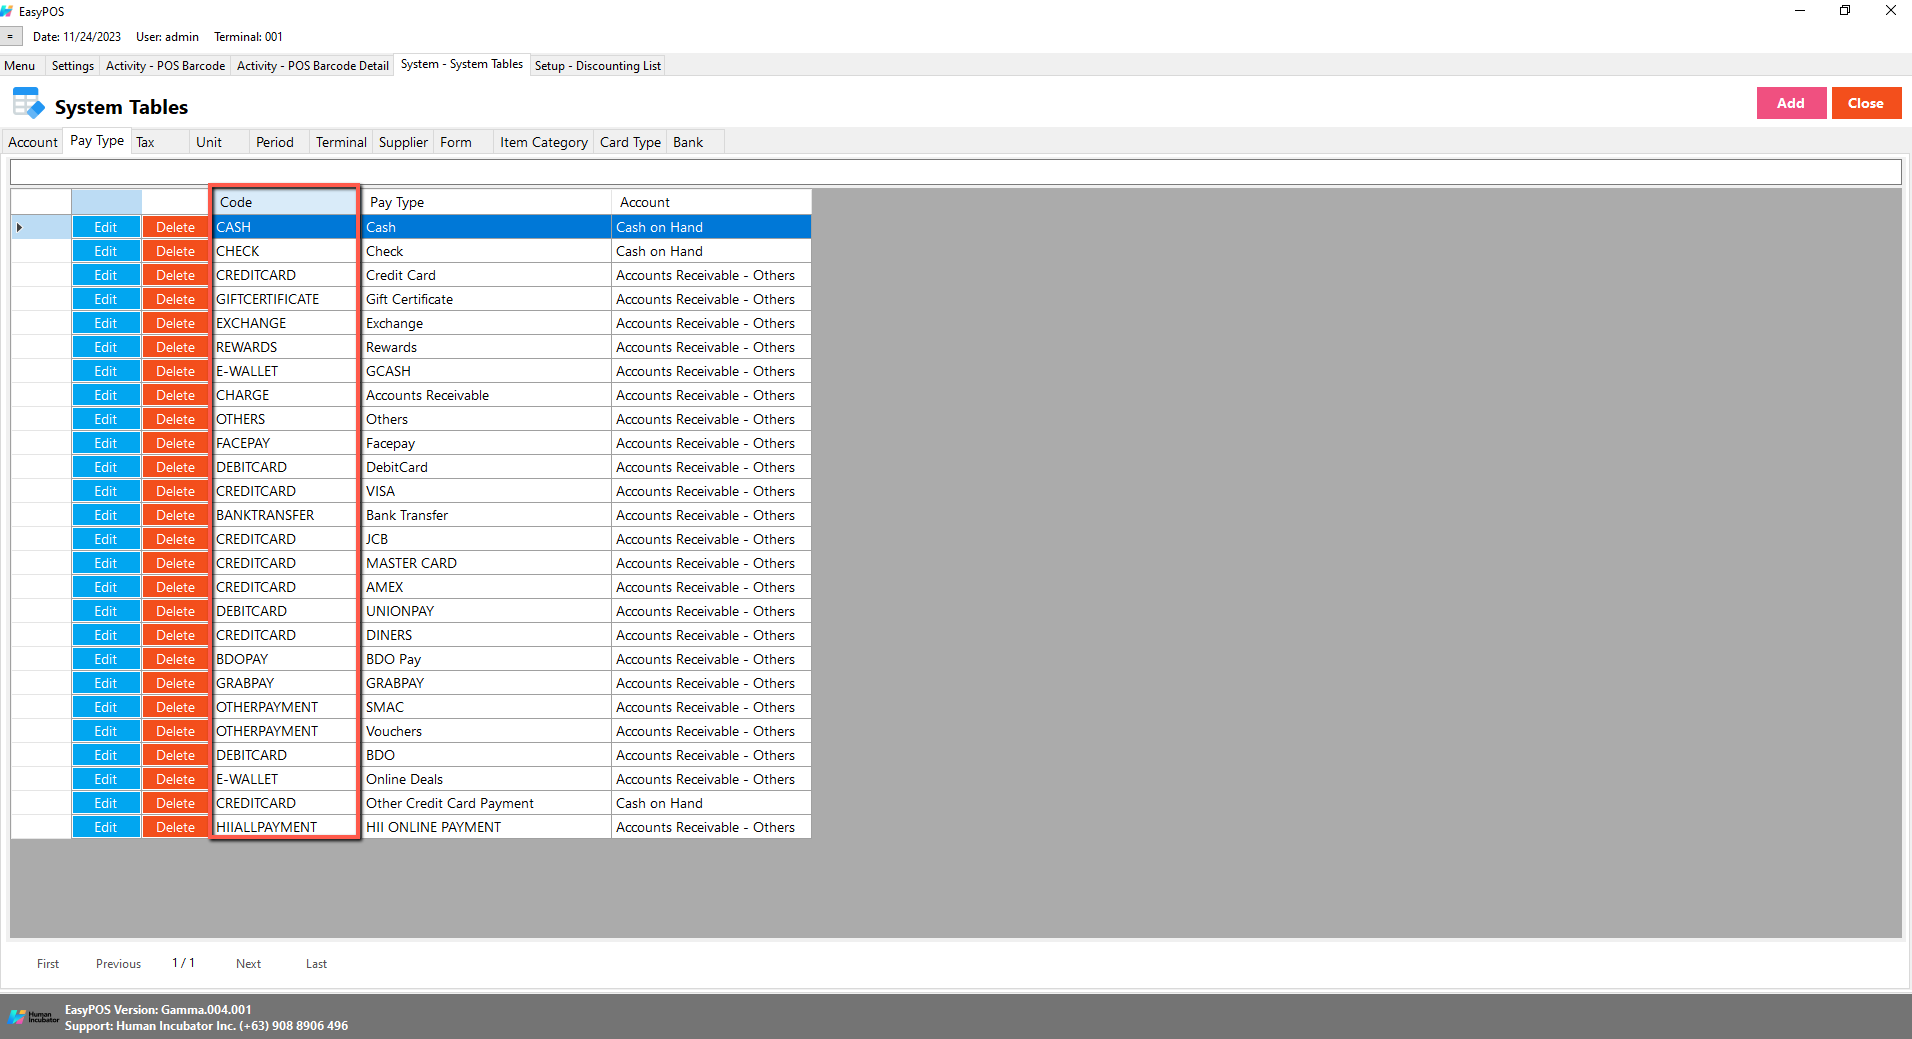
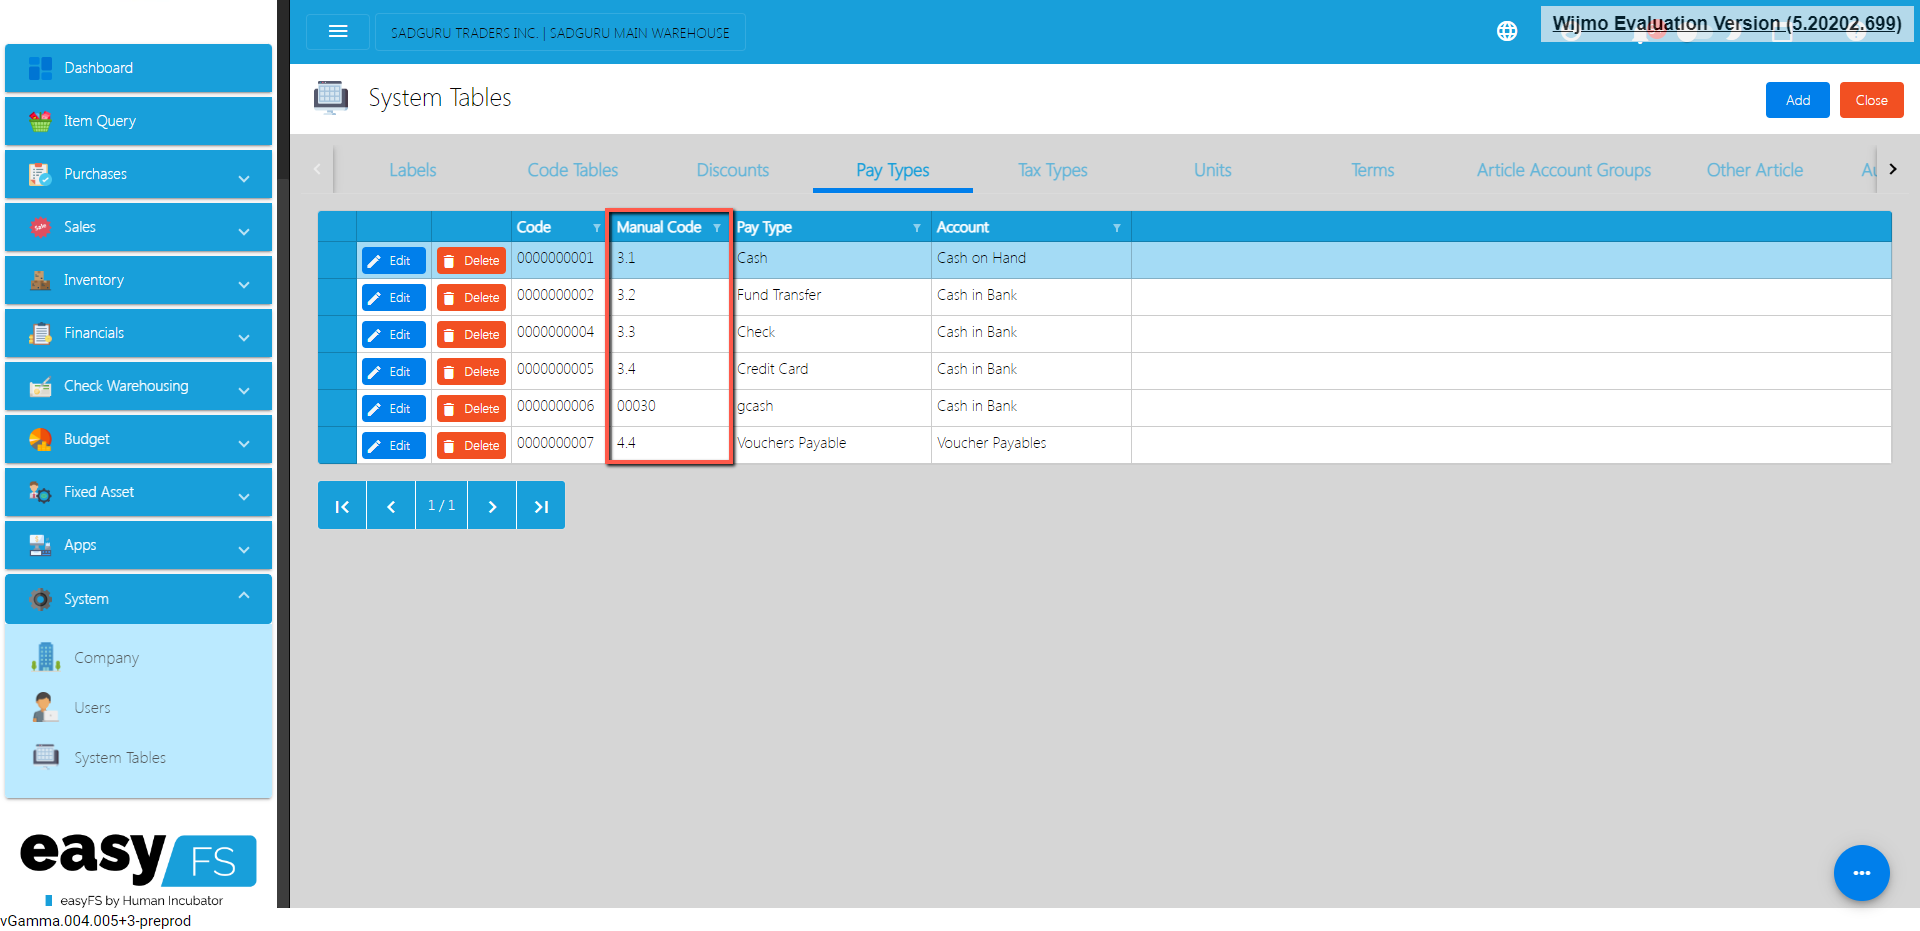
Make sure that the Manual Code for Pay Types should be the same on the easyPOS’ Pay Type Code.
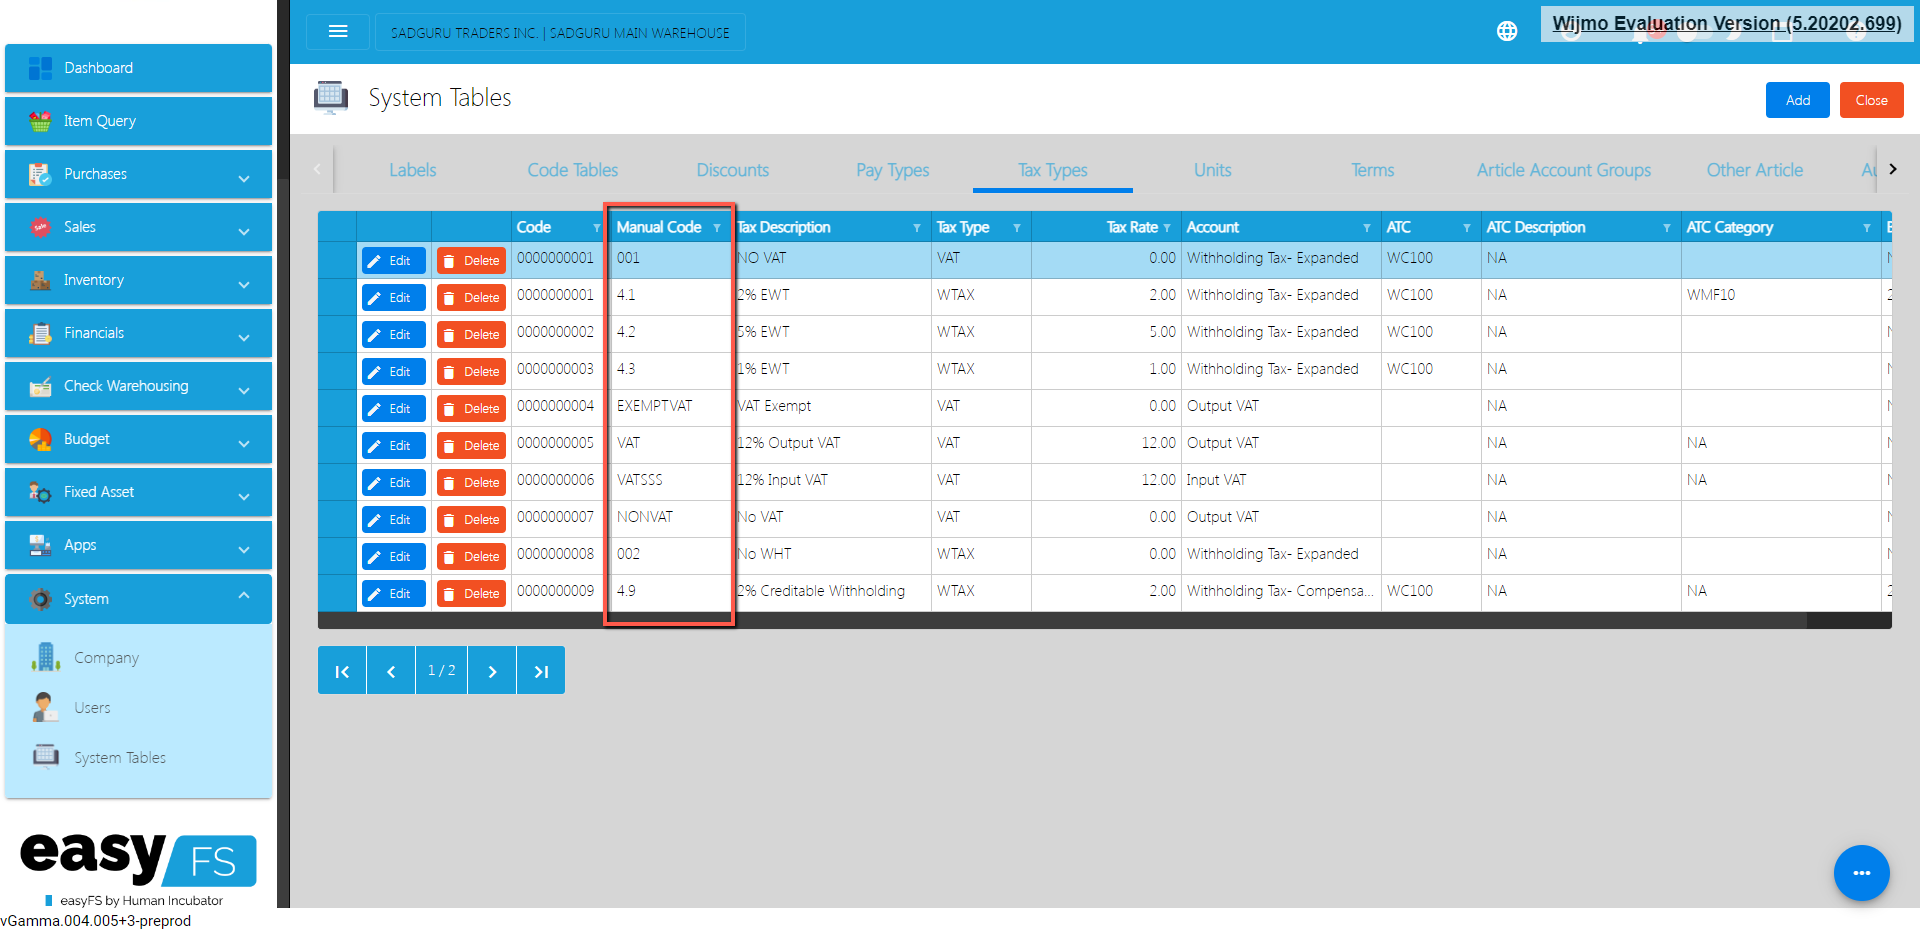
Make sure that the Manual Code for Tax Types should be the same on the easyPOS’ Tax Code.
The Item detail that you should be attentive to is the “Tax Code” for each “Tax Type” saved in each system. In EasyFS it is “SI VAT” and in EasyPOS it is “Sales VAT”. Otherwise you will be getting an error in integration that says “Output Tax Mismatch”.
Once the Items have been integrated to easyPOS, you can ONLY change or update the Price. If you want to change the Unit of Measure or Barcode, what you should do is to create a new entry or should I say add a new item with the updated item UOM/Barcode and then unlock the old entry of that item. If you insist on changing the Item detail directly, issues in the EasyPOS will start to show up like duplicated barcodes with the same item description which will cause system error as well as user confusion In making transactions in the EasyPOS. To avoid problems please follow what we have stated above.
For the inventory transaction, all “Stock In”, “Stock Out” and “Stock Transfer” should be made in the EasyFS.
As for the sales transaction, as much as possible no “sales transaction” should be manually made in EasyFS “Sales Invoice”. All sales transactions should be made in EasyPOS. Because if you don’t inventory discrepancies between the two systems will occur which takes time fixing it. To avoid conflicts or problems that will affect your business’s operation. Be attentive to the process that was instructed in this document.
Struggling to accept online payments? Discover how HII Online Payment Service solves your credit card merchant dilemma. HII Online Payment Service. Coming soon!
Struggling to accept online payments? Discover how HII Online Payment Service solves your credit card merchant dilemma. HII Online Payment Service. Coming soon!
Take advantage of Free easyFS Usage for Accounting Firms in the Philippines. Contact Us at +639176280355 or email at hiisales@humedit.ph
Take advantage of Free easyFS Usage for Accounting Firms in the Philippines. Contact Us at +639176280355 or email at hiisales@humedit.ph
Struggling to accept online payments? Discover how HII Online Payment Service solves your credit card merchant dilemma. HII Online Payment Service. Coming soon!
Struggling to accept online payments? Discover how HII Online Payment Service solves your credit card merchant dilemma. HII Online Payment Service. Coming soon!
Take advantage of Free easyFS Usage for Accounting Firms in the Philippines. Contact Us at +639176280355 or email at hiisales@humedit.ph
Take advantage of Free easyFS Usage for Accounting Firms in the Philippines. Contact Us at +639176280355 or email at hiisales@humedit.ph
Struggling to accept online payments? Discover how HII Online Payment Service solves your credit card merchant dilemma. HII Online Payment Service. Coming soon!
Struggling to accept online payments? Discover how HII Online Payment Service solves your credit card merchant dilemma. HII Online Payment Service. Coming soon!
Take advantage of Free easyFS Usage for Accounting Firms in the Philippines. Contact Us at +639176280355 or email at hiisales@humedit.ph
Take advantage of Free easyFS Usage for Accounting Firms in the Philippines. Contact Us at +639176280355 or email at hiisales@humedit.ph
Struggling to accept online payments? Discover how HII Online Payment Service solves your credit card merchant dilemma. HII Online Payment Service. Coming soon!
Struggling to accept online payments? Discover how HII Online Payment Service solves your credit card merchant dilemma. HII Online Payment Service. Coming soon!
Take advantage of Free easyFS Usage for Accounting Firms in the Philippines. Contact Us at +639176280355 or email at hiisales@humedit.ph
Take advantage of Free easyFS Usage for Accounting Firms in the Philippines. Contact Us at +639176280355 or email at hiisales@humedit.ph
Struggling to accept online payments? Discover how HII Online Payment Service solves your credit card merchant dilemma. HII Online Payment Service. Coming soon!
Struggling to accept online payments? Discover how HII Online Payment Service solves your credit card merchant dilemma. HII Online Payment Service. Coming soon!
Take advantage of Free easyFS Usage for Accounting Firms in the Philippines. Contact Us at +639176280355 or email at hiisales@humedit.ph
Take advantage of Free easyFS Usage for Accounting Firms in the Philippines. Contact Us at +639176280355 or email at hiisales@humedit.ph
Struggling to accept online payments? Discover how HII Online Payment Service solves your credit card merchant dilemma. HII Online Payment Service. Coming soon!
Struggling to accept online payments? Discover how HII Online Payment Service solves your credit card merchant dilemma. HII Online Payment Service. Coming soon!
Take advantage of Free easyFS Usage for Accounting Firms in the Philippines. Contact Us at +639176280355 or email at hiisales@humedit.ph
Take advantage of Free easyFS Usage for Accounting Firms in the Philippines. Contact Us at +639176280355 or email at hiisales@humedit.ph
Struggling to accept online payments? Discover how HII Online Payment Service solves your credit card merchant dilemma. HII Online Payment Service. Coming soon!
Struggling to accept online payments? Discover how HII Online Payment Service solves your credit card merchant dilemma. HII Online Payment Service. Coming soon!
Take advantage of Free easyFS Usage for Accounting Firms in the Philippines. Contact Us at +639176280355 or email at hiisales@humedit.ph
Take advantage of Free easyFS Usage for Accounting Firms in the Philippines. Contact Us at +639176280355 or email at hiisales@humedit.ph
Struggling to accept online payments? Discover how HII Online Payment Service solves your credit card merchant dilemma. HII Online Payment Service. Coming soon!
Struggling to accept online payments? Discover how HII Online Payment Service solves your credit card merchant dilemma. HII Online Payment Service. Coming soon!

 Log in to Messenger