EasyFS Master Files serve as centralized repositories for critical data that is fundamental to the business processes managed by the application.
Following are the Major Master Files of EasyFS.
Master File Type
Purpose
Key Data / Information
Item
Detailed information about products/items
Manual Code
SKU Code
Barcode
Description and specifications
Unit of measure
Cost and pricing details
Stock levels and locations
Supplier information
Historical data and lifecycle information
Customer
Manage customer relationships and transactions
Customer Manual Code
Name and contact details
Customer addresses
TIN (Tax Identification Number)
Payment terms and credit limits
Purchase history and transaction details
Customer-specific preferences or special agreements
Supplier
Information about suppliers or vendors
Supplier Manual Code
Name and contact details
TIN (Tax Identification Number)
Payment terms and credit terms
Delivery terms
Product or service offerings
Performance metrics and ratings
Bank
Crucial for financial transactions and management
Bank name and contact details
Account numbers
Account types (e.g., checking, savings)
Signatories and authorized personnel
Transaction history
Credit facilities and loans
Employee
Details about individuals employed by the organization
Employee ID or code
Personal information (name, address, contact details)
Job title and department
Salary and benefits information
Employment history
Performance evaluations and training records
Chart of Accounts
Foundation of the organization’s accounting system
Account codes and numbers
Account names and descriptions
Classification of accounts (e.g., assets, liabilities, revenue, expenses)
Opening balances and current balances
Hierarchical structure for easy navigation
Relationship to financial statements
Company
Includes the Company Details, Branch Details and default settings
Company Manual Code
Company Name
Company Address
Company TIN
Company TIN Branch Code
Business Style
Proprietorship
Cost Method (Last Purchase Cost, Moving Average)
Default Settings
BIR CAS Settings
Users
List of Users to Access the System
Username
Full Name
Email Address
Company (which the user can have access)
Branch (which the user can have access)
Rights of the User to determine which modules they are able to access
4.1 Setup Master Files
Setting up the Master Files is the first and foremost procedure in updating easyFS data. The system will not work or move into its transactions if the master files are not entered into the system.
4.1.1 Item
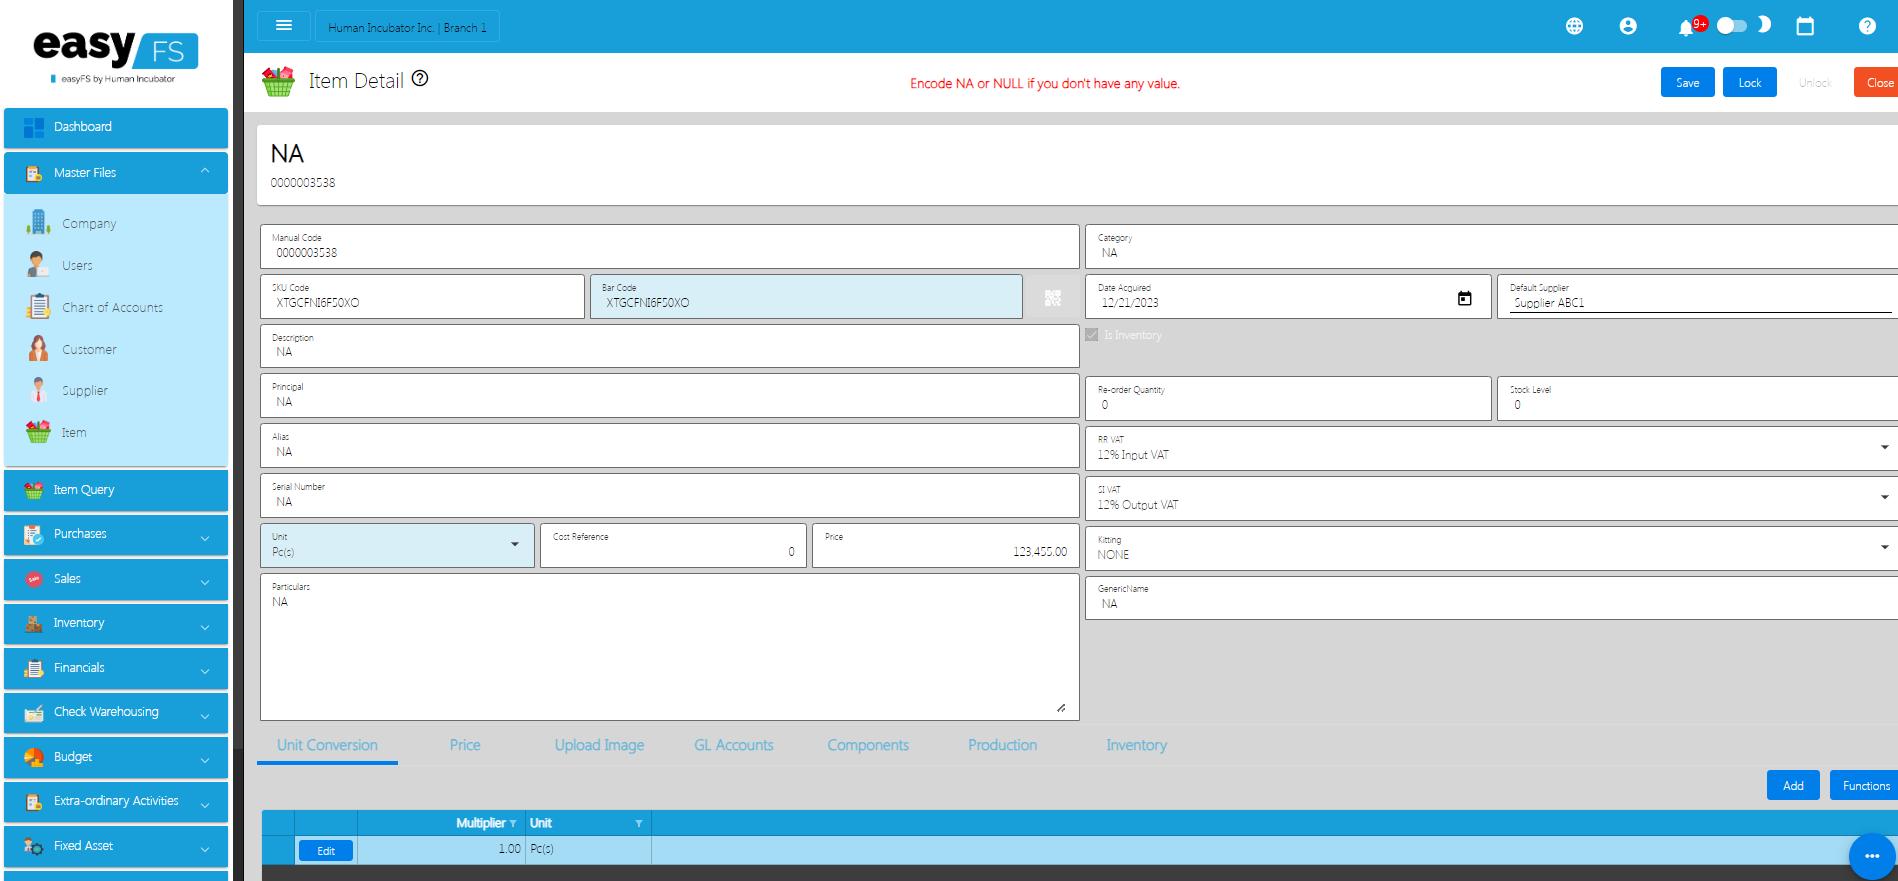
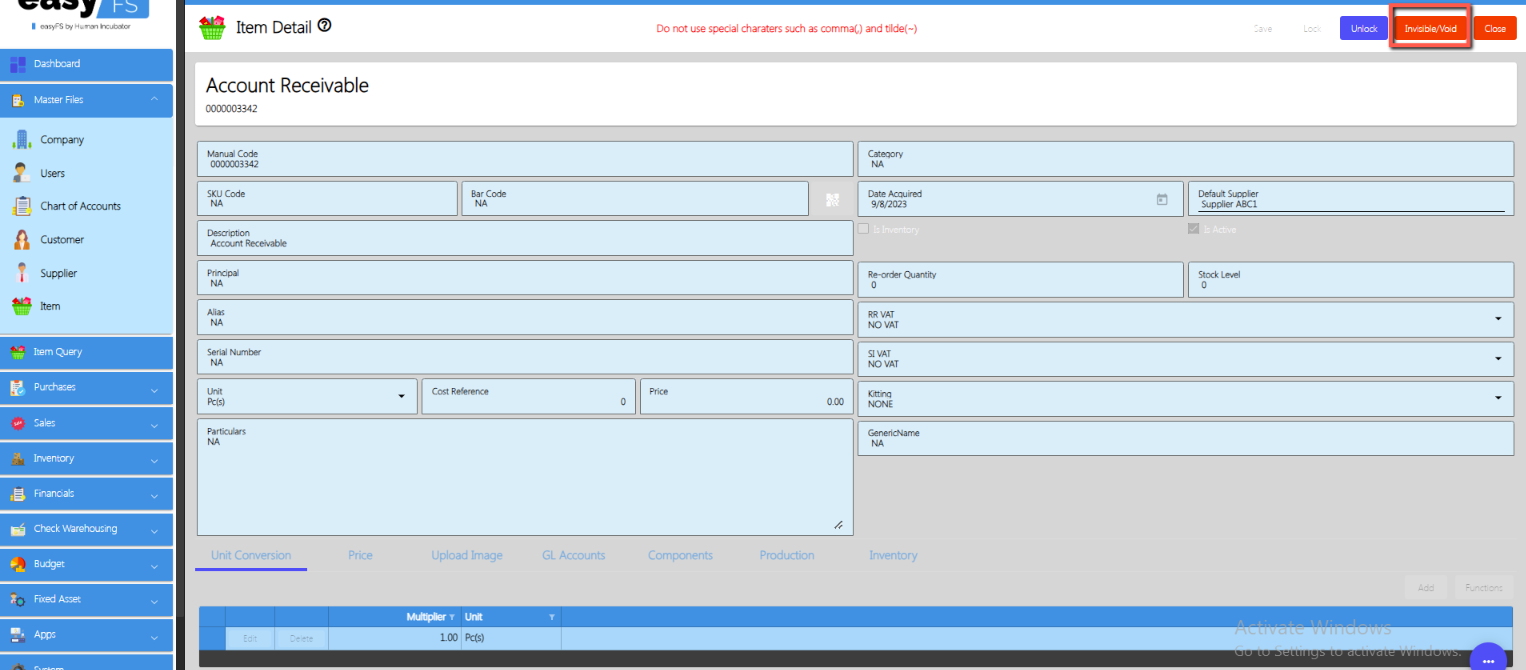
Item refers to a specific product, part, or unit that is tracked within a company’s inventory system. The item’s info includes a short description, how it’s measured (like pieces or pounds), how much it costs to buy or make, how much it’s sold for, how many are currently in stock, when it’s time to order more, how long it takes to get more, where it’s stored, and who the supplier is. All this info helps a business manage its stock better, making sure they have enough products at the right time and avoiding running out. Moreover, we’ve improved the way you see item details so that you don’t have to wait too long to view them.
4.1.1.1 How to Add an Item Manually
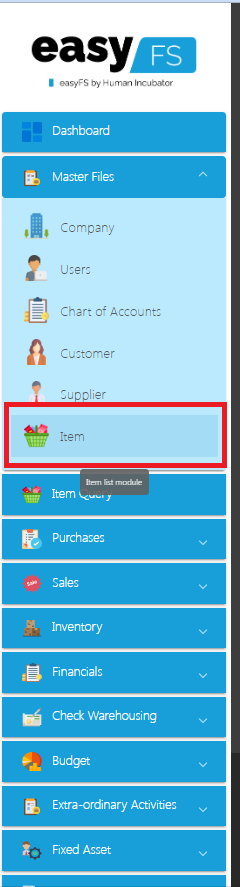
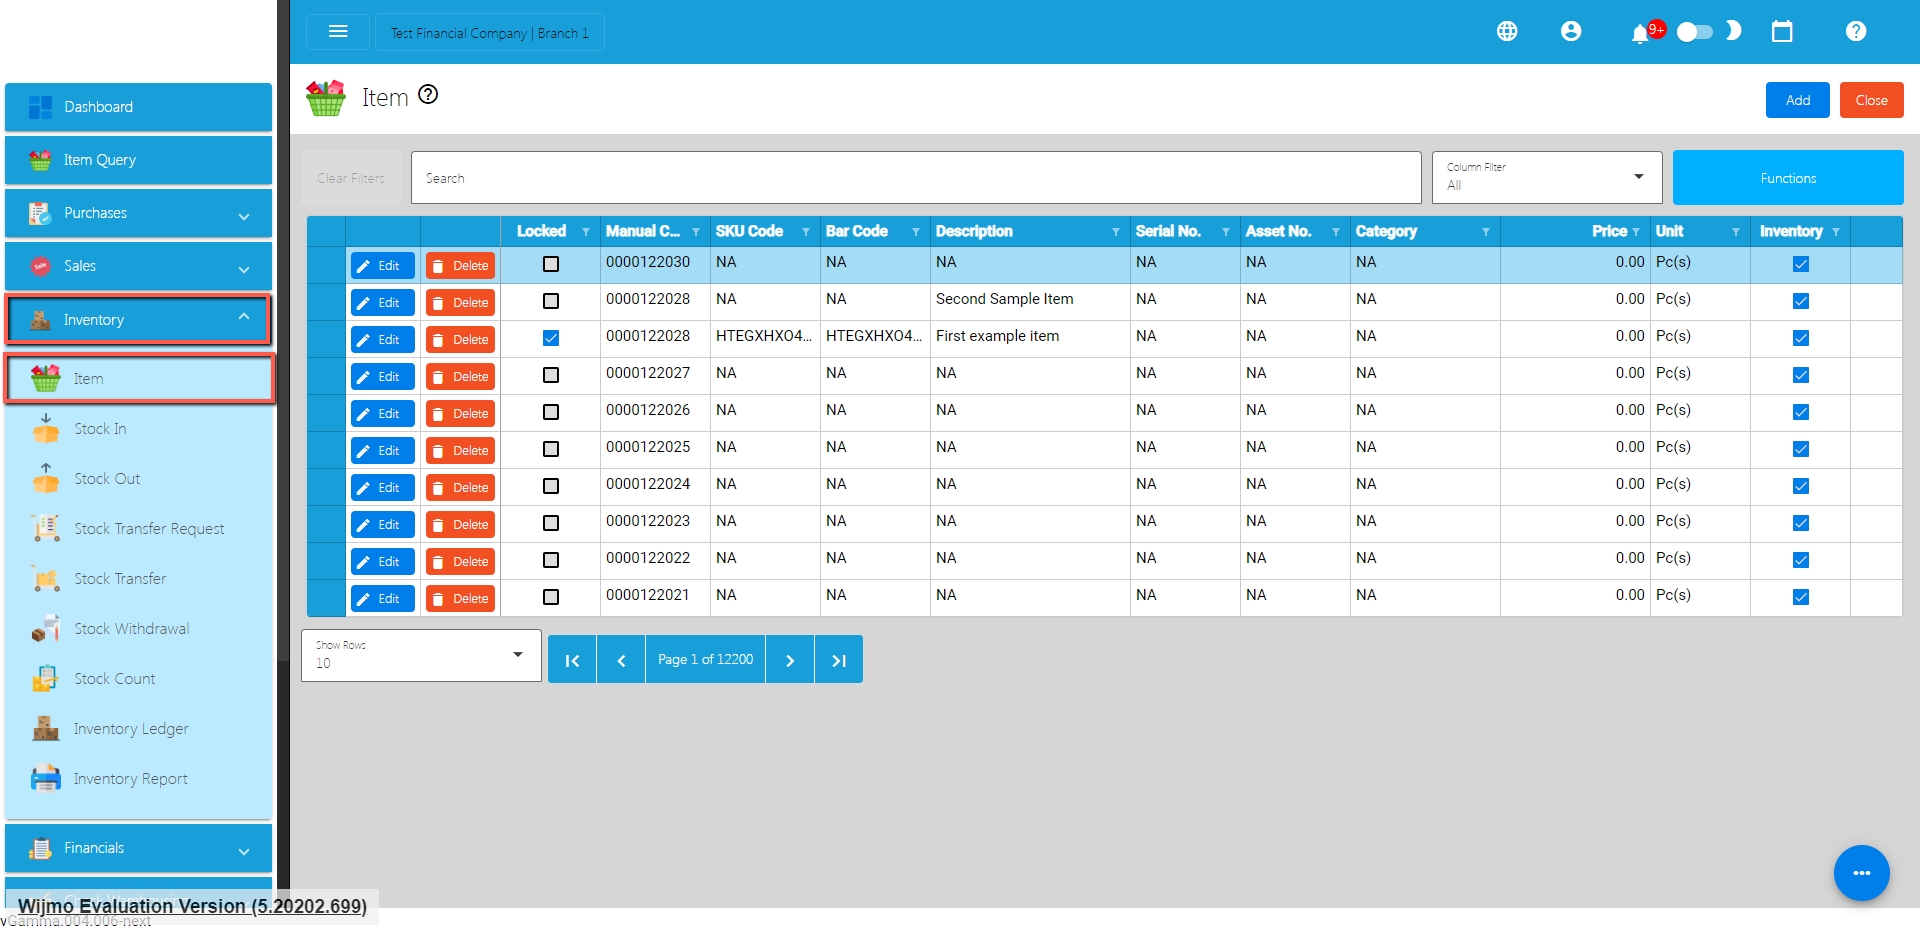
Goto the Menus → Master Files → Item
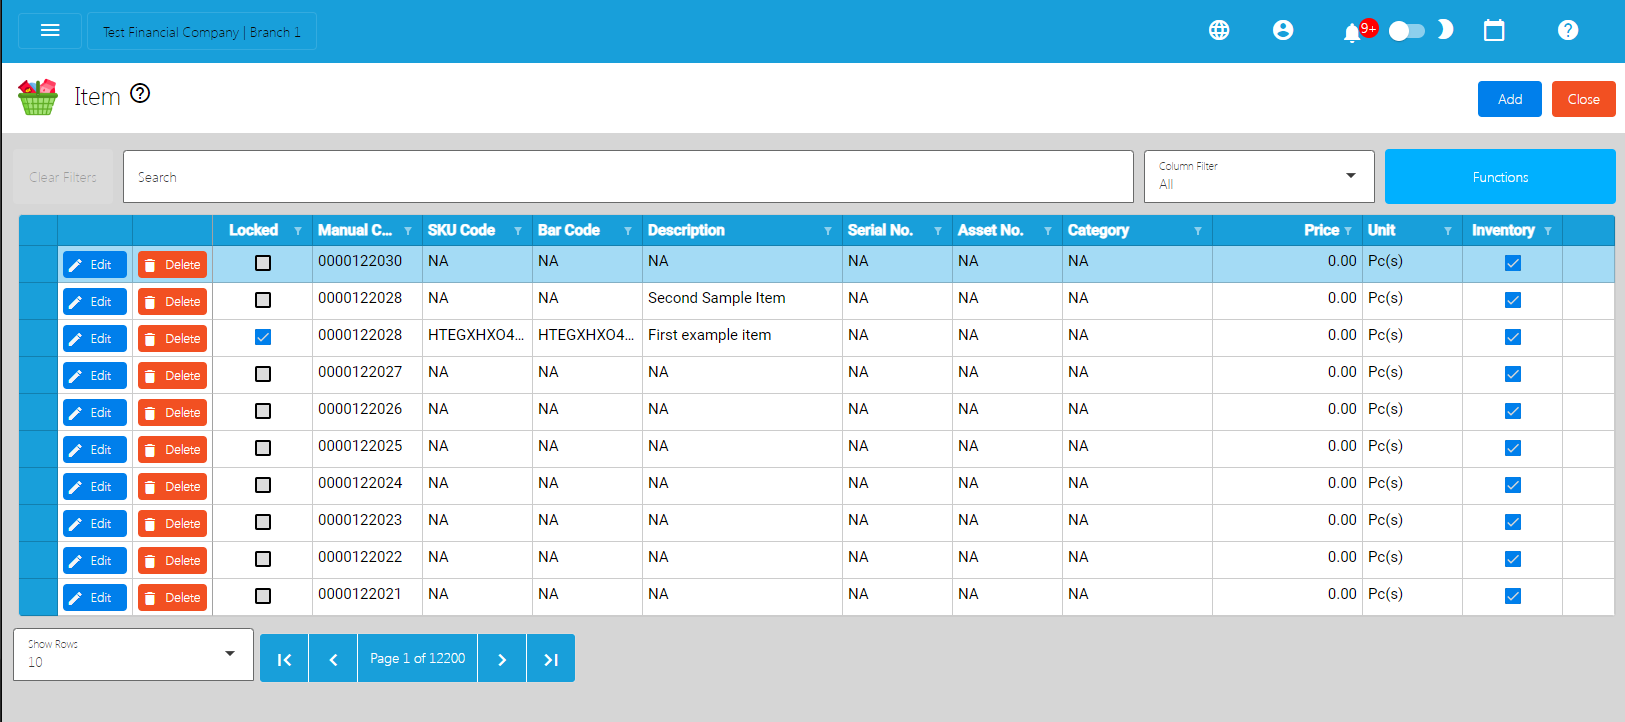
Click the Add button on the upper right corner from the Item List.
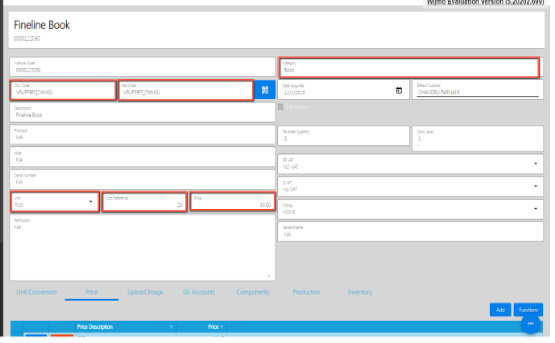
Fill up all the Required information SKU Code, Barcode, Description, Category,Unit, Cost Reference, Price
Name
Description
Acceptable Values
SKU Code
An SKU (Stock Keeping Unit) code is a unique identifier assigned to each distinct product or item in a retailer’s inventory or stock. It is used for tracking and managing inventory, facilitating accurate and efficient management of stock levels, sales, and restocking.
The SKU code allows for quick and precise identification of products, making it easier to monitor inventory movements and conduct accurate stock counts
The SKU code often includes information about the product, such as its color, size, style, and other relevant attributes. This helps in quickly identifying and locating the exact variant of a product in the inventory system. Overall, the use of SKU codes is crucial for efficient inventory management in retail and other industries.
255 Alphanumeric Characters
Restricted:
Comma(,)
Tilde(~)
Barcode
A barcode is a machine-readable representation of data in a visual, linear, or two-dimensional format. It consists of a series of parallel lines, dots, or rectangles that can be scanned and interpreted by a barcode scanner or camera-equipped device. Barcodes are used to uniquely identify products, assets, or entities and are commonly employed in various industries for purposes such as inventory management, retail, logistics, and more.
Barcodes are widely used in retail for product identification and inventory management, in logistics for tracking shipments, in healthcare for patient identification, and in various other applications to streamline data capture and reduce errors associated with manual data entry. They provide a quick and efficient way to access information about a particular item or entity in a digital format.
EasyFS uses the following types of Barcode
UPC (Universal Product Code)
Used in the retail industry for product identification.
Consists of a 12-digit numeric code.
EAN (International Article Number)
Similar to UPC but can have 13 digits.
Widely used in global trade and logistics.
Code 39
A variable-length, alphanumeric barcode.
Commonly used in industrial and manufacturing applications.
Code 128
A high-density, variable-length barcode.
Supports alphanumeric characters.
Used in various industries, including shipping and logistics.
QR Code (Quick Response Code)
Two-dimensional matrix barcode.
Can store a significant amount of data, including alphanumeric characters, binary, and kanji characters.
Commonly used for marketing, mobile payments, and inventory tracking.
WARNING: Changing or editing the barcode will cause a major error on the easyFS and easyPOS integration. It is strongly advised not to change the barcode once it is already encoded, saved and locked the item
255 Alphanumeric Characters
Restricted:
Comma(,)
Tilde(~)
Description
The item description is used to uniquely identify and label each item in the inventory. It distinguishes one product from another based on its characteristics, features, or other relevant details
255 Alphanumeric Characters
Restricted:
Comma(,)
Tilde(~)
Category
An “Item Category” in the context of inventory and product management refers to a classification or grouping assigned to a specific type of product or item based on common characteristics or attributes. Item categories help organize and streamline inventory management by grouping similar items together, simplifying the tracking, analysis, and reporting of products within a system.
Depending on how the organization categorizes its products. The following is a guide on various Criteria for Product Categorization
Product Type
Categorizing items based on their general type or nature. For example, grouping products into categories like electronics, clothing, or office supplies.
Function or Use
Classifying items based on their intended use or function. This might include categories such as tools, consumables, or accessories.
Industry Standards
Adhering to industry standards or regulations that require specific categorization. For instance, in healthcare, items may be categorized according to medical equipment, pharmaceuticals, or surgical supplies.
Lifecycle Stage
Organizing items based on their lifecycle stage, such as new arrivals, in-stock, clearance, or discontinued.
Sales or Marketing Strategy
Grouping items according to their sales performance or marketing strategy. This could involve categories like best-sellers, seasonal items, or promotional products.
Supplier or Brand
Categorizing items by their supplier or brand, especially if there are specific agreements or considerations associated with different suppliers.
Profitability
Grouping items based on their contribution to profitability, allowing businesses to prioritize or analyze products accordingly.
Location
Categorizing items based on their physical location within a warehouse or facility. This helps in efficient inventory management and retrieval.
255 Alphanumeric Characters
Restricted:
Comma(,)
Tilde(~)
Unit
Refers to the basic counting or measurement unit assigned to individual items or products within the inventory. The “unit” is the standard quantity in which items are counted, tracked, bought, and sold. It serves several important purposes in inventory management
WARNING: Changing the Unit will cause a major problem in the integration of easyFS and easyPOS. Never change the Unit of Measure if you have already saved and locked the item.
255 Alphanumeric Characters
Restricted:
Comma(,)
Tilde(~)
Cost Reference
Refers to the financial value associated with acquiring or producing goods that are held in inventory. The cost of inventory is a crucial aspect of managing a business’s finances and involves various components.
This is the amount paid to acquire products from suppliers. It includes the purchase price of goods, transportation costs, import duties, and any other costs directly attributable to obtaining the items.
Cost Reference will be automatically updated
Numeric up to (-) 999,999,999.99 up (+)
Price
“price” refers to the monetary value assigned to a specific item or product in the inventory. The price is a crucial element in financial transactions, sales, and overall financial management.
The unit price represents the selling price of a single unit of the item. It is the amount charged or paid for one individual item.
Prices are integrated into sales transactions and invoices, ensuring accurate financial records and reflecting the revenue generated from sales
Numeric up to (-) 999,999,999.99 up (+)
For the fields that are optional, default it to “NA” if there’s nothing to provide:
Principal
Alias
Serial Number
Particulars
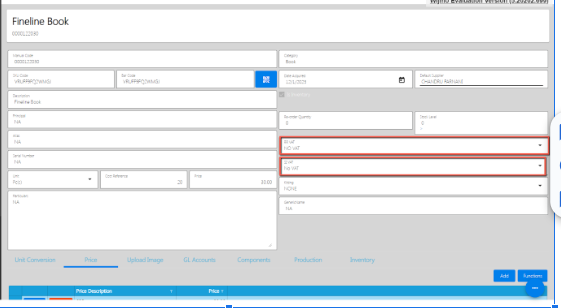
In the taxes fields, select a correct Tax value:
RR (Receiving Receipt) VAT (INPUT VAT or NON-VAT)
SI (Sales Invoice) VAT (OUTPUT VAT or NON-VAT)
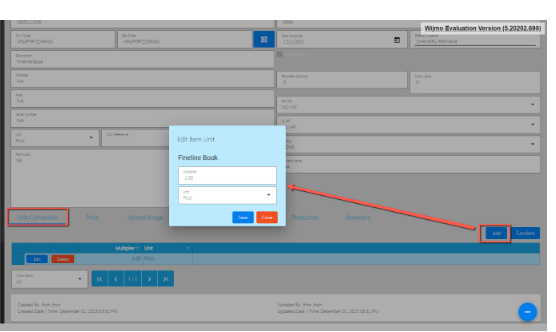
Unit Conversion
Assumption: Item detail is filled with necessary information.
Unit Conversion allows you to include multiple units for an item, eliminating the need to create a new item record with the same description.
Click the Add button, select first the unit that you selected on the Item detail and provide a multiplier. This is for you not to be able to hit an error when locking the Item detail.
Provide a multiplier and after that, click the Save button.
If you wish to add a new Unit Conversion record, repeat Steps 3 and 4.
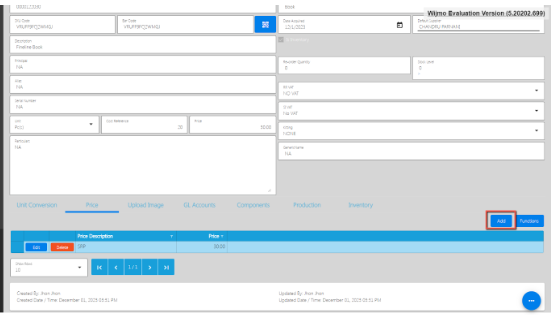
Price
The price tab in inventory is used to add one or more item prices to be used when having future transactions.
Click the Add button, provide first the Price that you provided on the Item detail and provide a price description. This is for you not to be able to hit an error when locking the Item detail.
After that, click the Save button.
If you wish to add a new Item Price record, repeat Steps 2 and 3.
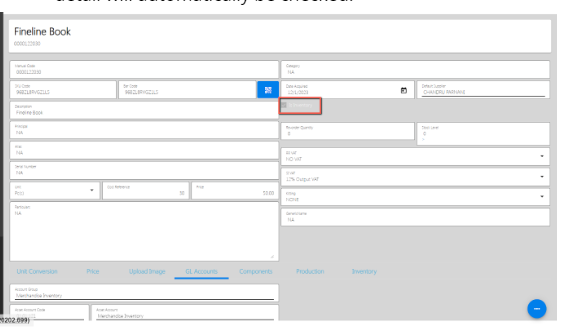
General Ledger Accounts
The importance of the General Ledger account is to know where the transaction will be recorded. Make sure all the accounts that you select on the GL account are also in the chart of accounts.
We have a default set up for this but if you have a specific account you want to use, you can do so.
If your Item is an Inventory, select an Account for Inventory. By this, the isInventory checkbox on the Item detail will automatically be checked.
If your Item is a Non-Inventory, select an Account for Non Inventory. By this, the isInventory checkbox on the Item detail will automatically be unchecked.
If your Item is a Fixed Asset, select an Account for Fixed Asset. By this, the isInventory checkbox on the Item detail will automatically be unchecked.
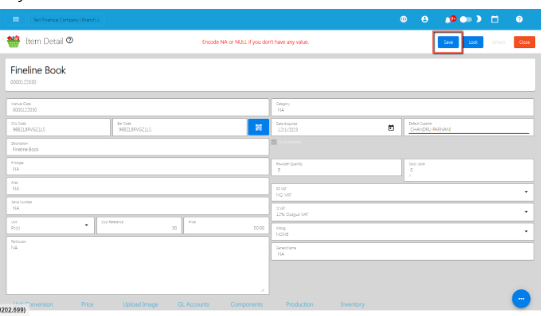
Save and Lock
Review the Item detail first.
Once everything is okay, click Save. Save button allows you to save your item detail, however, the item will not be visible when you do future transactions.
Inorder for your Item to be visible when doing future transactions, click the Lock button.
If you want to delete items , you can’t delete that one even if there’s no transaction because we don’t have a delete button but instead you can use Invisible/void for those unused items.
4.1.1.2 Add Item Via Import Function
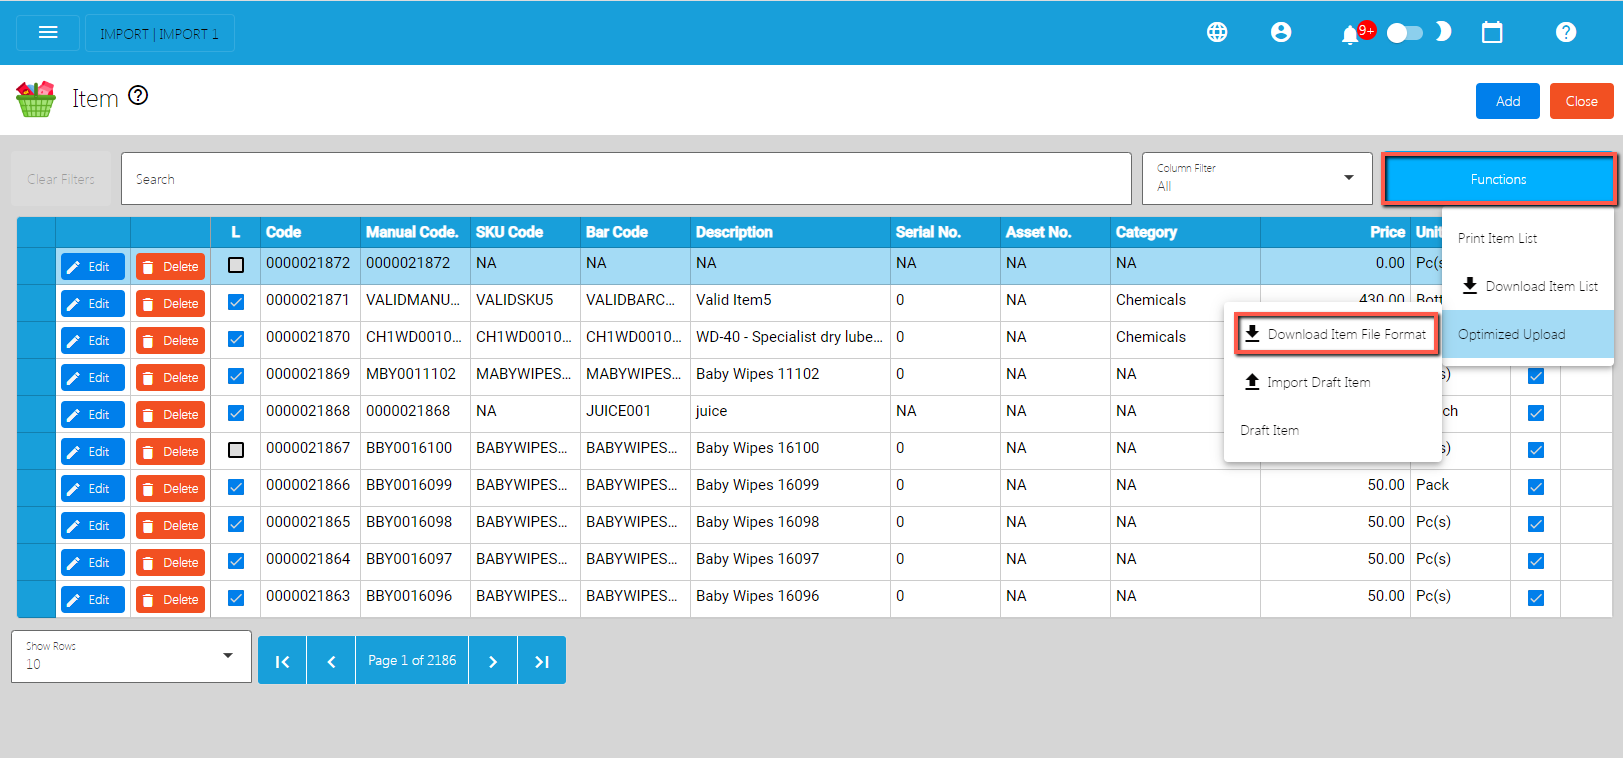
Go to Masterfiles, then select Items.
Click the Functions button, then click Download Item File Format.
An excel file is automatically downloaded for the Item File Format.
Open the file. The file is used if you want to import multiple items in our system. Just keep in mind, we advise with a maximum of 500 items per upload.
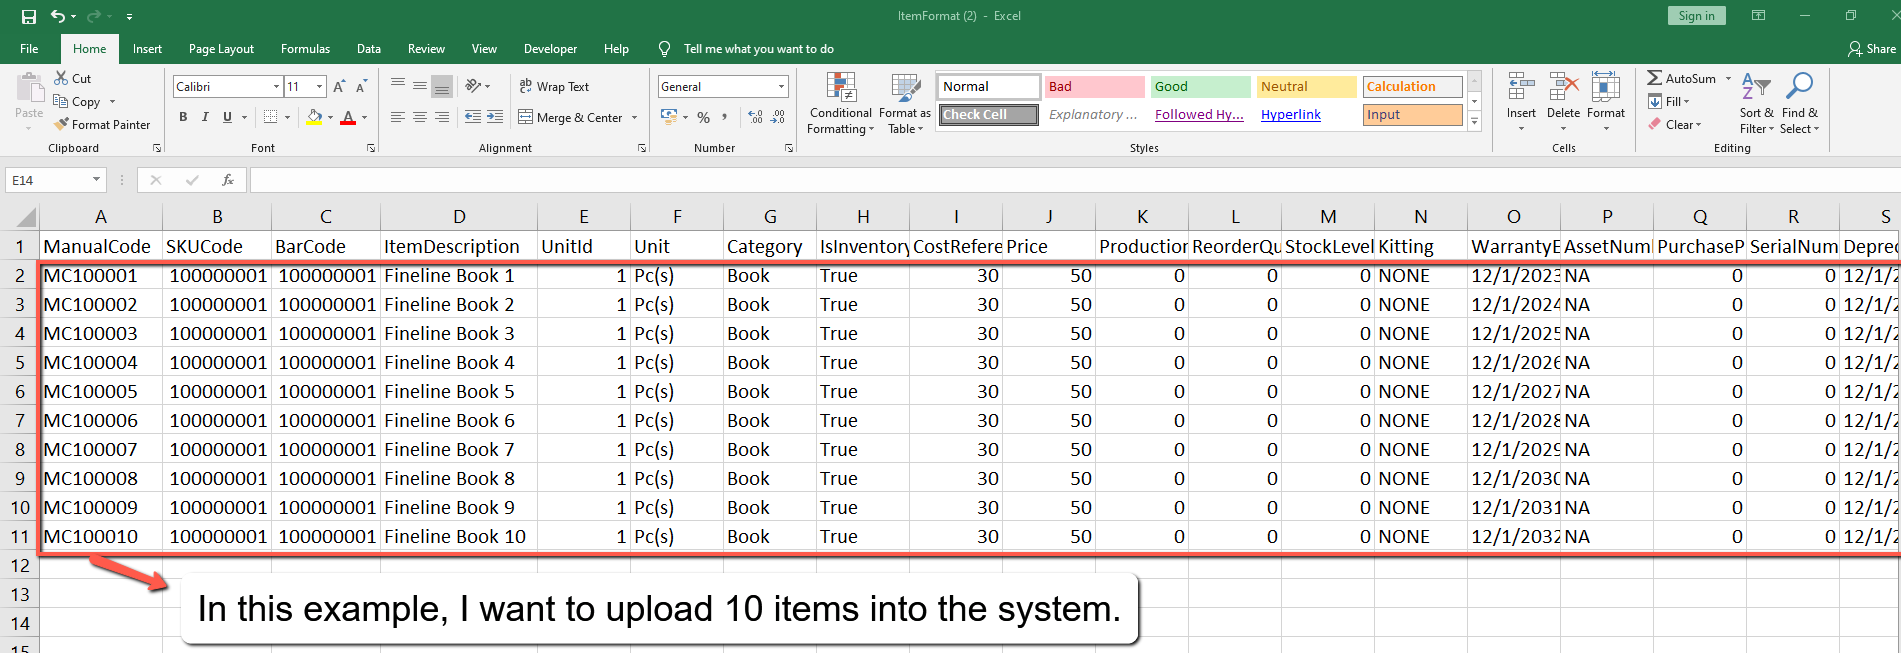
As you can see on the file, it has sample data where you can see the following columns (all in all, there are 44 columns):
ManualCode
SKUCode
Barcode
ItemDescription
UnitId
Unit
Category
IsInventory
CostReference
Price
ProductionCost
ReorderQuantity
StockLevel
Kitting
WarrantyExpiry
AssetNumber
PurchasePrice
SerialNumber
DepreciationStartDate
DepreciationMethod
Custodian
Particulars
Alias
GenericName
DateAcquired
SalvageValue
UsefulLife
DefaultSupplierId
DefaultSupplier
Principal
ArticleAccountGroupId
ArticleAccountGroup
AssetAccountId
AssetAccount
SalesAccountId
SalesAccount
CostAccountId
CostAccount
ExpenseAccountId
ExpenseAccount
RRVATId
RRVAT
SIVATId
SIVAT
If you have multiple items to be uploaded, we suggest copying first the sample data then pasting on the next row until it reaches out on the number of items to be uploaded. Take note, there is a limitation of the number of items to be uploaded. Better read the “Best Practices” section first.
Next, provide a correct value for each column especially on the following column(s):
Take note: Highlighted with ORANGE are the required column, otherwise put NA as value:
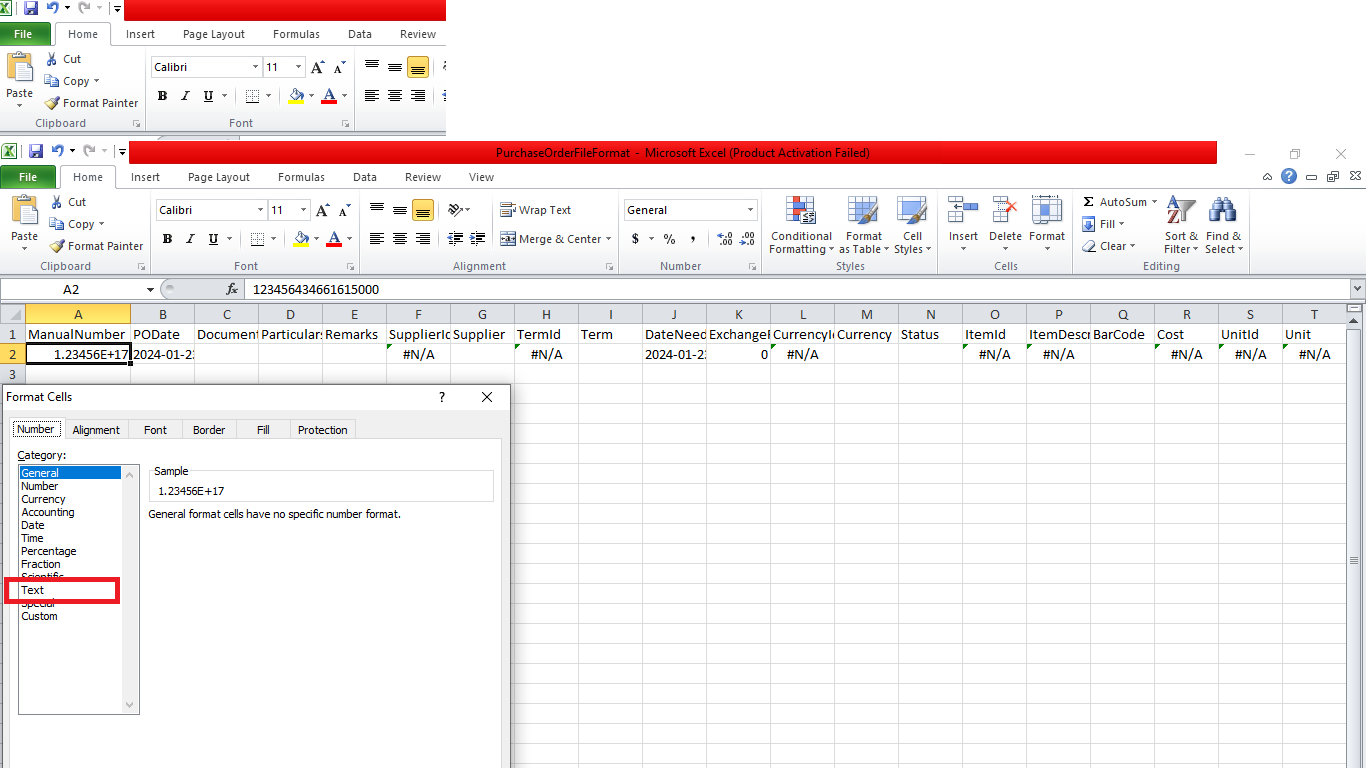
Manual Code→ should be unique, alphanumeric and should not exceed 255 characters. Example: ABC0000001
– if the Manual Code starts with 000, don’t forget to put an apostrophe (‘) at the beginning of the Manual Code. Example: ‘00000111231414
– if the Manual Code starts with a number but exceeds more than 10 digits, format the cell to Text to show all the numbers.
Steps on how to change the format to Text:
1. Right Click the Cell
2. Click Format Cell
3. Choose Text
4. Click OK
5. Then reselect the field
SKUCode → should be unique, alphanumeric and should not exceed 255 characters. Example: XYZ CA1001 – if the SKU Code starts with 000, don’t forget to put an apostrophe (‘) at the beginning of the Manual Code. Example: ‘00000111231414
– if the SKU Code starts with a number but exceeds more than 10 digits, format the cell to Text to show all the numbers.
Steps on how to change the format to Text:
1. Right Click the Cell
2. Click Format Cell
3. Choose Text
4. Click OK
5. Then reselect the field
Barcode → should be unique, alphanumeric and should not exceed 255 characters. Example: XYZ CA1001 – if the Barcode starts with 000, don’t forget to put an apostrophe (‘) at the beginning of the Manual Code. Example: ‘00000111231414
– if the Barcode starts with a number but exceeds more than 10 digits, format the cell to Text to show all the numbers.
Steps on how to change the format to Text:
1. Right Click the Cell
2. Click Format Cell
3. Choose Text
4. Click OK
5. Then reselect the field
ItemDescription → should be unique, has no special characters and should not exceed 255 characters.
Unit → you can select a unit value from the dropdown. Do not edit the UnitId column.
Cost → should be numeric
Price → should be numeric
Category → should have no special characters, (if none, default to NA)
IsInventory → true or false
Asset Number → alphanumeric, should have no special characters (if none, default to O or NA)
Custodian → alphanumeric, should have no special characters (if none, default to NA)
Particulars → alphanumeric, should have no special characters (if none, default to NA)
Alias → alphanumeric, should have no special characters (if none, default to NA)
Principal → alphanumeric, should have no special characters (if none, default to NA)
RRVAT → you can select a RRVAT value from the dropdown. Do not edit the RRVATId column.
SIVAT → you can select a SIVAT value from the dropdown. Do not edit the SIVATId column.
For the General Ledger Accounts, make sure to select correct accounts. If confused, you may check the GL of Account list on the System>System Tables>Article Account Groups.
Once okay, save the file.
Go back to the system, then go to Inventory, then select Items.
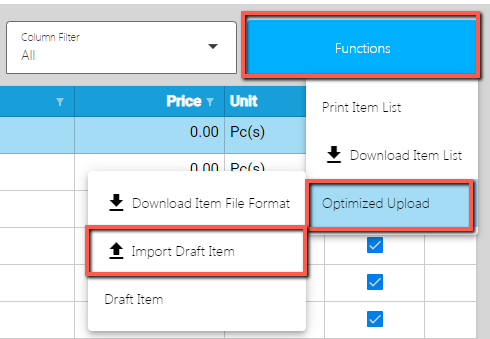
Click again the Functions button, then click Import Draft Item.
Look for the item file format, then double click.
A confirmation popup will display, just select confirm.
Wait until it will successfully be imported. At this stage, the item(s) is not yet added on the item list. Instead, it will be added on the Draft Item list. Meaning, the items being imported are subject for a review.
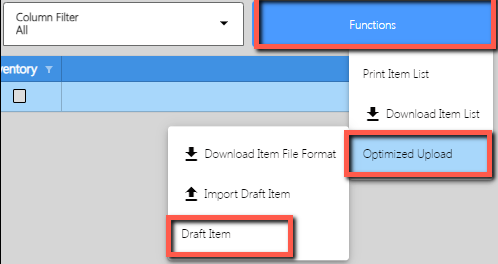
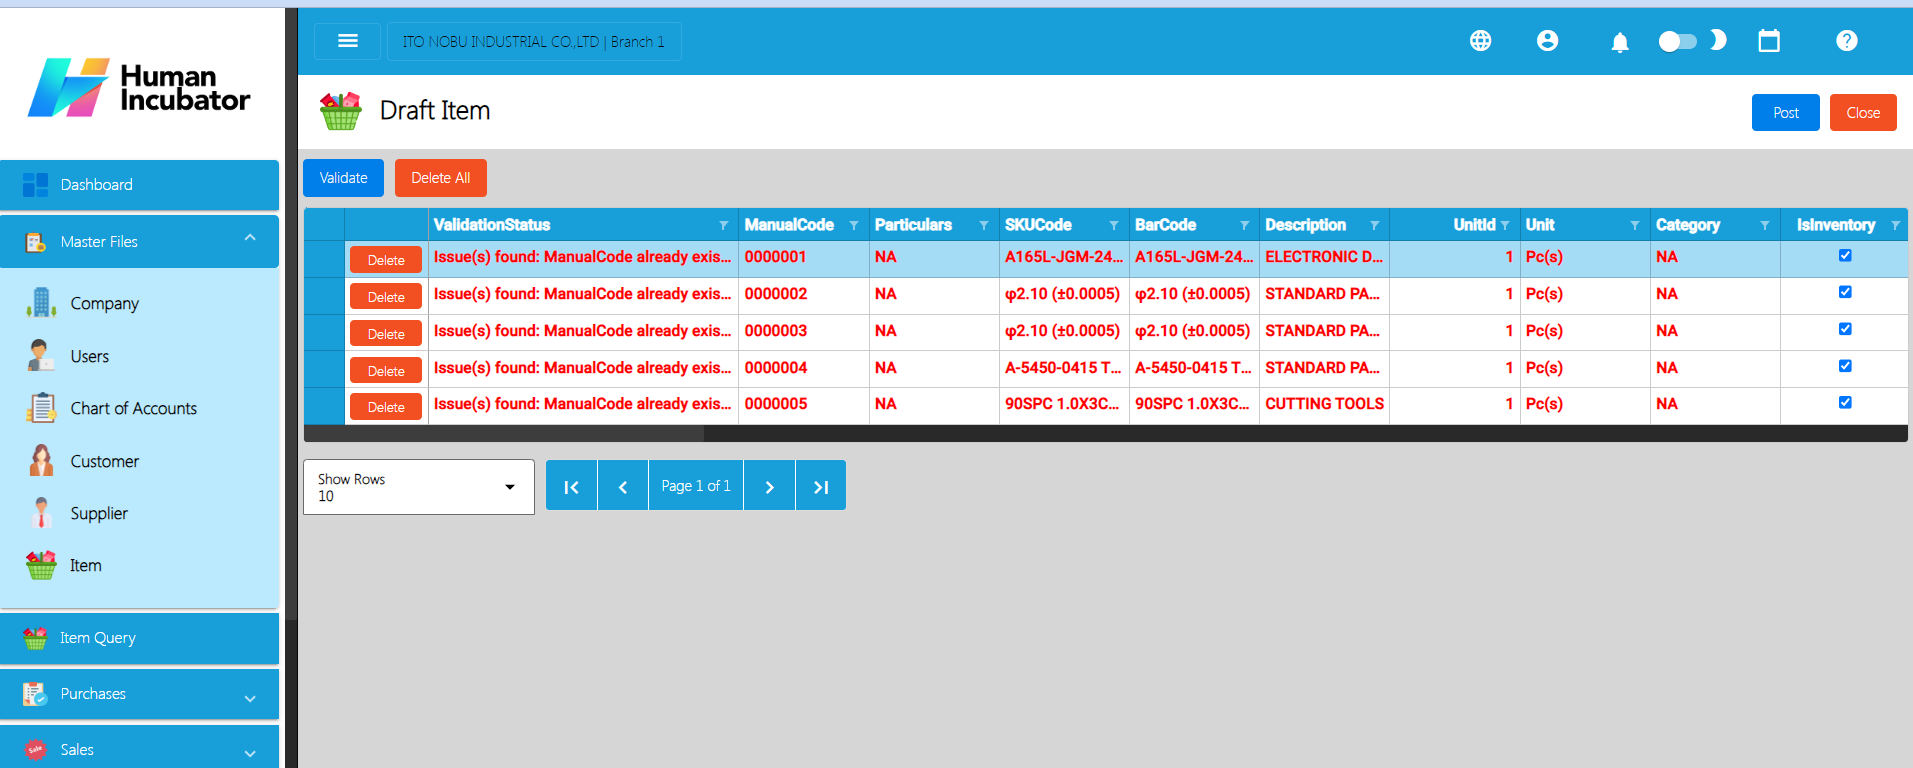
To view the items on the Draft Item, click the Functions button, then click on the Draft Item.
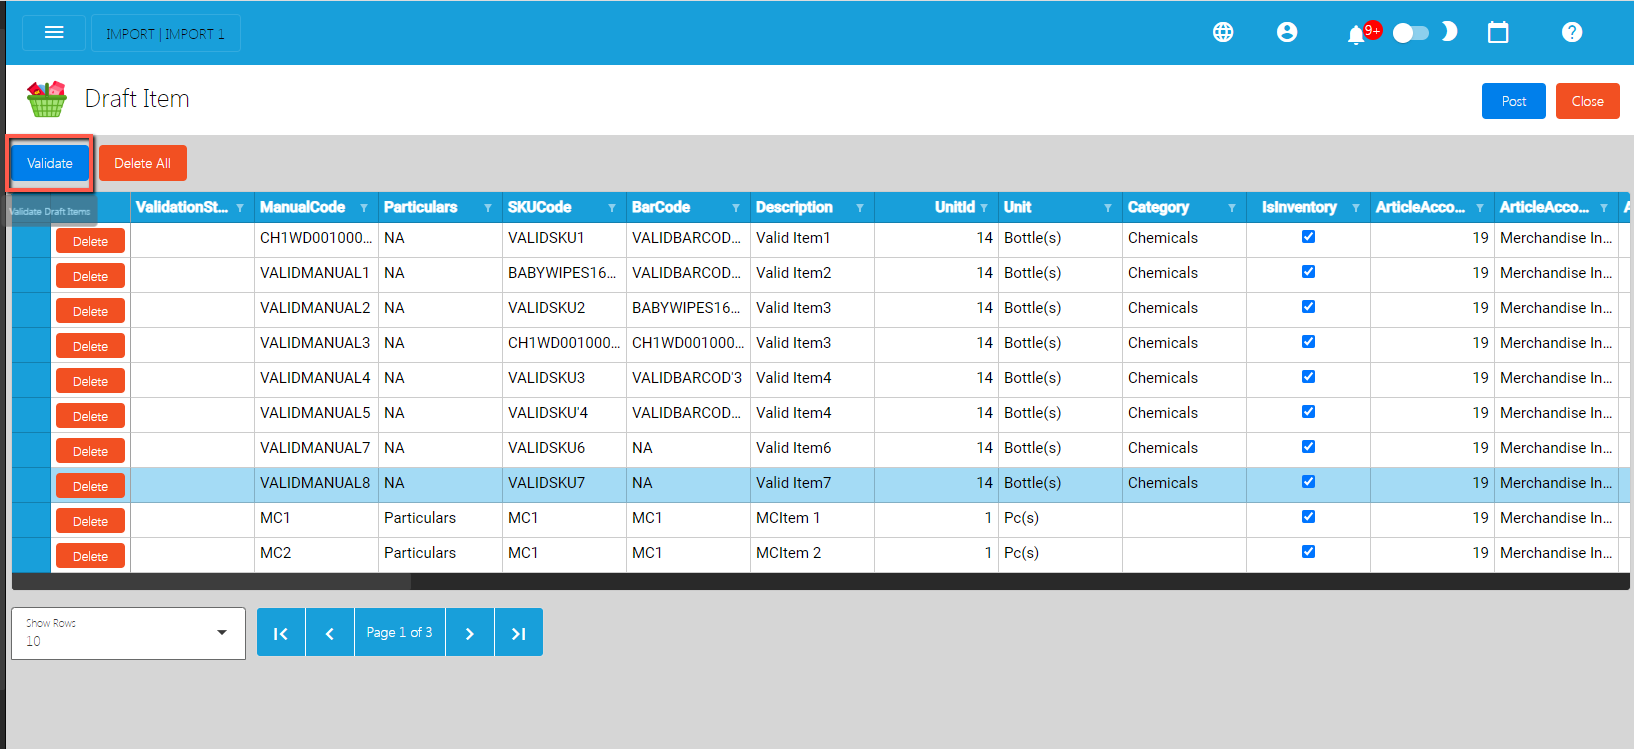
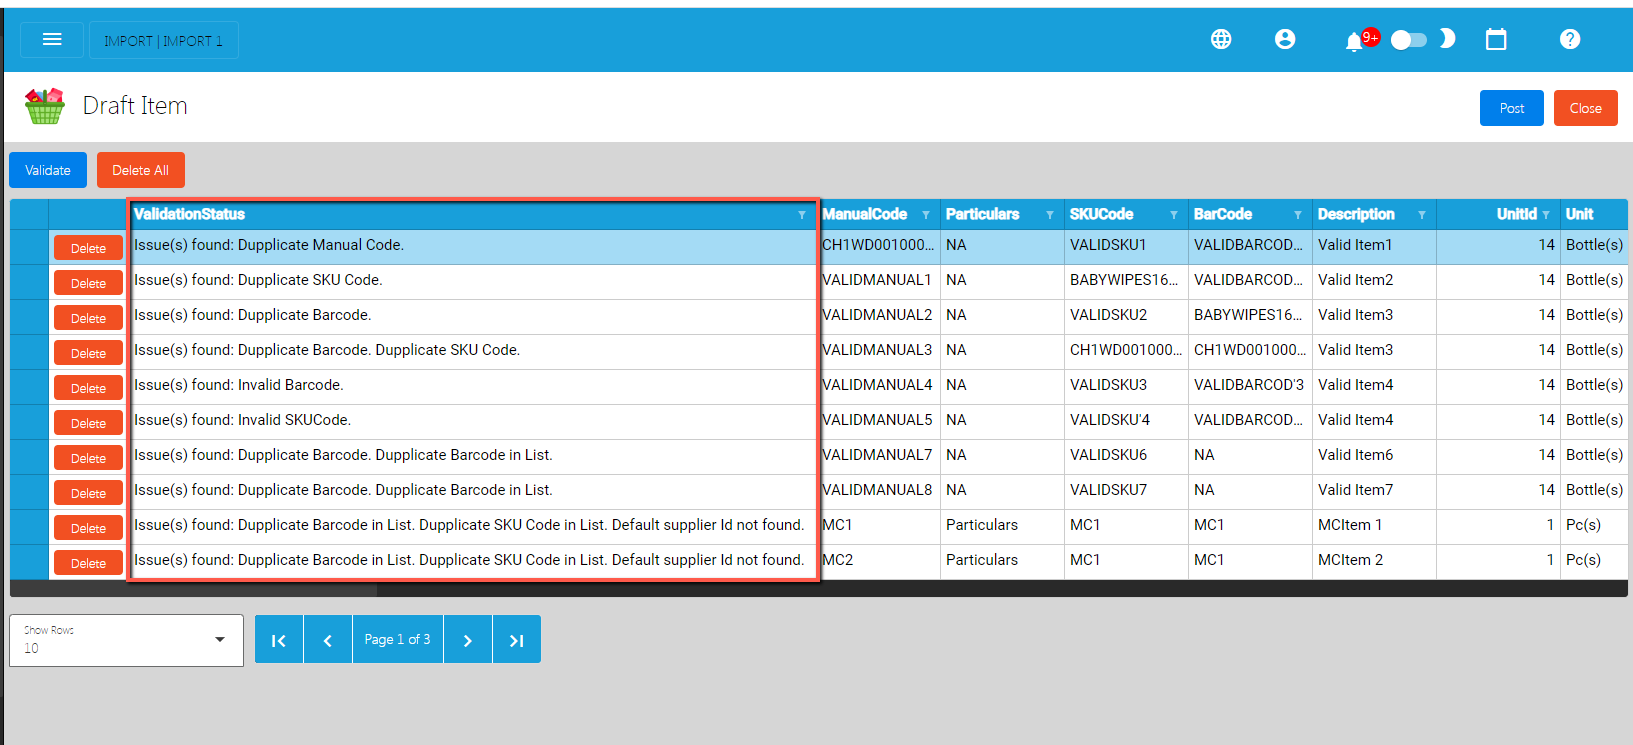
Review if the item(s) being imported are added on the Draft Item list.
Once okay, click the Validate button. This is to validate the Item details first if everything is correct before it can be posted. Please refer to the following validation status:
No ManualCode provided → means that ManualCode column has no value.
Duplicate ManualCode in list → means that ManualCode column has a duplicate value from the Draft Item list.
ManualCode already exists → means that ManualCode column value exists on the Item list.
No Particulars provided → means that Particulars column has no value.
No Description provided → means that the Description column has no value.
No SKUCode provided → means that SKUCode column has no value.
Duplicate SKUCode in list → means that SKUCode column has a duplicate value from the Draft Item list.
SKUCode already exists → means that SKUCode column value exists on the Item list.
No Barcode provided → means that the Barcode column has no value.
Duplicate Barcode in list → means that Barcode column has a duplicate value from the Draft Item list.
Barcode already exists → means that Barcode column value exists on the Item list.
UnitId not found → means that the UnitId column value does not exist on the database.
No Category provided → means that the Category column has no value.
ArticleGroupId not found → means that the ArticleGroupId column value does not exist on the database.
AssetAccountId not found → means that the AssetAccountId column value does not exist on the database.
SalesAccountId not found → means that the SalesAccountId column value does not exist on the database.
CostAccountId not found → means that the CostAccountId column value does not exist on the database.
ExpenseAccountId not found → means that the ExpenseAccountId column value does not exist on the database.
No Price provided → means that the Price column has no value.
Price should be numeric→ means that the Price should be in number format.
RRVATId not found → means that the RRVATId column value does not exist on the database.
SIVATId not found → means that the SIVATId column value does not exist on the database.
Invalid Kitting value → means that Kitting column is not equal to NONE, COMPONENT, PRODUCED, or PACKAGE.
No ProductionCost provided → means that the ProductionCost column has no value.
ProductionCost should be numeric→ means that the ProductionCost should be in number format.
Invalid DateAcquired value → means that the DateAcquired column is not in valid date format.
No SalvageValue provided → means that the SalvageValue column has no value.
SalvageValue should be numeric→ means that the SalvageValue should be in number format.
No UsefulLife provided → means that the UsefulLife column has no value.
UsefulLife should be numeric→ means that the UsefulLife should be in number format.
No CostReference provided → means that the CostReference column has no value.
CostReference should be numeric→ means that the CostReference should be in number format.
No ReorderQuantity provided → means that the ReorderQuantity column has no value.
ReorderQuantity should be numeric→ means that the ReorderQuantity should be in number format.
No StockLevel provided → means that the StockLevel column has no value.
StockLevel should be numeric→ means that the StockLevel should be in number format.
No AssetNumber provided → means that the AssetNumber column has no value.
No PurchasePrice provided → means that the PurchasePrice column has no value.
PurchasePrice should be numeric→ means that the PurchasePrice should be in number format.
Invalid WarrantyExpiry value → means that the WarrantyExpiry column is not in valid date format.
No SerialNumber provided → means that the SerialNumber column has no value.
Invalid DepreciationDate value → means that the DepreciationDate column is not in valid date format.
No DepreciationMethod provided → means that the DepreciationMethod column has no value.
No Custodian provided → means that the Custodian column has no value.
No Alias provided → means that the Alias column has no value.
No GenericName provided → means that the GenericName column has no value.
No Principal provided → means that the Principal column has no value.
DefaultSupplierId not found → means that the DefaultSupplierId column value does not exist on the database.
Once validation is okay, it will update the ValidationStatus. Read the validationStatus on what issues are being found. To correct the item detail, double click on the column where it has an issue then enter a valid value, then press Enter. After that, validate again by clicking the Validate button.
Once everything is okay (ValidationStatus is equal to Validated), click the Post button. A confirmation message will display, click the Confirm button. This will now add the validated item(s) on the Item list.
To check if the item(s) are added on the Item list, click the Close button then look for the item on the Item List.
Warning:
You cannot proceed with the posting after validation if there are errors encountered. Among the Errors you might encounter are:
Duplicate Manual Code
Duplicate Barcode
Duplicate SKU Code
Other Errors
Solution:
Option 1: You need to delete the line that caused the error before posting.
Option 2: You need to use the Delete All Button and re-upload the Excel file that caused the such errors and re-upload the Excel file again using the process mentioned above.
Struggling to accept online payments? Discover how HII Online Payment Service solves your credit card merchant dilemma. HII Online Payment Service. Coming soon!
Struggling to accept online payments? Discover how HII Online Payment Service solves your credit card merchant dilemma. HII Online Payment Service. Coming soon!
Take advantage of Free easyFS Usage for Accounting Firms in the Philippines. Contact Us at +639176280355 or email at hiisales@humedit.ph
Take advantage of Free easyFS Usage for Accounting Firms in the Philippines. Contact Us at +639176280355 or email at hiisales@humedit.ph
Struggling to accept online payments? Discover how HII Online Payment Service solves your credit card merchant dilemma. HII Online Payment Service. Coming soon!
Struggling to accept online payments? Discover how HII Online Payment Service solves your credit card merchant dilemma. HII Online Payment Service. Coming soon!
Take advantage of Free easyFS Usage for Accounting Firms in the Philippines. Contact Us at +639176280355 or email at hiisales@humedit.ph
Take advantage of Free easyFS Usage for Accounting Firms in the Philippines. Contact Us at +639176280355 or email at hiisales@humedit.ph
Struggling to accept online payments? Discover how HII Online Payment Service solves your credit card merchant dilemma. HII Online Payment Service. Coming soon!
Struggling to accept online payments? Discover how HII Online Payment Service solves your credit card merchant dilemma. HII Online Payment Service. Coming soon!
Take advantage of Free easyFS Usage for Accounting Firms in the Philippines. Contact Us at +639176280355 or email at hiisales@humedit.ph
Take advantage of Free easyFS Usage for Accounting Firms in the Philippines. Contact Us at +639176280355 or email at hiisales@humedit.ph
Struggling to accept online payments? Discover how HII Online Payment Service solves your credit card merchant dilemma. HII Online Payment Service. Coming soon!
Struggling to accept online payments? Discover how HII Online Payment Service solves your credit card merchant dilemma. HII Online Payment Service. Coming soon!
Take advantage of Free easyFS Usage for Accounting Firms in the Philippines. Contact Us at +639176280355 or email at hiisales@humedit.ph
Take advantage of Free easyFS Usage for Accounting Firms in the Philippines. Contact Us at +639176280355 or email at hiisales@humedit.ph
Struggling to accept online payments? Discover how HII Online Payment Service solves your credit card merchant dilemma. HII Online Payment Service. Coming soon!
Struggling to accept online payments? Discover how HII Online Payment Service solves your credit card merchant dilemma. HII Online Payment Service. Coming soon!
Take advantage of Free easyFS Usage for Accounting Firms in the Philippines. Contact Us at +639176280355 or email at hiisales@humedit.ph
Take advantage of Free easyFS Usage for Accounting Firms in the Philippines. Contact Us at +639176280355 or email at hiisales@humedit.ph
Struggling to accept online payments? Discover how HII Online Payment Service solves your credit card merchant dilemma. HII Online Payment Service. Coming soon!
Struggling to accept online payments? Discover how HII Online Payment Service solves your credit card merchant dilemma. HII Online Payment Service. Coming soon!
Take advantage of Free easyFS Usage for Accounting Firms in the Philippines. Contact Us at +639176280355 or email at hiisales@humedit.ph
Take advantage of Free easyFS Usage for Accounting Firms in the Philippines. Contact Us at +639176280355 or email at hiisales@humedit.ph
Struggling to accept online payments? Discover how HII Online Payment Service solves your credit card merchant dilemma. HII Online Payment Service. Coming soon!
Struggling to accept online payments? Discover how HII Online Payment Service solves your credit card merchant dilemma. HII Online Payment Service. Coming soon!
Take advantage of Free easyFS Usage for Accounting Firms in the Philippines. Contact Us at +639176280355 or email at hiisales@humedit.ph
Take advantage of Free easyFS Usage for Accounting Firms in the Philippines. Contact Us at +639176280355 or email at hiisales@humedit.ph
Struggling to accept online payments? Discover how HII Online Payment Service solves your credit card merchant dilemma. HII Online Payment Service. Coming soon!
Struggling to accept online payments? Discover how HII Online Payment Service solves your credit card merchant dilemma. HII Online Payment Service. Coming soon!

 Log in to Messenger