This is where to input the entire Sales Order needed. This is optional so you can go directly to the Sales Invoice.
Sales Order List
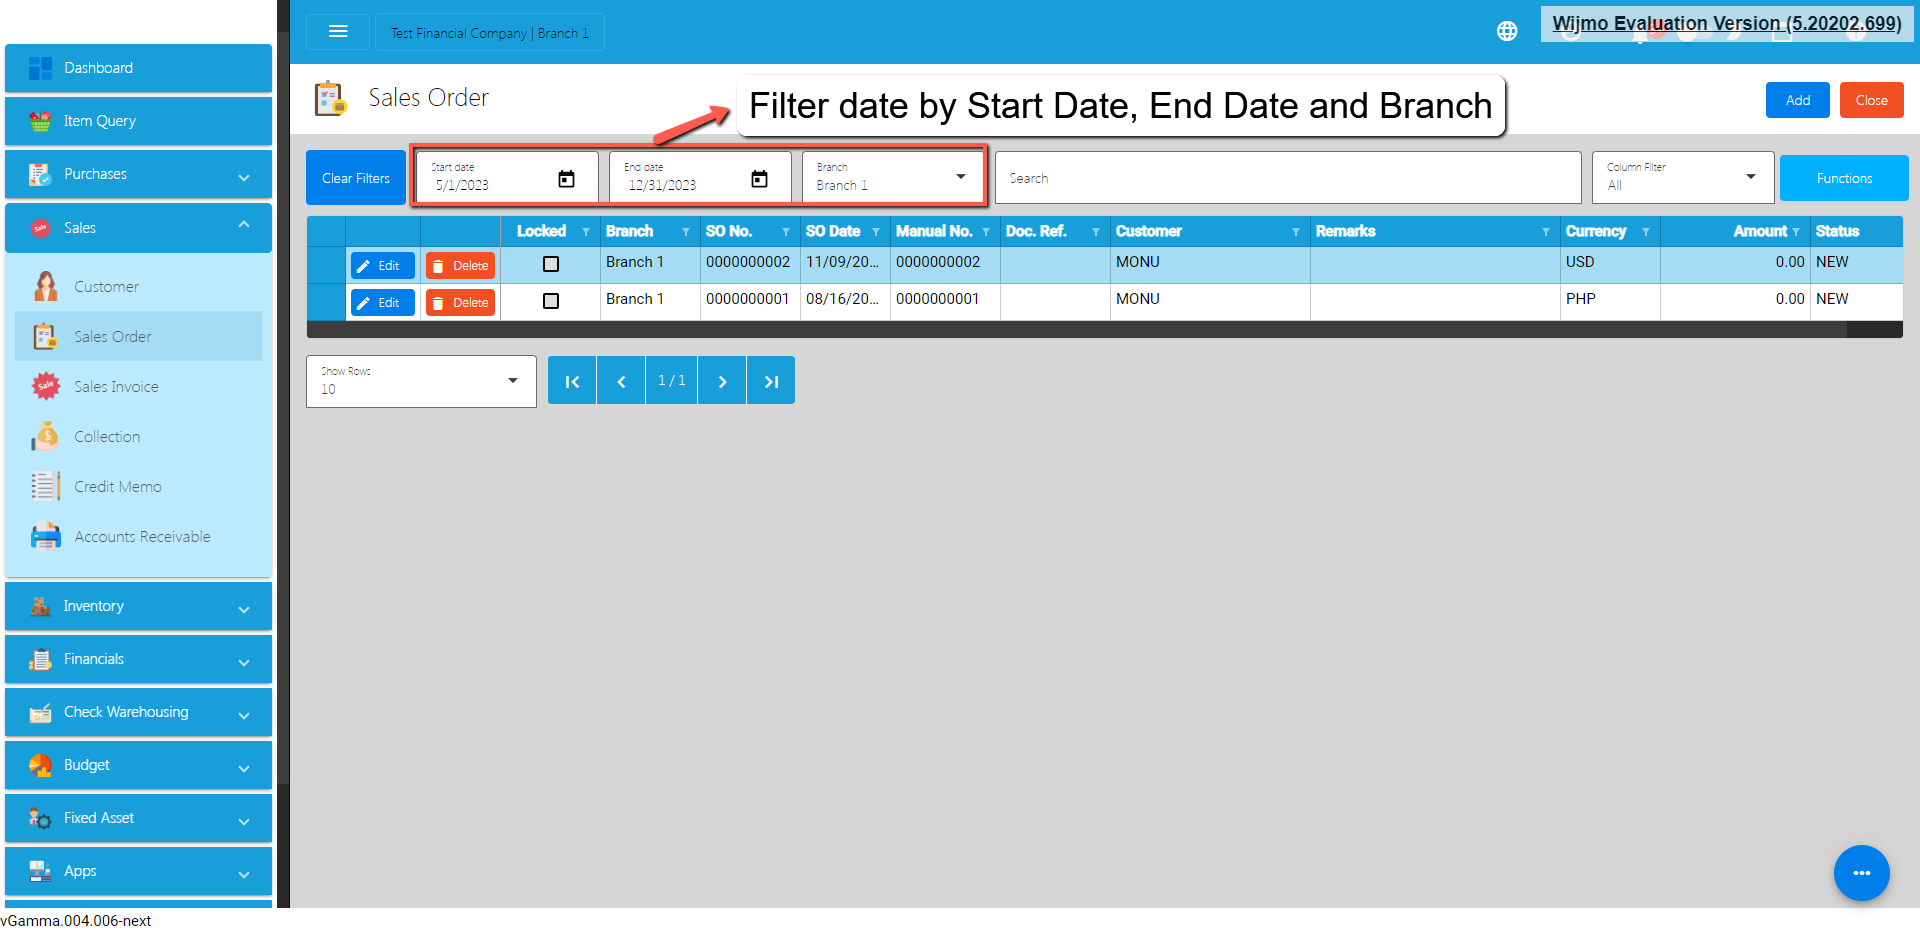
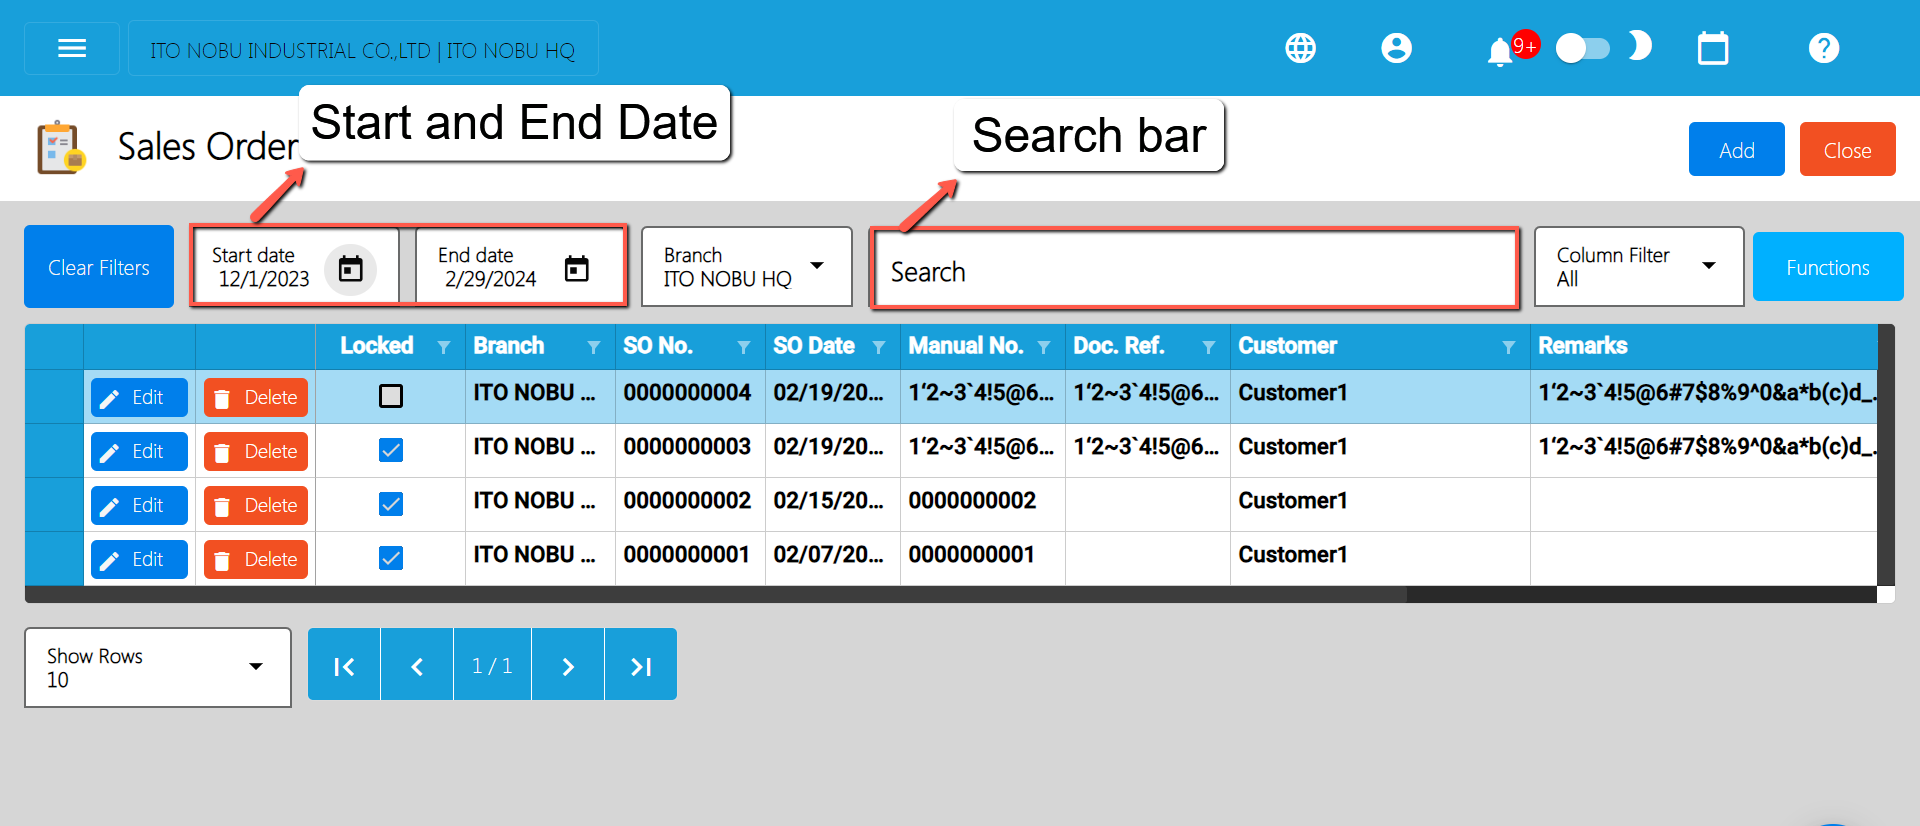
List of all the SO (Sales Order) and will also show the overview of the transaction.
You can filter the data to be displayed by providing the following:
Start Date
End Date
Branch
Also, you can search data by providing a value on the Search Bar and select the Column Filter on where to search the data.
Sales Order Detail
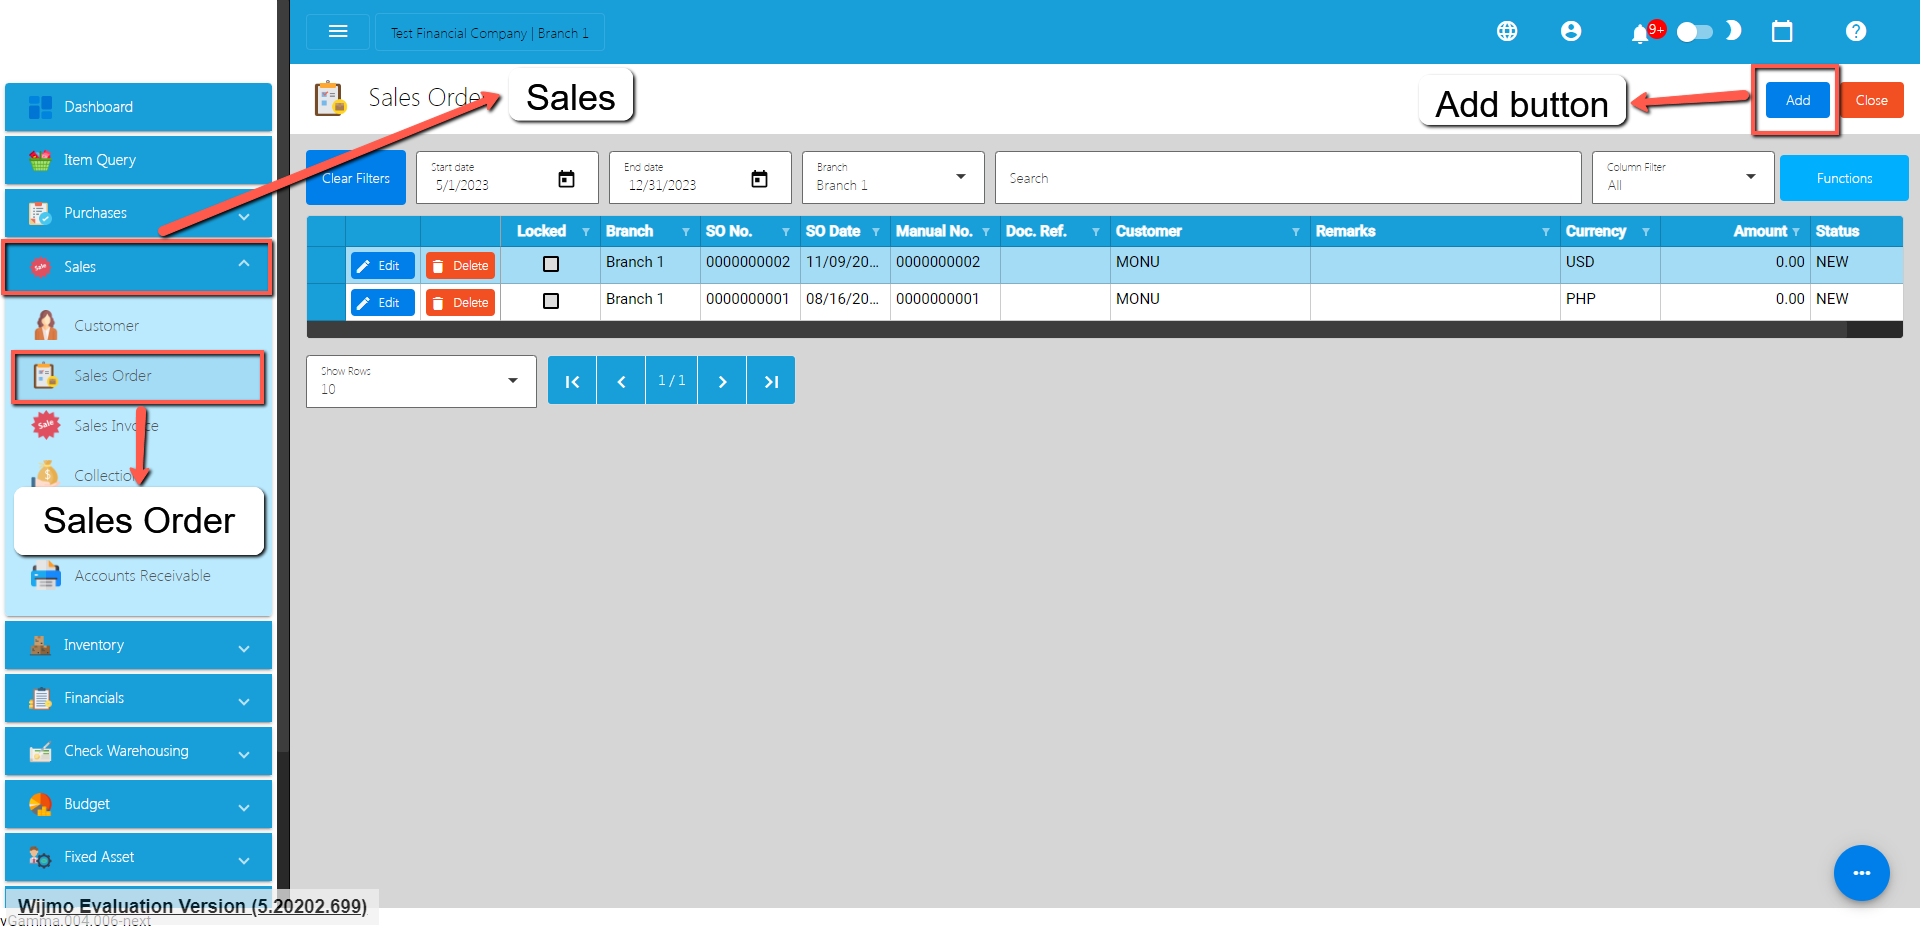
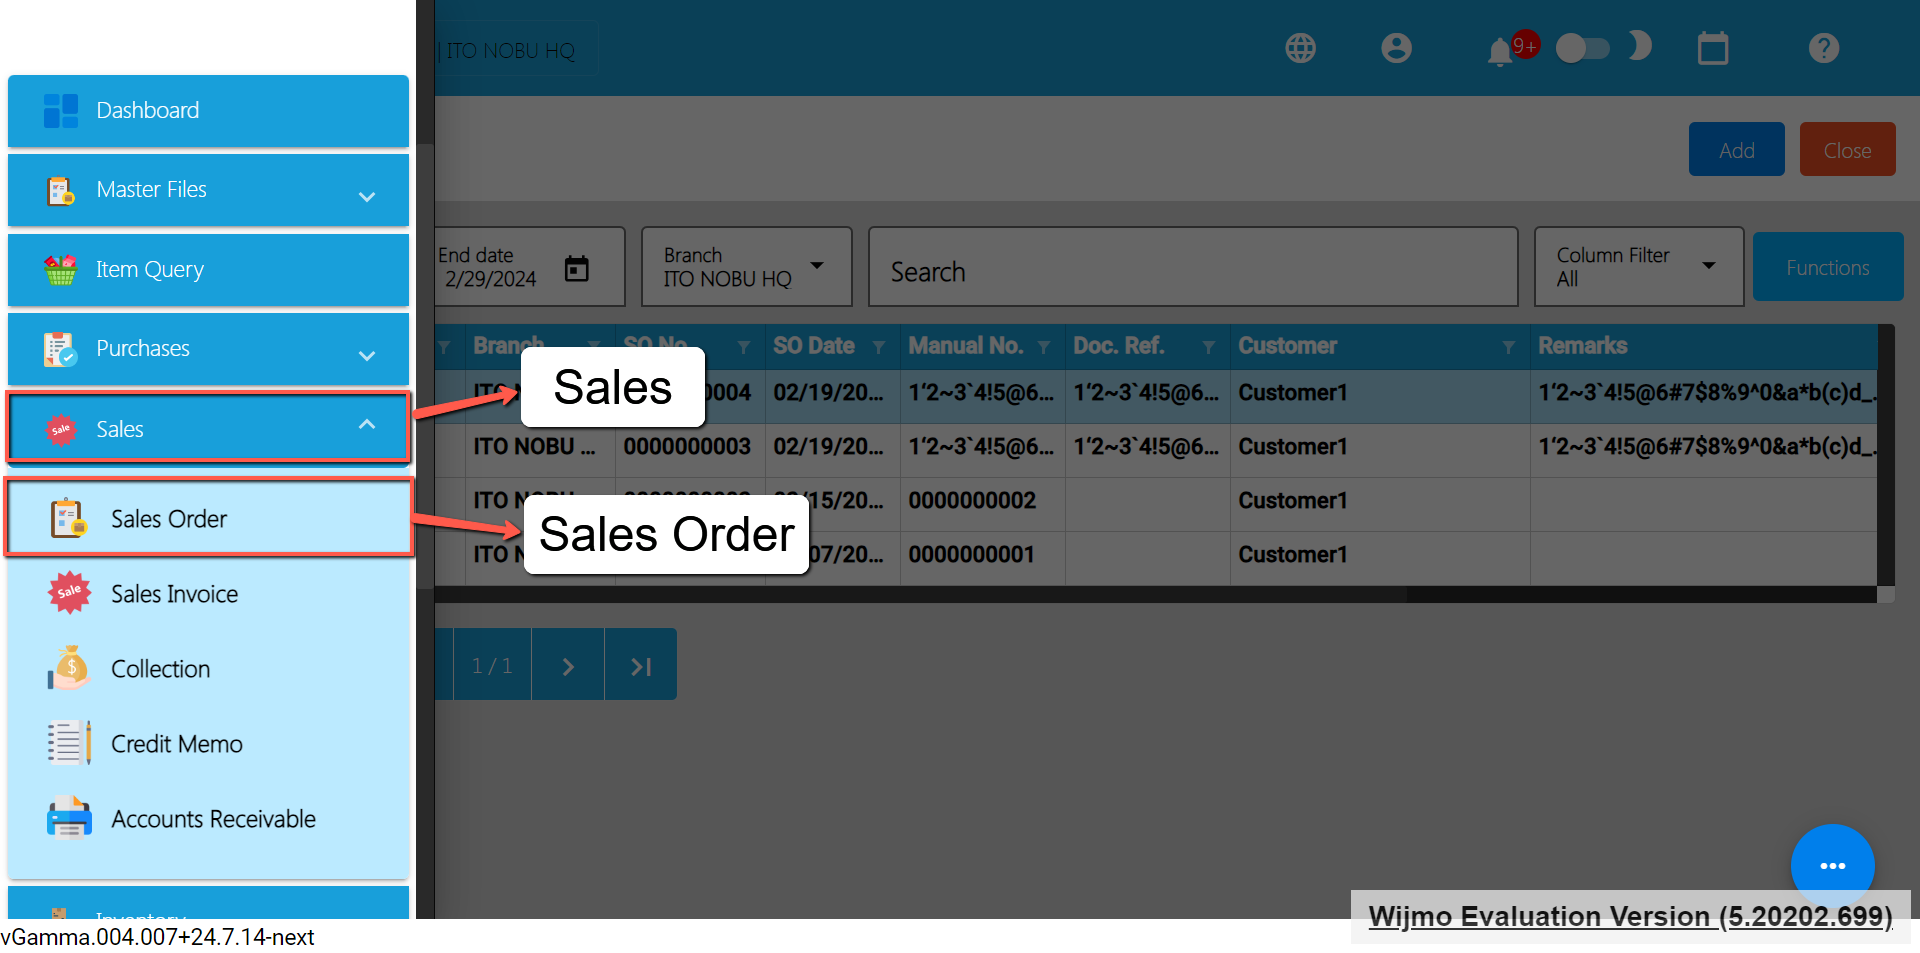
To add a new Sales Order, go to Sales then click Sales Order. After that, click the Add button that can be seen in the Sales Order list.
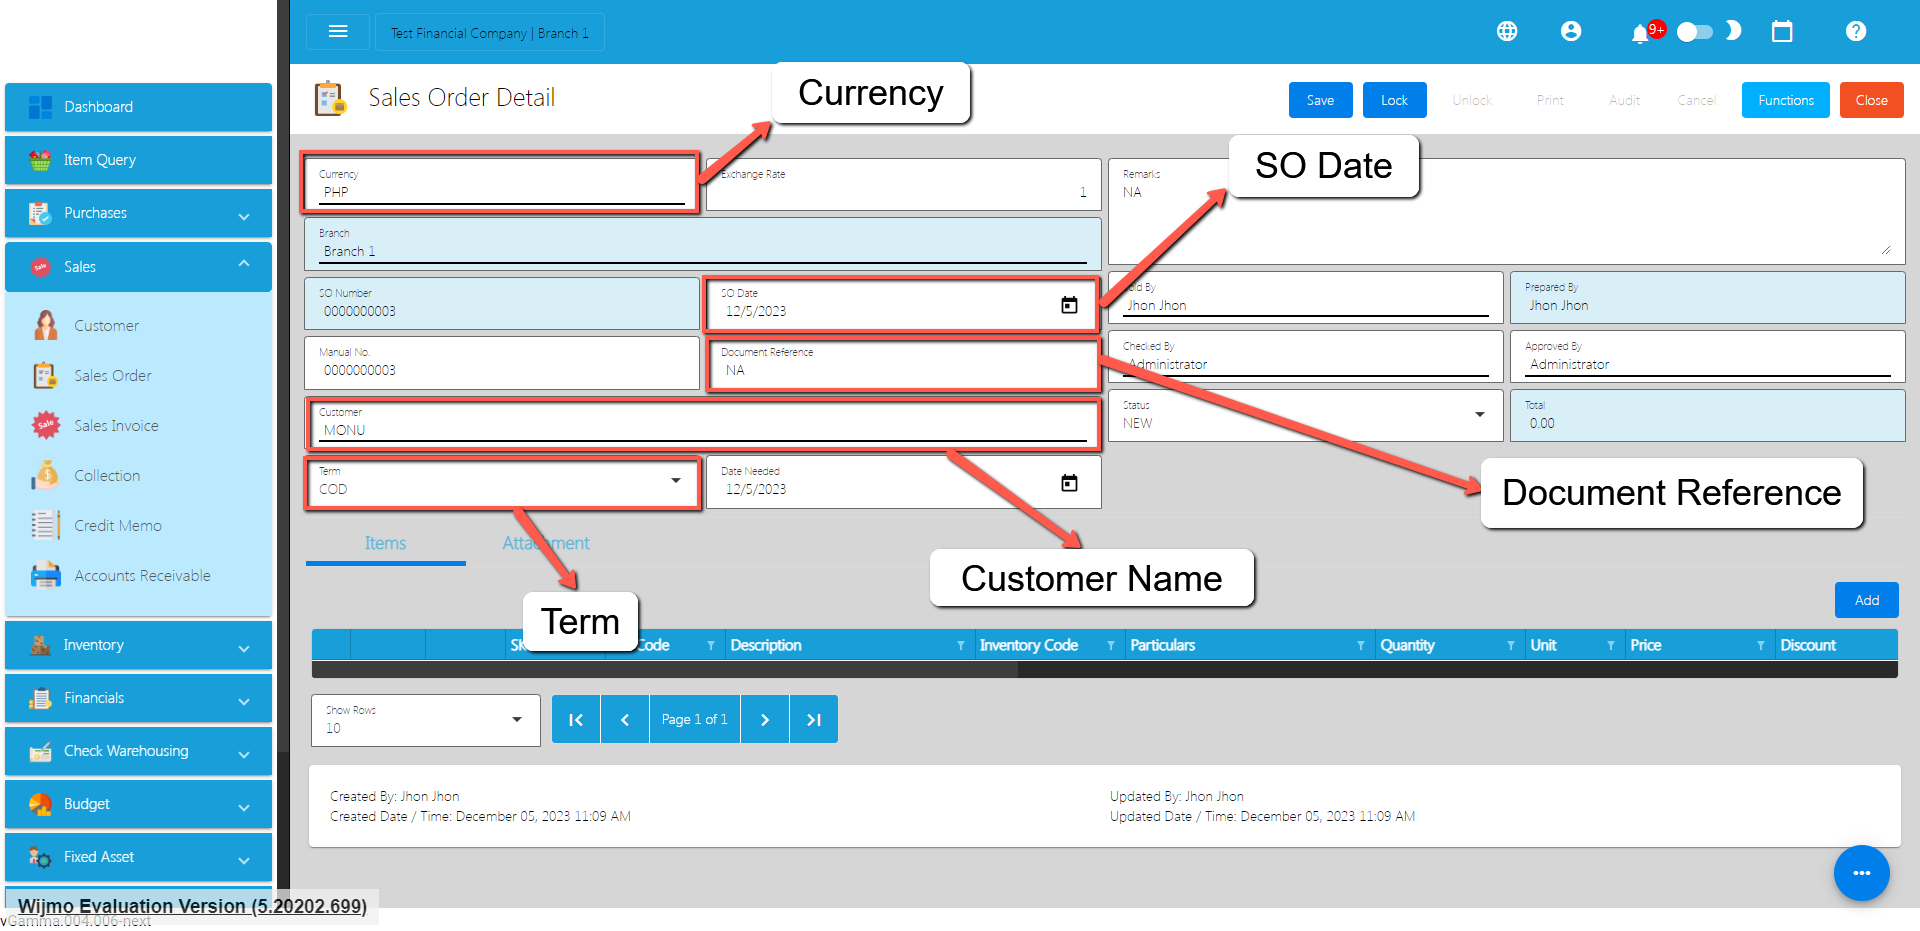
Fill out all the needed information for the Sales Order Detail like,
Currency
Customer Name
SO Date
Term
Document Reference
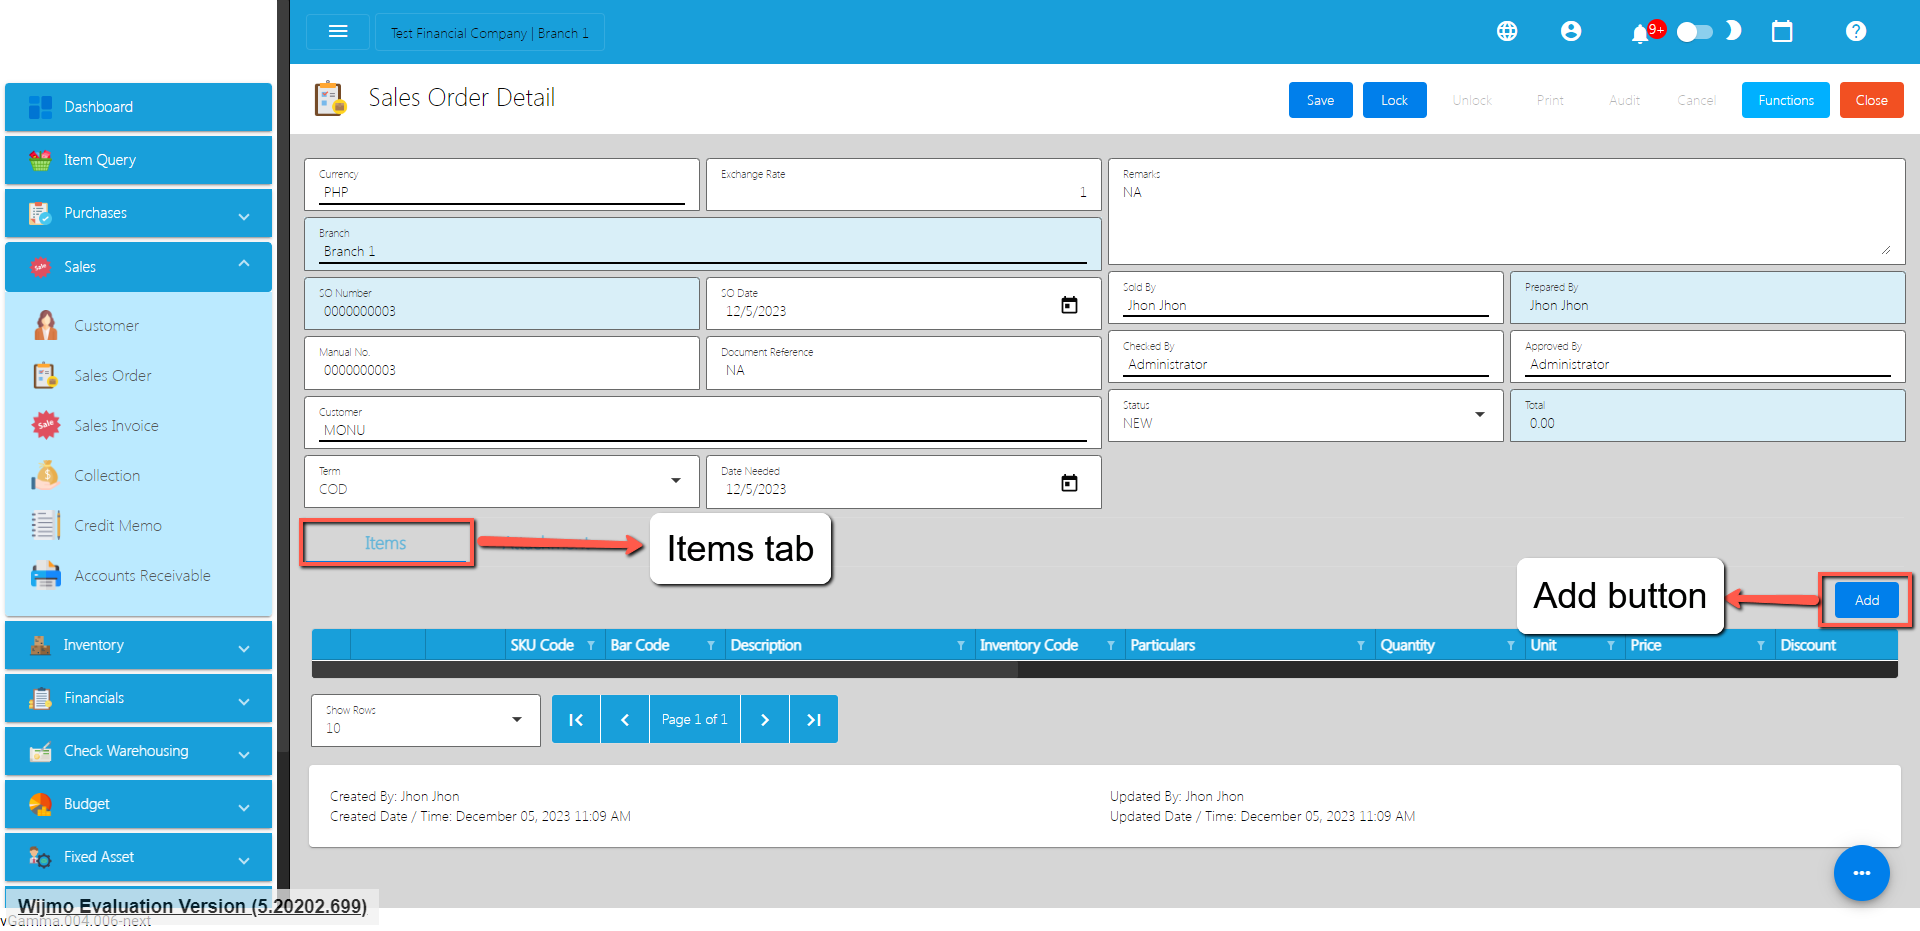
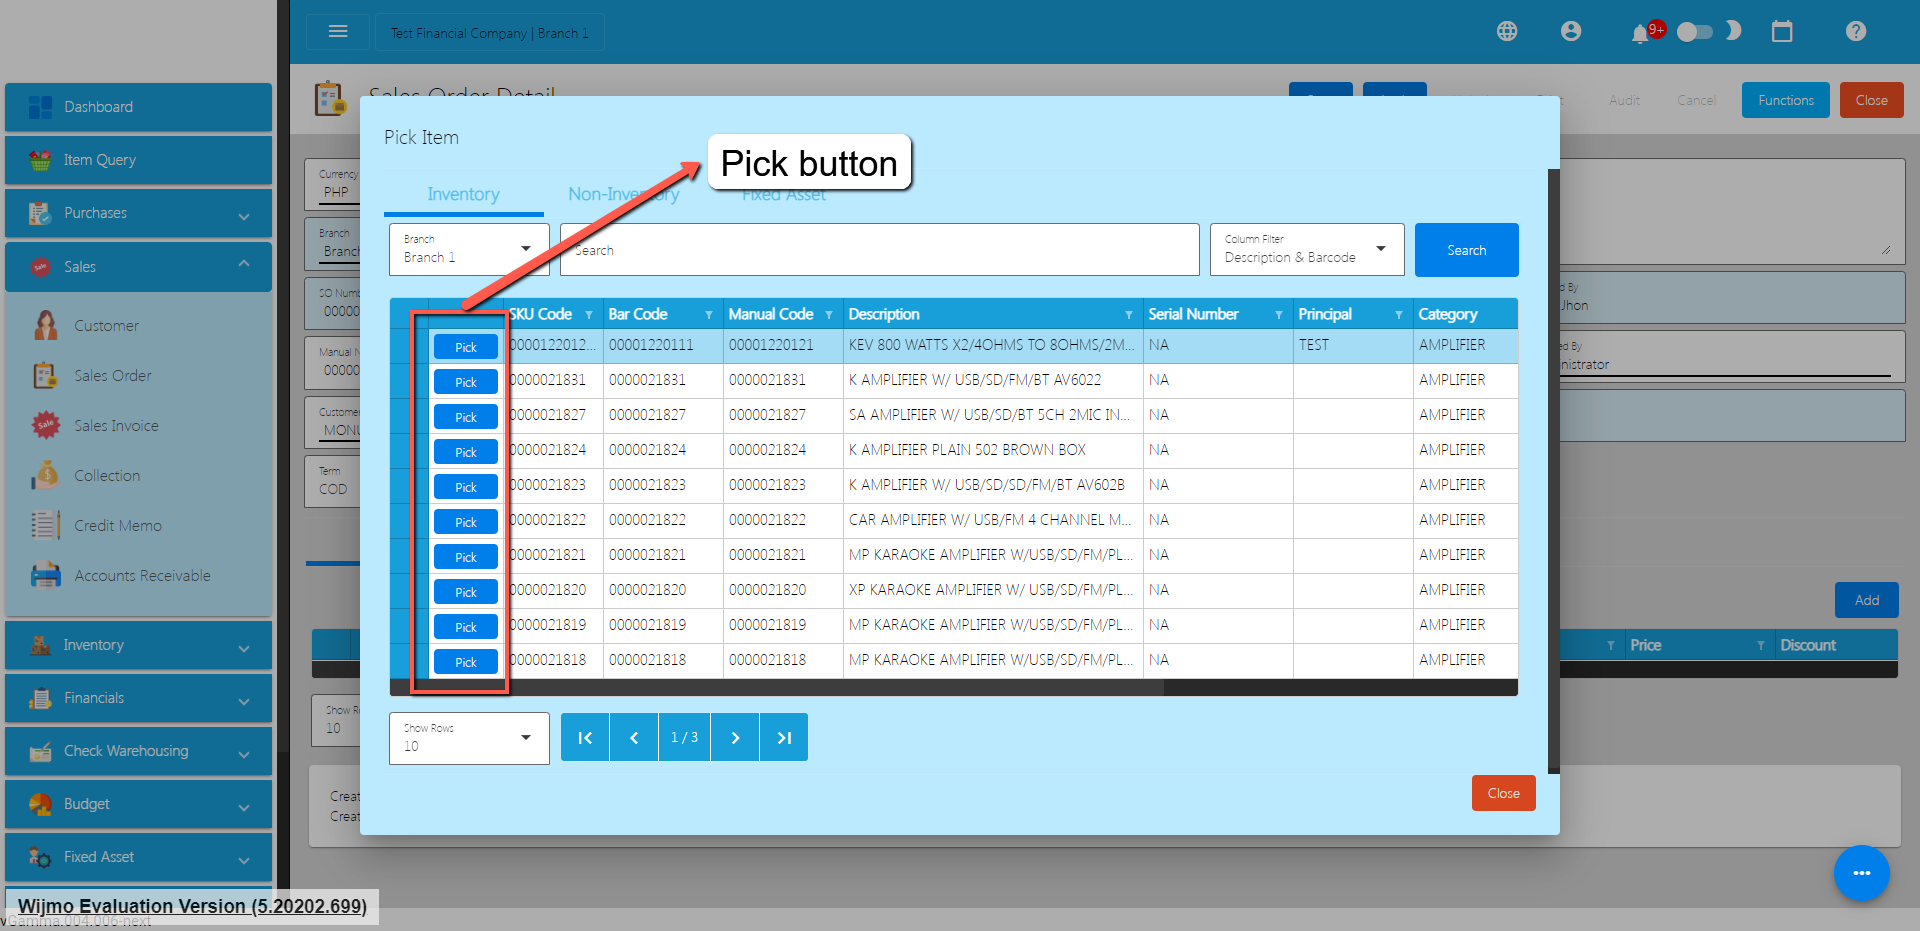
To add a Sales Order Line Item, click the Add button on the right part of the page under the Items tab.
Select the items, by clicking the Pick button.
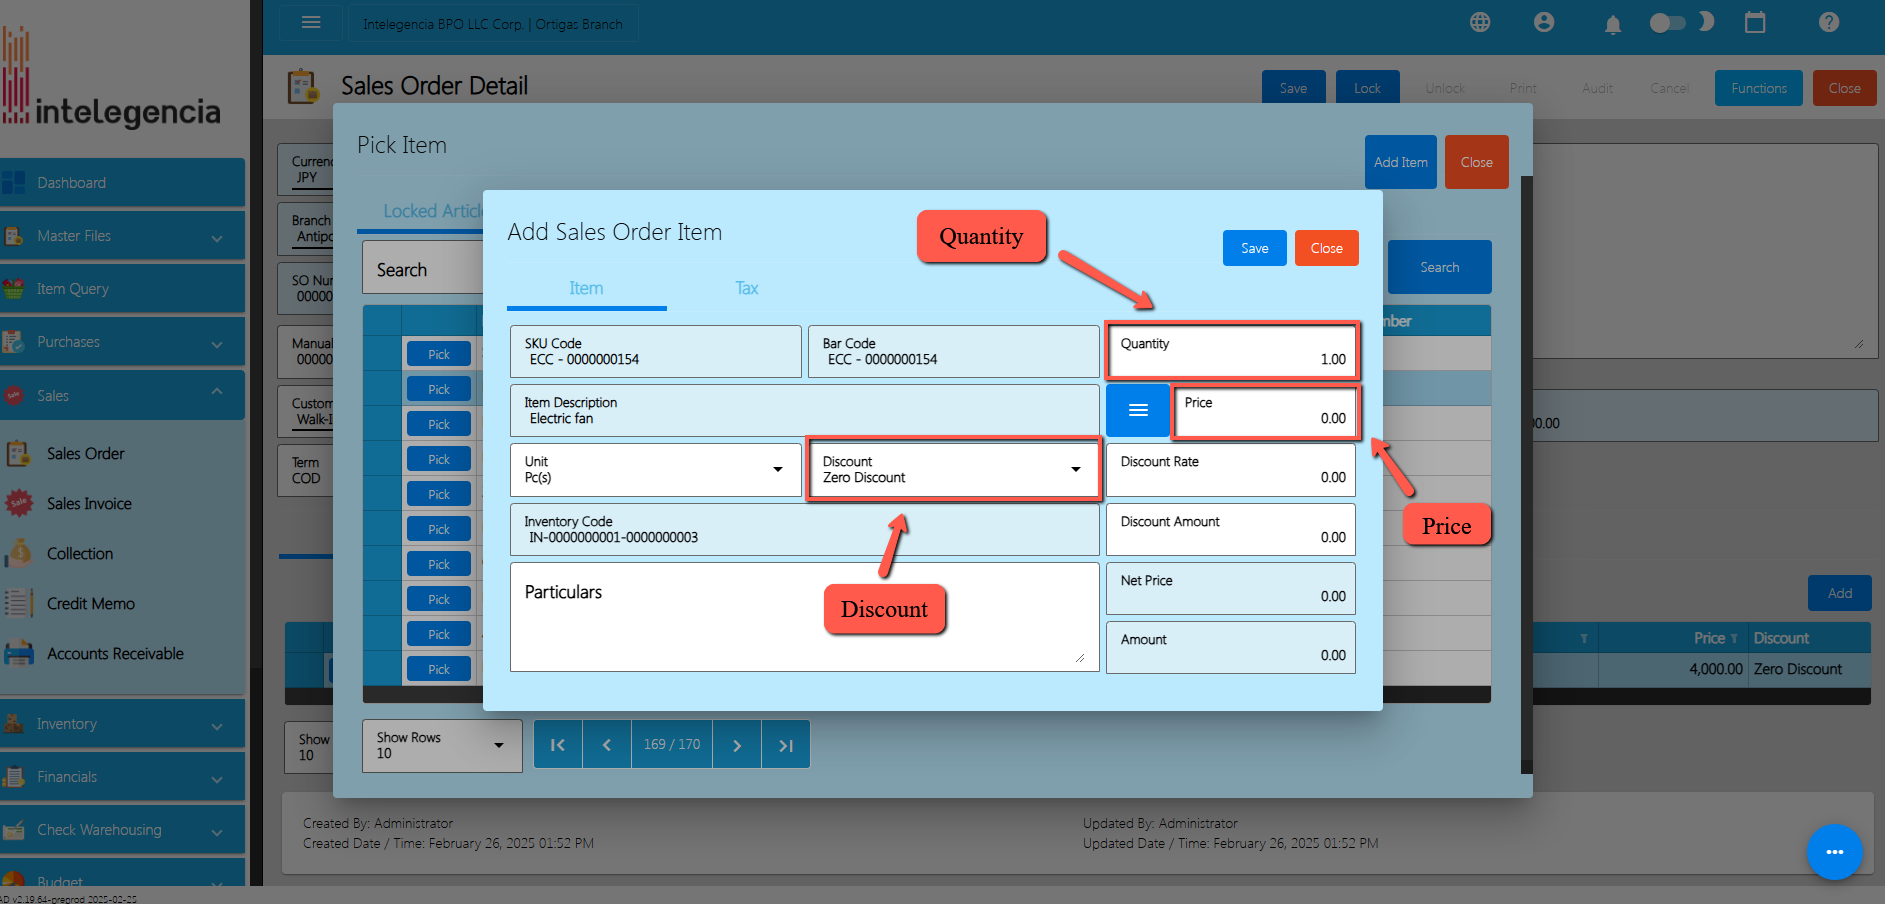
Once the Pickbutton is clicked, fill out the Quantity,Priceand Discount.
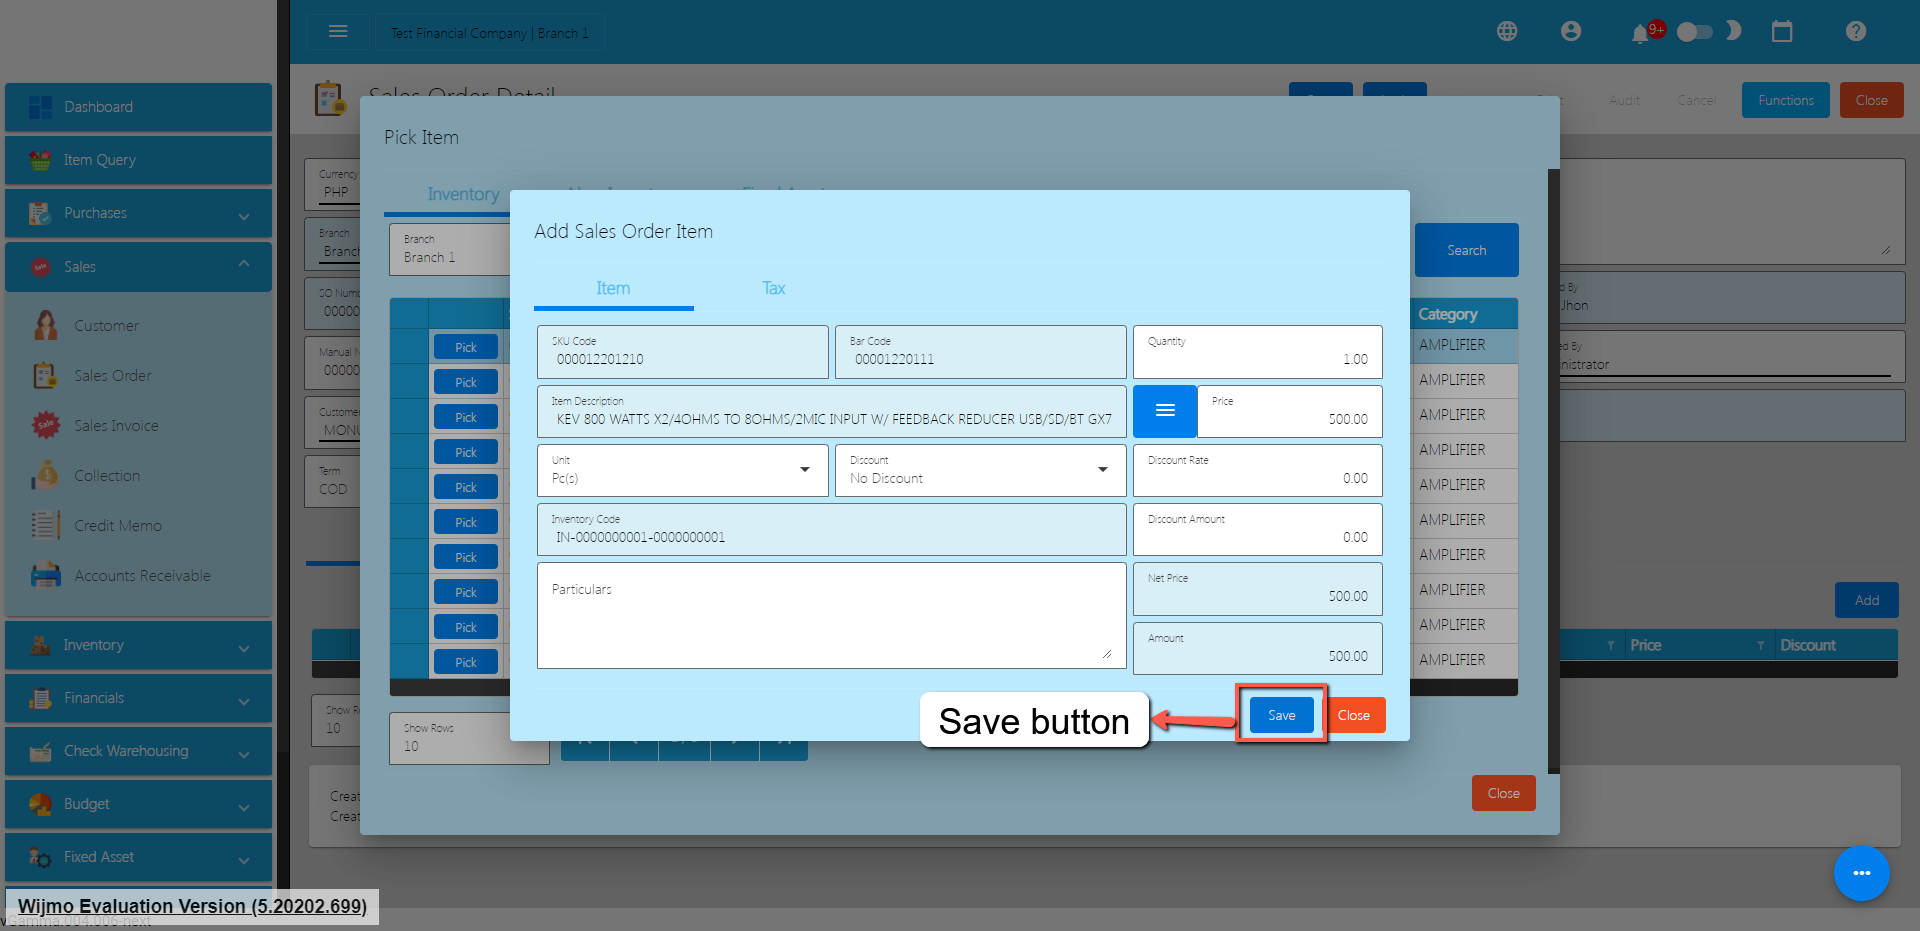
After that, click the Save button.
If you wish to add additional items, repeat Steps 4 to 6.
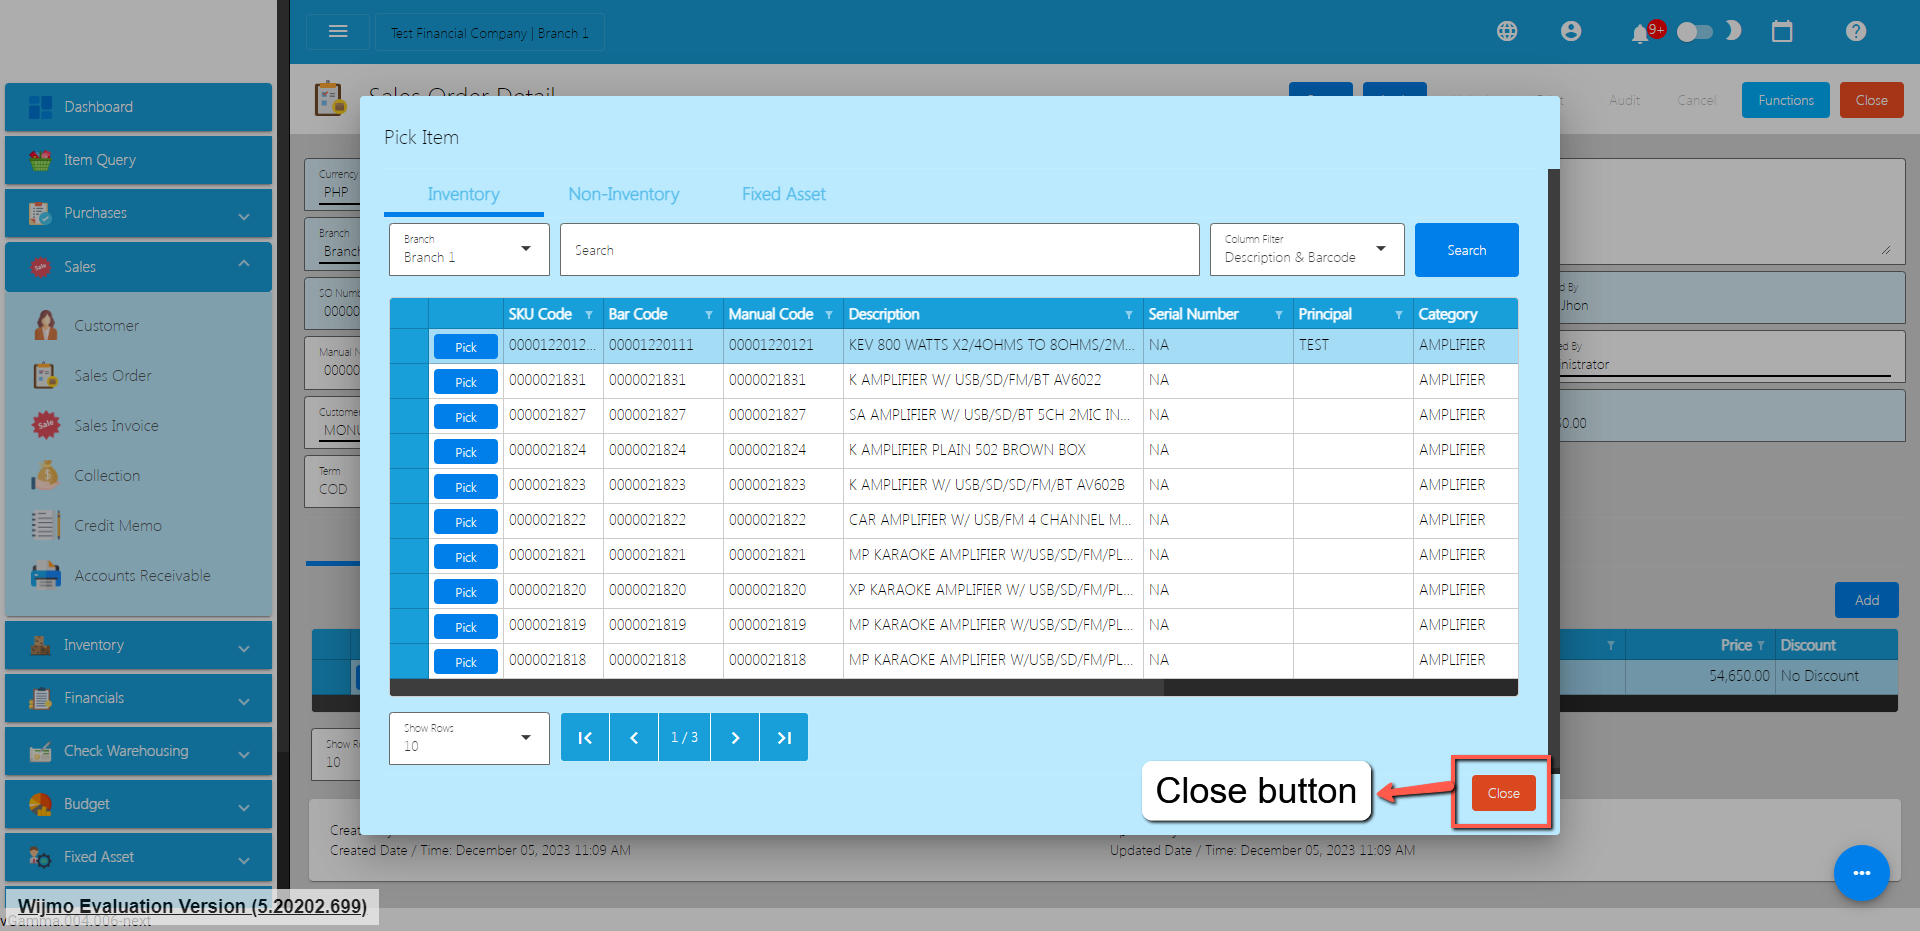
If you’re done adding line items, just click the Close button to hide the popup.
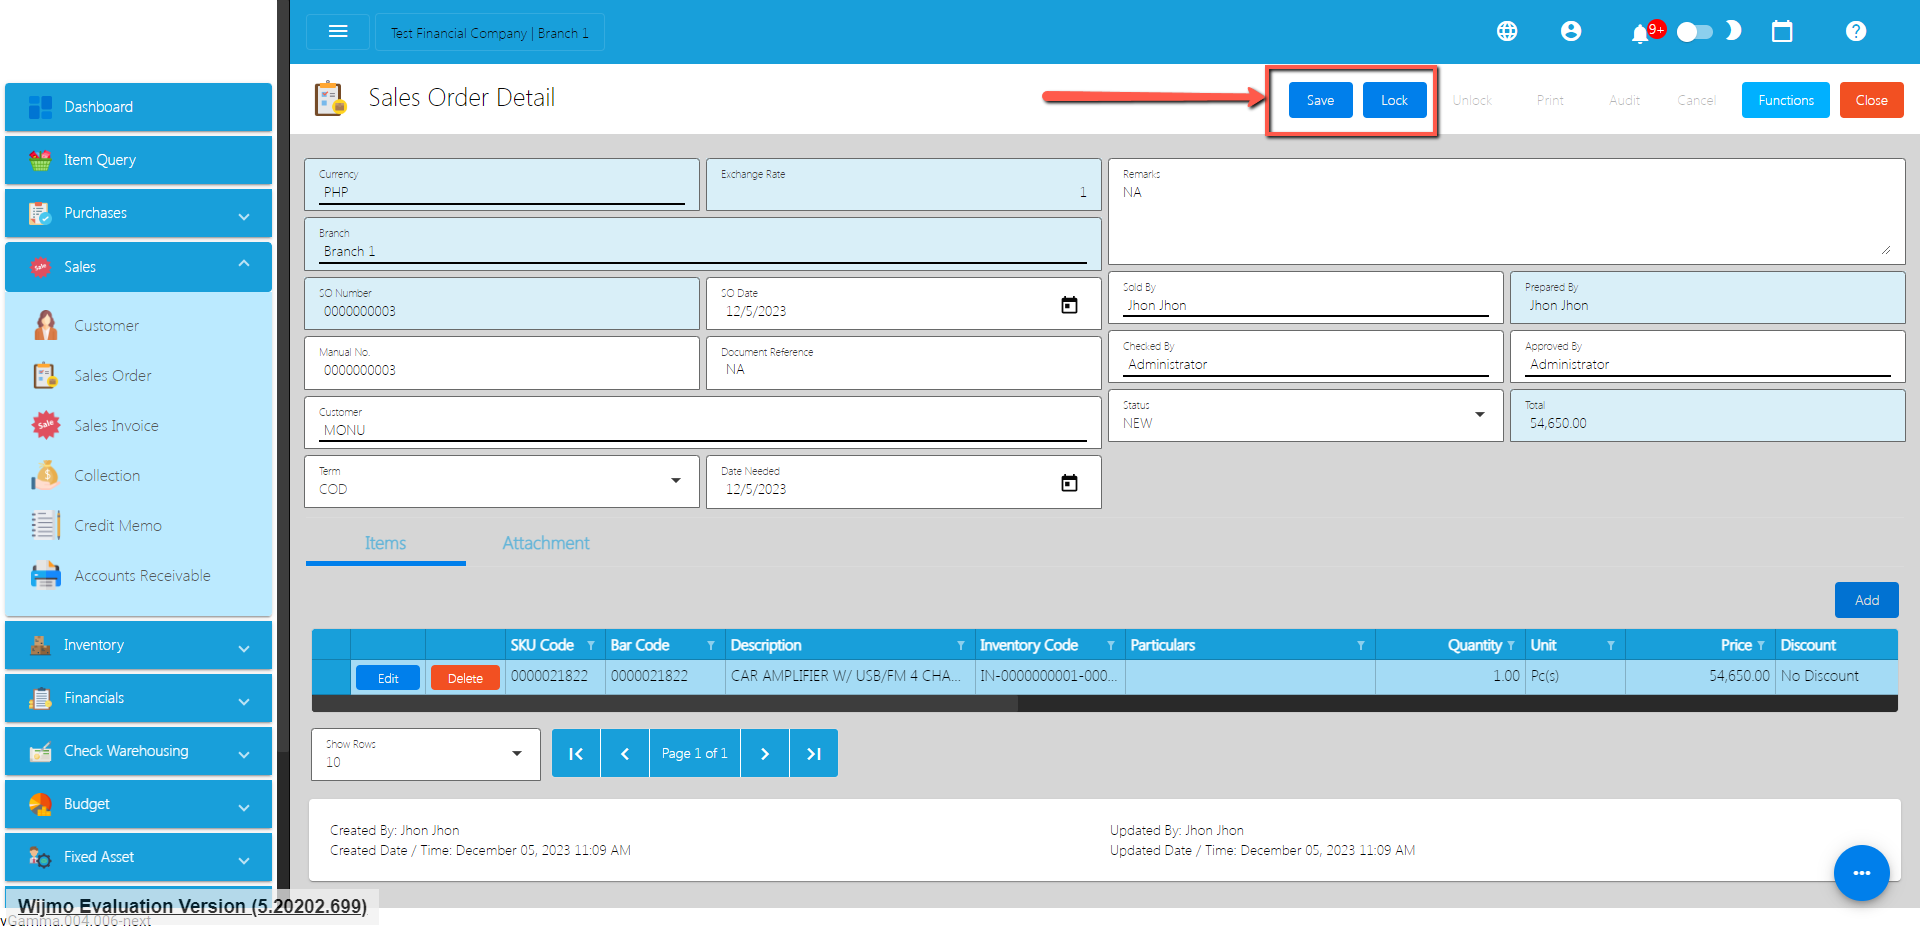
After adding Sales Order line items, simply click the Save and Lock button.
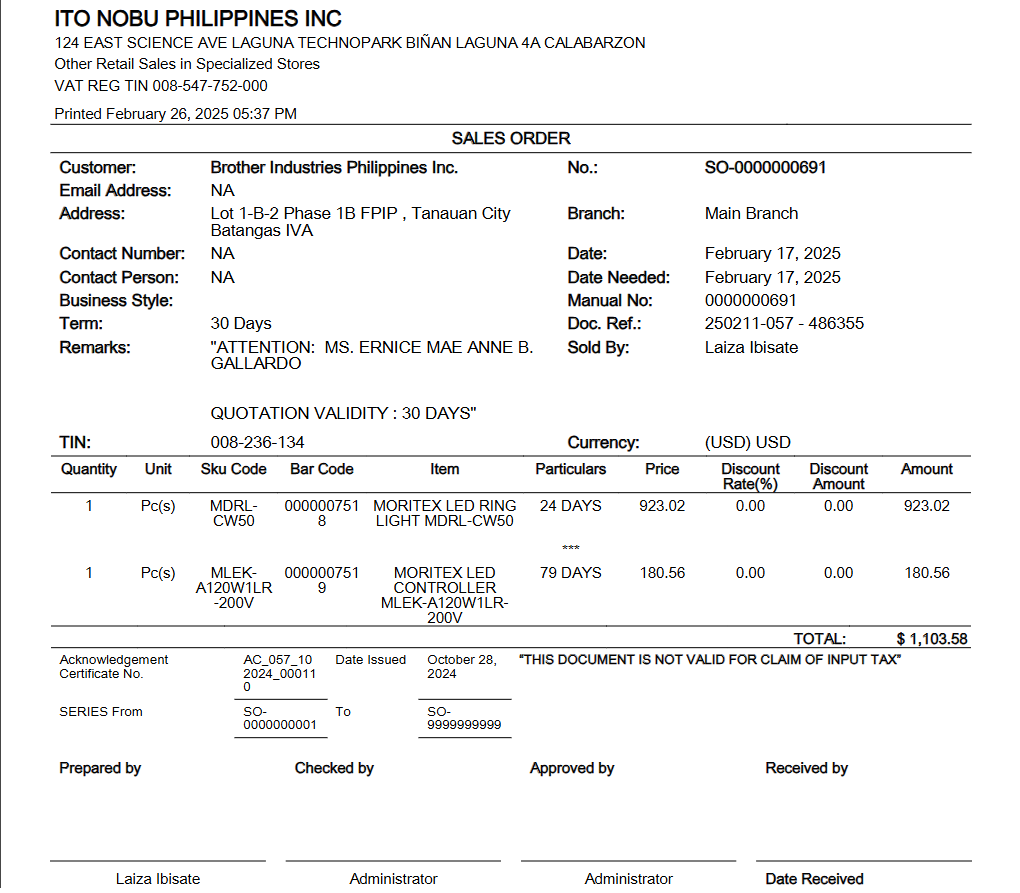
Note : To view the printout of the transaction make sure it is SAVE and LOCK. Then click the Print button.
Sales Order Transaction via Upload Template
To add a Sales Order Transaction via Upload Template, go to the Sales Order List then Click Functions.
Click Optimized Upload.
Select Download Sales Order File Format – an excel file will be downloaded. This is the file format where you will edit or encode the Items that you need to Sales Order.
3.1 In the Excel file:
Manual Codeshould be unique per transaction, alphanumeric and should not exceed 255 characters. Example: ABC0000001
– if the Manual Code starts with 000, don’t forget to put an apostrophe (‘) at the beginning of the Manual Code. Example: ‘00000111231414
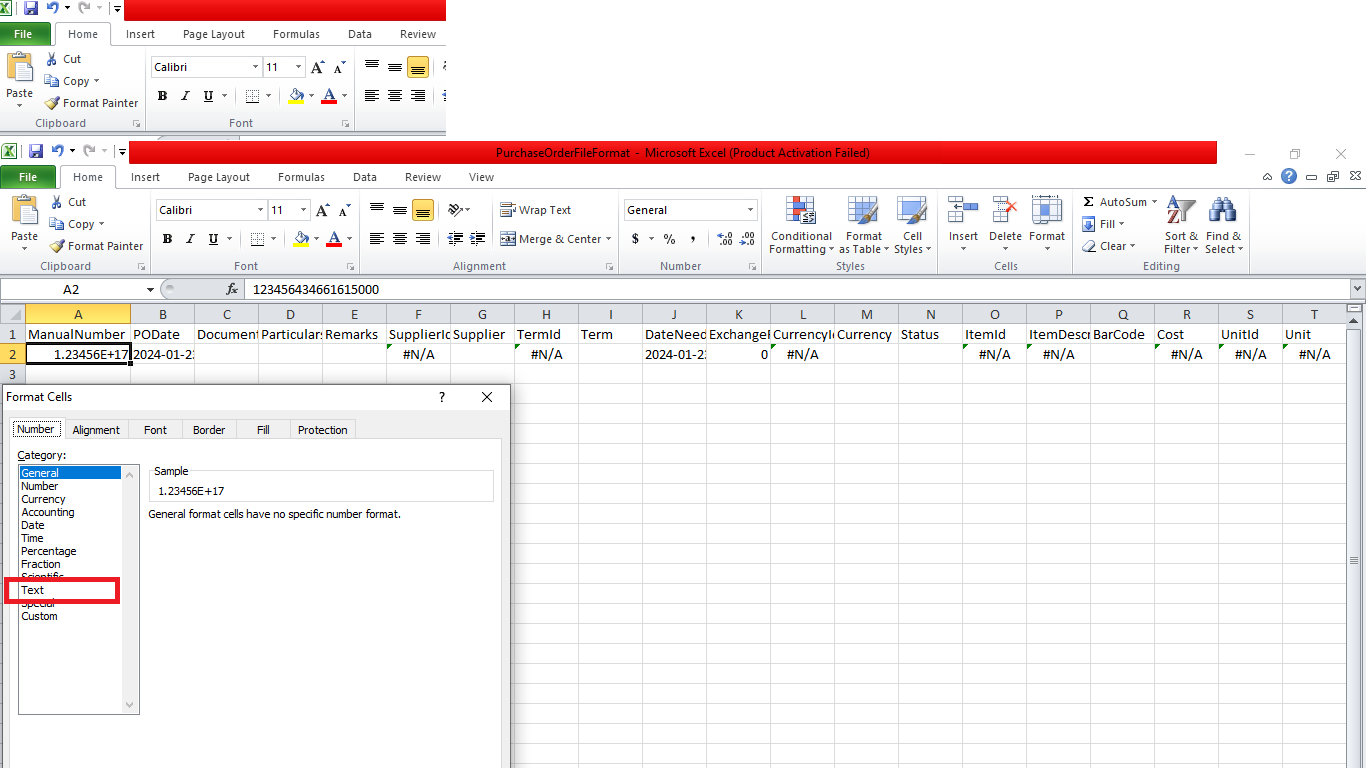
– if the Manual Code starts with a number but exceeds more than 10 digits, format the cell to Text to show all the numbers.
Steps on how to change the format to Text:
Right Click the Cell
Click Format Cell
3. Choose Text
4. Click OK
5. Then reselect the field
SO Date and Date Needed – SO Date is the date of SO or when it was created. Date Needed it can be after or on the date of the SO date, the format of the SO Date and Date Needed should be (yyyyy-mm-dd)
Document Referenceshould be unique per transaction, alphanumeric and should not exceed 255 characters. Example: ABC0000001
– if the Document Reference starts with 000, don’t forget to put an apostrophe (‘) at the beginning of the Manual Code. Example: ‘00000111231414
– if the Document Reference starts with a number but exceeds more than 10 digits, format the cell to Text to show all the numbers.
Steps on how to change the format to Text:
1. Right Click the Cell
2. Click Format Cell
3. Choose Text
4. Click OK
5. Then reselect the field
Particulars – in this column this is basically the remarks for each item line, it should be alphanumeric and should not exceed 255 characters.
Remarks – in this column is basically the remarks for the whole transaction, it should be alphanumeric and should not exceed 255 characters.
Customer and CustomerID – Select Customer from the dropdown and choose the Customer, CustomerIDwill correspond to the selected Customer. Never edit the CustomerIDsince it will automatically change after selecting the Customer.
Term and TermID – Select term from the dropdown and choose the term, TermID will correspond to the selected Term. Never edit the termID since it will automatically change after selecting the Term.
Currency and CurrencyID – Select the Currency from the dropdown and choose the correct Currency, CurrencyID will correspond to the selected currency. Never edit the CurrencyID since it will automatically change after selecting the currency.
Exchange Rate – exchange rate is the rate that is used to convert the currency.
Status – Status is the status of the transaction, just select the status from the dropdown.
ItemID, Item Description, Price, UnitID and Unit – all these fields are related to the Item. Once the barcode is selected all these fields will also change depending on the barcode that was selected.
Quantity – Input the quantity that is needed for the Sales Order
Discount and DiscountID – Select the Discount from the dropdown and choose the correct Discount, DiscountID will correspond to the selected Discount. Never edit the DiscountID since it will automatically change after selecting the Discount.
Amount – the amount will automatically calculate based on the selected Discount, Price and Quantity.
VAT and VATId – Select the VAT from the dropdown and choose the correct VAT, VATId will correspond to the selected WTAX. Never edit the VATId since it will automatically change after selecting the VAT.
WTAX and WTAXId – Select the WTAX from the dropdown and choose the correct WTAX, WTAXId will correspond to the selected WTAX. Never edit the WTAXId since it will automatically change after selecting the WTAX.
Cancel Sales Order Transaction
When you need to cancel a Sales Order, it’s important to follow these simple steps:
Log In: Visit your easyFS domain and login with your username and password.
Find your Sales Order: Navigate to the Sales, then Sales Order. You will be redirected to the Sales Order lists.
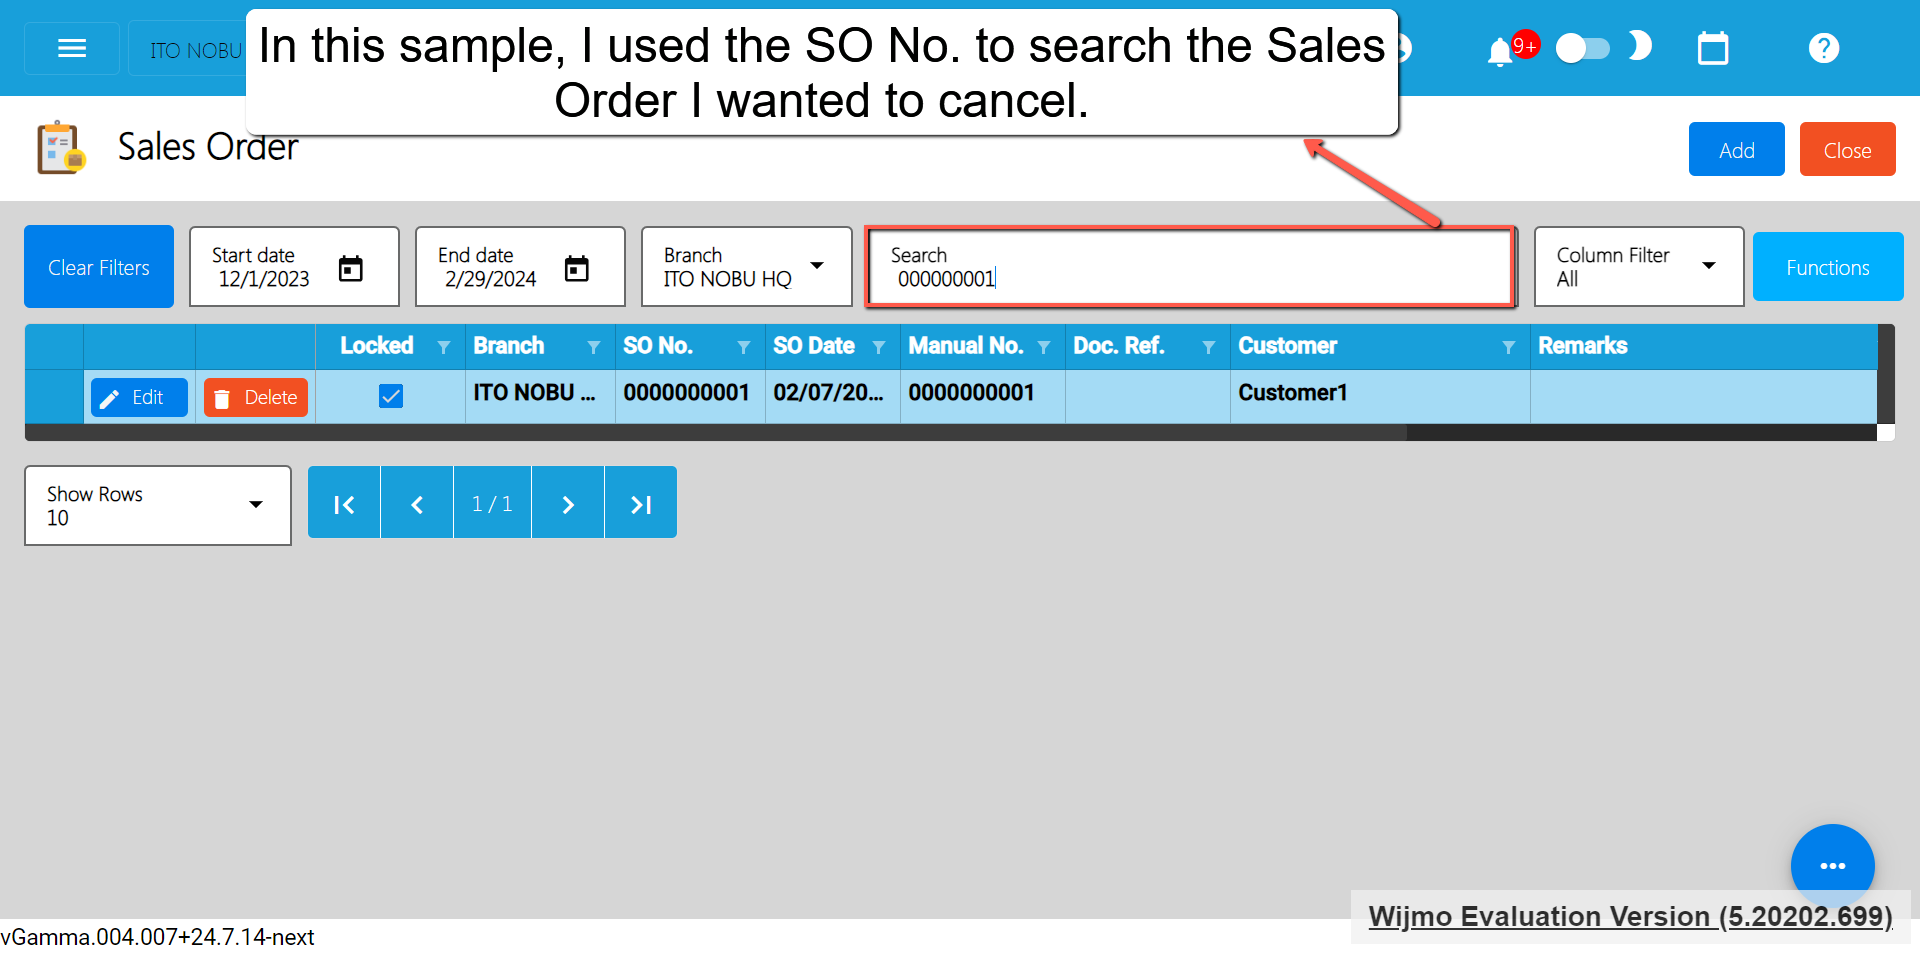
Locate the Right One: From the Sales Order list, you may use the search bar to look for the right Sales Order you want to cancel. You can search using the Sales Order’s SONUmber, Manual Number, Document Reference, etc.
Take note: Don’t forget to change the Start Date and End Date to your Sales Order’s transaction date to display the correct result.
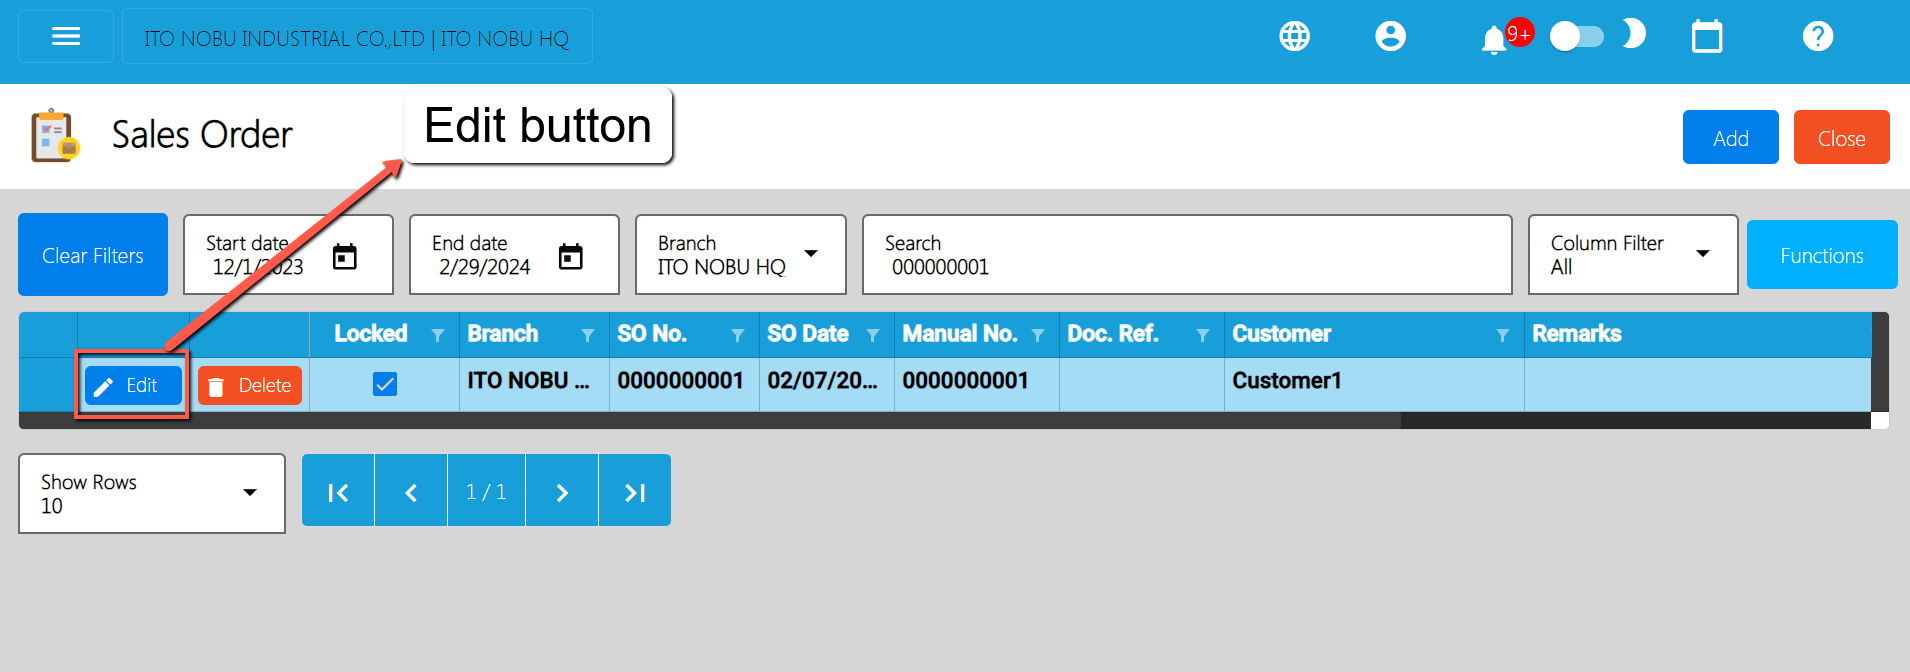
Open the Sales OrderDetail: Click the Edit button to open the Sales Order detail page.
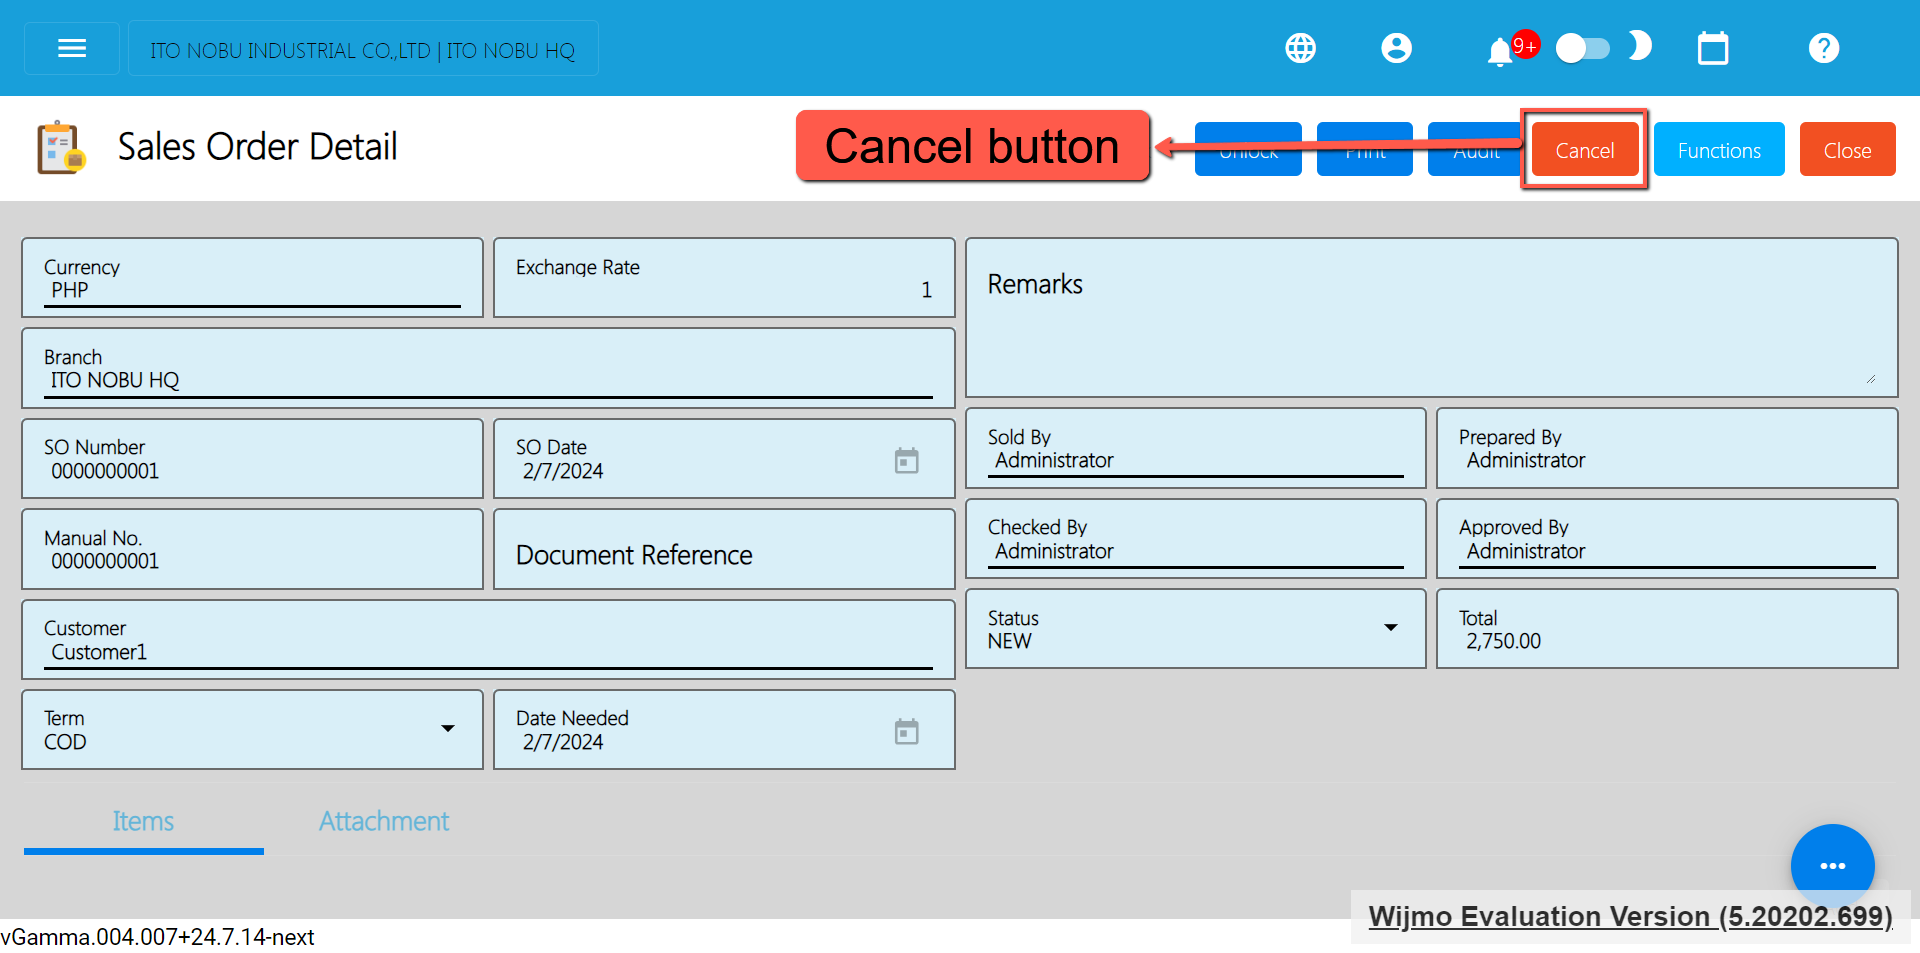
Cancel the Sales Order: To cancel your Sales Order transaction, look for the Cancel button found on the upper-right part of the page, then click.
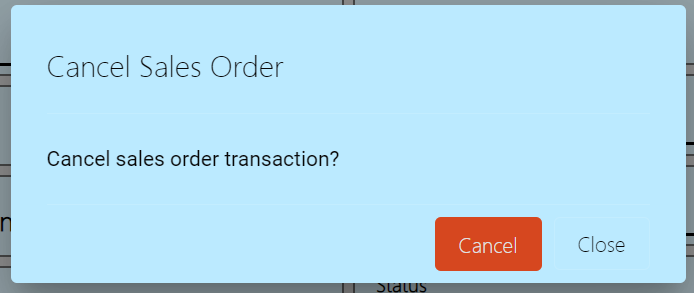
Confirm Canceling: After you click the Cancel button, there’s a Cancel Sales Order window. If you’re sure you want to cancel your Sales Order transaction, click the Cancel button.
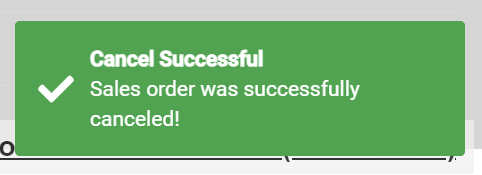
Check It’s Done: After canceling, make sure you get a success toast message confirming it’s canceled successfully. It is found on the bottom right of the page.
Let Others Know(if needed): If you believe canceling affects other people, it’s a good idea to inform them.
Keep Track: Remember to make a note somewhere that you canceled the Sales Order, just in case it is needed later.
5.3.2 Sales Invoice
Overview
Once the Customer responds/says that the Sales Order is all good, we can now proceed to creating a Sales Invoice.
Sales Invoice List
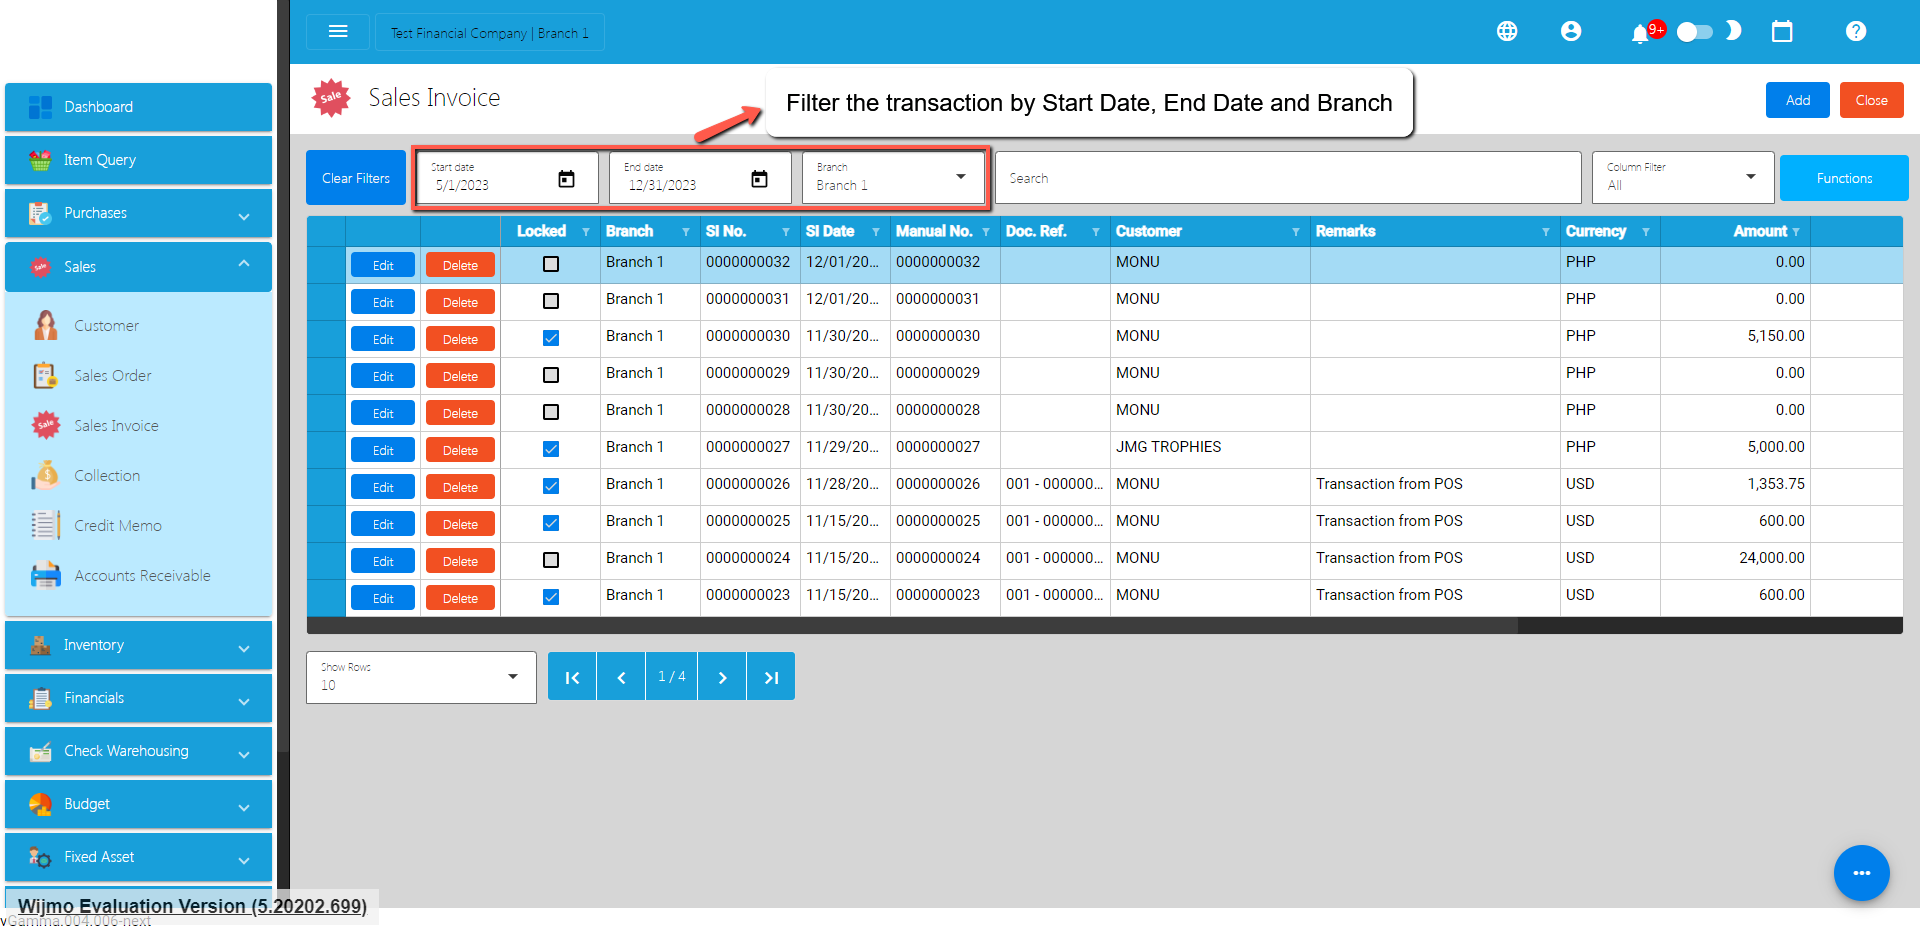
List of all the SI(Sales Invoice) and will also show the overview of the transaction.
You can filter the data to be displayed by providing the following:
Start Date
End Date
Branch
Also, you can search data by providing a value on the Search Bar and select the Column Filter on where to search the data.
Sales Invoice Detail
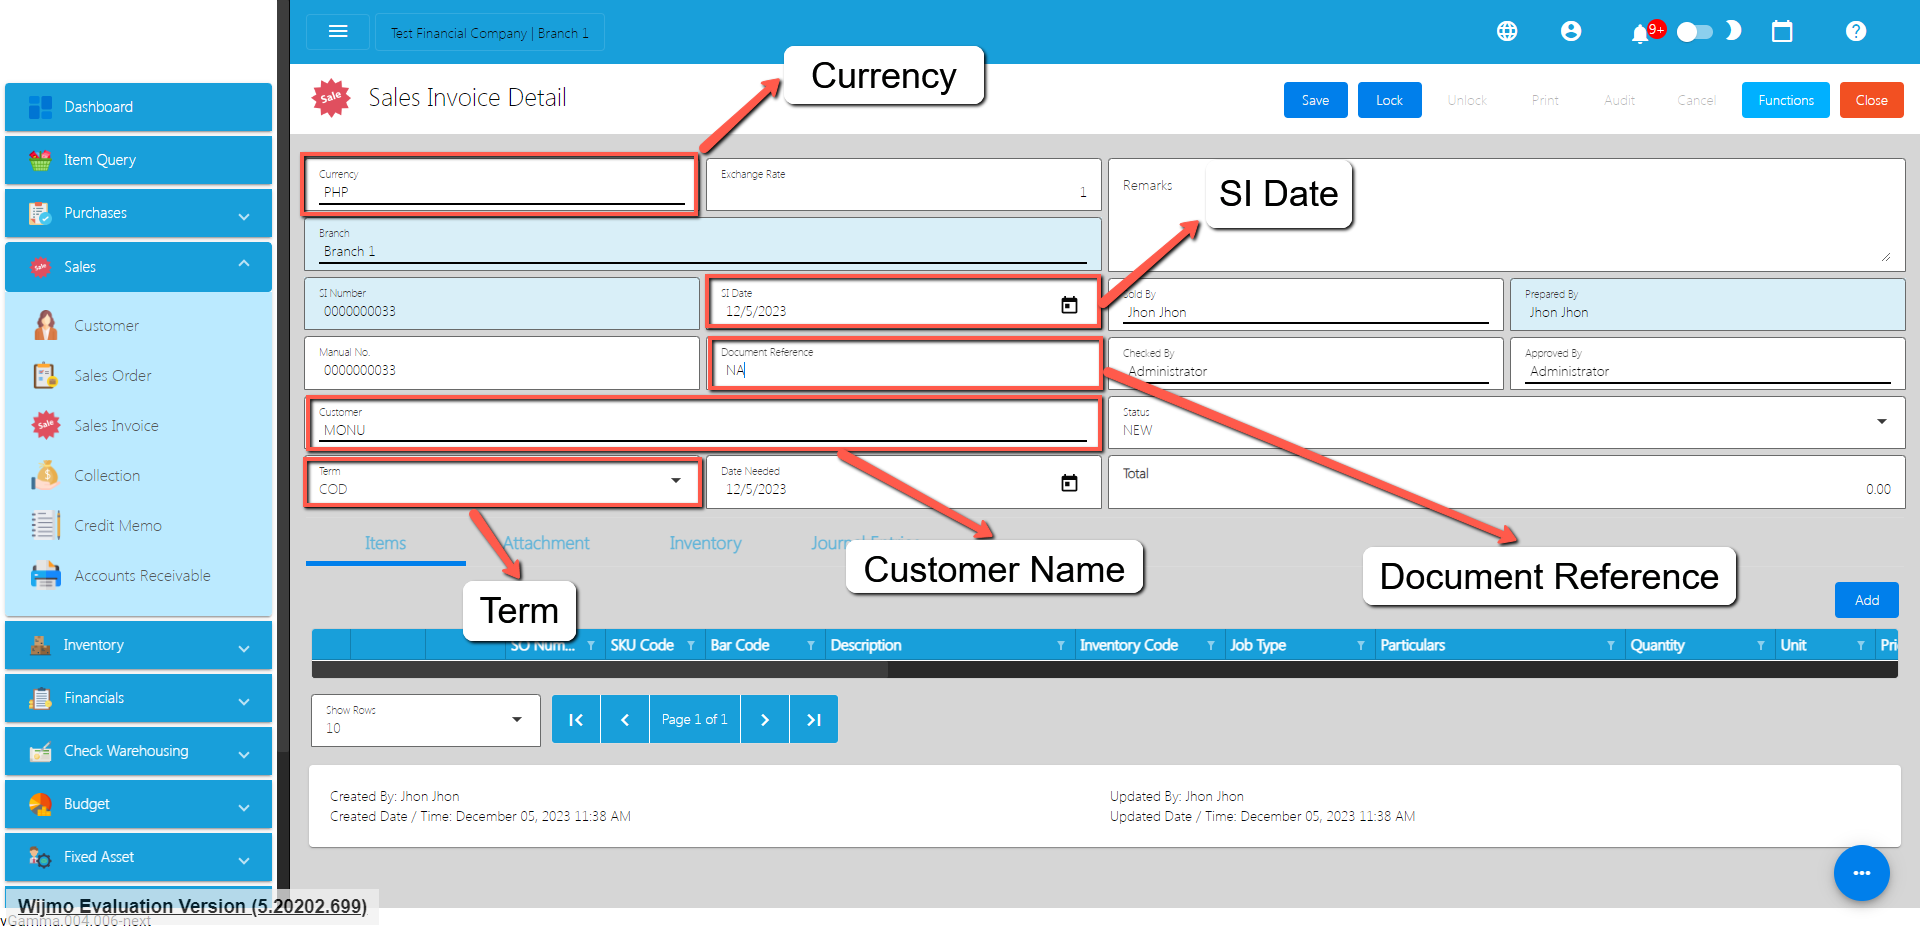
To add a new Sales Invoice, go to Sales then click Sales Invoice. After that, click the Add button that can be seen in the Sales Invoice list.
Fill out all the needed information for the Sales Invoice Detail like,
Currency
Customer Name
SI Date
Term
Document Reference
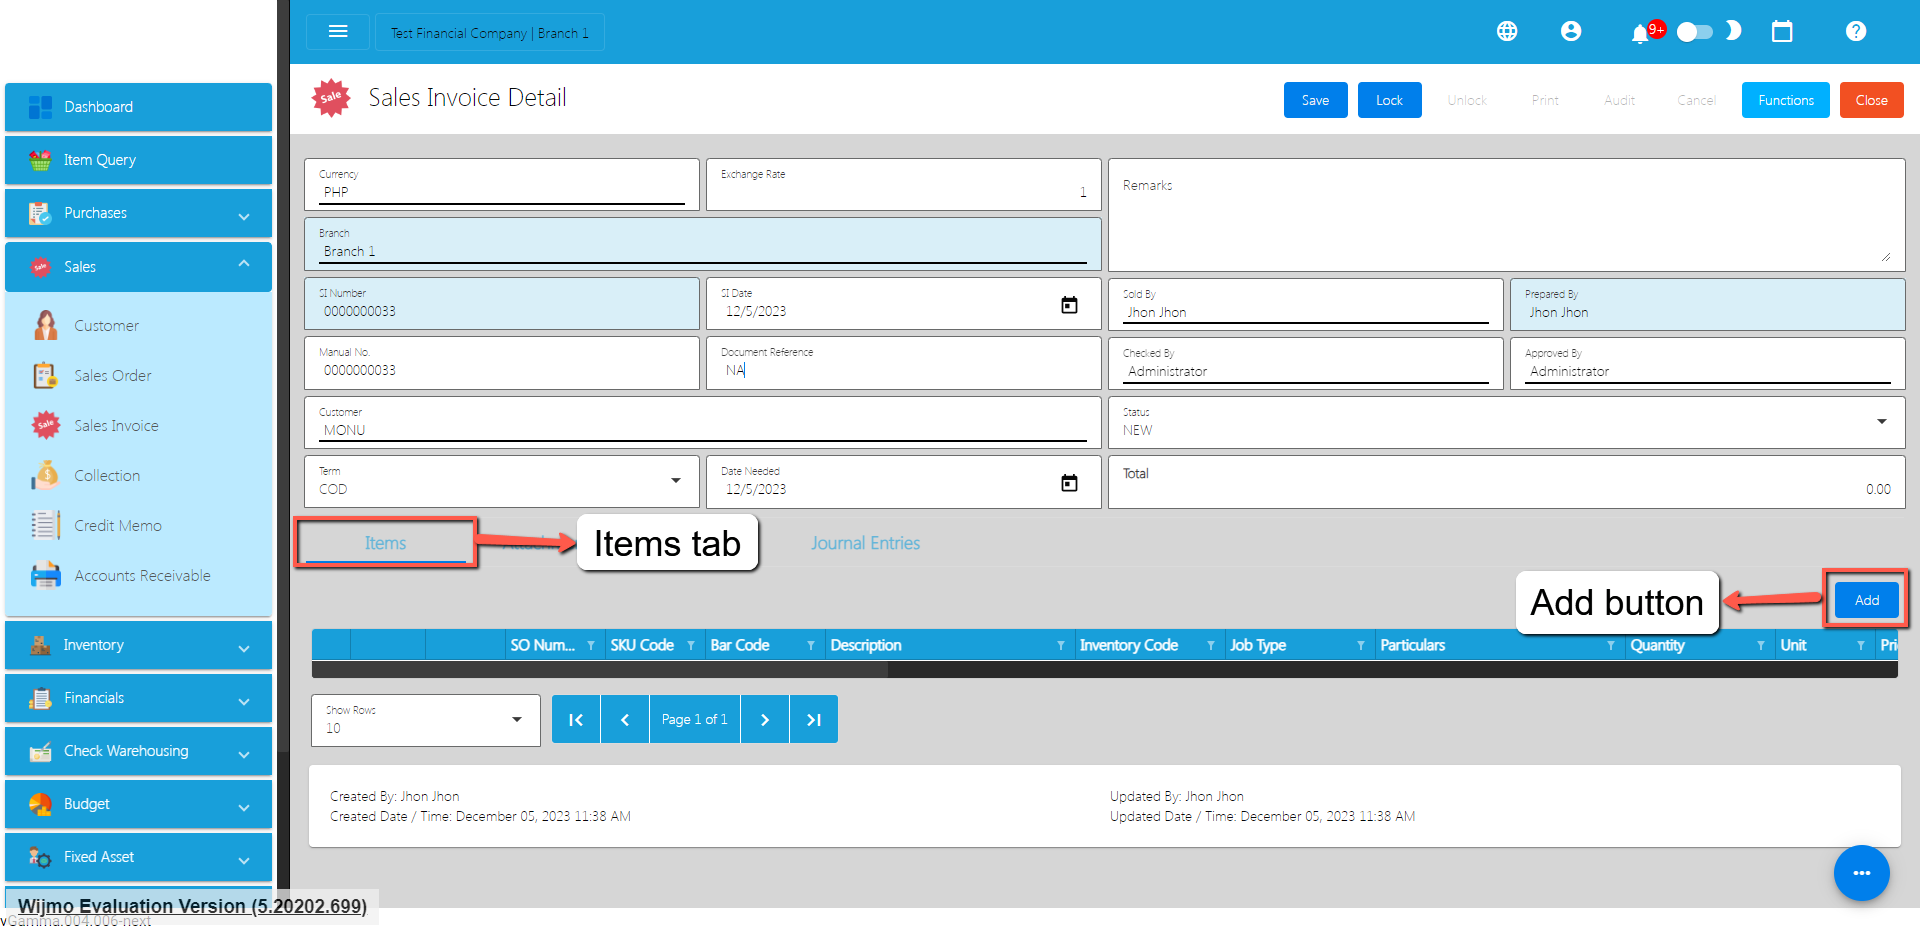
To add a Sales Invoice Line Item, click the Add button on the right part of the page under Items tab.
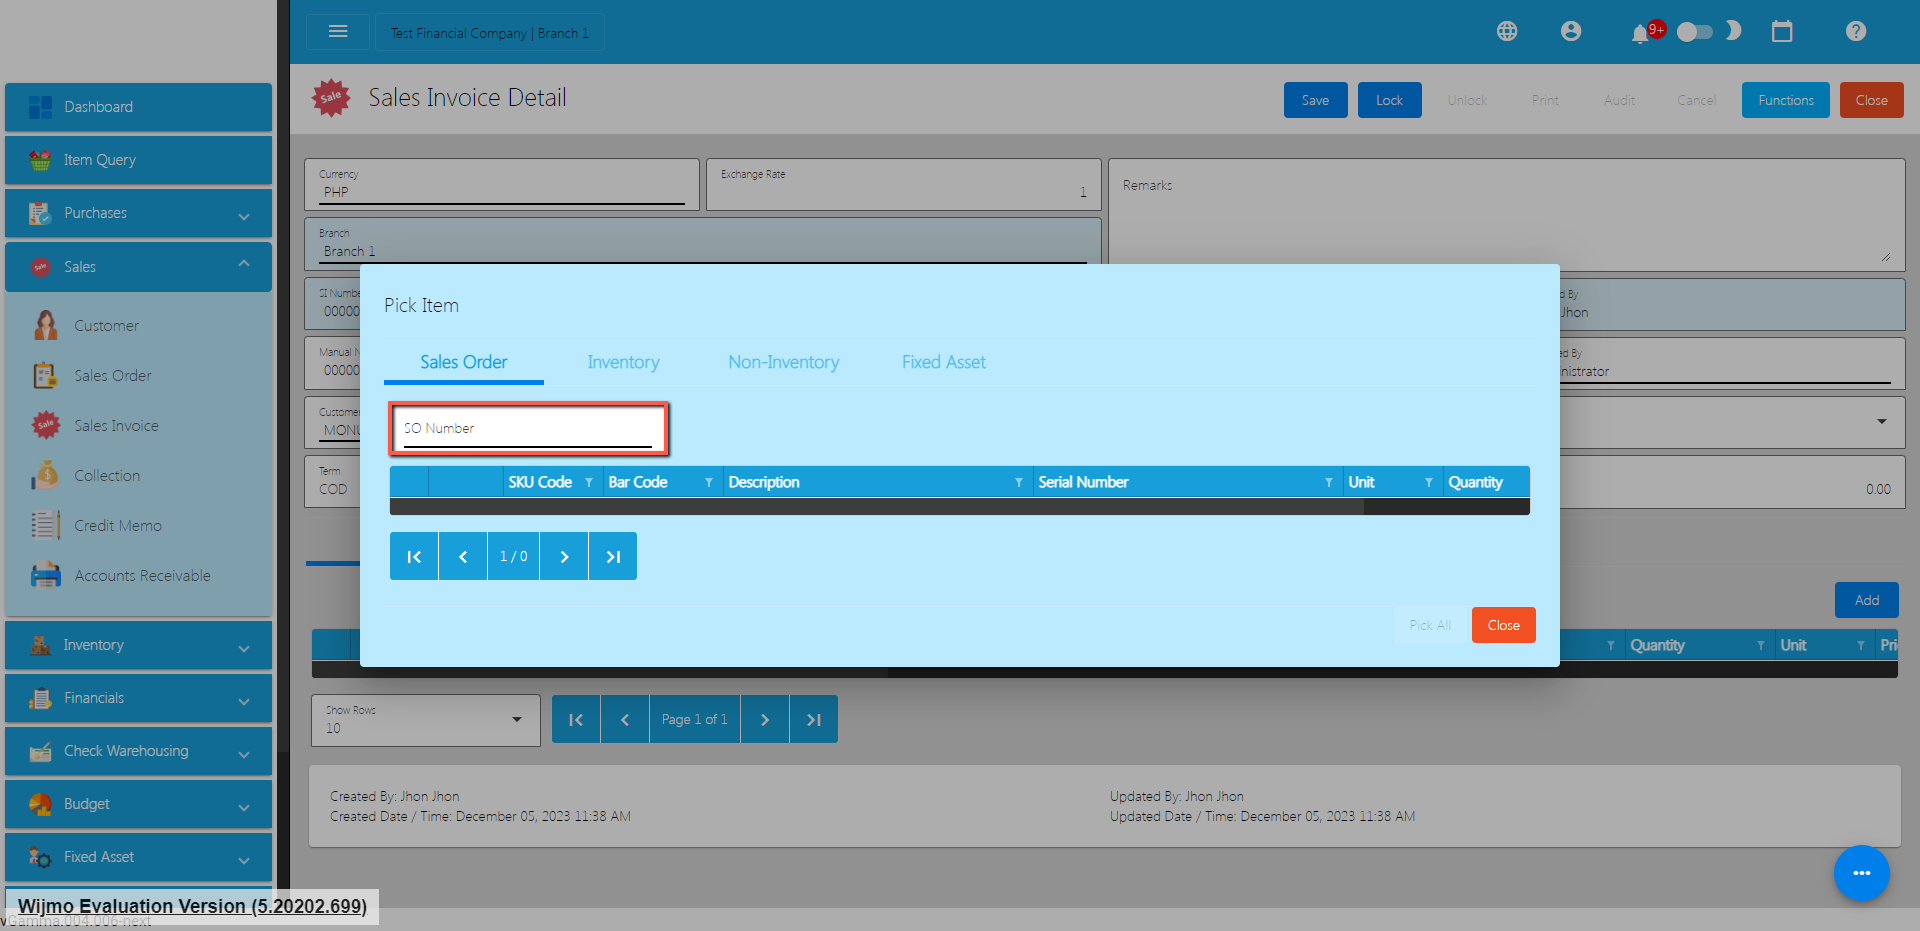
If you already have a Sales Order for the Sales Invoice, select the Sales Order by clicking on the SO Number.
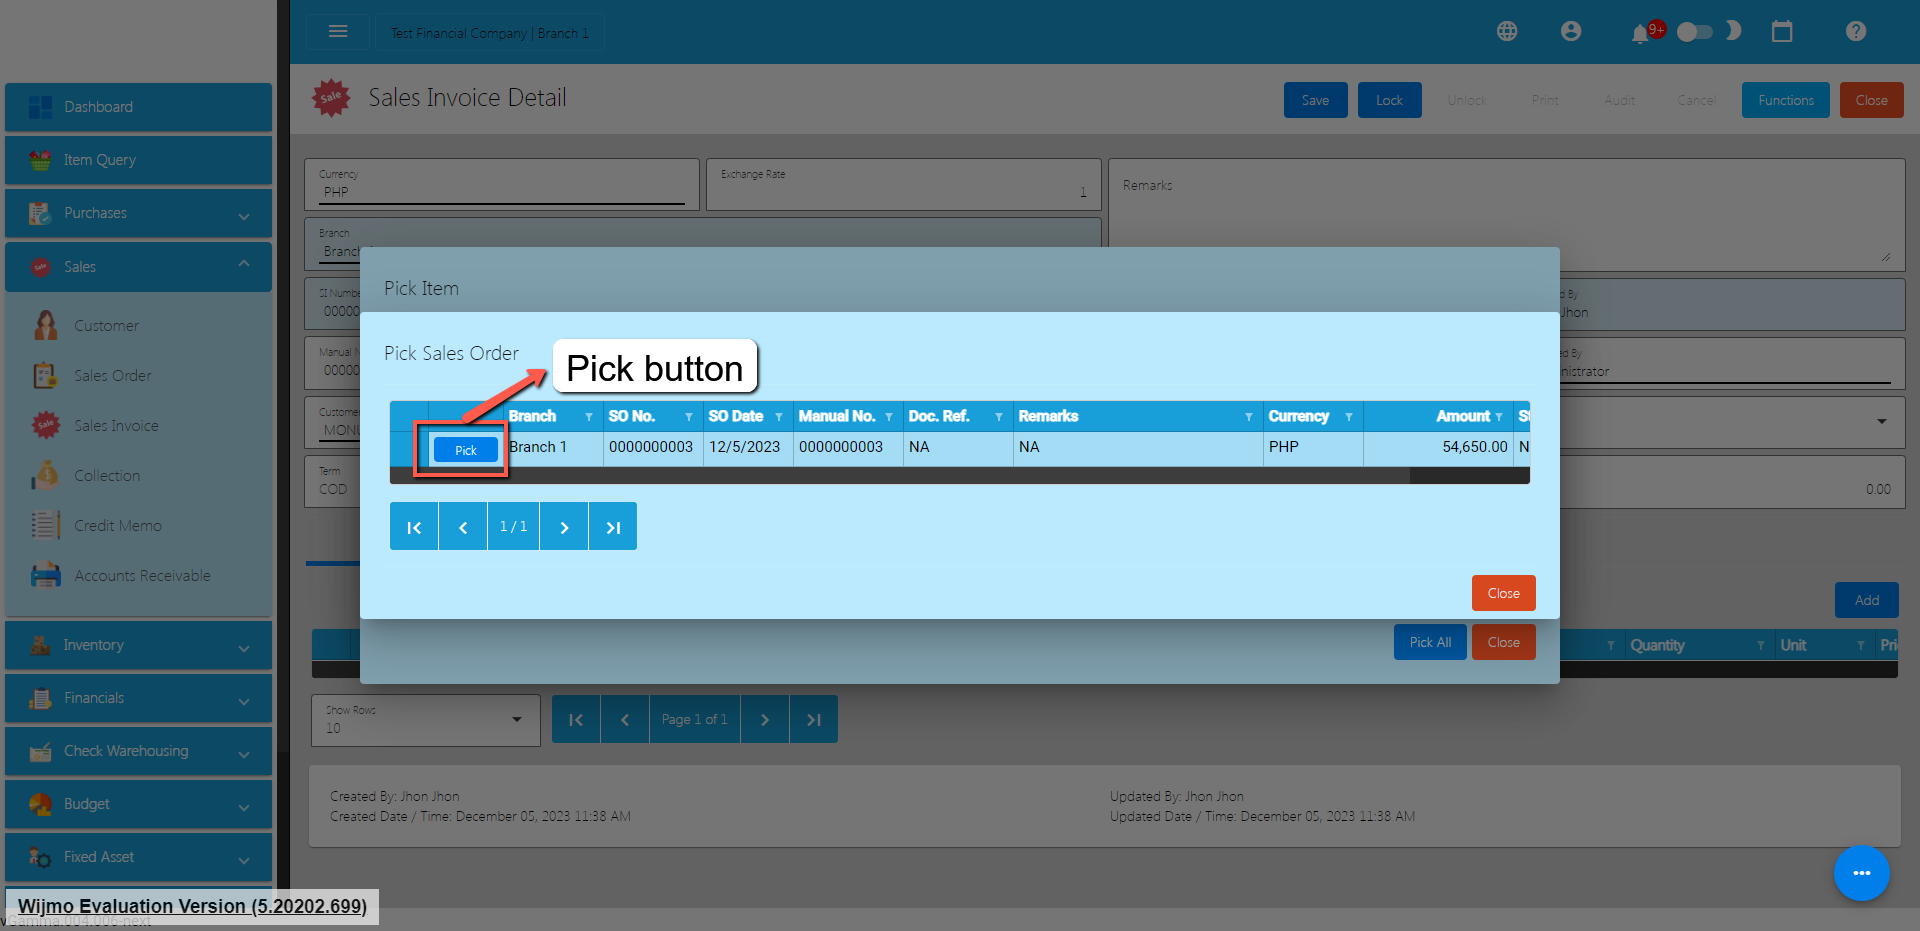
Once clicked, it will pop up all the Sales Order line items. Click the Pick button.
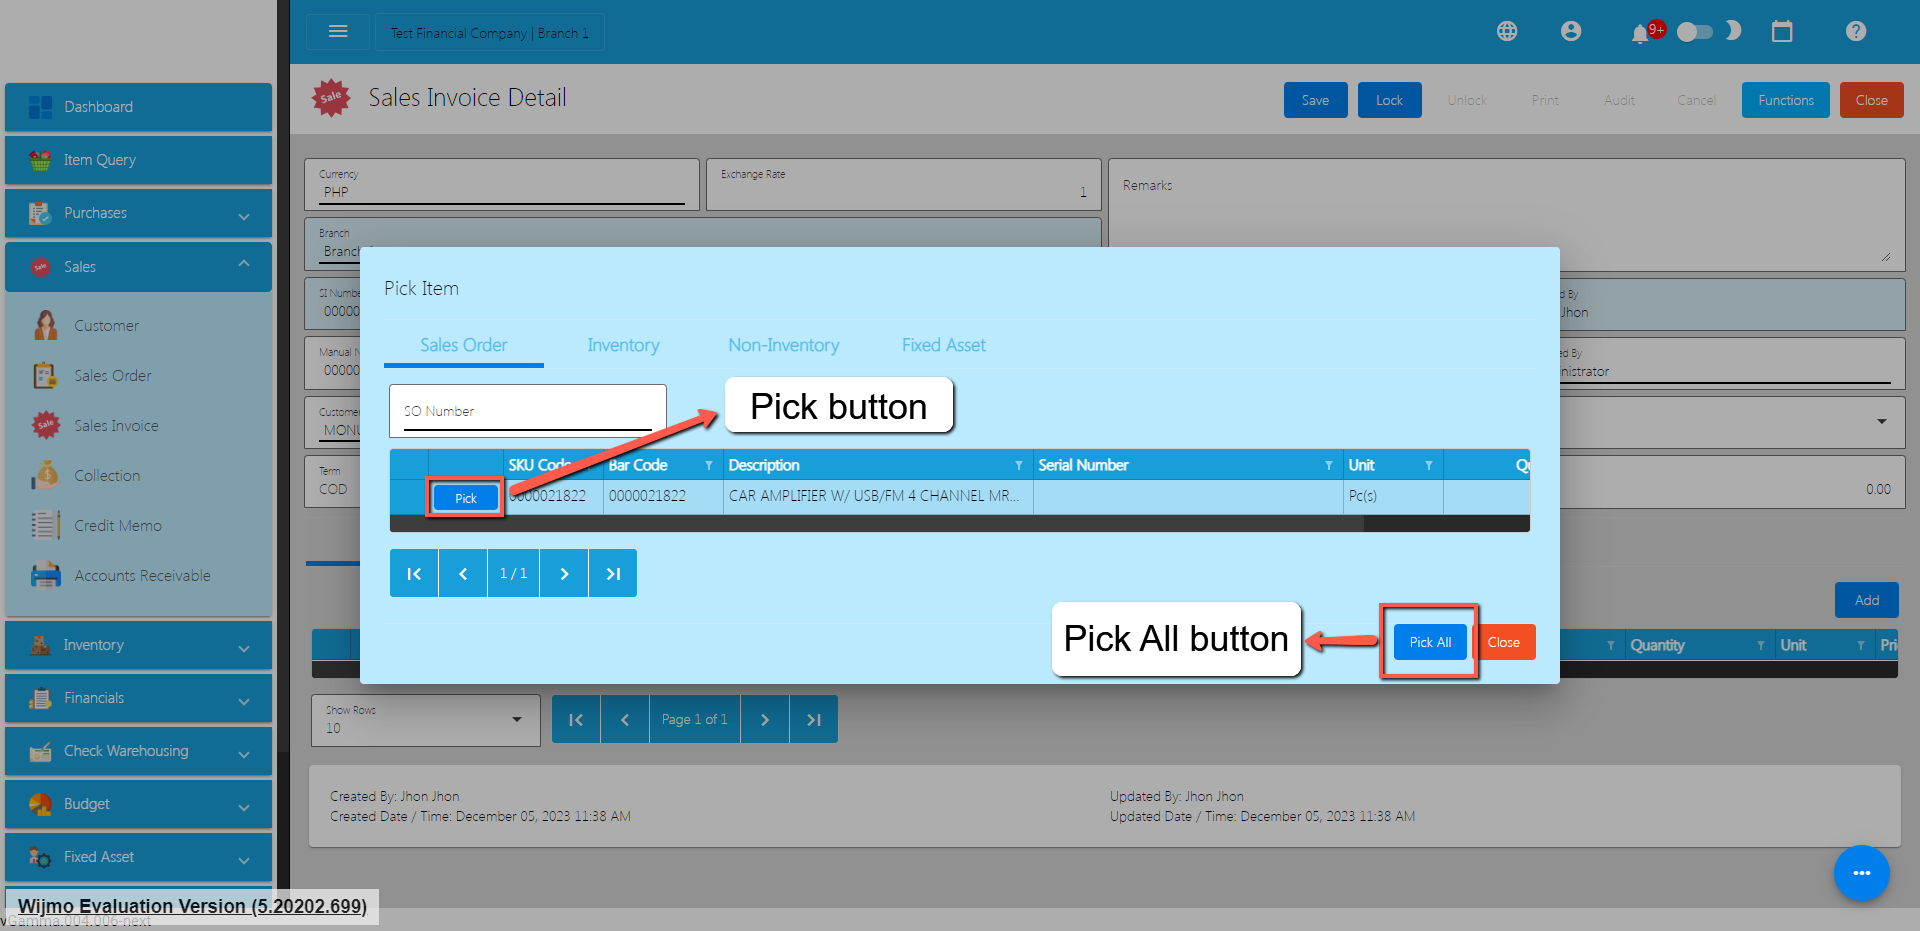
There are two ways to add the Sales Order’s line items to the Sales Invoice line items: (1) Click the Pick All button to automatically add the SO line items to the Sales Invoice line items; (2) You need to click the Pick button.
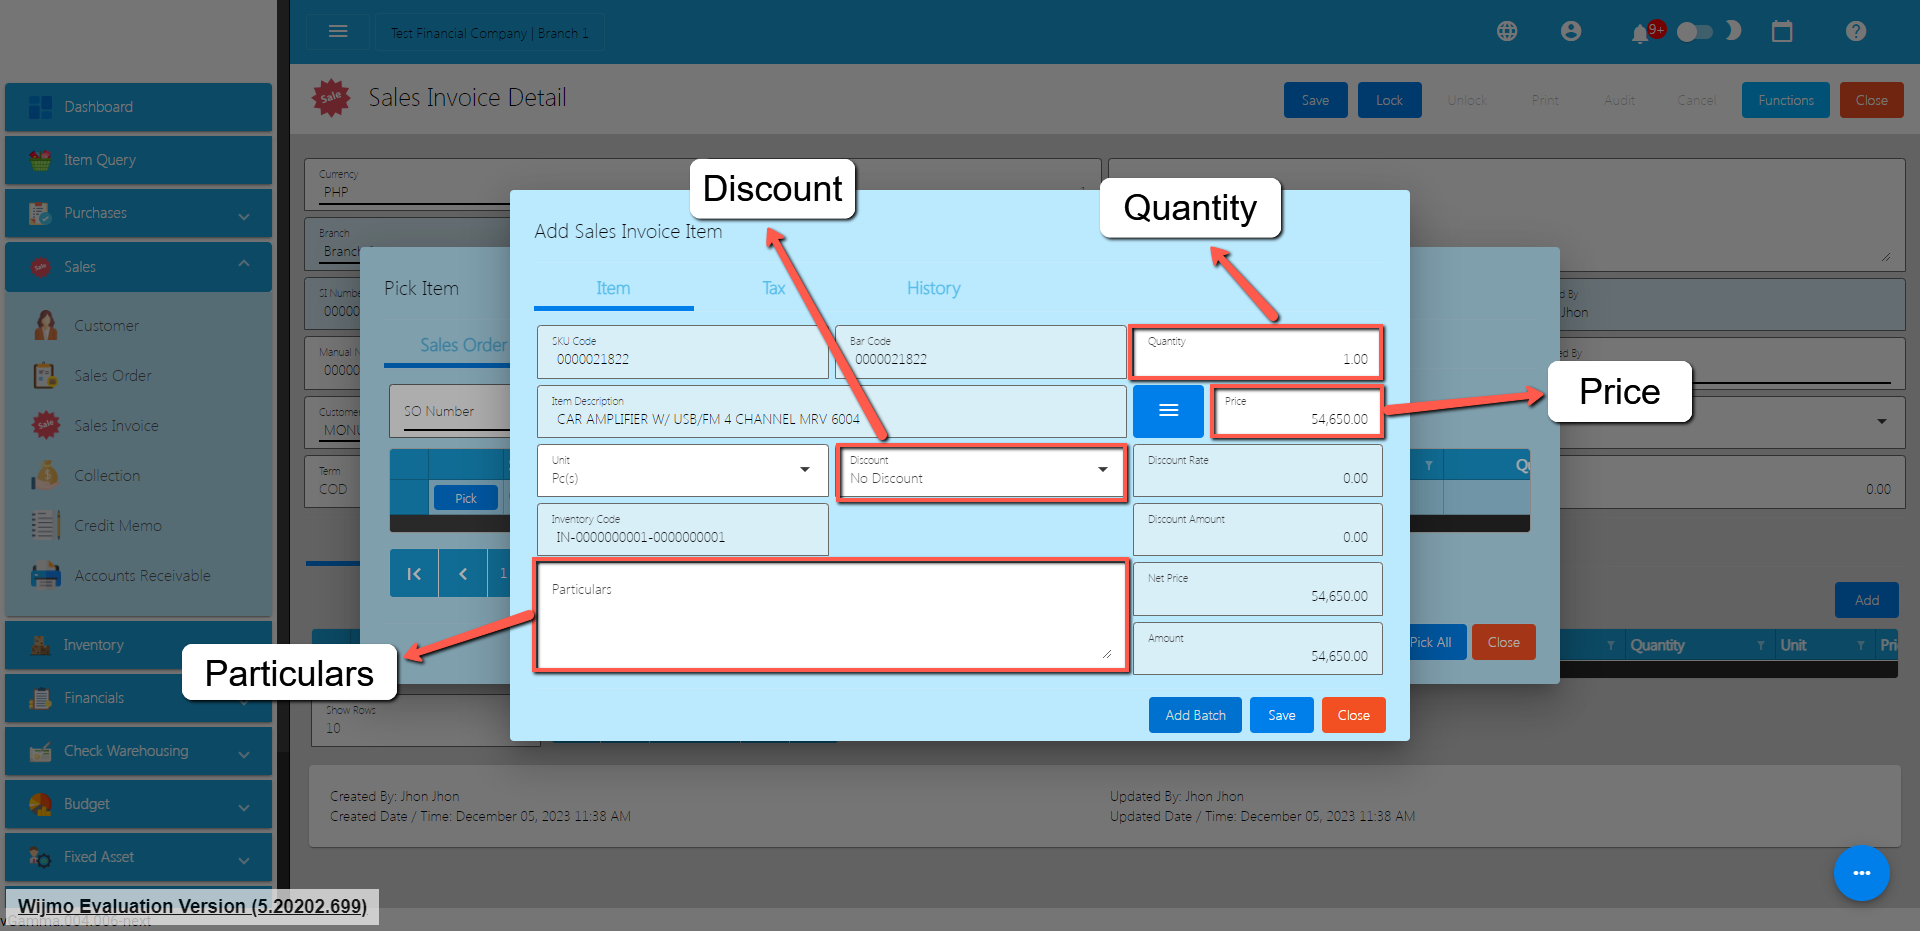
Once the Pick button is clicked, fill out the Quantity and Price.
If your sales transaction has a discount, you may select the correct discount by clicking on the Discount dropdown. If discount does not exist on the dropdown, you may add a new discount detail by navigating to the System>System Tables>Discounts>Add button.
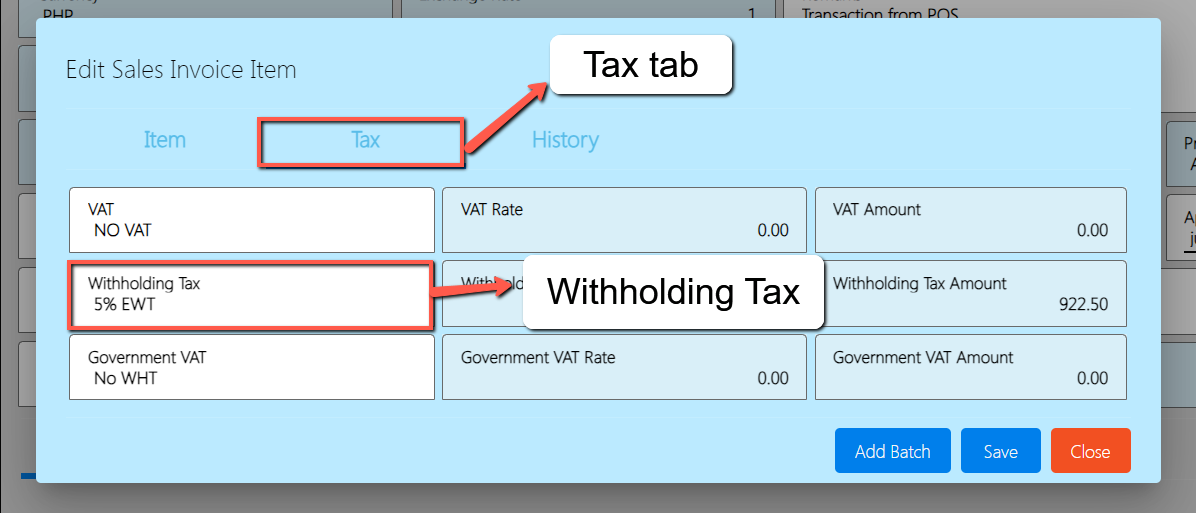
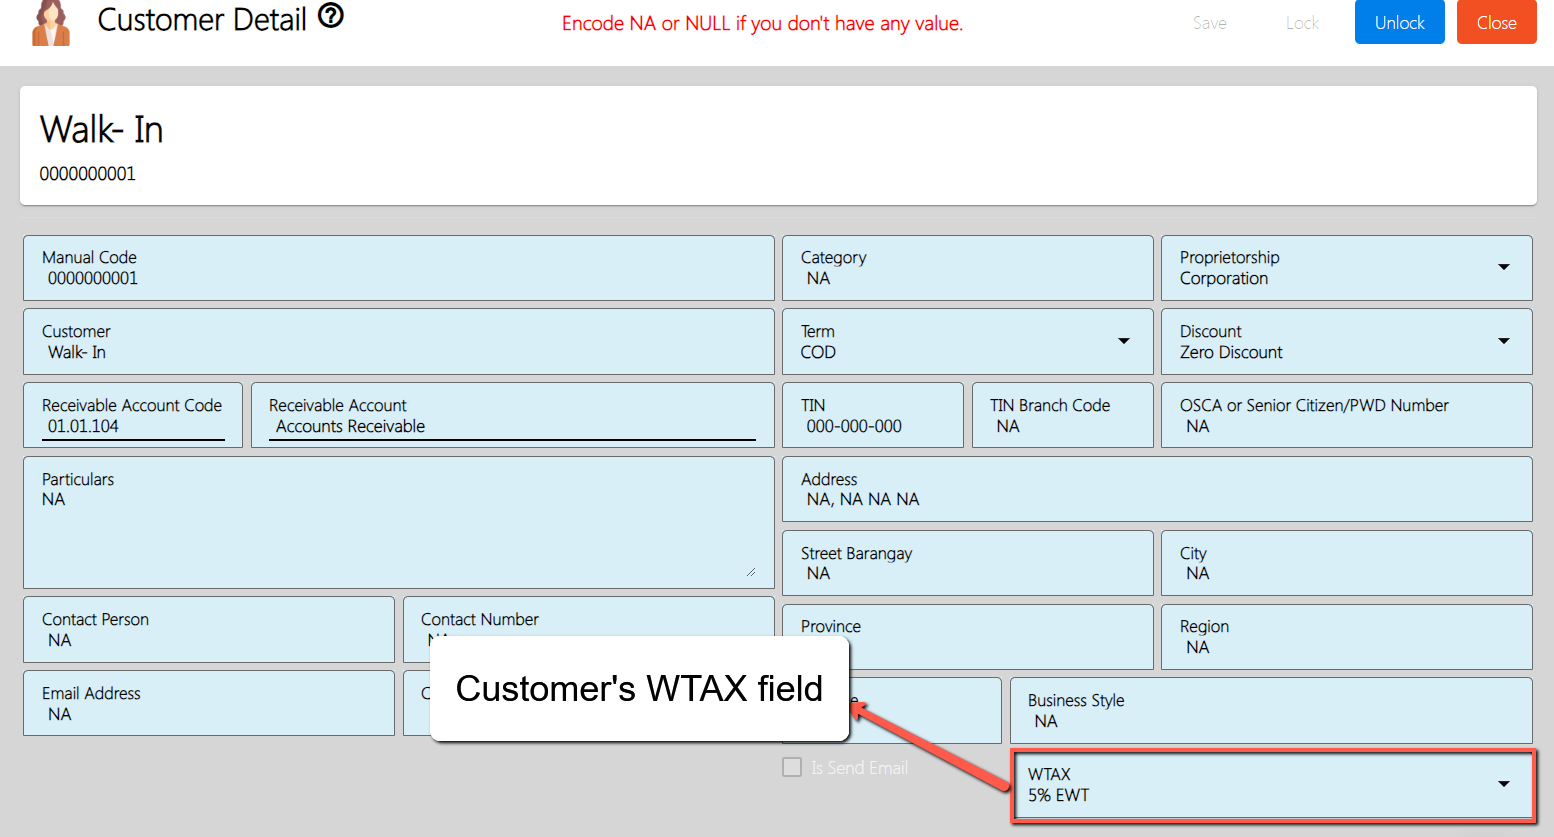
If your Customer for the sales transaction has a withholding tax, you may set that up by clicking the Tax tab first and look for the Withholding Tax dropdown. By its default value, it is based on the Customer’s WTAX field which you can update by navigating to Master Files>Customer.
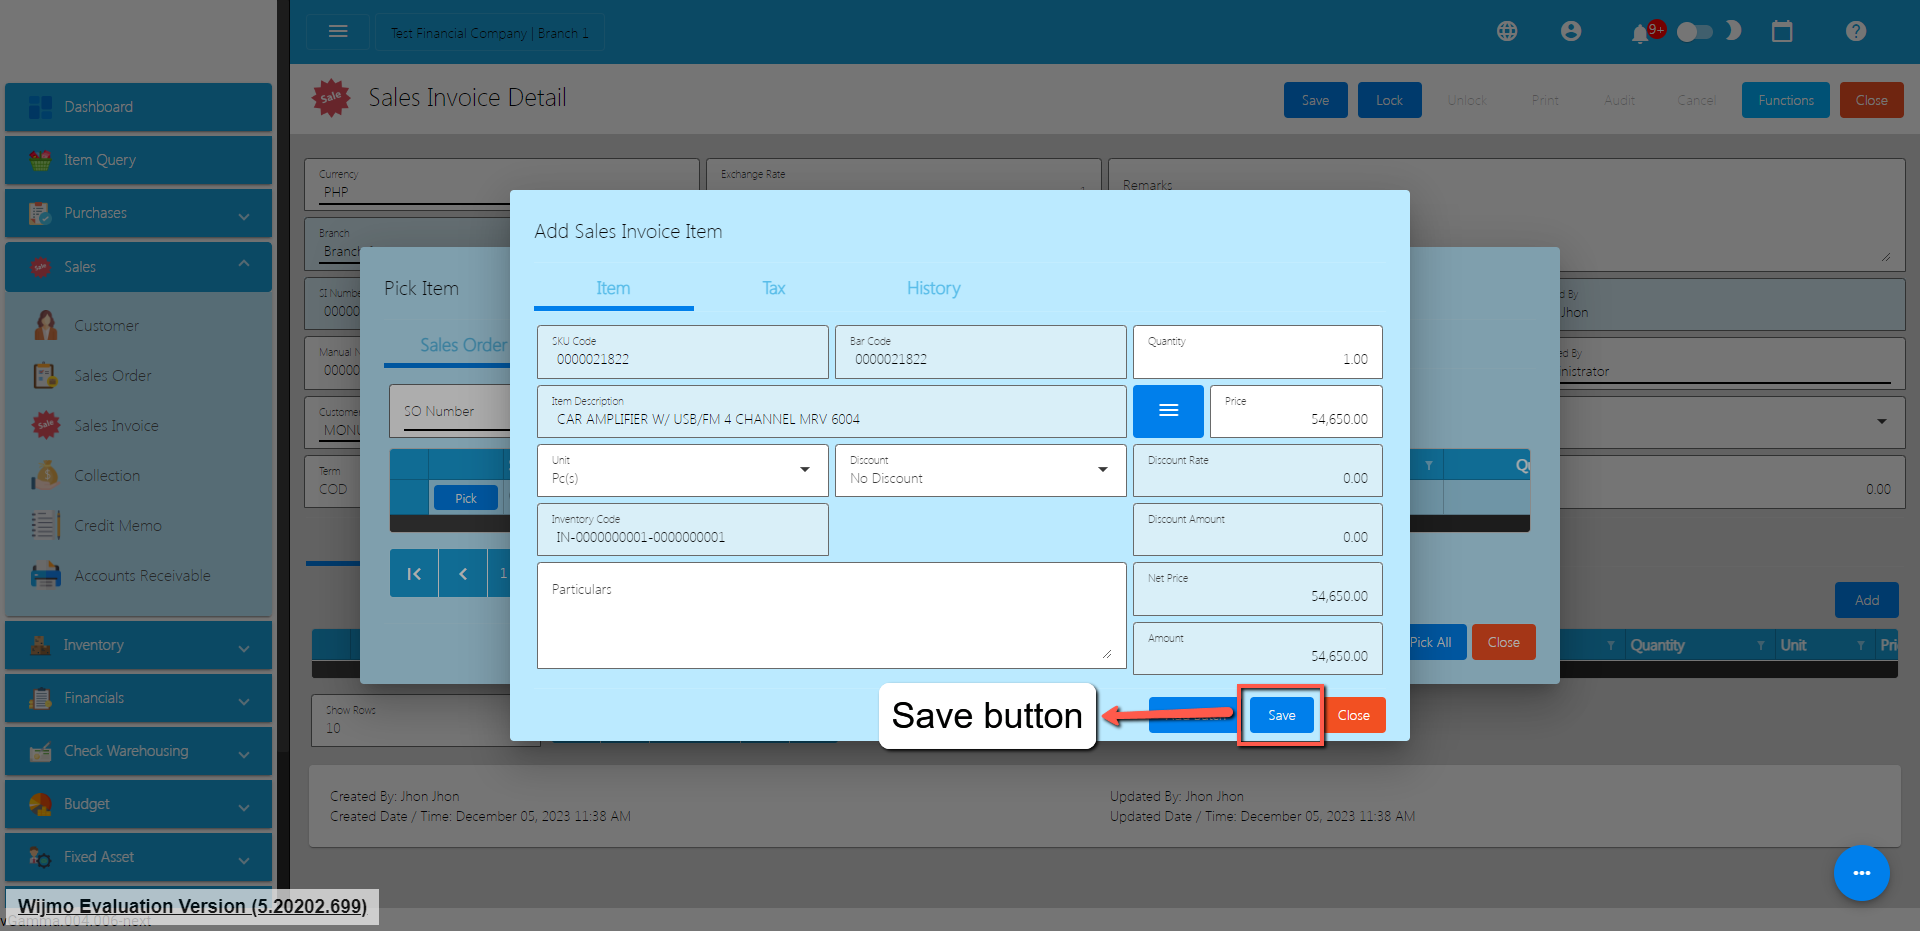
After that, click the Save button.
If you wish to add more items, repeat Steps 6 to 8.
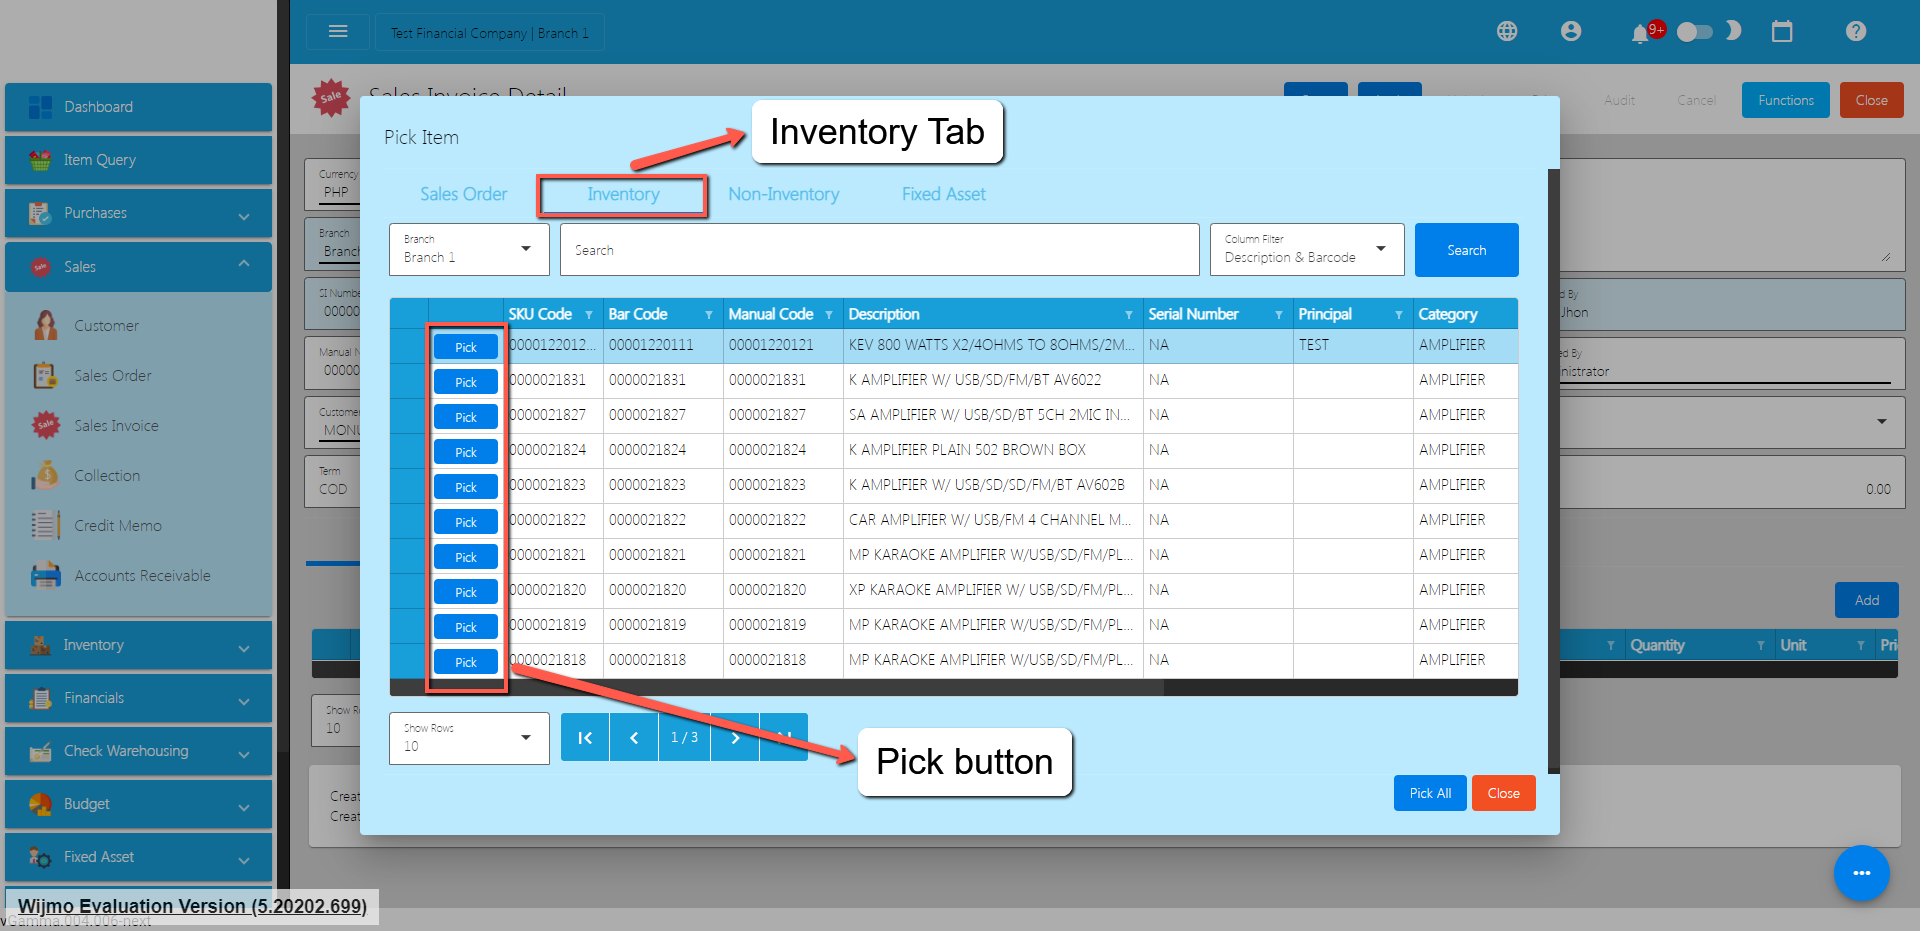
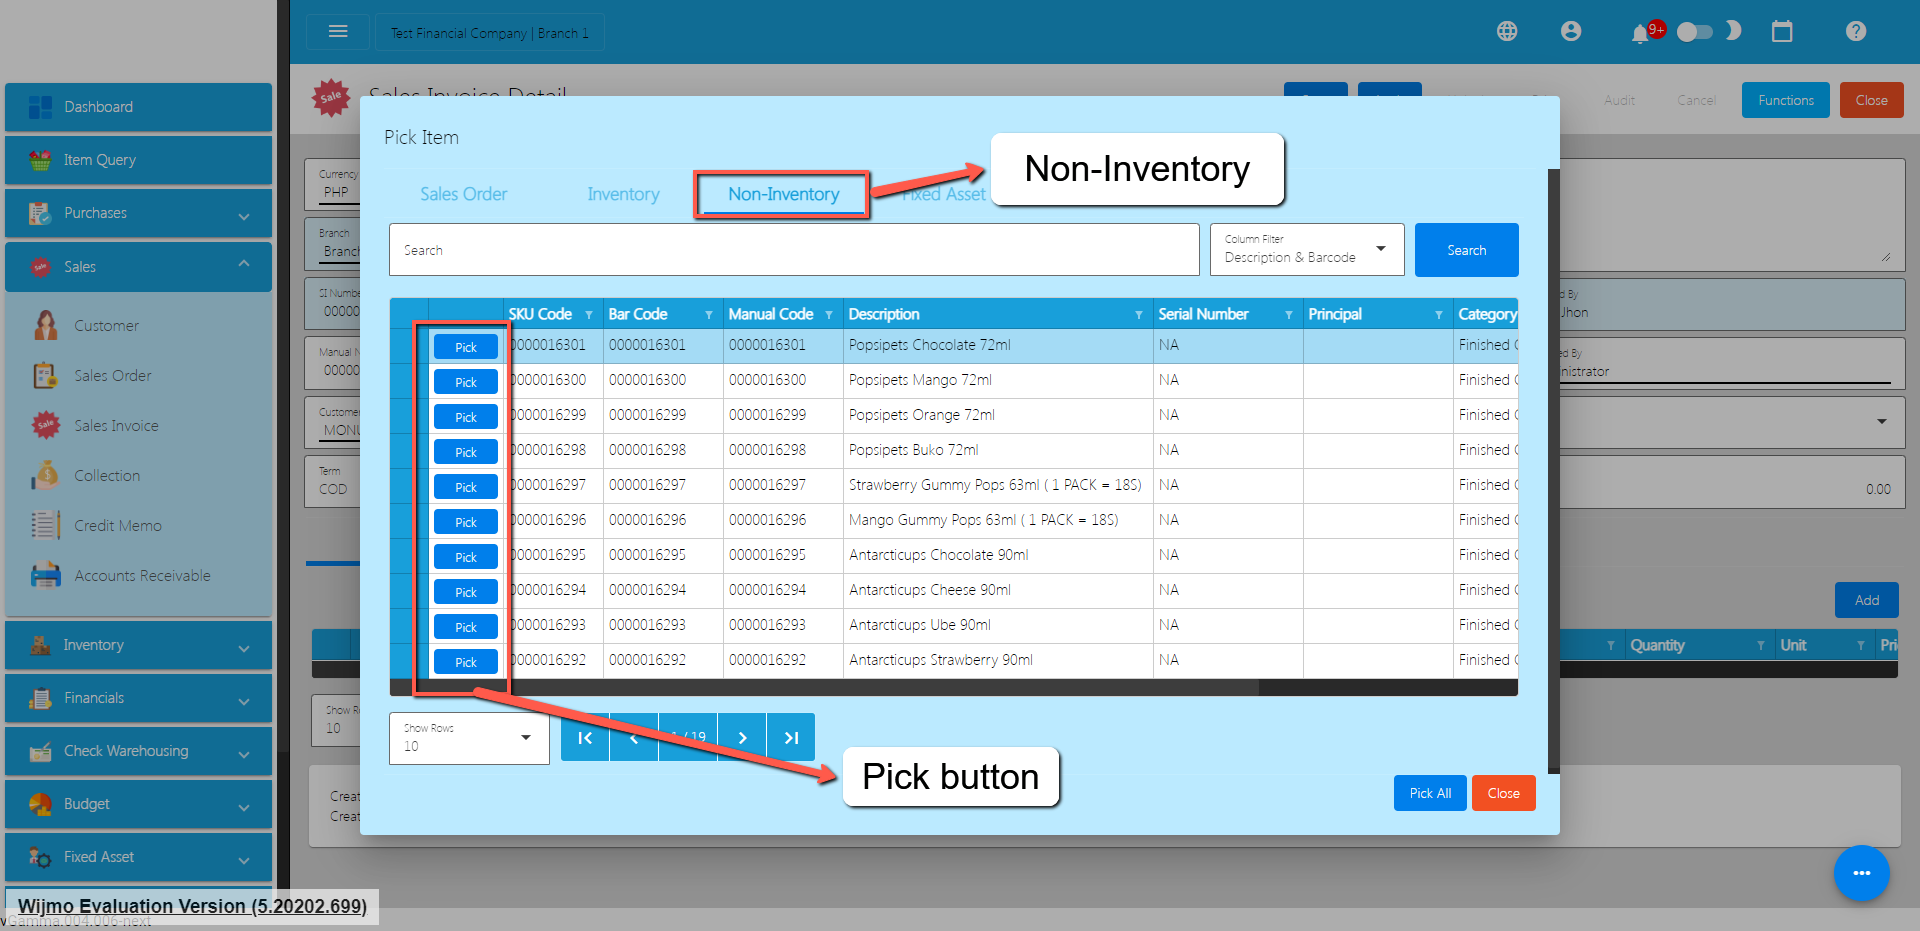
There’s no need to worry if you don’t have a Sales Order since you can go directly to the Inventory or Non-inventory tab and follow the steps from 6 to 8.
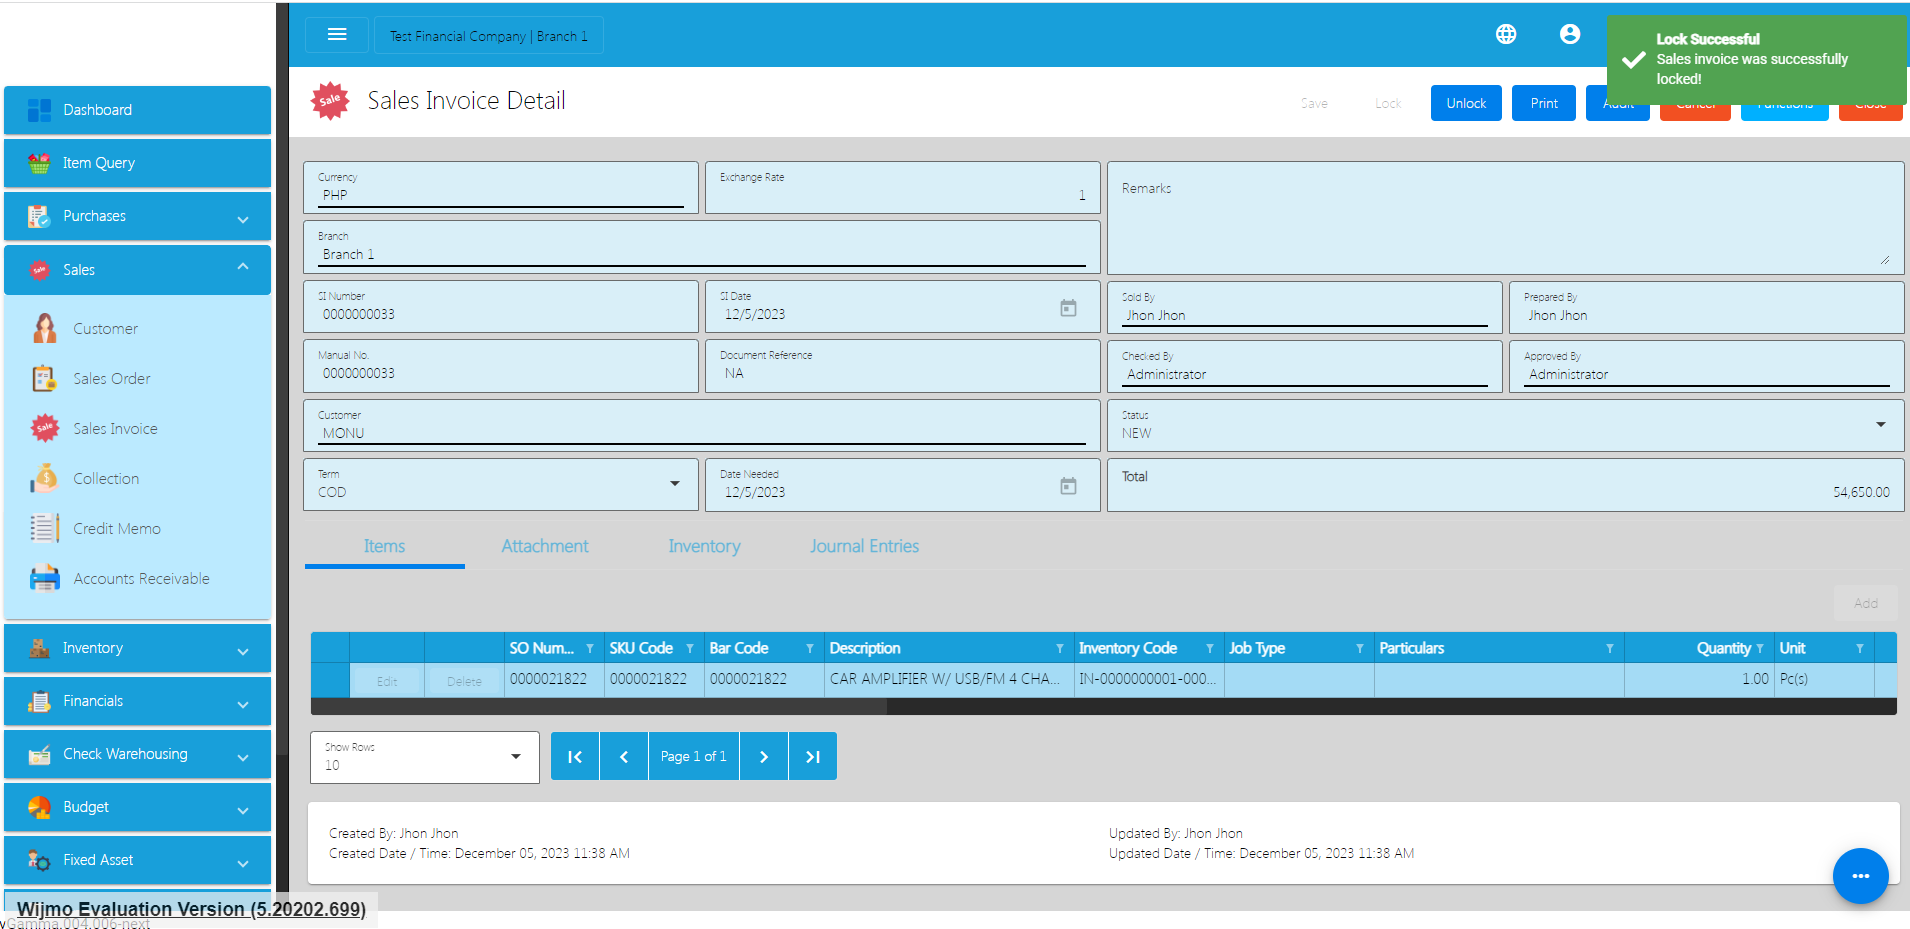
Review the Sales Invoice you created, once everything is okay, just click the Save and Lock button.
Sales Invoice Transaction via Upload Template
To add a Sales Invoice Transaction via Upload Template, go to the Sales Invoice List then Click Functions
Click Optimized Upload.
Select Download Sales Invoice File Format – an excel file will be downloaded. This is the file format where you will edit or encode the Items that you need to Sales Invoice.
3.1 In the Excel file:
Manual Codeshould be unique per transaction, alphanumeric and should not exceed 255 characters. Example: ABC0000001
– if the Manual Code starts with 000, don’t forget to put an apostrophe (‘) at the beginning of the Manual Code. Example: ‘00000111231414
– if the Manual Code starts with a number but exceeds more than 10 digits, format the cell to Text to show all the numbers.
Steps on how to change the format to Text:
Right Click the Cell
Click Format Cell
3. Choose Text
4. Click OK
5. Then reselect the field
SI Date and Date Needed – SI Date is the date of SI or when it was created. Date Needed it can be after or on the date of the SI date, the format of the SI Date and Date Needed should be (yyyyy-mm-dd)
Document Referenceshould be unique per transaction, alphanumeric and should not exceed 255 characters. Example: ABC0000001
– if the Document Reference starts with 000, don’t forget to put an apostrophe (‘) at the beginning of the Manual Code. Example: ‘00000111231414
– if the Document Reference starts with a number but exceeds more than 10 digits, format the cell to Text to show all the numbers.
Steps on how to change the format to Text:
1. Right Click the Cell
2. Click Format Cell
3. Choose Text
4. Click OK
5. Then reselect the field
Particulars – in this column this is basically the remarks for each item line, it should be alphanumeric and should not exceed 255 characters.
Remarks – in this column is basically the remarks for the whole transaction, it should be alphanumeric and should not exceed 255 characters.
Customer and CustomerID – Select Customer from the dropdown and choose the Customer, CustomerIDwill correspond to the selected Customer. Never edit the CustomerIDsince it will automatically change after selecting the Customer.
Term and TermID – Select term from the dropdown and choose the term, TermID will correspond to the selected Term. Never edit the termID since it will automatically change after selecting the Term.
Currency and CurrencyID – Select the Currency from the dropdown and choose the correct Currency, CurrencyID will correspond to the selected currency. Never edit the CurrencyID since it will automatically change after selecting the currency.
Exchange Rate – exchange rate is the rate that is used to convert the currency.
Status – Status is the status of the transaction, just select the status from the dropdown.
ItemID, Item Description, Price, UnitID and Unit – all these fields are related to the Item. Once the barcode is selected all these fields will also change depending on the barcode that was selected.
Quantity – Input the quantity that is needed for the Sales Invoice.
Discount and DiscountID – Select the Discount from the dropdown and choose the correct Discount, DiscountID will correspond to the selected Discount. Never edit the DiscountID since it will automatically change after selecting the Discount.
VAT and VATId – Select the VAT from the dropdown and choose the correct VAT, VATId will correspond to the selected WTAX. Never edit the VATId since it will automatically change after selecting the VAT.
WTAX and WTAXId – Select the WTAX from the dropdown and choose the correct WTAX, WTAXId will correspond to the selected WTAX. Never edit the WTAXId since it will automatically change after selecting the WTAX.
GVATand GVATId – Select the GVAT from the dropdown and choose the correct GVAT, GVATId will correspond to the selected GVAT. Never edit the GVATId since it will automatically change after selecting the GVAT.
PaidAmount – input the amount paid by the Customer.
Cancel Sales Invoice Transaction
When you need to cancel a Sales Invoice, it’s important to follow these simple steps:
Log In: Visit your easyFS domain and login with your username and password.
Find your Sales Invoice: Navigate to the Sales, then Sales Invoice. You will be redirected to the Sales Invoice lists.
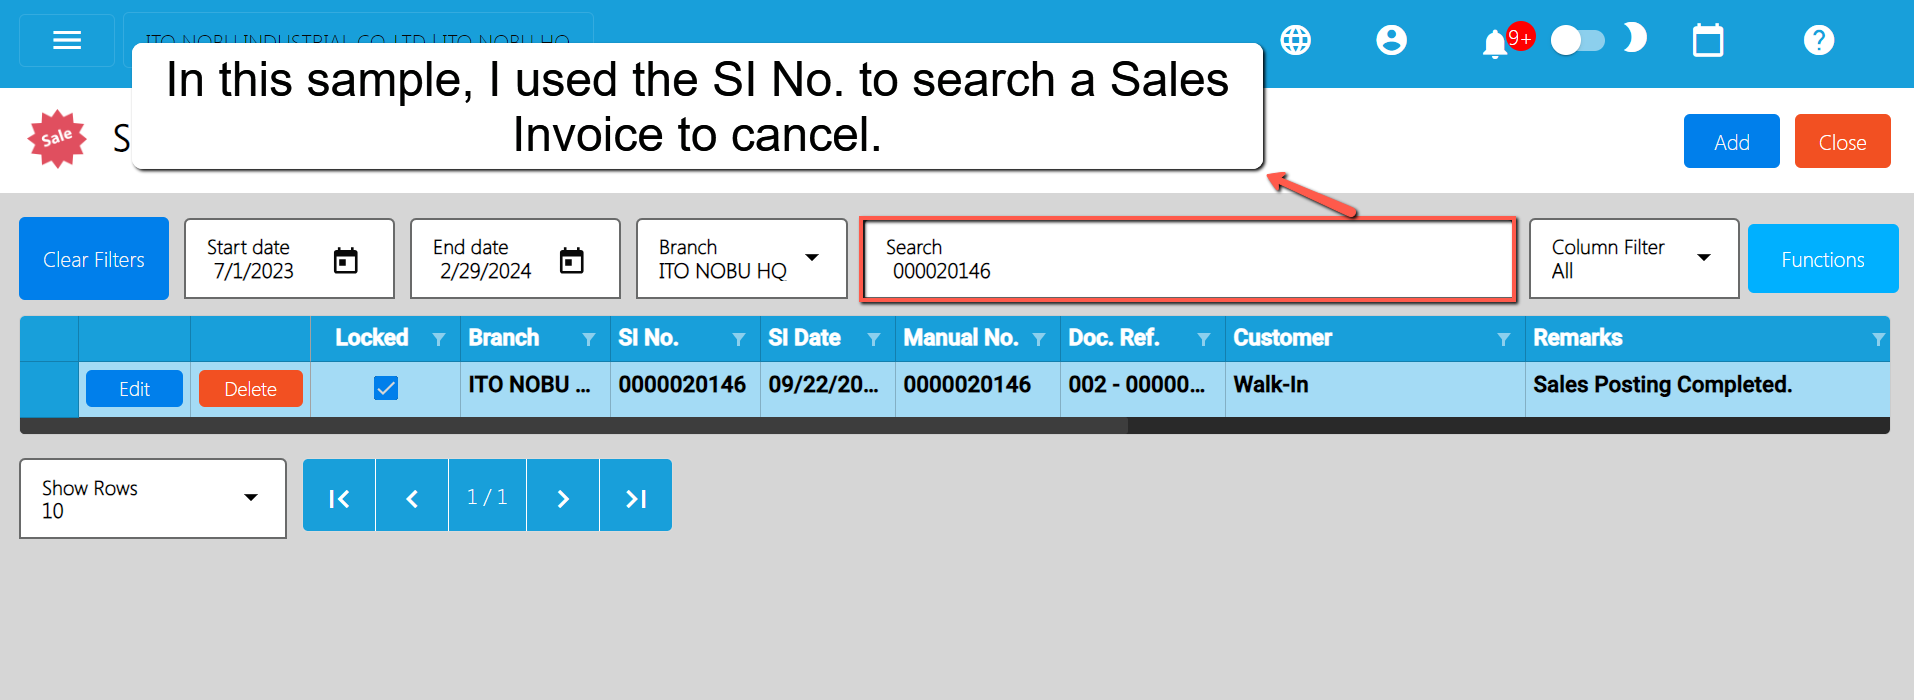
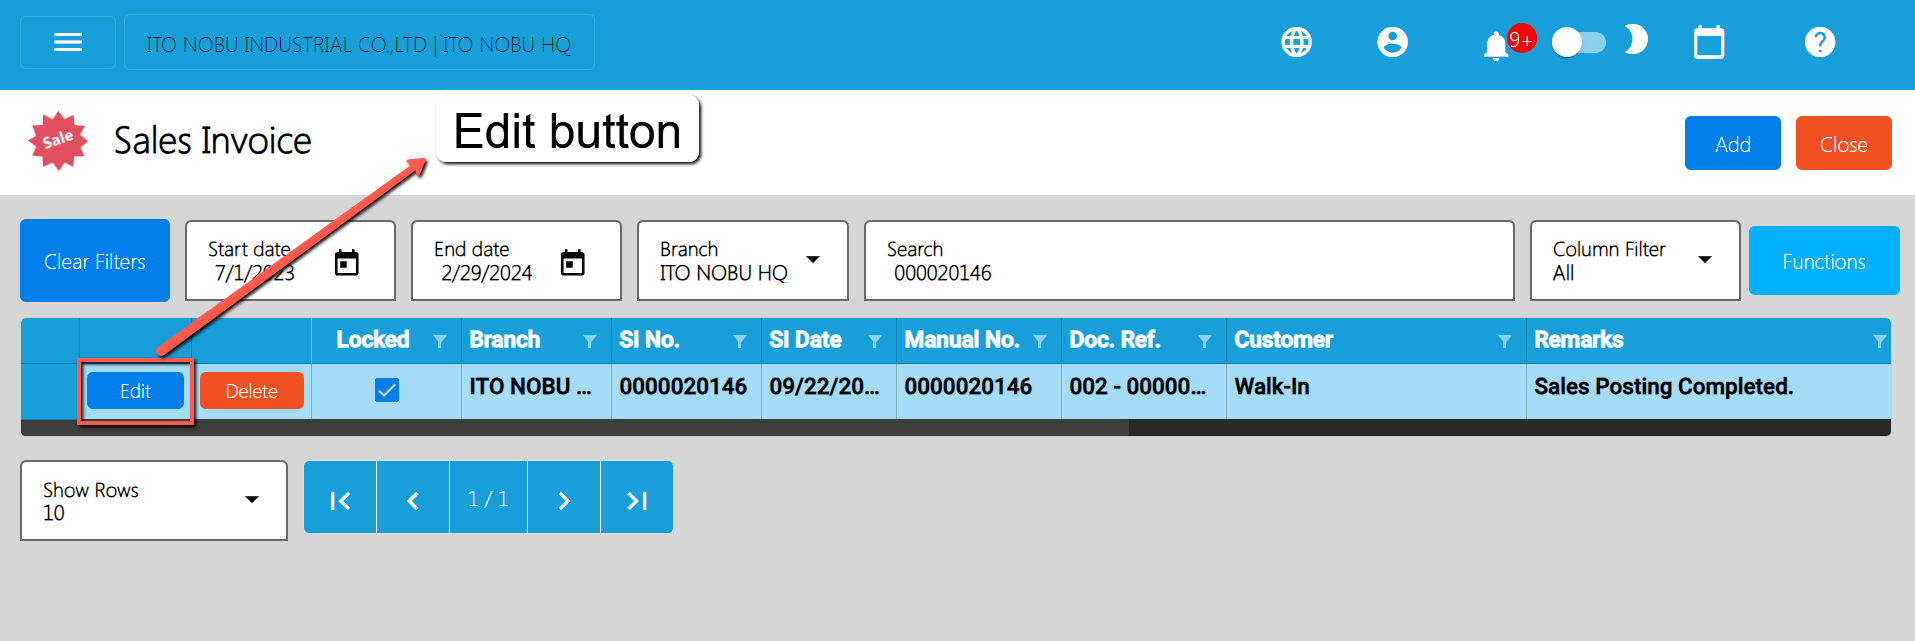
Locate the Right One: From the Sales Invoice list, you may use the search bar to look for the right Sales Invoice you want to cancel. You can search using the Sales Invoice’s SI NUmber, Manual Number, Document Reference, etc.
Take note: Don’t forget to change the Start Date and End Date to your Sales Invoice’s transaction date to display the correct result.
Open the Sales Invoice Detail: Click the Edit button to open the Sales Invoice detail page.
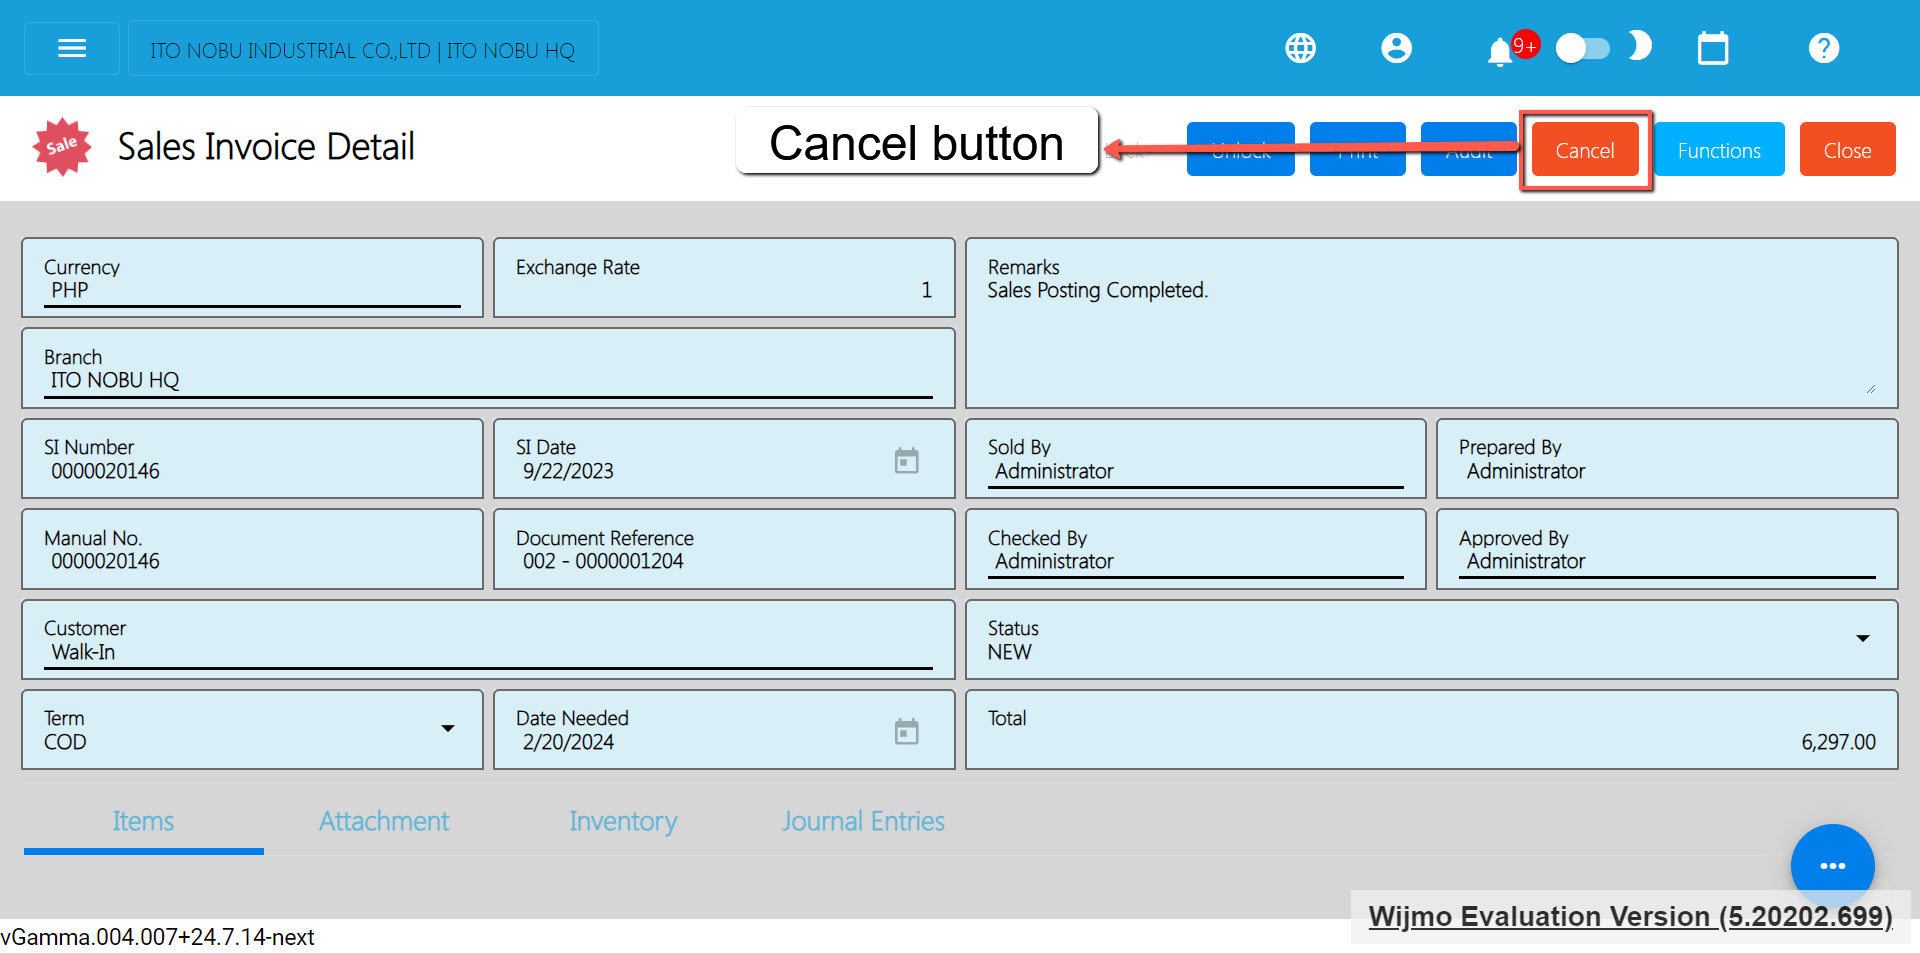
Cancel the Sales Invoice: To cancel your Sales Invoice transaction, look for the Cancel button found on the upper-right part of the page, then click.
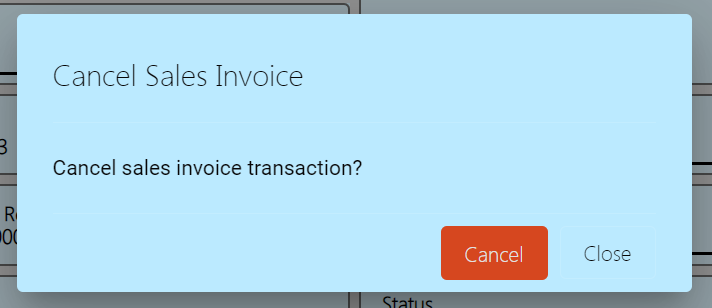
Confirm Canceling: After you click the Cancel button, there’s a Cancel Sales Invoice window. If you’re sure you want to cancel your Sales Invoice transaction, click the Cancel button.
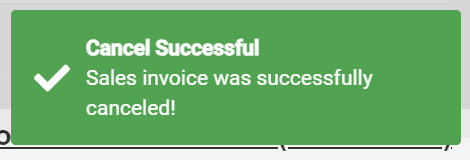
Check It’s Done: After canceling, make sure you get a success toast message confirming it’s canceled successfully. It is found on the bottom right of the page.
Let Others Know(if needed): If you believe canceling affects other people, it’s a good idea to inform them.
Keep Track: Remember to make a note somewhere that you canceled the Sales Invoice, just in case it is needed later.
Struggling to accept online payments? Discover how HII Online Payment Service solves your credit card merchant dilemma. HII Online Payment Service. Coming soon!
Struggling to accept online payments? Discover how HII Online Payment Service solves your credit card merchant dilemma. HII Online Payment Service. Coming soon!
Take advantage of Free easyFS Usage for Accounting Firms in the Philippines. Contact Us at +639176280355 or email at hiisales@humedit.ph
Take advantage of Free easyFS Usage for Accounting Firms in the Philippines. Contact Us at +639176280355 or email at hiisales@humedit.ph
Struggling to accept online payments? Discover how HII Online Payment Service solves your credit card merchant dilemma. HII Online Payment Service. Coming soon!
Struggling to accept online payments? Discover how HII Online Payment Service solves your credit card merchant dilemma. HII Online Payment Service. Coming soon!
Take advantage of Free easyFS Usage for Accounting Firms in the Philippines. Contact Us at +639176280355 or email at hiisales@humedit.ph
Take advantage of Free easyFS Usage for Accounting Firms in the Philippines. Contact Us at +639176280355 or email at hiisales@humedit.ph
Struggling to accept online payments? Discover how HII Online Payment Service solves your credit card merchant dilemma. HII Online Payment Service. Coming soon!
Struggling to accept online payments? Discover how HII Online Payment Service solves your credit card merchant dilemma. HII Online Payment Service. Coming soon!
Take advantage of Free easyFS Usage for Accounting Firms in the Philippines. Contact Us at +639176280355 or email at hiisales@humedit.ph
Take advantage of Free easyFS Usage for Accounting Firms in the Philippines. Contact Us at +639176280355 or email at hiisales@humedit.ph
Struggling to accept online payments? Discover how HII Online Payment Service solves your credit card merchant dilemma. HII Online Payment Service. Coming soon!
Struggling to accept online payments? Discover how HII Online Payment Service solves your credit card merchant dilemma. HII Online Payment Service. Coming soon!
Take advantage of Free easyFS Usage for Accounting Firms in the Philippines. Contact Us at +639176280355 or email at hiisales@humedit.ph
Take advantage of Free easyFS Usage for Accounting Firms in the Philippines. Contact Us at +639176280355 or email at hiisales@humedit.ph
Struggling to accept online payments? Discover how HII Online Payment Service solves your credit card merchant dilemma. HII Online Payment Service. Coming soon!
Struggling to accept online payments? Discover how HII Online Payment Service solves your credit card merchant dilemma. HII Online Payment Service. Coming soon!
Take advantage of Free easyFS Usage for Accounting Firms in the Philippines. Contact Us at +639176280355 or email at hiisales@humedit.ph
Take advantage of Free easyFS Usage for Accounting Firms in the Philippines. Contact Us at +639176280355 or email at hiisales@humedit.ph
Struggling to accept online payments? Discover how HII Online Payment Service solves your credit card merchant dilemma. HII Online Payment Service. Coming soon!
Struggling to accept online payments? Discover how HII Online Payment Service solves your credit card merchant dilemma. HII Online Payment Service. Coming soon!
Take advantage of Free easyFS Usage for Accounting Firms in the Philippines. Contact Us at +639176280355 or email at hiisales@humedit.ph
Take advantage of Free easyFS Usage for Accounting Firms in the Philippines. Contact Us at +639176280355 or email at hiisales@humedit.ph
Struggling to accept online payments? Discover how HII Online Payment Service solves your credit card merchant dilemma. HII Online Payment Service. Coming soon!
Struggling to accept online payments? Discover how HII Online Payment Service solves your credit card merchant dilemma. HII Online Payment Service. Coming soon!
Take advantage of Free easyFS Usage for Accounting Firms in the Philippines. Contact Us at +639176280355 or email at hiisales@humedit.ph
Take advantage of Free easyFS Usage for Accounting Firms in the Philippines. Contact Us at +639176280355 or email at hiisales@humedit.ph
Struggling to accept online payments? Discover how HII Online Payment Service solves your credit card merchant dilemma. HII Online Payment Service. Coming soon!
Struggling to accept online payments? Discover how HII Online Payment Service solves your credit card merchant dilemma. HII Online Payment Service. Coming soon!

 Log in to Messenger