Search User Manual

I: Introduction

1.1 Overview

1.2 EasyFS Process

1.3 Purpose of this User Manual

1.4 Who Should Use This Manual

1.4 Best Practices and System Limitations

1.4.1 Setting up the Master Files

1.4.2 Internet Connection

1.4.3 Device Shutdown

II. Version History

2.1 Overview

2.2 Gamma.003.001

2.3 Gamma.004.003

2.4 Gamma.004.004

2.5 Gamma.004.004

2.6 Gamma.004.004

2.7 Gamma.004.005

III: Getting Started

3.1 Introduction

3.2 Accessing EasyFS

3.2.1 Logging In

3.2.2 Forgot Password

3.2.3 The Dashboard Page

3.2.4 Navigating EasyFS

IV: Master Files

4.0 Overview

4.1 Setup Master Files

4.1.1 Item

4.1.1.1 How to Add an Item Manually

Unit Conversion

Price

General Ledger Accounts

Save and Lock

4.1.1.2 Add Item Via Import Function

4.1.2 Customer

4.1.2.1 Add Customer Manually

4.1.2.2 Add Customer Via Import Function

4.1.3 Supplier

4.1.3.1 Add Supplier Manually

4.1.3.2 Add Supplier Via Import Function

4.1.4 Company

Company List

Company Detail

4.1.5 Users

Users List

List of All Users that were added to the System

Users Detail

4.1.6 Chart of Accounts

4.1.6.1 Chart of Accounts Lists

4.1.6.2 Manual Add Chart of Accounts

4.1.6.2 Add Chart of Accounts via Upload Account

4.1.7 Bank

4.1.7.1 Bank List

4.1.7.2 Manual Add of Bank

4.1.8 Currency

4.1.8.1 Currency List

4.1.8.2 Manual Add of Currency

4.2 Update Master Files

4.2.1 Item

4.2.1.1 Manual Update Item Detail

4.2.1.2 Update Item Detail in Bulk

4.2.2 Supplier

4.2.2.1 Manual Update Supplier Detail

4.2.2.1 Update Supplier Detail in Bulk

4.2.3 Customer

4.2.3.1 Manual Update Customer Detail

4.2.3.1 Update Customer Detail in Bulk

V: Transactions

5.1 Overview

5.2 Purchases Transaction Module

5.2.1 Purchase Request

Overview

Purchase Request List

Purchase Request Detail

Cancel Purchase Request Transaction

5.2.2 Purchase Order

Overview

Purchase Order List

Purchase Order Detail

Purchase Order Transaction via Upload Template

Cancel Purchase Order Transaction

5.2.3 Receiving Receipt

Overview

Receiving Receipt Detail

Receiving Receipt List

Cancel Receiving Receipt Transaction

5.2.4 Disbursement

Overview

Disbursement List

Disbursement Detail

Cancel Disbursement Transaction

5.2.5 Debit Memo

Debit Memo List

Debit Memo Detail

Debit Memo Transaction via Upload Template

Cancel Debit Memo Transaction

5.3 Sales Transaction Module

5.3.1 Sales Order

Overview

Sales Order List

Sales Order Detail

Sales Order Transaction via Upload Template

Cancel Sales Order Transaction

5.3.2 Sales Invoice

Overview

Sales Invoice List

Sales Invoice Detail

Sales Invoice Transaction via Upload Template

Cancel Sales Invoice Transaction

5.3.3 Collection

Overview

Collection List

Collection Detail

Collection Transaction via Upload Template

Cancel Collection Transaction

Overview

Scenario 1: Single  Branch

Item Creation/Management

Purchase Order

Receiving Receipt

Sales Invoice

Inventory Report

Scenario 2: Multi-Branch

Item Creation/Management

Stock Transfer Request

Stock Transfer

Sales Invoice

Inventory Report

Scenario 3: Extra-Ordinary Activities

Extraordinary Stock In

Extraordinary Stock Out

Scenario 4: Multi-Branch with EasyPOS Integration

Item Creation/Management

Supplier Creation/Management

Customer Creation/Management

Purchase Order

Receiving Receipt

Sales (easyPOS)

Official Receipt (easyPOS)

POS Apps (easyFS)

Sales Invoice

Collection/ Payment

Inventory Report

5.4.1 Stock In

Overview

Stock In List

Stock In Detail

Customer Return via Stock In

5.4.2 Stock Out

Overview

Stock Out List

Stock Out Detail

Supplier Return via Stock Out

5.5 Stock Transfer Request

Overview

Stock Transfer Request List

Stock Transfer Request Detail

5.6 Stock Transfer

Overview

Stock Transfer List

Stock Transfer Detail

5.7 Stock Withdrawal

Stock Withdrawal List

Stock Withdrawal Detail

5.8 Stock Count

Stock Count List

Stock Count Detail

5.9  Inventory Ledger

Inventory Ledger List

Inventory Ledger Detail

6.0: Financials Transactions

7.2 Bank Reconciliation

Bank Reconciliation Detail

7.3 Journal Voucher

Overview

Journal Voucher List

Journal Voucher Detail

Reports

Accounts Payable Reports

Accounts Payable Report

Accounts Payable Voucher Report

Accounts Payable By Currency Report

Purchase Request Summary Report

Purchase Request Detail Report

Purchase Order Summary Report

Purchase Order Detail Report

Purchase Order Detail With Balance Report

Receiving Receipt Summary Report

Receiving Receipt Detail Report

Disbursement Summary

Disbursement Detail Report

Print or Download the PDF Report

Debit Memo Summary Report

Debit Memo Detail Report

Supplier Journal

Supplier Item Report

Available Item Per Batch Report

Top Purchased Item Report

Top Supplier Report

Cancelled Purchase Request Report

Cancelled Purchase Order Report

Cancelled Receiving Receipt Report

Accounts Receivable Report

Accounts Receivable Summary Report

Accounts Receivable by Term Report

Accounts Receivable by Currency Report

Accounts Receivable Report (One Month)

Statement of Account

Statement of Account (By Date Range)

Statement of Account By Term

Counter Receipt

Customer Advances

Sales Order Summary Report

Sales Order Detail Report

Sales Invoice Summary Report

Sales Invoice Detail Report

Collection Summary Report

Collection Summary by PayType Report

Collection Detail Report

Customer Journal

Sold Item Per Batch Report

Top Selling Item

Top Selling Branch

Cancelled Sales Order Report

Cancelled Sales Invoice Report

Cancelled Collection Report

Credit Memo Summary Report

Credit Memo Detail Report

Sales Invoice Detail Report with Cost

Financial Reports

General Ledger

Trial Balance

Balance Sheet

Account Ledger

Disbalance Journal Entries

Income Statement

Cash Flow Statement

Chart of Accounts

Top Expenses

Top Income

Receiving Receipt Book

Disbursement Book

Debit Memo Book

Sales Invoice Book

Collection Book

Credit Memo Book

Journal Voucher Book

Inventory Ledger Book

Inventory Report

Inventory Report Per Item

Stock In Detailed Report

Stock Out Detailed Report

Stock Transfer Detailed Report

Stock Count Detailed Report

Physical Count Sheet

Top Item Inventory Onhand

Top Moving Item

Stock Card

Check Warehousing Report

PDC Summary Report

Bounced Check Report

PDC Cleared Report

PDC Uncleared Report

Budget Reports

Report Budget

Report CashFlow Projection

Fixed Asset Reports

Fixed Asset Detail Report

Asset Disposal Summary Report

Asset Disposal Detail Report

BIR CAS Reports

General Journal

General Ledger

Sales Journal

Cash Receipt Journal

Purchase Journal

Cash Disbursement Journal

Inventory Ledger Journal

Form 2306

Form 2307

Form 0619 - E

Form 0619 - F

Form 1601 - FQ

Form 1601 - EQ

Form 1604 - E

Form 1604 - F

Form 1702 - Q

Form 1702 - RT

Form 2550 - M

Form 2550 - Q

VIII : Check Warehousing

8.1 Check Warehousing

Check Warehousing List

Check Warehousing Detail

8.2 Check Writer

Check Writer Detail

IX : Budget

9.0 Overview

9.1 Budget Manager

Budget Manager List

Budget Manager Detail

Cash Flow Projection Detail

X : Fixed Asset

10.0 Overview

Fixed Asset List

10.2 Asset Disposal

Asset Disposal List

Asset Disposal Detail

XI : Apps

11.0 Overview

11.1 Price

11.1.1 Overview

11.1.2 How to Setup a Price

XII : System

12.0 Overview

XIII: Integration

13.1 Overview

13.1.1 Benefits of Integration

13.2 Types of Integration

13.2.1 EasyPOS Integration Overview

Benefits:

13.3 How to Set Up Integrations
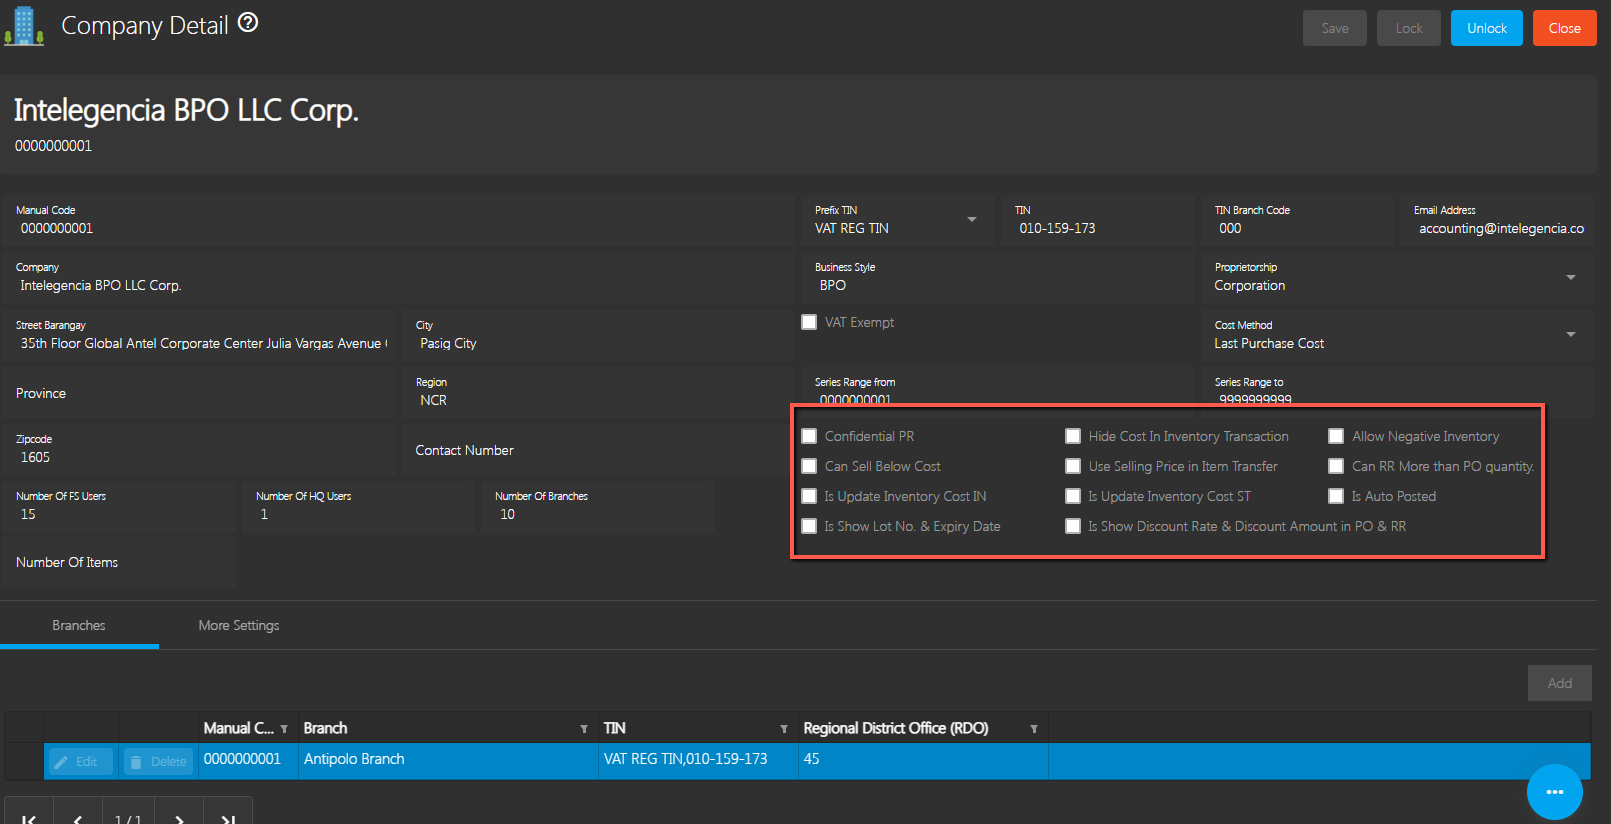
13.3.1 EasyPOS Integration

13.4 Managing Integrations

13.4.1 EasyPOS Integration

13.5 Guidelines for Integrations: Do’s and Don'ts

13.5.1 EasyPOS Integration

IX: Definition of Terms

X: FAQ

4.1.4 Company

Company refers to the name of the organization using EasyFS. Each company can have multiple branches. Depending on how the organization will configure their branches, they could use it as a profit center, a cost center or a warehouse. Each Company has its own consolidated Financial Reports.

Company List

  • List of All Companies that were added to the system.

Company Detail

  • To add a new Company detail, click on the Add button that can be seen on the Company list page.
  • In the company Detail there are some few settings for having the proper settings. Here are some few settings in easyFS

  • Confidential PR – This setting will allow the user to hide the Supplier in the Purchase Request(PR) and Purchase Order(PO) transaction.
  • Can Sell Below Cost – This will allow the user to sell the item or product lower than the purchase cost.
  • Is Update Inventory Cost IN – this will allow the user to update the cost in the inventory report by creating a Stock in
  • Is show Lot No. & Expiry Date – This will allow the user to hide or show the Lot No. & Expiry Date in the Receiving Receipt(RR) printout.
  • Is Show Discount Rate & Discount Amount in PO & RR – This will allow the user to hide or show the Discount Rate and the Discount Amount in PO & RR
  • Hide Cost In Inventory Transaction – Will allow the user to hide the cost of the item while doing an inventory transaction.
  • Use Selling Price in Items Transfer – This will allow the user to use the Selling price instead of the cost in doing a stock transfer transaction.
  • Is Update Inventory Cost ST – this will allow the user to update the cost in the inventory report by creating a Stock Transfer
  • Allow Negative Inventory – This will allow the user to still do a transaction even if there is no stocks or quantity in the inventory
  • Can RR More than PO Quantity – This will allow the user to create more Receiving Receipts(RR) even if the Purchase Order(PO) are all received.

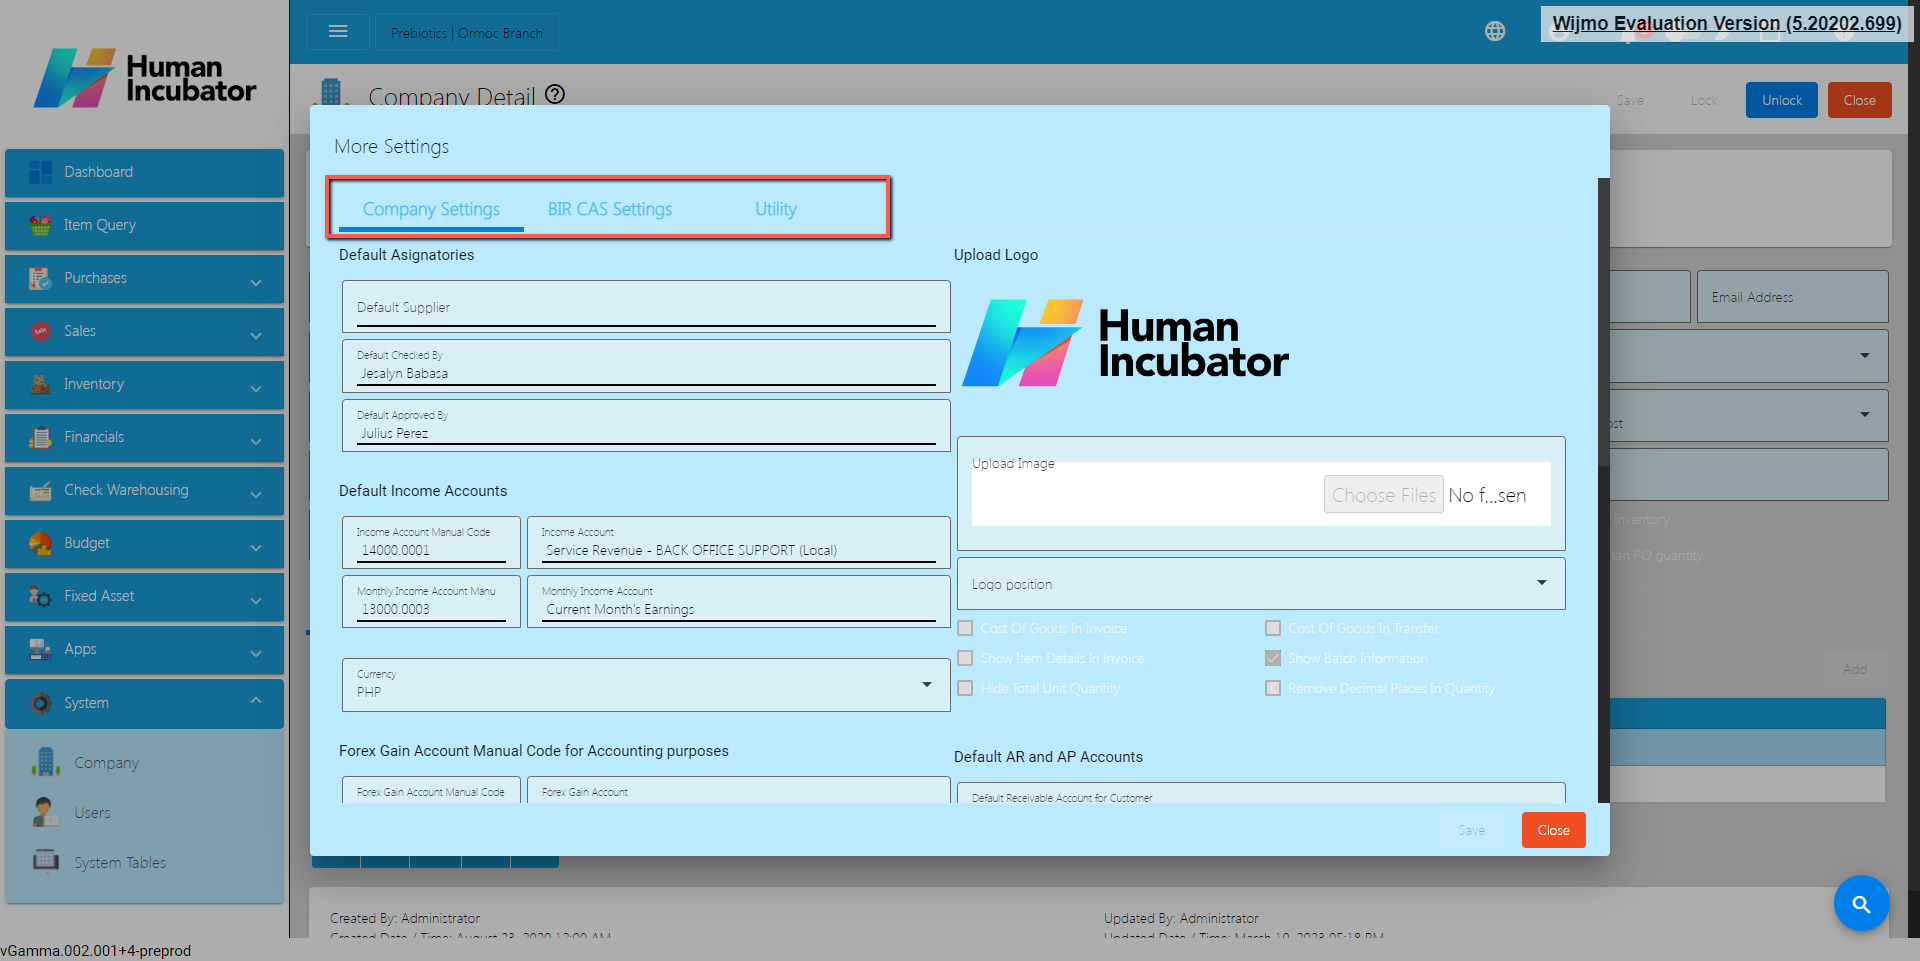
Provide all the necessary information for the More Settings for the company the tabs shown here are:

  • Company Settings – more settings for company tweaking.
  • If EasyFS has easyPOS integration, make sure to turn on the With Integration checkbox. Turning on the With Integration will prevent the user to Unlock/Edit the following transactions:
  • Stock In
  • Stock Out
  • Stock Transfer
  • Receiving Receipt
  • BIR CAS Settings – more settings to tweak BIR Forms format
  • Utility  – use for several functions, like uploading items in bulk, truncating all transactions, etc.

4.1.5 Users

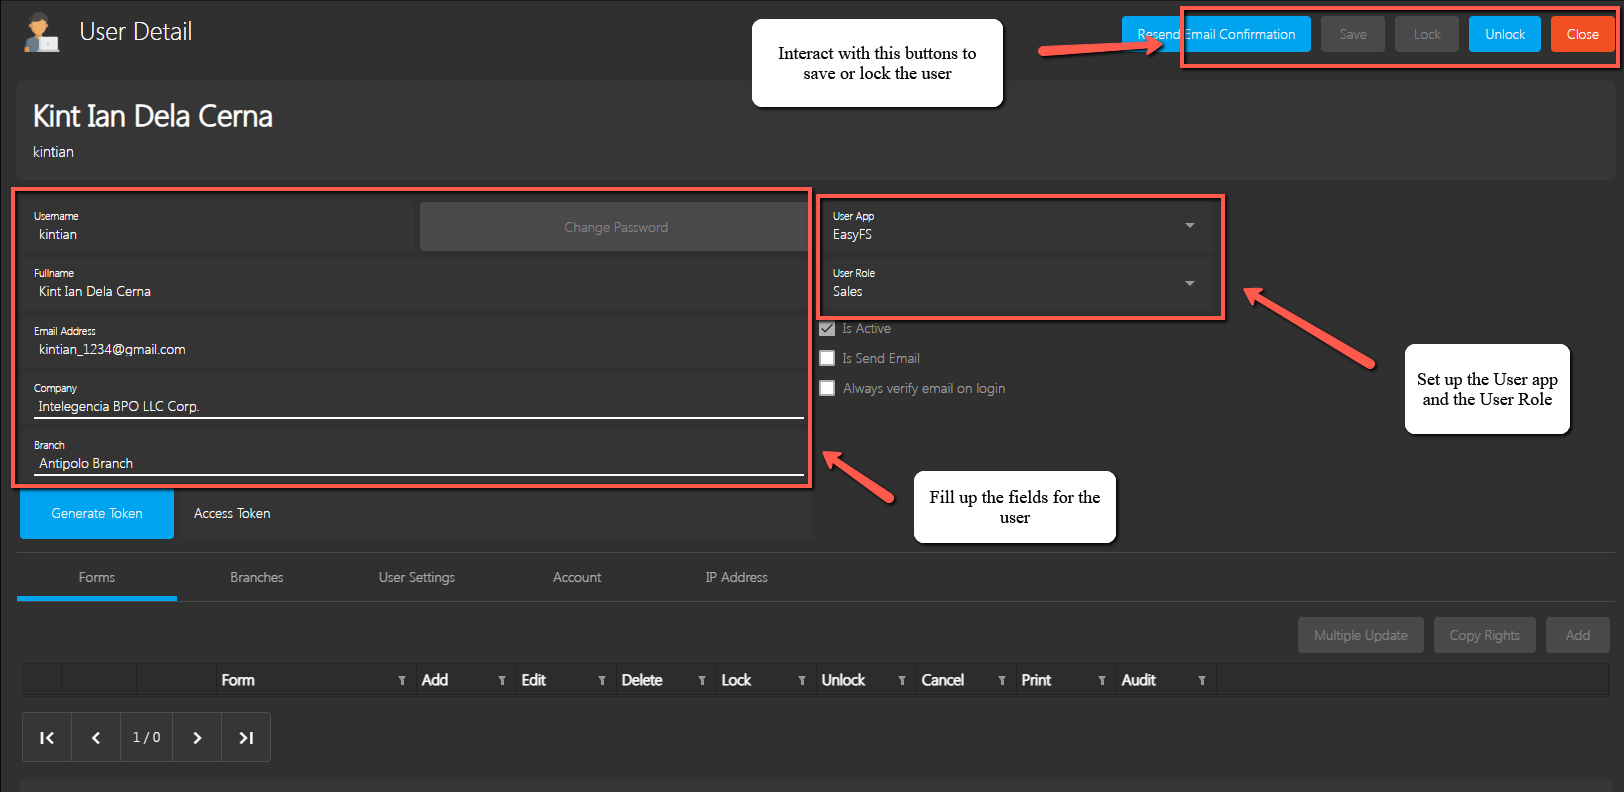
User refers to an individual who has access to EasyFS. Each user will be given rights and permissions to the Modules, Forms and Reports of EasyFS. This will depend on how the organization will configure or implement their access rights.

Note: A user license is part of the contract of EasyFS and it should be coordinated with HII Sales for proper accounting and to avoid unnecessary disruption in the organization’s operations. For more additional inquiry on the User License you can contact Hiisales@human-incubator.com

Users List

List of All Users that were added to the System.

Users Detail

  • Fill up the required fields for the User to use:

  • Username – username that will be used in logging into the system

Fullname – Full Name of the user, it will be reflected in the reports and in the transactions.

  • Email Address – Please provide an active email address. This will be used to send your password and receive notifications for all transactions
  • Company – a company which the user can only access
  • Branch – a branch which the user can only access
  • User Role – This will determine if the user will be included to the Number of User, User will choose either admin or sales
  • Admin Role – The admin role will be included in the Number of User that will have an access to easyFS
  • Sales Role – The sales Role will not be included in the Number of users and it will not have an access to the easyFS, They will be used only for tagging of sales/transaction.
  • Is Active  – it should be checked so that the user can access the system
  • Is Send Email – If this button is checked, you will receive notifications for all transactions you have created
  • Always Verify Email on Login – If this button is checked, you will receive an OTP every time you log-in to the system.* Note: The password will be set up once the username setup is completed. An email will be sent to the registered email address provided in the user details. Please ensure that you click the link within 5 minutes.
  •  Set-up also the Apps for the user to access,  either All (Both EasyFIS and EasyHQ), EasyFIS, EasyHQ.
  • Forms – set the forms that a USER can only access. Select or  Check the Necessary fields like ADD, EDIT, DELETE, LOCK, UNLOCK, CANCEL, PRINT, AUDIT.
  • Branches – set the branch this user can use, there should be a button there that says Copy Branch that will copy another user’s set of branches.
  • User Settings  – set the users preferences on what charts to be seen on the Dashboard. Upload electronic signature on this tab also.
  • Account – set the Account for you to watch the balance of, this can be found in the Dashboard, which is called Account Watch
  • IP Address – add an IP Address to limit access for this user based on the added IP Address example of IP Address is (255.255.255.0)


Back to Top

Chat with HII Easy Series

Typically replies within a few hours

Hi! How can we help you